Anthropics PortraitPro 2019 review
Anthropics PortraitPro 2019 review
Introduction
Anthropics PortraitPro 2019 hardly needs any introduction. It’s the go-to software for batch- and beauty enhancement for many portrait-, lifestyle and wedding photographers out there. And while there still might be some differences between a full manual beauty enhancement routine in photoshop and PortraitPro, the differences are getting smaller and smaller with each iteration of this interesting plug-in. Especially if you know what you’re doing and have a good knowledge of all the modules inside PortraitPro 2019.
There are currently two versions of Anthropics PortraitPro 2019 available. The Studio and Studio Max versions only differ in the fact that the latter also has a batch mode which allows you to process multiple images (with your own or one of their presets. Both also work as a plug-in from Photoshop which is my preferred way of using it. Portrait Pro Max costs 89,90, Studio costs 299,90.
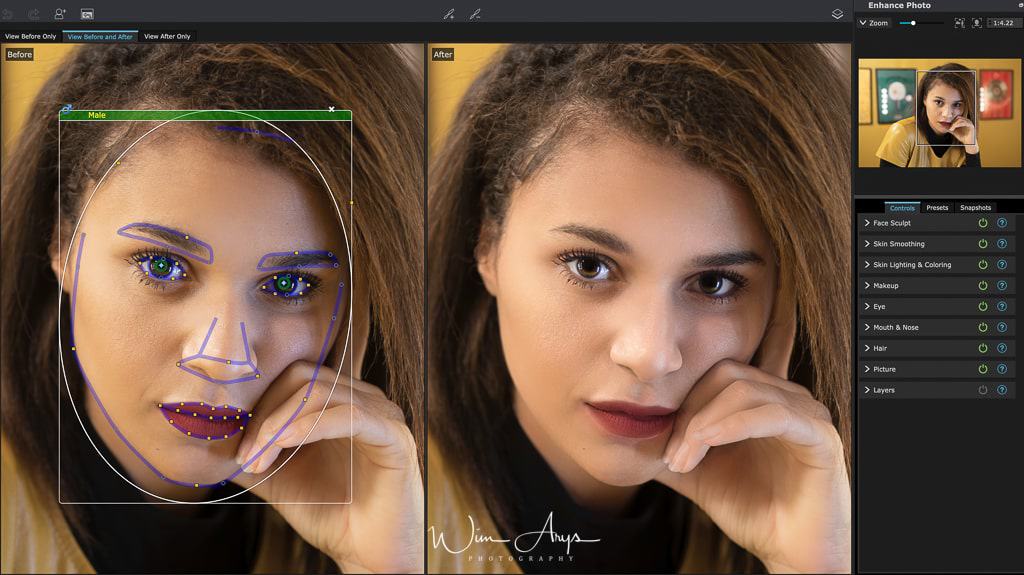
Now once you’ve selected an image and load it into PortraitPro 2019, the software will immediately start calculating where your subject’s nose, eyes, mouth, eyebrows, hair, and jaw outlines are. This automated process called ‘markup’ gets better with each version, and it’s now up to a point where you don’t need to amend anything to a well-lit portrait.
Presets
Presets let you quickly set the values of several or all sliders.
Presets are divided into sections, which match the sections available in the main slider controls. The presets in each section only affect the sliders in the corresponding section in the main slider controls.
In addition, there is a section for Global presets. Presets in this section affect all the sliders in all the sections.
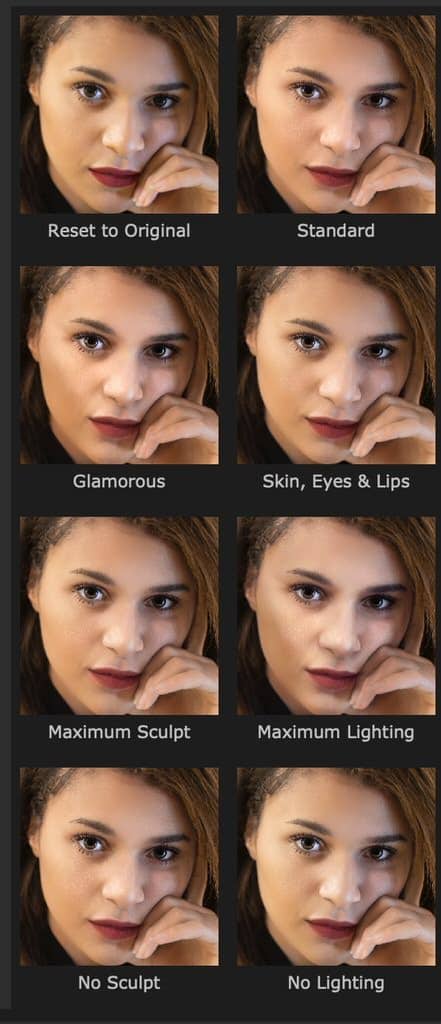
Each preset has a name, and also shows an image showing the result of applying that preset to the current face.
When PortraitPro is installed, it comes with a number of presets ready for you to use.
One of the global presets is used to set the initial slider values when a face is enhanced. The preset used can be different depending on whether the face is female, male or child.
SnapShots
Snapshots are very similar to global presets, except that they are only stored for the current image. They provide a way to store several sets of settings for the current image, that you can then quickly switch between.
To save a snapshot, switch to the Snapshots tab and then press the Save button. Alternatively, you can press the keyboard shortcut F3. When you save a snapshot, you can optionally give it a name. This will be shown under the snapshot image when you view the snapshots.
If you save a PortraitPro session (using the Save Session command in the File menu), then the snapshots will be saved with that session and restored when you reload the session. Otherwise, snapshots are lost when you close the session.
To convert a snapshot to a preset, simply apply the snapshot to the current face, then save the current settings as a preset.
Let’s have a look at these modules, as well as a good workflow in order to get the best results.
Interface Module overview

PortraitPro 2019 Face Sculpt Module
PortraitPro gives you the ability to subtly reshape and enhance facial features, simply by moving sliders. Some people regard this as going too far when enhancing a portrait. For those people, the shape sliders can simply be left at 0 and PortraitPro will not change the shape.
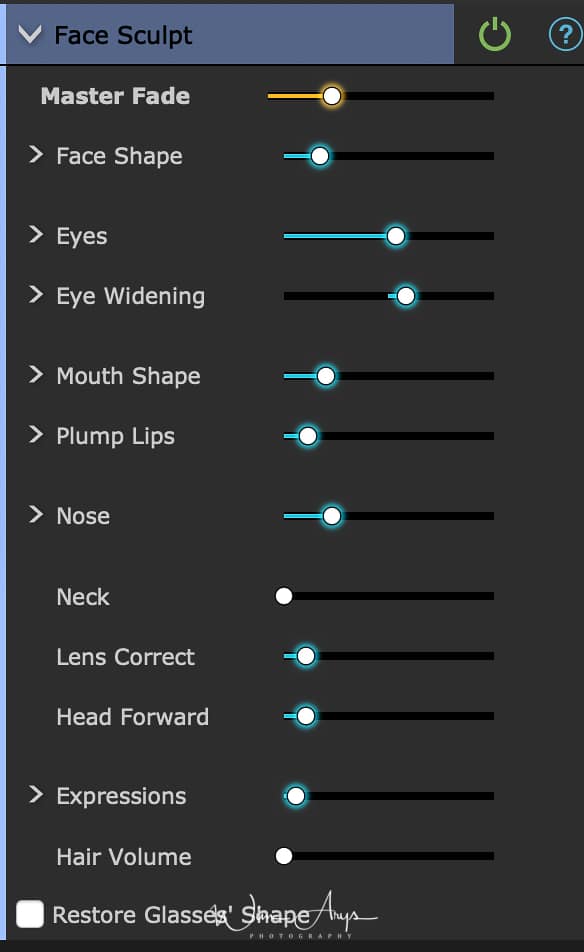
Master fade
Master fade is the master controller for the face sculpt tab. This fader will dynamically affect all the functionalities in this menu.
Face Shape
Changing the face shape is also an effect that mostly depends on your selected face. This enhancement will automatically change to the shape of the face and pull it more towards what is generally considered a more eye-pleasing, more perfect ratio between forehead, chin, and cheekbones.
Studies of these ratios have been made since the times of Ancient Greek and Roman sculptures. Keep in mind that changes like this might make for a more eye-pleasing image, but clients are quick to notice that it has been ‘photoshopped’. So use sparingly.
Eyes
A human being is rarely born with both eyes at the same height and space toward the nose. Numerous experiments have however established that we feel more attracted to symmetrical faces. This slider will do exactly that, it will pull both eyes in line towards more symmetry. Both left and right eyes can be adjusted separately if you feel that this effect changes the dynamic of the face position too much. This can also be done with the eyebrow shape.
Eyes Widening
Widening the eyes makes for a more expressive and less tiring look. Both eyes can also be manipulated separately. A nice feature for beauty shoots if used sparingly.
Mouth Shape
It’s also possible to change the shape of the mouth, i.e. make the mouth wider.
Plump Lips
Plump lips are of course all the rage right now. You can fatten both upper and lower lips together or separately.
Nose
You can make the nose more narrow if you want. This is often useful if you’re working on an image shot from a more awkward angle and you want to save it from the bin. It’s possible to shorten the nose separately, as well as the Philtrum (the vertical indentation in the middle area of the upper lip). You can also slip the nose and the nose tip/
Neck
You can elongate the neck if you feel it looks squeezed in what is, of course, a 2D rendering of a 3D person.
Lens Correct
It’s generally accepted that an 85mm prime lens will render a face more or less how we perceive it in reality. Wide-angle lenses can often distort a face, making it appear more elongated. Especially the forehead and nose become out of proportion. The Lens correction feature can remedy this for you.
Head Forward
Head forward attempts to create the optical illusion that the head is tilted slightly to the front. This is considered more eye-pleasing in many cultures.
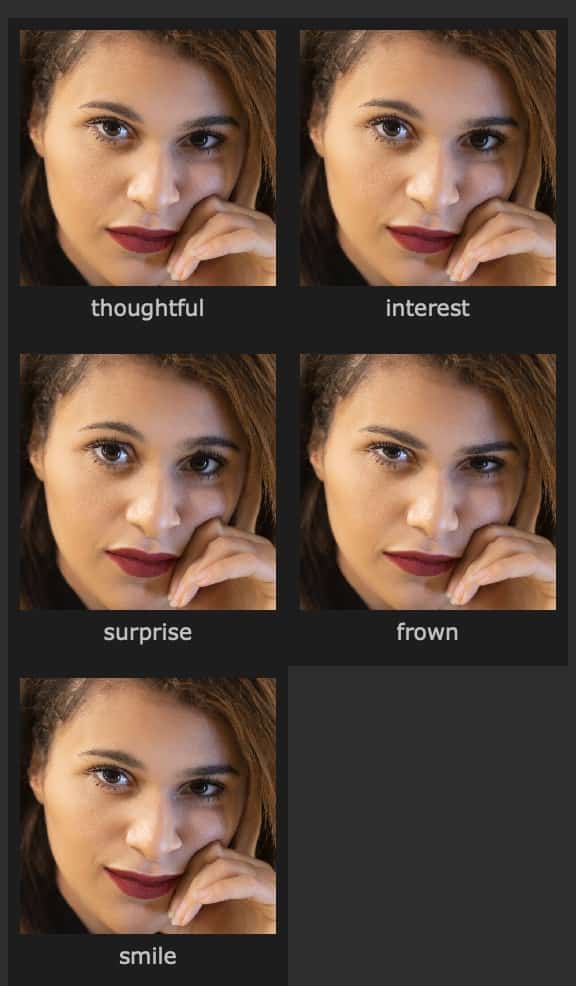
Expressions
Turn that frown upside down. it’s been a feature of the photoshop face liquify pannel for a while now, and of course, PortraitPro 2019 needed to follow suit. PortraitPro is in most ways better and more advanced by the way. It’s possible to change the facial expression to a Smile, a Frown, Surprise, Interest, and Thoughtful. Not all work well with every face but it’s amazing to see how realistic most are.
Hair Volume
If you feel that your model can do with a bit more volume in the hair, Athentech has this covered too.
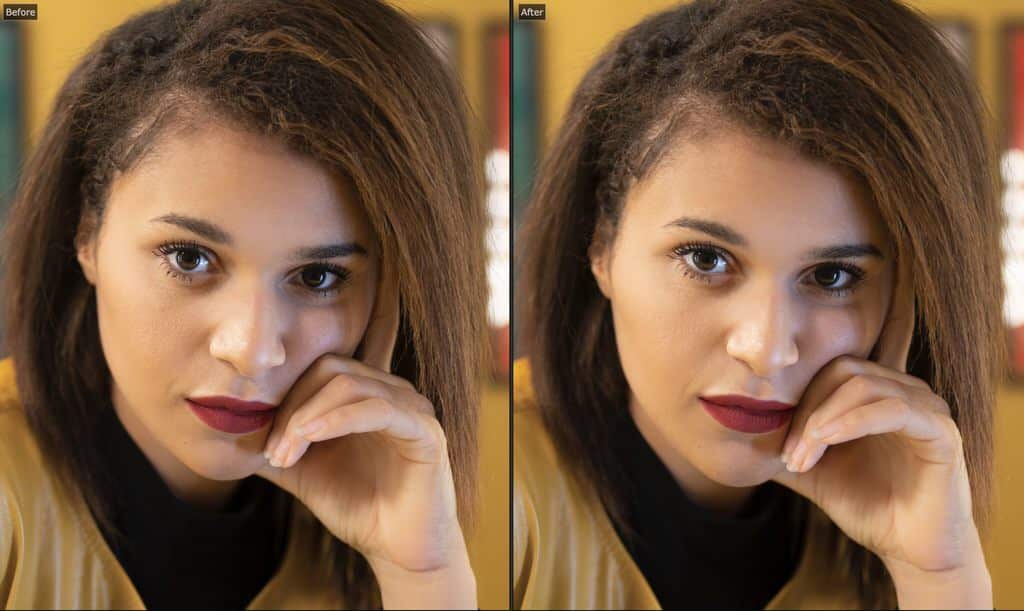
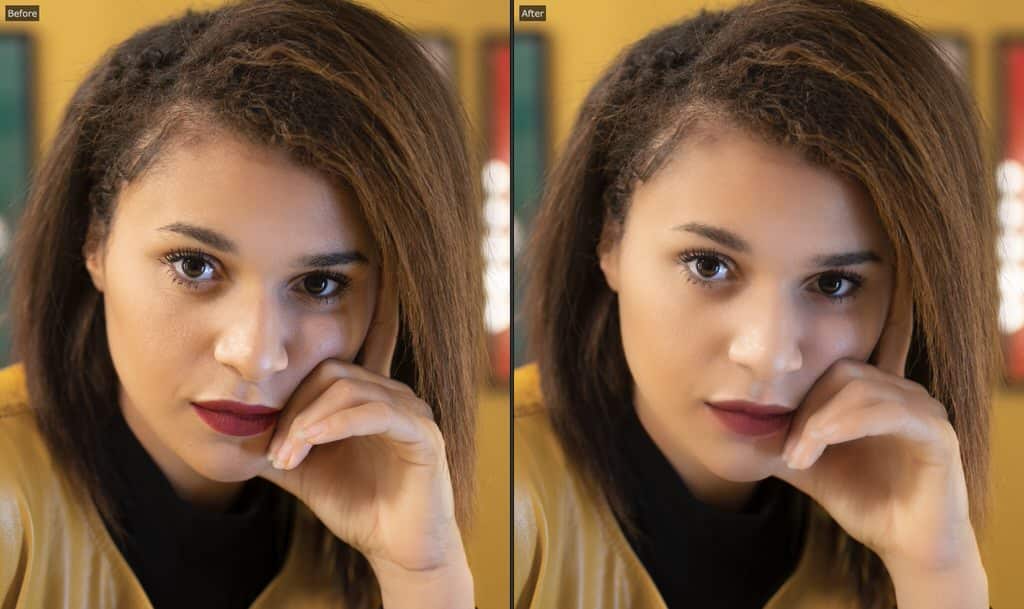
PortraitPro 2019 Skin Smoothing Module
The skin-smoothing controls let you selectively remove or reduce wrinkles, spots, shine, shadows and other skin defects while retaining a natural skin texture.
PortraitPro automatically determines the skin area, but you will get better results if you check and fix the skin area.
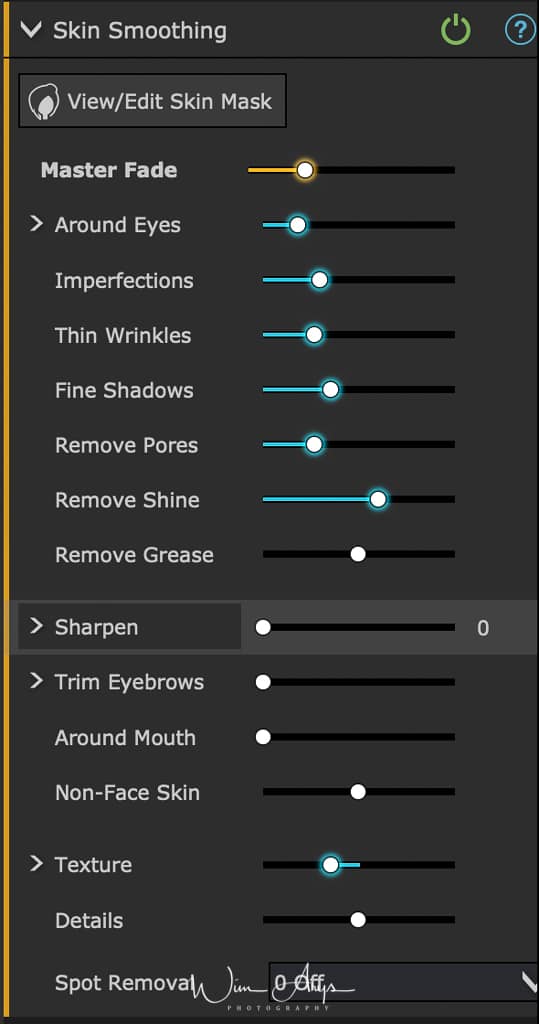
Master Fade
This slider is connected to the other sliders in this section that perform general enhancements to the skin. You will see the other sliders move as this one is moved.
Around Eyes
Reduces bags under the eyes, and reduces “crows feet”, the wrinkles that appear next to the outer corners of the eyes. Pressing the Around Eyes button opens the following sub-sliders that let you control these enhancements independently:
- Lighten Eye Bags: Reduces the appearance of bags under the eyes by lightening the skin color in the area where eye bags appear. Click the triangle next to Lighten Eye Bags to access sliders that let you control the left & right eyes independently.
- Smooth Eye Bags: Reduces the appearance of bags under the eyes by lightening the skin color in the area where eye bags appear. Click the triangle next to Smooth Eye Bags to access sliders that let you control the left & right eyes independently.
- Smooth Crows Feet: Smooths the areas to the left of the left eye and to the right of the right eye where crows feet appear. Click the triangle next to Smooth Crows Feet to access sliders that let you control the left & right eyes independently.
Imperfections
Subtly removes redness and reduces small skin blotchiness within the skin area.
Thin Wrinkles
De-emphasizes wrinkles by making them thinner and lighter within the skin area.
Fine Shadows
Fades away dark specks and fine wrinkles within the skin area.
Remove Pores
Removes pores within the skin area giving a smooth, airbrushed effect.
Remove Shine
Corrects small areas of shine within the skin area.
Remove Grease
Corrects larger areas of shine within the skin area.
Sharpen
Sharpens the skin area. Press the Sharpen button to open the Scale sub-slider, which affects the scale at which the sharpening is applied.
Trim Eyebrows
Removes stray hairs from around the eyebrows.
Around Mouth
Quickly clears up faults such as wrinkles from around the mouth.
Non-Face Skin
Smooths skin that is not on the face.
Texture
Maintains a natural look by applying realistic skin texture in areas where skin texture is being corrected. This texture goes into touch-up brush strokes and areas where the sliders have had an effect. You will need to zoom in the picture to see the effect of changes to the skin texture. Clicking on the triangle next to Texture opens the following sub-sliders:
- Brightness: Finer control over skin texture brightness.
- Saturation: Finer control over skin texture saturation. The greater the saturation, the more intense the color.
- Size: Makes the skin texture pattern larger or smaller.
Details
The Details slider allows you to bring back or further reduce details such as moles, wrinkles and strong spots. It affects all the other skin smoothing sliders and the touch-up brush.
It has no effect if the other skin smoothing sliders are at zero, and has the most effect when the other skin smoothing sliders are high.
If the touch-up brush doesn’t completely remove a blemish, moving the detail slider to the left should reduce the blemish further, by giving more of an air-brushed look.
PortraitPro 2019 Skin Lighting & Coloring Module
PortraitPro lets you change the lighting on the subject’s face via simple controls. These controls can provide a very effective way to enhance the appearance of the face.
Note that some of these controls are quite sensitive to the positions of the outlines around the face. If you are not getting a good result, try adjusting the outlines shown over the before view so that they line up with the edges of the face.
Note: the sliders and other controls in this section only affect those parts of the picture that are in the skin area. Press the View/Edit Skin Area button to change the skin area.
Contrast
Changes the lighting contrast.
Modeling
Relights the image to make the features of the face appear more sculpted or defined.
Fix Lighting
Applies lighting similar to “beauty lighting” that makes skin and features appear smoother.
Cheekbones
Gives more definition to the cheekbones. Pressing the Cheekbones button opens two sub-sliders that let you change the left and right cheeks independently.
Left Shadow
Adds shadow to the left side of the face.
Right Shadow
Adds shadow to the right side of the face
Left Kick
Adds a kick light to the left side of the face.
Right Kick
Adds a kick light to the right side of the face.
Smokey eyes
Darkens the area above the eyes to simulate smokey eyeshadow or a stronger brow.
Pout
Adds shadow below the lips to make them appear fuller.
Sculpt Nose
Adds definition to the nose.
Skin Color
This slider can do different things depending on the setting of the drop-down menu on the left of the slider.
- Color Correct: A very general color correct that will fix badly colored skin.
- Other options: Will change the skin color to match a particular style of coloring.
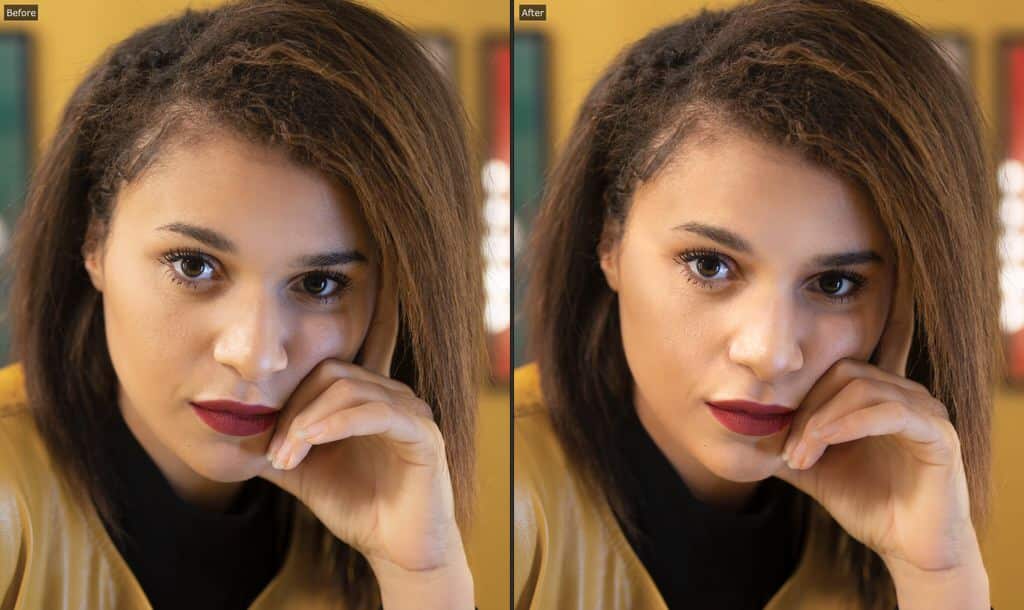
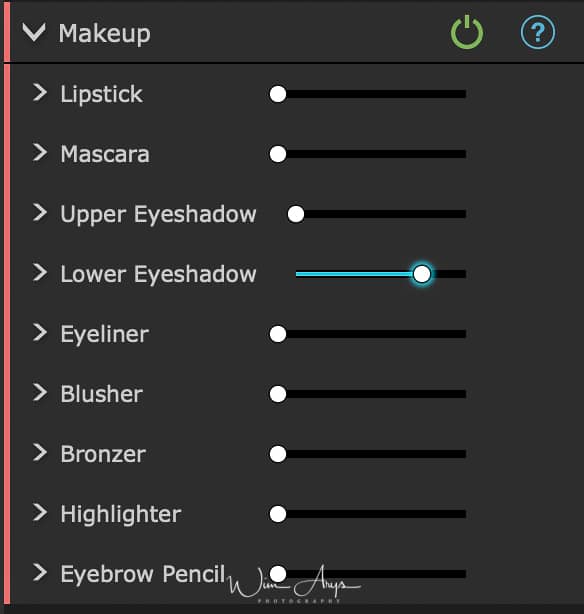
PortraitPro 2019 Makeup Module
Makeup controls allow you to add realistic looking makeup after your picture has been taken. This can be done to make your subject look better, or just to explore different looks.
To start adding a makeup Element, just slide up the master slider (next to the element name) to increase the opacity of that element. All makeup elements come with sensible defaults that can be altered as described here.
- Hair covering the face: Because makeup shouldn’t appear over the top of hair, if there is hair covering any area where makeup is applied, adjust the Hair Area (found in the Hair controls) to paint away makeup in areas where there is hair.
- Objects covering the face: Sometimes glasses, accessories or hands may be covering an area where makeup is being applied. To prevent this, use the Restore Brush set to Restore To Original image to paint over the area.
- Profile faces: please note that makeup is not supported for faces that are viewed in profile, so the makeup section will not appear for those faces.
Lipstick
Lipstick isn’t just for giving the appearance of lipstick, it can also be used to cover faults on the lips (using the coverage slider).
|
Master slider |
The master slider controls the opacity of the entire lipstick. All the controls under it are affected by the opacity. Because you won’t see any difference to the lipstick when the opacity is at 0, it will automatically jump to 75% when adjusting any of the other controls. |
|
Texture |
Use this to control the material property of the lipstick. The best way to understand this is just to scroll through the different options to see what they do. |
|
Color |
The color of the lipstick is controlled using the brightness slider and the hue and saturation picker underneath. Drag the “plus” around to alter the hue and saturation. |
|
Shine |
This is used to tweak the amount of shine added to the lipstick. |
|
Coverage |
This affects how much of the original shine from the lips is visible. When applying to already shiny lips, a low coverage can result in overly shiny lips. A higher coverage can cover faults in lips better, but can end up looking artificial as the original lighting is discarded. |
Mascara
Mascara can be used to draw attention to the eyes.
|
Master slider |
The master slider controls the opacity of the mascara. All the controls under it are affected by the opacity. Because you won’t see any difference to the mascara when the opacity is at 0, it will automatically jump to 75% when adjusting any of the other controls. |
|
Application |
Use this to choose what style the mascara appears in. |
|
Softness |
Because sometimes eyes are slightly out of focus, Portrait Pro measures the focus of the original pictures eyes and tries to match the mascara softness to it. This slider can be used to manually tweak the default focus detection. |
|
Nudge lashes |
Portrait Pro uses the eye markup in the “before” panel to place the mascara. The markup should be placed where the waterline meets the eyeball. Lashes come out of the outside of the waterline, so there is a gap between the markup and the roots of the mascara. However if the head is tilted, the waterline can be larger or smaller. This slider lets you adjust the position of the mascara to compensate in these situations. |
|
Texture |
Adds texture to the mascara. |
Eyeshadow
Eyeshadow can be used to draw attention to the eyes.
|
Master slider |
The master slider for the eyeshadow element controls the opacity of the entire eyeshadow. All the controls under it are affected by the opacity. Because you won’t see any difference to the eyeshadow when the opacity is at 0, it will automatically jump to 75% when adjusting any of the other controls. |
|
Texture |
Use this to control the material property of the eyeshadow. The best way to understand this is just to scroll through the different options to see what they do. |
|
Color |
The color of the eyeshadow is controlled using the brightness slider and the hue and saturation picker underneath. Drag the “plus” around to alter the hue and saturation. |
|
Shine |
This is used to tweak the amount of shine added to the eyeshadow. |
|
Inner/Outer opacity |
This is used to change the opacity of the inside or outside parts of the makeup. |
Eyeliner
Eyeliner can be used to draw attention to the eyes.
|
Opacity |
Controls the opacity of the eyeliner. |
|
Application |
Controls the shape of the eyeliner. |
|
Texture |
Adds a texture to the eyeliner. |
Blusher
Blusher is used to give cheeks a rosy glow.
|
Master slider |
The master slider controls the opacity of the blusher. All the controls under it are affected by the opacity. Because you won’t see any difference to the blusher when the opacity is at 0, it will automatically jump to 75% when adjusting any of the other controls. |
|
Face shape |
You can adjust the blusher to flatter different face shapes. |
|
Color |
The color of the blusher is controlled using the brightness slider and the hue and saturation picker underneath. Drag the “plus” around to alter the hue and saturation. |
Bronzer
Bronzer is way to sculpt the face while giving a tanned look.
|
Master slider |
The master slider controls the opacity of the bronzer. All the controls under it are affected by the opacity. Because you won’t see any difference to the bronzer when the opacity is at 0, it will automatically jump to 75% when adjusting any of the other controls. |
|
Color |
The color of the bronzer is controlled using the brightness slider and the hue and saturation picker underneath. Drag the “plus” around to alter the hue and saturation. |
Highlighter
Highlighter is used to sculpt the face while making it glow.
|
Master slider |
The master slider controls the opacity of the highlighter. All the controls under it are affected by the opacity. Because you won’t see any difference to the highlighter when the opacity is at 0, it will automatically jump to 75% when adjusting any of the other controls. |
|
Color |
The color of the highlighter is controlled using the brightness slider and the hue and saturation picker underneath. Drag the “plus” around to alter the hue and saturation. |
Eyebrow pencil
When using the eyebrow pencil controls, make sure the eyebrow outlines are correctly positioned over the eyebrows. If they are not correctly positioned, you can move them in the “before” view.
|
Master slider |
The master slider controls the opacity of the eyebrow pencil. All the controls under it are affected by the opacity. Because you won’t see any difference to the eyebrow pencil when the opacity is at 0, it will automatically jump to 75% when adjusting any of the other controls. |
|
Color |
The color of the eyebrow pencil is controlled using the brightness slider and the hue and saturation picker underneath. Drag the “plus” around to alter the hue and saturation. |
|
Left and right |
Use this to individually adjust the left and right opacity. |
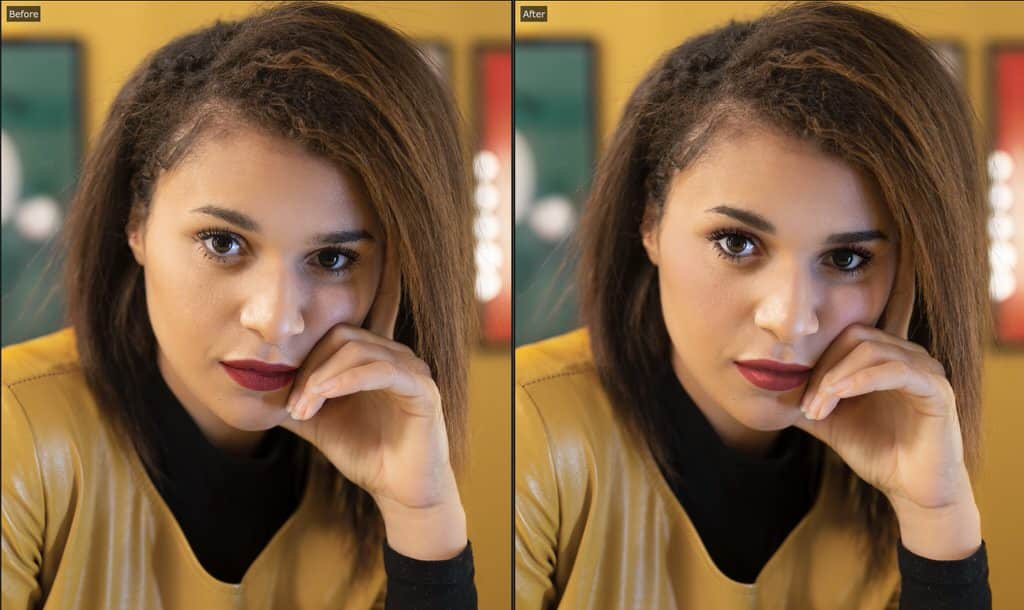
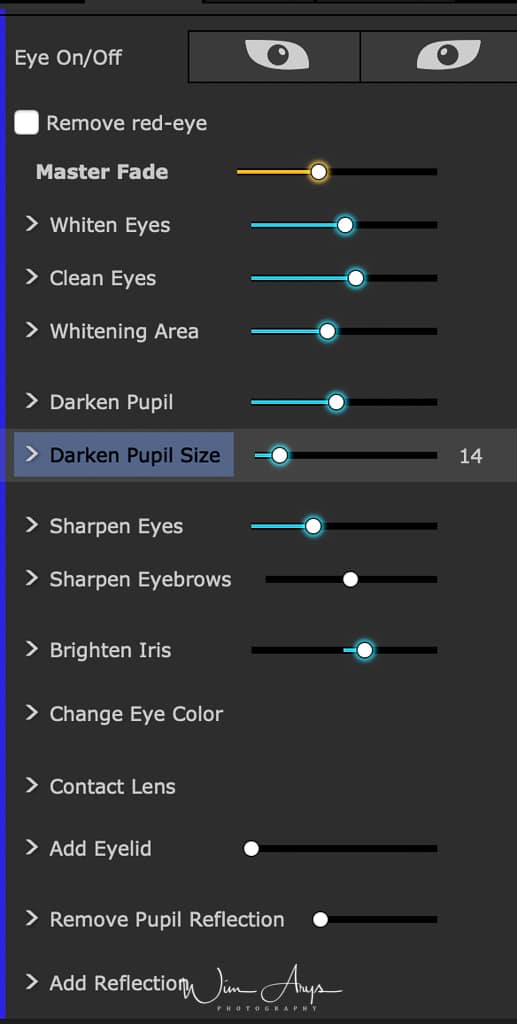
PortraitPro 2019 Eye Module
PortraitPro can automatically brighten, whiten and sharpen the eyes. The Eye controls allow you to adjust exactly how much effect you get. You can also change the color of the eyes.
- Partially obscured eyes: The eye sliders look bad when applied over hair that covers eyes. If there is hair covering the eyes, use the Hair Area brush (found in the Hair controls) to paint away the effect of eye sliders by marking pixels as hair.
- If another object (such as a hand or glasses) is covering the eye, you can use the Restore Brush to prevent edits being made to that item. Simply select Restore To Original Image and paint over the object.
- Totally obscured eyes: If one of the eyes is completely obscured, you can turn off all changes to that eye using the Eye On/Off buttons at the top of the Eye menu. If both eyes are obscured, simply turn off the eye menu entirely using the power button next to its header.
Master Fade
This slider is connected to some of the other sliders in this section that perform general enhancements to the eyes. You will see the other sliders move as this one is moved.
Whiten Eyes
Whitens and brightens the white part of the eyes. The area affected is controlled by the Whitening Area slider.
Whitening takes any color out of the whites of the eyes leaving them a shade of gray when the slider is at the top.
Pressing the Whiten Eyes button opens two sub-sliders that let you whiten the left and right eyes independently.
Clean Eyes
Cleans up veins and other discolorations in the whites of the eyes. The area affected is controlled by the Whitening Area slider.
Pressing the Clean Eyes button opens four sub-sliders that let you control the left and right eyes independently. The sub-sliders Left Eye and Right Eye let you control the overall effect for each eye, from 0 (no effect) to 100 (maximum effect). The sub-sliders Left Curve and Right Curve can be used to either increase the apparent curvature of the eye by moving the slider to the right, or make the eye appear flatter by moving the slider to the left. The curve sliders work by adjusting the cleaning effect added, so they will have no effect if the corresponding left/right eye slider is 0.
Whitening Area
Changes the area of the eye that will be whitened or cleaned by the Whiten Eyes or Clean Eyes sliders.
Pressing the Whitening Area button opens two sub-sliders that let you change the area for the left and right eyes independently.
Darken Pupil
Darkens the pupil (the black part in the middle of the eye) in the eyes.
Pressing the Darken Pupil button opens two sub-sliders that let you darken the left and right pupils independently.
Darken Pupil Size
Use to change the size of the pupil when darkening.
Pressing the Darken Pupil Size button opens two sub-sliders that let you change the left and right pupils independently.
Sharpen Eyes
Sharpens the subject’s eyes.
Pressing the Sharpen Eyes button opens the following sub-sliders that let you control the amount of sharpening applied to different parts of the eyes.
|
Upper L Lash |
Sharpens the upper left eye lashes. |
|
Lower L Lash |
Sharpens the lower left eye lashes. |
|
Left Eye |
Sharpens the left eye. |
|
Left Lash Area |
Changes the size of the area that the left eye sharpening influences. |
|
Upper R Lash |
Sharpens the upper right eyelashes. |
|
Lower R Lash |
Sharpens the lower right eyelashes. |
|
Right Eye |
Sharpens the right eye. |
|
Right Lash Area |
Changes the size of the area that the right eye sharpening influences. |

Sharpen Eyebrows
Sharpens the subject’s eyebrows.
Pressing the Sharpen Eyebrows button opens two sub-sliders that let you sharpen the left and right eyebrows independently.
Brighten Iris
Brightens or darkens the iris (the colored part of the eye).
Pressing the Brighten Iris button opens two sub-sliders that let you brighten or darken the left and right irises independently.
Change Eye Color
Press the Change Eye Color button to open the sub-sliders that let you change the color if the irises.
|
Amount of Change |
If this slider is 0, the color of the eyes will be unchanged (the Color and Intensity sliders will be ignored). Set this to 100 to set the eye color selected by the Color and Intensity sliders. Lower values will blend between the selected color and the original eye color. If this slider is at 0, it is automatically set to 100 whenever the Color or Intensity sliders are moved. Press the Amount of Change button to open two sub-sliders that let you set the amount of change for the left and right eyes independently. |
|
Color |
Sets the color of the eyes (provided the Amount of Change slider is not 0). Press the Color button to open two sub-sliders that let you set the color for the left and right eyes independently. |
|
Intensity |
Sets the intensity of the eye color. Press the Intensity button to open two sub-sliders that let you set the intensity for the left and right eyes independently. |
Contact Lens
You can choose from a list of contact lens options to be applied to the eye. There is an opacity slider to fade it in and out and a scale slider to change the size.
Add Eyelid
Accentuates the line above the eye where the eyelid starts.
Remove Pupil Reflection
This slider blackens the pupil area to remove reflections. This can be used with the Add Reflection drop down list to add new eye reflections.
Pressing the Remove Pupil Reflection button opens two sub-sliders that let you remove catch-light reflections from the left and right pupils independently.
Add Reflection
You can choose from a selection of reflection images (catch-lights) to be added to the eyes.
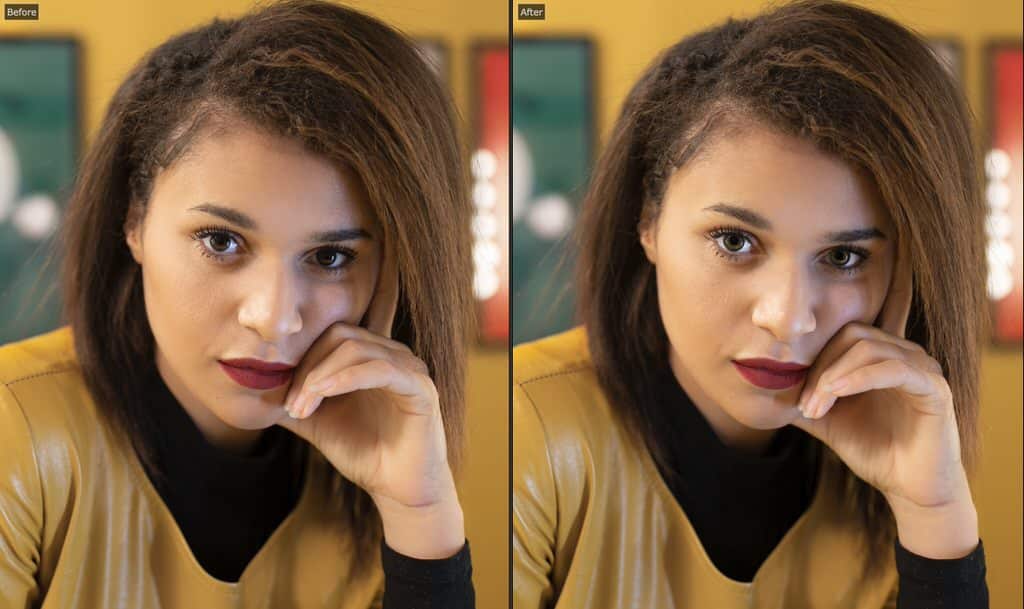
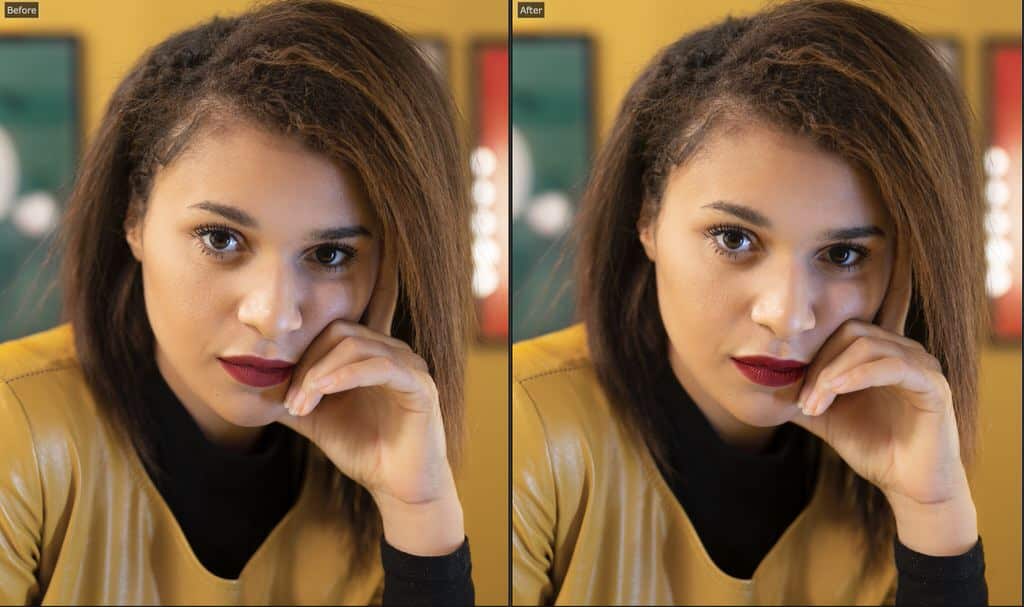
PortraitPro 2019 Mouth & Nose Module
PortraitPro automatically whitens the teeth and enhances the color of the lips. The Mouth & Nose controls allow you to adjust these effects to get exactly the look you want.
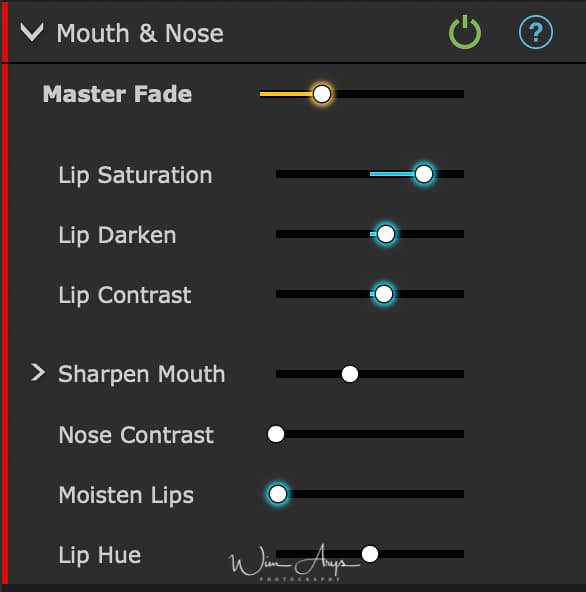
Master Fade
This slider is connected to some of the other sliders in this section that perform general enhancements to the mouth and nose areas. You will see the other sliders move as this one is move
Whiten Teeth
Removes any color from the teeth. The area affected is controlled by the Whiten Area slider. This control is not shown if the mouth is closed.
Clean Teeth
Cleans the teeth. The area affected is controlled by the Whiten Area slider. This control is not shown if the mouth is closed.
Whiten Area
Changes the teeth area affected by the Whiten & Clean Teeth sliders. This control is not shown if the mouth is closed.
Lip Saturation
Makes the lips more colorful.
Lip Darken
Move this slider to the right to darken the lips, or to the left to make them lighter.
Lip Contrast
Increases the contrast within the lip area, giving the lips more impact.
Sharpen Mouth
Sharpens the outline and details of the mouth. Press the Sharpen Mouth button to open the following sub-sliders that let you control the amount of sharpening applied to the different parts of the mouth independently.
|
Top Lip |
Sharpens the top lip only. |
|
Bottom Lip |
Sharpens the bottom lip only. |
Sharpen teeth
Sharpens the teeth.
Nose Contrast
Increases the contrast within the nose to draw attention to it.
Moisten Lips
Adds some shine to the lips.
Lip Hue
Changes the color of the lips.
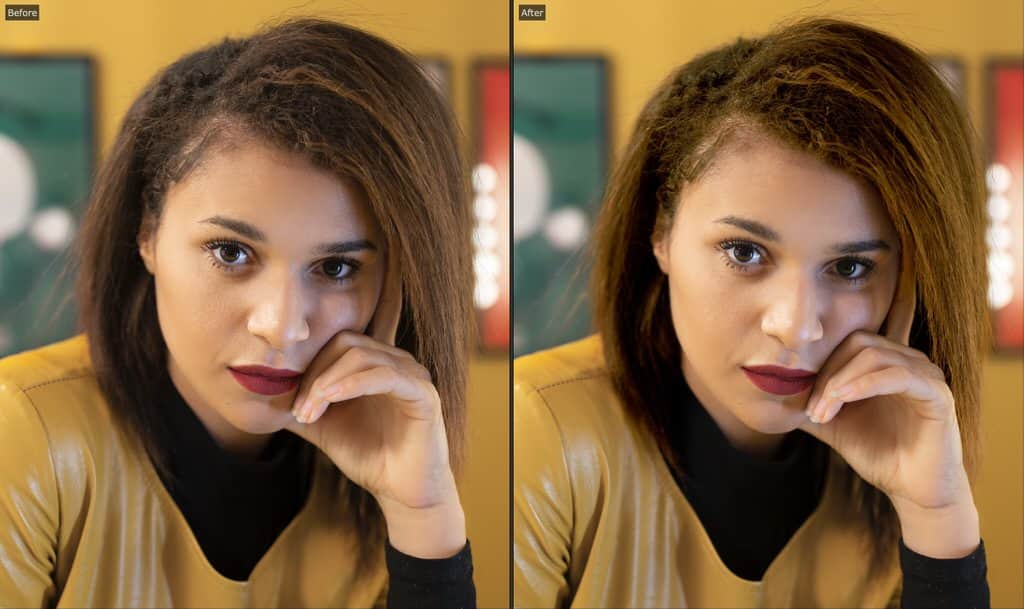
PortraitPro 2019 Hair Module
PortraitPro lets you enhance the hair of the subject by moving sliders. Please note that before doing this, it is important to have the hair area set reasonably accurately.

Hair Color
Controls how much hair recoloring to apply.
The color is set by selecting one of the hair swatches.
This slider will be automatically set to 75 if it is at 0 when a hair color is selected in the Hair Recolor drop-down list.
Shine
Makes the hair more shiny. Pressing the Shine button opens two sub-sliders, Shine Amount and Shine Softness.
Shine Amount lets you set how much shine to add.
Shine Softness controls the softness of the shine added. This has no effect if Shine Amount is set to 0.
Auto levels
Automatically improves the contrast and colors in the hair area.
Fill Light
Adds a fill light to the hair area, which will brighten shadow areas.
Blacks
Darkens or lightens the black areas within the hair.
Contrast
Adjusts the contrast of the hair area.
Vibrance
Increasing the vibrance will make the color of the hair more intense.
Saturation
Adjusts the saturation of the colors in the hair area.
Temperature
Adjusts the temperature (red-blue) of the colors in the hair area.
Tint
Adjust the tint (green-purple) of the colors in the hair area.
Sharpen
Increase or decrease contrast in dark areas if needed.
PortraitPro 2019 Picture Module
These controls affect the whole image and allow you to adjust the overall look of the picture, controlling things like the contrast and color temperature.
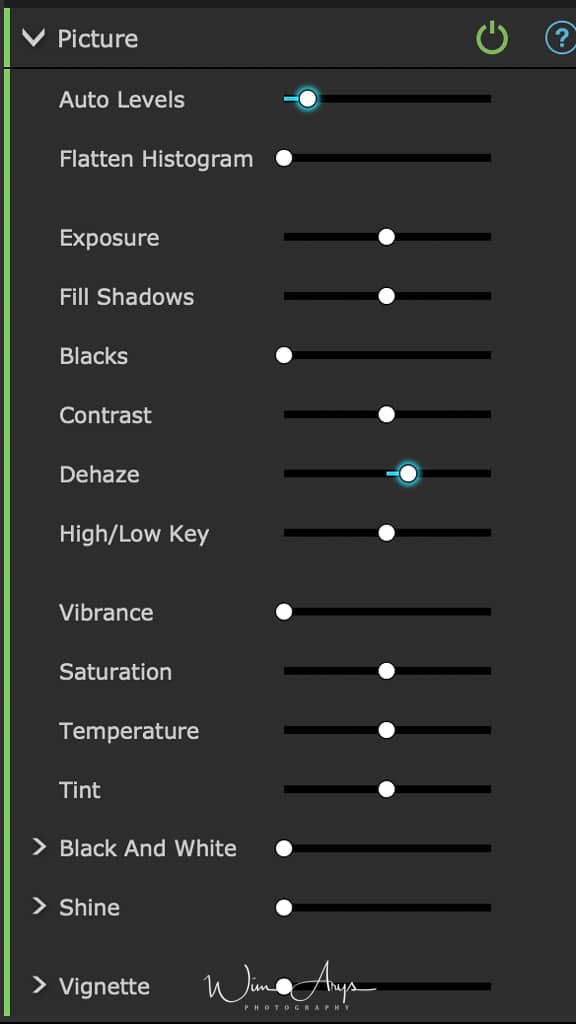
Auto Levels
Automatically improves the contrast and colors of the whole image. Note: this slider may have little effect on some images.
Flatten Histogram
Adjusts the colors in the image to flatten the histogram.
Exposure
Adjusts the overall exposure (brightness) of the whole image.
Fill Shadows
Simulates adding a fill light, which brightens the darker areas of the image.
Blacks
Darkens or brightens the very dark areas of the image.
Contrast
Increases or decreases the contrast of the image.
Dehaze
Increases or decreases the contrast in dark areas if needed.
High/Low Key
Makes the image more high key (more brighter tones) or low key (more darker tones).
Vibrance
Adjusts the overall vibrancy of the colors in the whole image. Increasing vibrancy will make muted colors more intense, but has less effect on colors that are already saturated. This helps preserve skin tones.
Saturation Temperature
Adjusts the saturation of the colors in the whole image. Increasing the saturation will make the colors in the picture more intense. Decreasing the saturation will make the colors less intense (grayer).
Temperature
Use this slider to adjust the color of the whole image to remove any temperature (red-blue) color cast.
Tint
Use this slider to adjust the color of the whole image to remove any tint (green-purple) color cast.
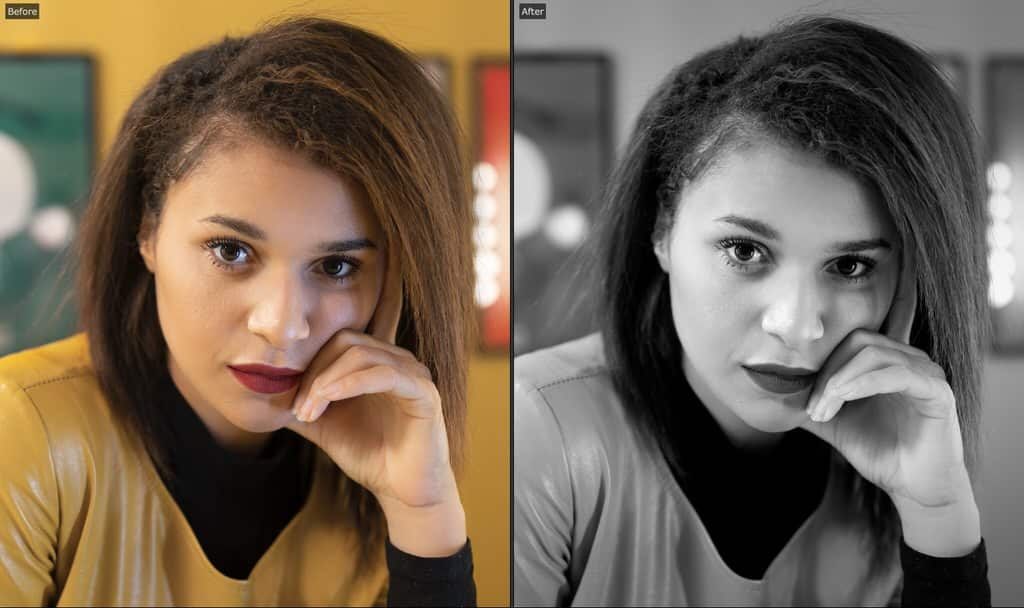
Black and White
By default, this slider converts the image into black and white.
If you press on the Black And White button, it opens three color wells that let you set the color for the dark tones, the color for the mid tones, and the color for the bright tones. These default to black, mid gray and white, but by changing these you can get a variety of effects.
Shine
Makes the image more “shiny”. Pressing the Shine button opens two sub-sliders, Shine Amount and Shine Softness.
Shine Amount lets you set how much shine to add.
Shine Softness controls the softness of the shine added. This has no effect if Shine Amount is set to 0.
Vignette
The vignette controls let you add a classic vignette effect over the image.
|
Vignette |
The main vignette slider controls the opacity of the vignette effect. If this is at 0, no vignette is applied. At 100, the vignette effect will be opaque at the edges. |
|
Radius |
Controls the radius of the oval used to create the vignette effect. |
|
Color |
Sets the color for the vignette. |
|
Hardness |
Sets the size of the soft part of the vignette. |
|
Horizontal Offset |
Moves the center of the vignette left and right. |
|
Vertical Offset |
Moves the center of the vignette up and down. |
PortraitPro 2019 Layers Module
PortraitPro lets you add extra image layers over your image.
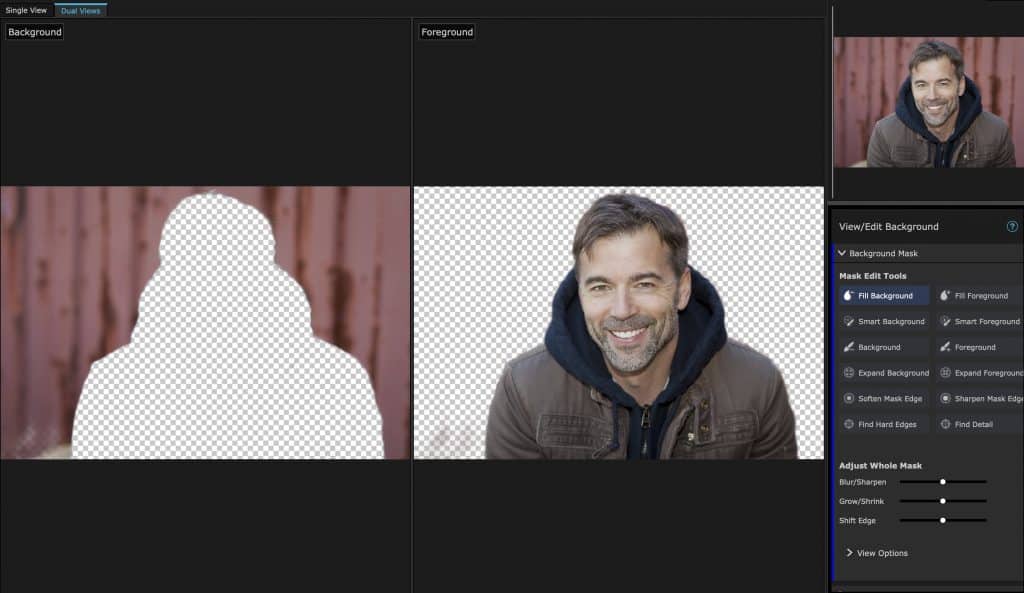
PortraitPro also lets you make changes to the background, including replacing the background completely or adding additional elements between the background and foreground parts of the image.
The background mask identifies which parts of the image are background and which are foreground. PortraitPro will automatically create a background mask. Tools are provided so that you can modify the background mask as required.
Before pressing the Create Background Mask button, you should make sure all the faces in the image have been found, and the face outlines correctly shown around them. Press the Other Faces button in the toolbar if any faces have not been located properly. This is necessary since PortraitPro needs to know the location of the faces to make the initial background mask.
Don’t spend much time adjusting the background mask initially. Once the mask is roughly correct, press the Next button to open the other section, Change Background.
When the Background controls are shown, you can switch between the Background Mask controls and the Background Image controls by clicking on the header for that section.
After you have changed the background image, go back to the Background Mask section and use the tools there to refine the mask.
Note that the accuracy needed for the background mask depends greatly on the change made to the background. If the new background is very similar to the original background, then you usually don’t need to be very accurate with the background mask. However, if the new background is very different from the original, then a highly accurate mask will probably be needed.
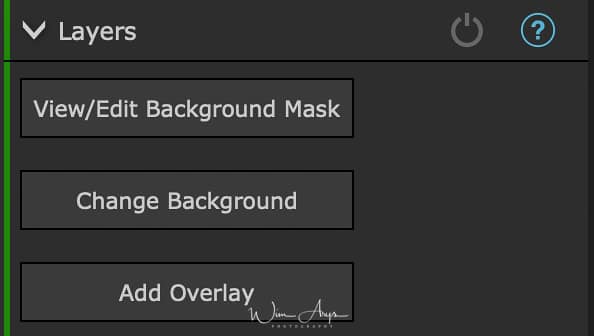
Create Background Mask
When you press this button, PortraitPro will automatically create a mask and then switch to the Background controls, with the View/Edit Background Mask controls section open. This button is only shown if the background mask has not yet been created.
View/Edit Background Mask
Switches to the Background controls, with the View/Edit Background Mask controls section open.
This button is only shown if the background mask has been created, or if the original image loaded had an alpha channel.
Change Background
Switches to the Background controls, with the Change Background controls section open.
This button is only shown if the background mask has been created, or if the original image loaded had an alpha channel.
Add Overlay
Switches to the Overlay controls. This button is only shown if no overlays have already been added.
View/Edit Overlays
Switches to the Overlay controls. This button is only shown if one or more overlays have already been added.
Conclusion
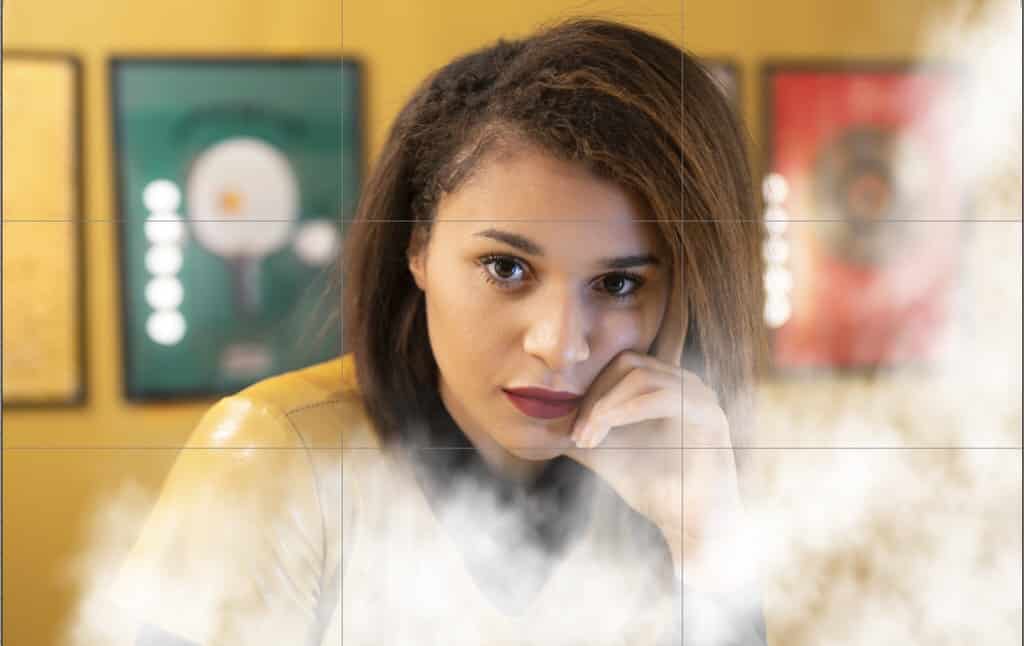
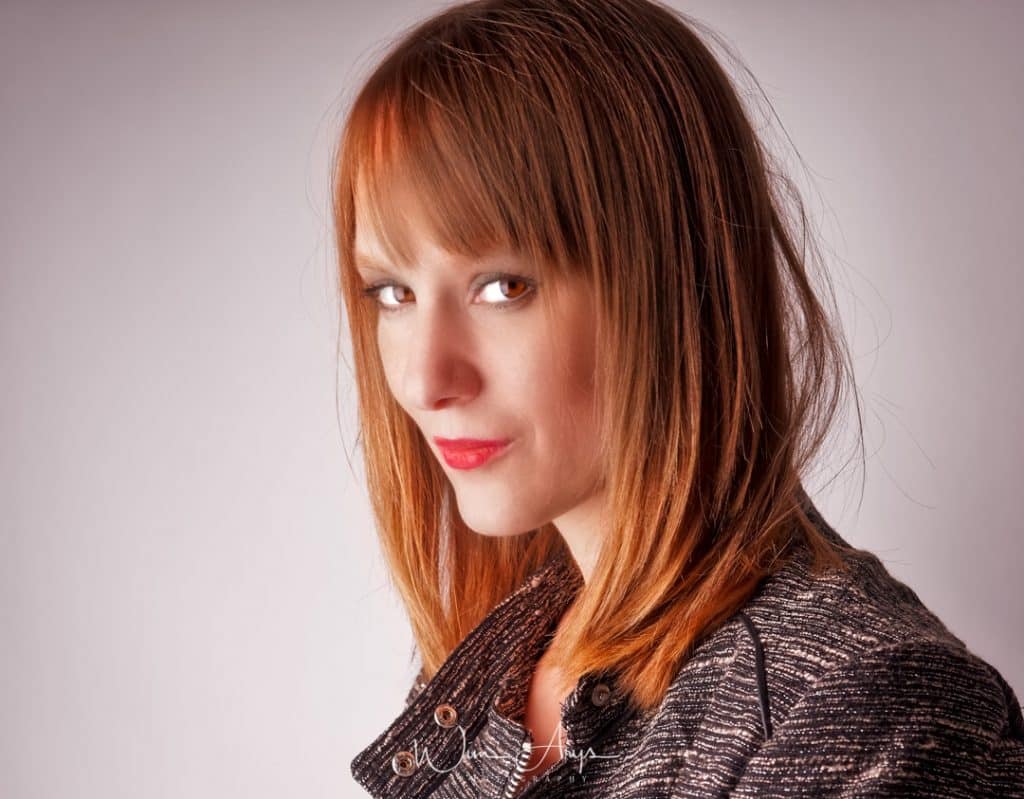
Athnetech PortraitPro 2019 hardly needs any introduction. I’ve been using the software for years and each version gets better and better. There are still some problems, however, like at times it has difficulty automatically recognizing jawlines with hands in front of the face (like the example above) and sometimes natural light portraits where features are less apparent.
The procedure of actually editing and changing these automatically generated markers (the markup process as they call it) has gotten faster in the last few versions of Portraitpro. It used to take a lot of computing power and hence was very slow, now it’s a lot better and easier to do.
The ‘preset’ processing was also dialed down from the exaggerated beautification in version 17 and 18, although this might also have something to do with the more refined processing in PortraitPro 2019.
There are also some new features like the expressions menu where you can add a smile, a frown, and even express surprise or interest on your subject’s face. This works convincingly well.
Besides this, the layers panel has also received a full overhaul, enabling you to add overlays and backgrounds from an included library. Masking of the face is also fully customizable thanks to new tools that allow you to edit the mask precisely.
PortraitPro 2019 is definitely a worthy upgrade for any serious portrait photographer or retoucher. Almost all aspects of this beautification software have been enhanced and streamlined. Even a few new features have been added that can allow wedding photographers to use Portrait Pro as standalone software for a complete image editing flow from start to finish.
Portrait Pro coupon code
The kind people at Portrait Pro 19 have kindly provided me with a coupon code for 15% discount. Just go to the Anthropics website and fill in “WIM15” in the coupon field. This is on top of any other promotions that might be running!

I have been looking at this product for some time. You provide the most details of what it can do. VERY well done! I would like to see a comparison of this and other similar products like Luminar AI. BTW: Your review button on you main page does not seem to work.