Tips for Achieving Depth and Dimension in Your Photos
Hey there! Are you looking to take your photography skills to the next level? Well, you’ve come to the right place! In this article, we’re going to dive into the fascinating world of achieving depth and dimension in your photos. Whether you’re a beginner or a seasoned photographer, these tips will help you bring your images to life and make them truly captivating. So, grab your camera and let’s get started!
Have you ever looked at a photograph and felt like you could step right into it? That’s the magic of depth and dimension in photography. By incorporating these elements into your images, you can create a sense of spatial awareness, making the viewer feel like they are a part of the scene. It adds a whole new level of realism and interest to your photos.
Understanding depth and dimension is not only important for creating stunning visuals, but it also helps in telling a compelling story. By employing various techniques, you can guide the viewer’s eye through different layers of the image, drawing them in and keeping them engaged. Whether you’re capturing landscapes, portraits, or even still life, these tips will help you achieve that sense of depth and make your photos stand out.
So, let’s jump right in and explore how depth and dimension can transform your photography!
Understanding Depth and Dimension in Photography
When it comes to photography, capturing depth and dimension in your photos can take them from ordinary to extraordinary. Depth and dimension are essential elements that can make your images more engaging, immersive, and visually appealing. So, how can you achieve depth and dimension in your photography? Let’s dive in and explore!
What is Depth in Photography?
In photography, depth refers to the perception of distance and three-dimensionality in an image. It is the illusion of space and distance that is created within a two-dimensional photograph. When a photo has depth, it can make the viewer feel like they are looking into the scene, rather than just at it.
Importance of Dimension in Photos
Dimension is what gives photographs a sense of scale and presence. It adds layers and visual interest to an image, making it more compelling and captivating. By creating depth and dimension in your photos, you can draw the viewer’s eye into the image, leading them on a visual journey and creating a sense of immersion.
So, how can you master the art of achieving depth and dimension in your photography? Let’s explore some techniques that can help you take your photos to the next level!
Tip: The key to achieving depth and dimension in your photos is to create a sense of space and distance. This can be accomplished through various composition techniques, the clever use of light and shadows, playing with perspective, and incorporating layers and textures in your images.
- Composition Techniques: By understanding how to compose your shots, you can effectively create depth and dimension in your photos. Some popular composition techniques include:
- Foreground, Middle Ground, and Background Elements: Include elements in the foreground, middle ground, and background to create a sense of depth and perspective. This can be anything from a tree branch in the foreground, a subject in the middle ground, to a landscape in the background.
- Leading Lines and Diagonals: Utilize leading lines and diagonal elements to guide the viewer’s eye into the scene, creating a sense of depth. This could be a winding road, a fence, or even a row of trees.
- Frame within a Frame: Use natural or man-made objects to create a frame within your photo. This can add depth and dimension by creating a sense of a window or portal into the scene.
- Utilizing Light and Shadows: Lighting plays a crucial role in creating depth and dimension in your photos. Here are a few techniques to consider:
- Golden Hour Photography: Take advantage of the soft, warm light during the golden hour (shortly after sunrise or before sunset). This lighting can create beautiful shadows and add depth to your images.
- High Contrast and Low Key Lighting: Experiment with high contrast or low key lighting to create dramatic shadows and bring out the dimension in your subjects.
- Creating Dramatic Shadows: Play with the positioning of your subject in relation to the light source to cast interesting shadows that add depth and dimension to your photos.
- Playing with Perspective: Altering the perspective can significantly enhance the sense of depth in your photos. Consider the following techniques:
- Bird’s Eye View: Capture your subjects from a high vantage point to give a unique perspective and a sense of scale.
- Low Angle Shots: Get down low and shoot your subjects from a low angle to make them appear larger and more imposing, creating depth and dimension.
- Wide-angle and Fisheye Lenses: Experiment with wide-angle and fisheye lenses to create a larger field of view and exaggerate the perspective, resulting in a sense of depth and dimension.
Now that you have a good understanding of how to achieve depth and dimension in your photos, it’s time to put your skills into practice. Start experimenting with these techniques and don’t be afraid to get creative. Remember, photography is all about capturing unique perspectives and conveying emotions through your images. So, go out there and capture stunning photos with depth and dimension that will leave a lasting impression on your viewers!
“Photography takes an instant out of time, altering life by holding it still.” – Dorothea Lange
Mastering Composition Techniques
When it comes to achieving depth and dimension in your photos, mastering composition techniques is key. By strategically arranging the elements within your frame, you can create a sense of depth that draws the viewer into the image. Here are some composition techniques to help you enhance the depth and dimension in your photos:
1. Foreground, Middle Ground, and Background Elements
- Foreground: Including foreground elements in your composition can add depth to your photos. It creates a sense of distance and provides a frame of reference for the viewer. Look for interesting objects, textures, or leading lines that can be placed in the foreground.
- Middle Ground: The middle ground is the area between the foreground and the background. It helps in creating a smooth transition between the two and adds depth to the image. Look for elements like trees, buildings, or people that can be placed in the middle ground.
- Background: A well-defined background is crucial for creating depth. It should complement the foreground and middle ground elements and provide context to the photo. Look for interesting textures, patterns, or landscapes that can form a visually appealing backdrop.
2. Leading Lines and Diagonals
- Leading lines: These are lines within the photo that guide the viewer’s eyes and create a sense of depth. Look for natural or man-made lines such as roads, fences, or rivers that can lead the viewer’s gaze into the image.
- Diagonals: Incorporating diagonals in your composition can add a dynamic element to the photo and create a sense of depth. Diagonal lines can be found in architectural structures, landscapes, or even the pose of a subject.
3. Frame within a Frame
- Frame within a frame: This technique involves using elements within the scene to create a frame around the main subject. It adds depth and draws attention to the subject by creating a sense of focus. Look for natural frames such as doorways, windows, or arches that can be used to frame your subject.
By using these composition techniques, you can create visually engaging photos that have a sense of depth and dimension. Remember to experiment with different combinations of foreground, middle ground, and background elements, leading lines, diagonals, and frames within frames to find what works best for your subject and your artistic vision.
Utilizing Light and Shadows
When it comes to creating depth and dimension in your photos, one of the most important factors is the way light and shadows are used in your composition. Light and shadows can add drama, depth, and visual interest to your images. Here are some tips on how to effectively utilize light and shadows in your photography:
Golden Hour Photography
One of the best times to capture stunning photos with depth and dimension is during the golden hour, which is the period of soft, warm light that occurs just after sunrise or before sunset. During this time, the sun is low in the sky, casting long shadows and creating a beautiful, golden glow.
- Tip: Plan your photography sessions during the golden hour to take advantage of the magical lighting conditions it provides.
High Contrast and Low Key Lighting
Another technique for adding depth and dimension to your photos is by using high contrast and low key lighting. High contrast lighting involves capturing scenes with a significant difference between the brightest and darkest areas, creating a sense of depth and drama. On the other hand, low key lighting involves primarily using dark tones and shadows, which can add a mysterious and intriguing atmosphere to your images.
- Tip: Experiment with different lighting conditions and adjust your exposure settings to capture the desired level of contrast and mood in your photos.
Creating Dramatic Shadows
Shadows play a crucial role in adding depth and dimension to your images. By positioning your subject or objects strategically, you can create interesting and dramatic shadows that enhance the three-dimensional feel of your photos. Experiment with different angles and light sources to cast shadows that add a sense of depth and texture to your composition.
- Tip: Use props or objects to manipulate the shadows and create unique shapes and patterns that add interest to your photos.
By understanding how to effectively utilize light and shadows, you can elevate your photography and create images that have depth and dimension. These techniques can transform an ordinary scene into a visually compelling and engaging photograph. So, go ahead, grab your camera, and start experimenting with light and shadows to take your photos to the next level!
Playing with Perspective
When it comes to photography, perspective is a powerful tool that allows you to create depth and dimension in your photos. By exploring different angles and viewpoints, you can add a unique and captivating element to your images. In this section, we’ll delve into some techniques that will help you play with perspective and take your photography to new heights.
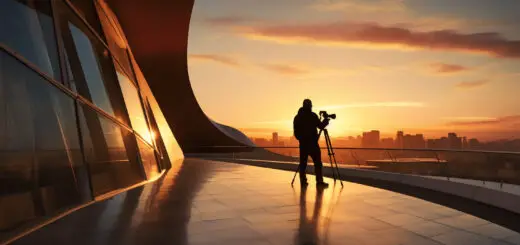
Bird’s Eye View
One interesting perspective that you can experiment with is the bird’s eye view. This involves capturing images from a high vantage point, as if you were looking down on the subject. It can provide a fresh and unique perspective, especially for scenes that are commonly shot from eye level. Try finding a rooftop or a tall structure to get an elevated viewpoint and capture the world from a different angle.
Low Angle Shots
On the opposite end of the spectrum, low angle shots offer a fresh perspective by shooting from a lower vantage point. This technique can make your subjects appear more dominant and powerful. It works particularly well for portraits or capturing architecture from below. Get down on the ground and experiment with different angles to create visually striking images.
Wide-angle and Fisheye Lenses
Using wide-angle and fisheye lenses can enhance the perspective in your photos by exaggerating the difference in size between objects at various distances. Wide-angle lenses have a broader field of view, allowing you to capture more of the scene in a single frame. Fisheye lenses, on the other hand, create a distorted, spherical effect that can add a sense of fun and creativity to your images.
Key Takeaways:
- Experiment with different perspectives to add depth and dimension to your photos.
- Explore bird’s eye view shots for a unique and elevated viewpoint.
- Try low angle shots to make your subjects appear more powerful.
- Use wide-angle and fisheye lenses to exaggerate size differences and add a sense of fun.
By incorporating these techniques into your photography repertoire, you can bring a fresh and dynamic perspective to your images. Remember to always be curious and experiment with different angles, viewpoints, and lenses. Let your creative instincts guide you and discover new ways to capture depth and dimension in your photos.
Adding Depth with Layers and Textures
One of the key elements in creating depth and dimension in your photos is incorporating layers and textures. By adding multiple elements in the foreground and background, you can give your photos a sense of depth, making them more engaging and visually appealing. Here are some tips on how to add depth with layers and textures:
Using Foreground and Background Elements
- Foreground elements: Including objects or subjects in the foreground of your photo can make it more immersive and create a 3D effect. It helps to establish a sense of depth by providing a point of reference for the viewer’s eye. For example, you can include branches, rocks, or flowers in the foreground of a landscape shot to add depth and create a more dynamic composition.
- Background elements: Incorporating interesting elements in the background can also enhance the depth in your photos. Look for elements such as trees, buildings, or mountains that can serve as a backdrop for your main subject. This will give your photo a sense of distance and make it feel more layered.
Incorporating Patterns and Textures
- Patterns: Including repetitive patterns in your photos can create a sense of depth and dimension. Look for patterns in nature, architecture, or even in everyday objects. For example, capturing a field of flowers, a tiled floor, or a series of windows can add depth and visual interest to your composition.
- Textures: Adding textures to your photos can make them feel more tactile and three-dimensional. Consider photographing objects with interesting textures such as tree bark, fabric, or textured walls. This will introduce a tactile quality to your photos and make them more visually appealing.
Incorporating layers and textures in your photos is a great way to add depth and dimension. Experiment with different compositions and elements to create captivating and immersive images. Remember, the key is to include foreground and background elements, as well as patterns and textures, to create a visually compelling photo that draws the viewer in.
“Layers and textures can transform a flat image into a dynamic and captivating photograph.”
Creating Depth in Portraits
Portraits are a beautiful way to capture the essence and personality of a person. To make your portraits truly come alive and stand out, it’s important to create depth and dimension in your photos. Depth adds visual interest and can make a portrait more engaging and captivating. Here are some tips to help you achieve depth in your portrait photography:
Depth through Depth of Field
One of the most effective ways to create depth in portraits is by using depth of field. Depth of field refers to the range of focus in your photo, from the nearest point to the farthest point. By controlling the depth of field, you can bring attention to your subject while creating a blurred background that adds depth.
- Use a wide aperture (small f-number) to achieve a shallow depth of field. This will blur the background and make your subject stand out.
- Position your subject away from the background. This will increase the distance between the subject and the background, further enhancing the blurred effect.
Utilizing Depth Cues
Depth cues are visual elements in a photograph that give the viewer a sense of depth and perspective. By incorporating depth cues into your portraits, you can create a three-dimensional effect that adds depth.
- Use leading lines to guide the viewer’s eyes and create a sense of depth. Leading lines can be natural elements like roads or pathways, or even architectural elements within the frame.
- Incorporate elements in the foreground, middle ground, and background to create layers and depth. This could be anything from trees or plants to props or furniture that add visual interest and depth to the composition.
- Experiment with different angles and perspectives to add depth. Shooting from a low angle can make your subject appear larger and more dominant, while shooting from a higher angle can create a sense of vulnerability or intimacy.
Using Props and Backgrounds
Props and backgrounds play a significant role in creating depth in portraits. They can provide context, add visual interest, and contribute to the overall composition.
- Choose a background that complements your subject and adds depth. Look for textured walls, interesting architecture, or natural settings that can enhance the overall look of the portrait.
- Incorporate props that interact with your subject and add depth. Props can be anything from a chair or a stool for your subject to sit on, to objects they can hold or interact with.
Remember, creating depth in portraits is not only about technical aspects but also about storytelling and capturing emotions. Experiment with different techniques and don’t be afraid to think outside the box. The more you practice and explore, the better you will become at creating depth and dimension in your portrait photography.
So grab your camera, find a willing subject, and start capturing stunning portraits that truly come alive with depth and dimension.
Read on for more tips on Post-processing Techniques for Depth.
Post-processing Techniques for Depth
Post-processing is an essential part of the photography process, and when it comes to achieving depth and dimension in your photos, it can play a significant role. By making some adjustments in post-processing, you can enhance the perception of depth and make your images more visually engaging. Here are some post-processing techniques that can help you achieve depth in your photos:
- Selective Focus and Bokeh: One way to create depth in your photos during post-processing is by using selective focus and bokeh. This technique involves emphasizing your subject by keeping it in sharp focus while blurring the background. This not only separates the subject from the background but also adds a sense of depth to the image. You can achieve this effect using tools like the “Lens Blur” filter in Photoshop or using aperture settings during the shooting process.
- Dodge and Burn: Dodging and burning is a technique in post-processing that involves selectively lightening and darkening specific areas of an image. By using this technique, you can create the illusion of depth by enhancing the highlights and shadows in various parts of the photo. You can use tools like the “Dodge” and “Burn” brushes in Photoshop or similar software to selectively adjust the exposure and contrast in different areas.
- Contrast and Clarity: Increasing contrast and clarity can also contribute to adding depth to your photos. By boosting the contrast, you can make the darker areas darker and the lighter areas lighter, creating a more three-dimensional look. Increasing the clarity can enhance the details and textures in your image, making it feel more immersive. Both these adjustments can be made using the sliders available in most photo editing software like Lightroom or Photoshop.
Remember, while post-processing techniques can be powerful tools, it’s important to use them in moderation and with restraint. Overdoing these adjustments can result in an unnatural and artificial look. It’s always best to aim for a balance that enhances the depth without sacrificing the overall integrity of the image.
In conclusion, post-processing techniques can be valuable tools for enhancing the perception of depth in your photos. By utilizing selective focus and bokeh, dodge and burn, as well as contrast and clarity adjustments, you can create images that have a greater sense of depth and dimension. Experiment with these techniques and find the post-processing workflow that works best for your style of photography. Practice and creativity go hand in hand when it comes to achieving stunning photos with depth.
Experimenting with Depth and Dimension
Once you have a grasp on the fundamental techniques for achieving depth and dimension in your photos, it’s time to get creative and experiment with different approaches. This is where you can let your imagination run wild and push the boundaries of your photography skills. Here are some exciting ways to explore depth and dimension in your photographs:
Macro Photography
Macro photography allows you to capture intricate details and magnify the subject in a way that gives a sense of depth. By getting up close to your subject, whether it’s a delicate flower, an insect, or a small object, you can reveal its unique textures and patterns.
Tips for macro photography:
- Use a macro lens or extension tubes to achieve a higher level of magnification.
- Keep your subject in sharp focus by using a narrow aperture (higher f-number).
- Experiment with different angles and perspectives to bring out interesting details and create a sense of depth.
Long Exposure Photography
Long exposure photography involves capturing a scene over an extended period of time, resulting in smooth, flowing movements and a dreamlike quality. This technique can add a sense of depth by capturing the motion of objects in the frame and contrasting them with the static elements.
Tips for long exposure photography:
- Use a tripod to keep your camera steady during the long exposure.
- Choose a low ISO setting to reduce noise in the image.
- Experiment with different shutter speeds to achieve the desired effect. Slower shutter speeds will result in more pronounced motion blur, while faster shutter speeds will freeze the action.
Forced Perspective
Forced perspective is a technique that can create optical illusions and make objects appear larger, smaller, or closer than they actually are. By strategically positioning subjects in the frame and playing with angles, you can manipulate the perception of depth and dimension.
Tips for forced perspective:
- Experiment with different angles and distances between subjects to create the desired effect.
- Keep the background simple and uncluttered to enhance the illusion.
- Have fun with props and creative elements to add an extra dimension to your composition.
Remember, experimentation is key when it comes to achieving depth and dimension in your photographs. Don’t be afraid to step out of your comfort zone and try new techniques. Each time you go out with your camera, challenge yourself to see the world from a different perspective and capture moments that evoke a sense of depth and dimension.
Conclusion
In conclusion, achieving depth and dimension in your photos can truly elevate your photography to the next level. By understanding the concept of depth, mastering composition techniques, utilizing light and shadows, playing with perspective, adding layers and textures, creating depth in portraits, using post-processing techniques, and experimenting with different approaches, you can bring your images to life and captivate your viewers.
Remember, photography is an art form, and it requires practice, patience, and creativity. Keep exploring and pushing your boundaries to discover new ways of capturing depth and adding dimension to your photographs.
If you’re looking for more photography tips, tutorials, and inspiration, be sure to check out Wimarys.com. As a photography website run by Wim Arys, a talented photographer with a passion for capturing stunning portrait and landscape images, you’ll find a wealth of resources and knowledge to fuel your photography journey.
So grab your camera, get out there, and start creating images that truly immerse your viewers in a world of depth and dimension. Happy shooting!
Product link:
Check out the latest Sony mirrorless cameras and accessories on Wimarys.com to take your photography to new heights. Explore the features and capabilities of these cutting-edge cameras that can enhance your ability to capture depth and dimension in your photos. (Note: Product link and context should be included naturally, if applicable)
Remember, the right equipment can play a significant role in achieving your desired results, so make sure to choose gear that aligns with your photography goals and style.
Frequently Asked Questions
- What does achieving depth and dimension in photos mean?
Achieving depth and dimension in photos refers to creating a sense of distance and three-dimensionality in a two-dimensional image, making the subjects appear more lifelike and captivating.
- How can I create depth in my photos?
To create depth in your photos, you can use techniques like leading lines, foreground interest, perspective, using a wide aperture for shallow depth of field, and incorporating objects of varied sizes.
- What is the role of lighting in achieving depth in photos?
Lighting plays a crucial role in achieving depth in photos. By using light and shadows strategically, you can create a sense of depth and bring out texture, form, and details in your subjects.
- What camera settings should I use to enhance depth and dimension in my photos?
To enhance depth and dimension in your photos, consider using a wide-angle lens, setting a wide aperture (low f-number), adjusting the focal length, and using manual focus to control depth of field.
- What post-processing techniques can I use to enhance depth and dimension in my photos?
In post-processing, you can enhance depth and dimension in your photos by adjusting contrast, shadows, highlights, and clarity, utilizing dodging and burning techniques, and utilizing software tools like Photoshop or Lightroom.