How to detect dirt on my Sony A7r II sensor, and how to clean it
How to detect dirt on my Sony A7r II sensor, and how to clean it
Introduction
If you own an interchangeable lens camera, you’ll inevitably get dust and dirt particles on your sensor after a while. Whether it’s dust from the environment, oil from moving parts, fibers from a cleaning brush or even an inadvertent fingerprint, it happens to us al. You won’t notice all dust spots in every photo, though, but heavy processing will bring it out, especially in the sky. Dust is everywhere… If you use a zoom lens, you’ll suck air – and any particles in it- into the camera. So the question is not whether your sensor is dirty, it’s more when. And but when your sensor is dirty, you’re eventually going to see it in your images.
When does sensor dust become a problem
How do you detect residue or dust on a camera sensor, maybe you think that if you don’t see anything, nothing is there?
The truth is that there is always dust in the air. Dust has always been an issue, since the days of darkrooms and analog film, and you might think that digital photography is less affected by this. This statement is only partly true, as your camera sensor can look quite nasty before you realize that something is wrong.

A typical dust spot
Dust and dirt will continue to build up until you finally start noticing it in that one essential shoot that is going to make or break your career. You’ll notice this first at small apertures (f/16 to f/22) like when you’re shooting outside on a bright day.
Removing Dust spots
Each modern photo editing program now can remove dust and tiny spots by cloning another piece of the picture on that location. If you find yourself with a series of images with the same dust spots, modern image editing programs offer the ability to touch up simultaneously a series of photos.
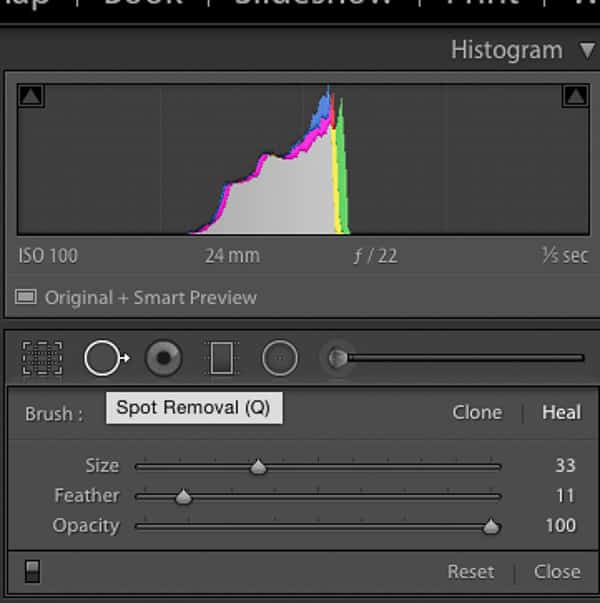
Spot Removal in Lightroom
You select a series of pictures, use the clone stamp or healing brush on one image and then synchronize all the selected photos. All selected photos will now have the carbon retouch performed.
How to detect dirt on your camera sensor
The easiest way to find dust spots on your sensor is with a wide-angle lens. More light hits the camera sensor. Hence, it’s easier to find dust spots. Though if your lens suffers from heavy vignetting, it might be harder to find dust spots at the frame edge. You can use either Adobe Photoshop or Lightroom though Lightroom is way more efficient.
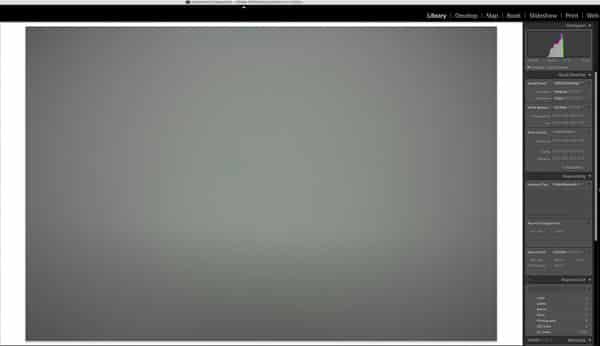
Dusty sensor detection, first a photo of a white sheet of paper
Photoshop recipe for dust sensor-check
- Turn the camera on aperture priority (A) and choose the smallest possible aperture (f/22).
- Choose RAW or JPG in the highest resolution and adjust the white balance to artificial light.
- Set ISO to 100.
- Set to manual focus, and focus at the shortest possible distance.
- Take a picture of a piece of white paper, more or less evenly lit.
- It’s not necessary to have a sharp image, in fact, blurry is better.
- Open your image in Photoshop, and set to 100%.
- Increase the contrast, for example through the levels panel, this will make it easier to recognize dirt on the sensor.
Lightroom dust Sensor test

Visualize Spots in Lightroom is the easiest way to detect dirt and dust on your sensor
- Take a picture in the same way as in the Photoshop recipe.
- Import the image in a Lightroom,
- go to the Develop menu and choose the healing brush (below the histogram)
- Left-click below the picture on ‘Visualize Spots’. With the slider next to the box, you can adjust the sensitivity by using the slider next to the check box.

A clear view of all the dust particles on my Sony A7r II
Types of dust and how to clean them
The Sony A7r II and many other cameras have an auto clean mode. You’ll find it on page 3 of the last Menu called SETUP. It’s a good idea to do this regularly to avoid dust buildup.
- Confirm that the battery has been charged sufficiently.
- MENU → (Setup) → [Cleaning Mode] → [Enter]
- Turn off the camera
- Detach the lens.
- Use the blower to clean the image sensor surface and the surrounding area, with the sensor compartment pointing down.
This cleaning gets rid of small dust particles that haven’t attached to the sensor. After a while, you’ll find that heat and humidity make dust particles stick to the sensor surface.
Sony advises you to send the camera for a sensor cleaning to a service center, and this is honestly the best course of action. If anything goes wrong during the wet cleaning process, you are not covered under warranty! Replacing a sensor or a sensor glass cover is very expensive.
If you would like to attempt a cleaning yourself anyway, never use a sensor stick or Lenspen on a Sony A7rM2. The material that makes the dust stick to the pen, often wind up on your sensor. This will make your problems worse, not better.

Eclipse Sensor Solution
Sony service uses [easyazon_link keywords=”Eclipse Sensor Solution” locale=”US” tag=”wimarysdigitc-20″]Eclipse Sensor Solution[/easyazon_link] to wet clean Sensors. Eclipse is the highest purity lens cleaner available. It contains less than five parts per million (ppm) of contamination that is the whitish residue left after evaporation. It dries as quickly as it can be applied leaving absolutely no residue, making it the only recommended cleaner for CCD and CMOS sensor. You’ll also need [easyazon_link keywords=”swabs for a full frame sensor” locale=”US” tag=”wimarysdigitc-20″]swabs for a full frame sensor[/easyazon_link]. These swabs come Vacuum packed, either with cloth pre-applied or with separate cloth pieces that you need to apply to the swab.
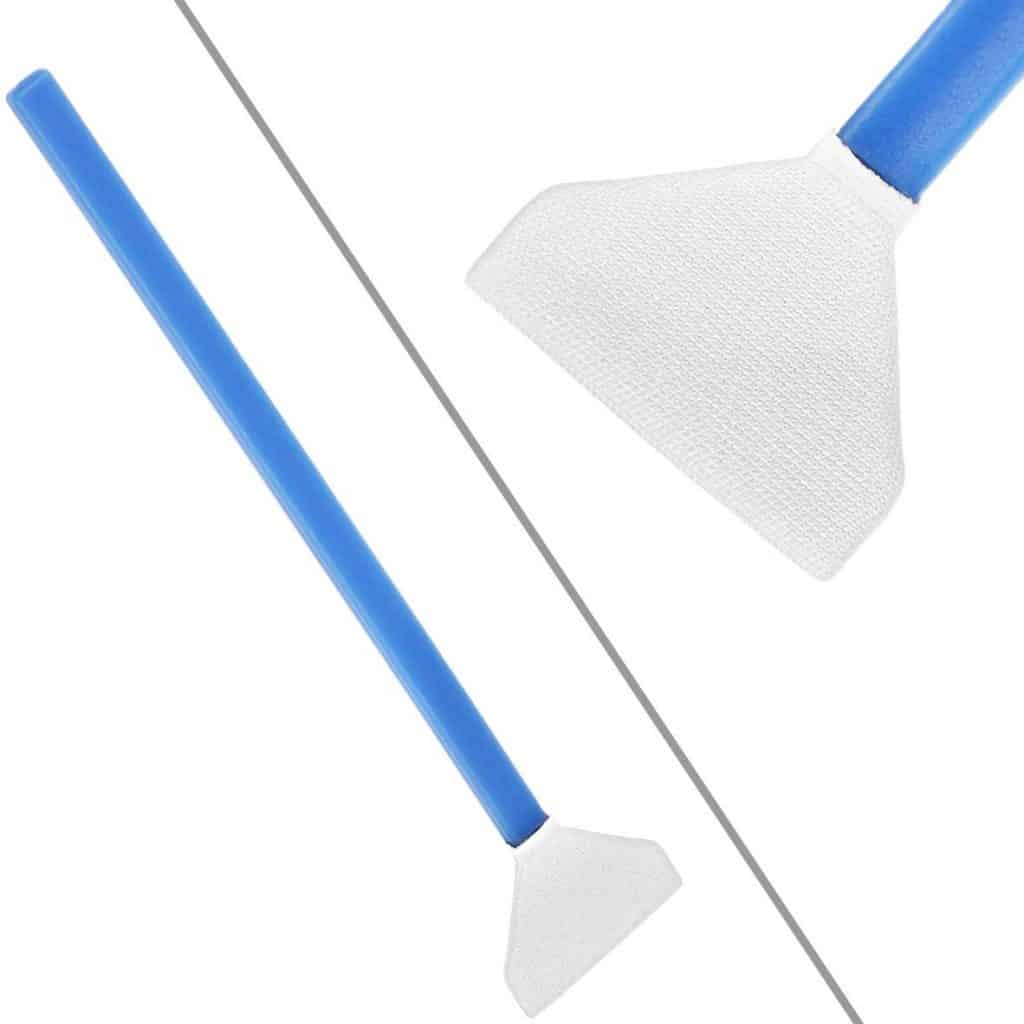
Full Frame sensor swabs
Since the Sony A7rM2 sensor uses a 5-Axis Stabilization system, you’ll need to be very careful in order not to damage the stabilization system.
- Apply one drop of the Eclipse sensor solution to both sides of the sensor swab.
- Sweep across the sensor with one side of the swab once without applying pressure, and again with the other side of the swab.
- Use a sensor loupe to check your work
- Repeat this procedure with a new swab if there is still dust visible on the sensor.
- After three tries, if you still see dust, I would strongly advise you to get a professional to do this for you. Different types of dust or residue often need different chemical solutions, and a Pro will know exactly what is required.
Not dust, but a dead Pixel, hot pixel or stuck pixel?
Dead Pixels
A dead pixel is a permanently damaged pixel that does not receive any power. This results in a black spot. All sensors have dead pixels, and more will pop-up over time. Your Sony A7r II automatically scans for these dead pixels monthly and remaps them for you. If you find any dead pixels, a trick is to set the date of your camera forward by one month. You’ll see that the dead pixel is gone.
Stuck Pixels
Stuck pixels always receive power, which results in a colored pixel that shows up when you zoom into pixel level. The colors can be red, green, blue or any combination of these colors. Unlike dead pixels, stuck pixels do not change their color from picture to picture. Stuck pixels are very common, but not permanent like dead pixels and most disappear over time.
Hot Pixels
Hot pixels appear when the camera sensor gets hot during long exposures. Hot pixels are very normal, and they will show up even on brand new cameras, although Sony do their best to map hot pixels out. Most RAW developers can detect hot pixels and filter them out by guessing the RGB value of that pixel by comparing it to adjacent pixels.
