The Art of Macro Flower Photography: Techniques and Inspiration
When it comes to photography, flowers have always been a popular subject. Their vibrant colors, delicate petals, and intricate details make them a captivating focal point for any photographer. One specific genre of flower photography that has gained popularity over the years is macro flower photography.
Macro flower photography involves capturing close-up images of flowers, revealing the beauty and intricacies that might go unnoticed with the naked eye. This technique allows photographers to showcase the smallest details, such as the texture of a petal or the delicate veins of a leaf.
In this article, we will delve into the art of macro flower photography, exploring various techniques and sources of inspiration. Whether you’re an aspiring photographer looking to hone your skills or simply a flower enthusiast looking to capture the essence of nature, this guide will provide you with valuable insights and practical tips.
So, grab your camera, select your favorite flowers, and let’s dive into the world of macro flower photography!
Importance of Depth of Field
Depth of field is a crucial concept in photography that can greatly impact the visual appeal and storytelling of an image. It refers to the range of distance within a photograph that appears acceptably sharp, from the nearest point to the farthest point. Understanding and effectively controlling depth of field can make a significant difference in the overall quality and impact of your photographs.
Here are a few reasons why depth of field should be a key consideration in your photography:
1. Creating Visual Interest and Emphasis
Controlling the depth of field allows you to direct the viewer’s attention to a specific subject or element within the frame. By using a shallow depth of field, you can blur the background and make your subject stand out prominently. This technique is commonly used in portrait photography, where the subject is the main focus. On the other hand, a larger depth of field can be useful in landscape photography to keep everything in the frame sharp and in focus.
2. Conveying Depth and Dimension
Depth of field can also be used to add depth and dimension to your images. By intentionally blurring parts of the scene that are further away from the camera, you can create a sense of distance and three-dimensionality. This technique is especially effective when photographing landscapes or scenes with significant foreground, midground, and background elements.
3. Controlling the Narrative
Depth of field can be a powerful tool for storytelling in photography. By selectively focusing on certain elements within the frame while blurring others, you can guide the viewer’s attention and evoke specific emotions or narratives. For example, a shallow depth of field can be used to isolate a single object or person in a busy environment, emphasizing their significance or solitude.
4. Enhancing Composition
The careful use of depth of field can greatly enhance the composition of your photographs. By strategically choosing what to keep in focus and what to blur, you can create a sense of balance, symmetry, or visual tension. Experimenting with different depths of field can lead to more visually compelling images that draw the viewer’s eye and create a stronger overall composition.
In conclusion, understanding the importance of depth of field in photography is essential for creating visually engaging and impactful images. By mastering the control of depth of field, you can effectively guide the viewer’s attention, convey depth and dimension, tell compelling stories, and enhance the composition of your photographs. So, the next time you pick up your camera, be conscious of the depth of field and explore the creative possibilities it offers.
Using a Tripod for Stability
Have you ever tried to take a perfectly sharp and steady photo only to end up with a blurry mess? Camera shake can be frustrating, especially when you’re trying to capture a moment or create professional-quality images. That’s where a tripod comes in handy. Using a tripod can greatly improve the stability of your shots, resulting in clear, sharp images that truly stand out.
Let’s explore why a tripod is an essential tool for photographers and how it can benefit your photography:
Stability is Key
When capturing still shots or working with long exposures, keeping your camera steady is essential. Even the slightest movement can impact the sharpness of an image. A tripod provides a solid and stable platform for your camera, eliminating any handheld shakiness or vibrations. This stability allows you to focus on your composition and capture razor-sharp images, no matter the conditions.
Ultimate Flexibility
One of the greatest advantages of using a tripod is the ability to position your camera exactly where you want it. With its adjustable legs and versatile head, a tripod offers endless possibilities for framing and composing your shots. Whether you’re shooting low to the ground or capturing a grand landscape, a tripod can keep your camera in position for as long as needed, ensuring the perfect composition every time.
A Tool for Every Situation
Tripods come in various sizes, weights, and designs, making them suitable for different photography genres and shooting environments. From compact and travel-friendly tripods for street and travel photography to heavy-duty tripods for studio setups or outdoor adventures, there’s a tripod available for every photographer.
Long Exposures Made Easy
Creating stunning long exposure images requires stability and precision. Whether you’re capturing dreamy landscapes, smooth waterfalls, or aesthetically pleasing nightscapes, a tripod is a must-have tool. By keeping your camera steady during long exposure shots, a tripod allows you to capture the motion and light in a controlled manner, resulting in breathtaking images that showcase the passage of time.
Take Control of Your Selfies
Selfies have become a popular way to document our lives and capture moments with friends and loved ones. While handheld selfies may be convenient, they often lack the stability needed for a clear and crisp photo. By using a tripod with a smartphone mount or a remote trigger, you can easily capture well-composed and steady selfies, ensuring you’re always in focus and looking your best.
Conclusion
Whether you’re a professional photographer or an enthusiastic hobbyist, using a tripod can significantly enhance the quality of your images. Its stability, flexibility, and adaptability make it an indispensable tool for any photography style or situation. Invest in a high-quality tripod that suits your needs and watch your images transform from shaky to stunning!
Optimal Lighting Conditions
When it comes to capturing stunning photographs, lighting plays a crucial role. The right lighting can enhance the mood, bring out the colors, and add depth to your images. Understanding the different lighting conditions and knowing how to use them to your advantage can make a significant difference in the quality of your photos.
Cloudy Light
Cloudy days might not seem like the ideal time for photography, but don’t be quick to dismiss them. Cloudy light can be surprisingly flattering and create a soft, diffused lighting effect. Here’s why shooting in cloudy conditions can be beneficial:
- Even Lighting: Cloud cover acts as a natural diffuser, scattering the sunlight evenly. This eliminates harsh shadows and reduces contrast, making it easier to capture details in both shadows and highlights.
- Vibrant Colors: Without direct sunlight, colors appear more saturated and true to life. The absence of harsh shadows allows hues to pop, giving your images a more vibrant and natural look.
- Flattering Portraits: Cloudy light acts as a giant softbox, providing a beautifully even light to flatter your subjects. It minimizes harsh lines and wrinkles, resulting in smoother skin tones and more flattering portraits.
Golden-Hour Light
The golden hour, also known as the magic hour, refers to the period shortly after sunrise and before sunset. During this time, the sun sits lower in the sky, casting a warm, golden light. Here’s why shooting during the golden hour can elevate your photographs:
- Warm and Soft Light: The low angle of the sun during the golden hour creates a warm and soft light that adds a magical touch to your images. It bathes your subjects in a beautiful glow, imparting a sense of warmth and serenity.
- Long Shadows and Dimension: The golden hour light creates long, dramatic shadows that add depth and dimension to your images. The warm tones also enhance textures, giving your subjects a three-dimensional feel.
- Rich Colors: The golden hour light enhances the warmth and richness of colors, making them more saturated and vivid. It’s an ideal time for landscape photography, as the golden light can transform ordinary scenes into breathtaking vistas.
So, whether you’re shooting during a cloudy day or taking advantage of the golden hour, understanding the unique qualities of each lighting condition can help you capture remarkable photographs. Experiment with different lighting scenarios, and don’t be afraid to embrace the magic of these optimal lighting conditions. Your images will thank you!
Want to learn more about mastering the art of photography in various lighting conditions? Check out this comprehensive guide on photography lighting techniques to take your skills to the next level.
Exploring Different Angles and Perspectives
When it comes to exploring a topic, it’s important to consider different angles and perspectives. This allows us to gain a deeper understanding and uncover new insights. By examining a subject from various viewpoints, we are able to think critically, challenge existing assumptions, and broaden our knowledge.
Taking a multifaceted approach to exploring a topic is especially valuable in fields like science, arts, and social sciences where there is often no one-size-fits-all answer. Let’s dive into why exploring different angles and perspectives is so important:
1. Gain a Well-rounded Perspective
Examining a topic from multiple angles helps us build a comprehensive understanding. Just like viewing an object from different sides gives us a complete picture, exploring different angles allows us to see all sides of an issue. This helps us avoid bias and better appreciate the complexities involved.
2. Stimulate Critical Thinking
Exploring different angles and perspectives requires us to think critically and analyze information from various sources. It encourages us to question our own assumptions and consider alternative viewpoints. By challenging our own beliefs and opinions, we broaden our perspective and become more open-minded.
3. Foster Creativity and Innovation
When we explore different angles and perspectives, we expose ourselves to new ideas and ways of thinking. This stimulates our creativity and can lead to innovative solutions and breakthroughs. By embracing diverse viewpoints, we can push the boundaries of what is known and discover new possibilities.
4. Enhance Problem-solving Skills
Approaching a problem from different angles allows us to tackle it from various directions. This increases the likelihood of finding effective solutions and overcoming challenges. By considering different perspectives, we are more likely to identify overlooked factors and come up with well-rounded strategies.
5. Encourage Empathy and Understanding
Exploring different angles and perspectives helps us develop empathy and understanding for others. It allows us to see the world through different lenses and appreciate diverse experiences and beliefs. This promotes empathy and helps build bridges between individuals and communities.
In conclusion, exploring different angles and perspectives is critical for gaining a comprehensive understanding of a subject. It stimulates critical thinking, fosters creativity and innovation, enhances problem-solving skills, and encourages empathy and understanding. By embracing diverse viewpoints, we enrich our knowledge and broaden our horizons. So, let’s embrace the diversity of perspectives and unlock new insights!
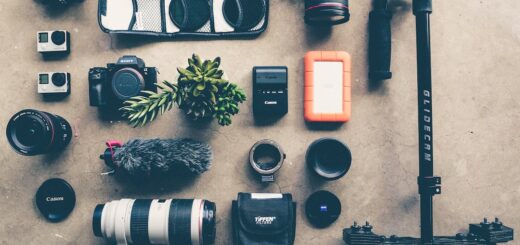
Utilizing Macro Lens or Macro Rings
In the world of photography, capturing close-up images with intricate details has always been an art form in itself. Whether it’s capturing the delicate petals of a flower or the tiny details of a butterfly’s wings, macro photography allows us to explore tiny universes that are often overlooked.
But when it comes to achieving those stunning macro shots, photographers have two main options to choose from: using a macro lens or macro rings. Both options have their own advantages and drawbacks, but ultimately, they serve the same purpose—to capture close-up images with exceptional clarity.
Macro Lens
A macro lens is specifically designed for macro photography. It allows photographers to focus at very close distances, often producing a 1:1 magnification ratio. Here is a breakdown of the advantages and disadvantages of using a macro lens:
Advantages:
- High-quality optics: Macro lenses are designed to produce sharp and detailed images, ensuring excellent image quality.
- Dedicated purpose: Macro lenses are exclusively built for close-up photography, making them an optimal choice for capturing small subjects.
- Autofocus capabilities: Many macro lenses come with autofocus functionality, which can be incredibly helpful when working with fast-moving subjects or in challenging lighting conditions.
Disadvantages:
- Cost: Macro lenses tend to be quite expensive due to their specialized nature. They can be a significant investment, especially for photographers who don’t specialize in macro photography.
- Limited versatility: While macro lenses excel at close-up photography, their performance might not be as impressive when used for other types of photography, such as landscape or portrait photography.
- Weight and size: Macro lenses are generally larger and heavier compared to standard lenses. This can make them less convenient to carry around, especially for photographers who value portability.
Macro Rings
Macro rings, on the other hand, are accessories that can be attached to a standard lens to achieve macro magnification. They consist of a set of rings with different depths that are placed between the lens and the camera body, allowing for closer focusing distances. Let’s take a closer look at the pros and cons of using macro rings:
Advantages:
- Affordable option: Macro rings are often a more budget-friendly alternative to purchasing a dedicated macro lens. They can be a great option for photographers who want to explore macro photography without breaking the bank.
- Versatility: Macro rings can be used with a variety of lenses, making them a versatile option for photographers who want to experiment with different focal lengths.
- Lightweight and portable: Unlike macro lenses, macro rings are compact and lightweight, making them easy to carry around in a camera bag.
Disadvantages:
- Image quality: The use of macro rings can sometimes result in a slight decrease in image quality compared to using a dedicated macro lens. This is particularly noticeable in terms of sharpness and chromatic aberration.
- Manual focus: Unlike macro lenses, most macro rings do not come with autofocus capabilities. This means that photographers will need to manually focus on their subject, which can be challenging, especially with moving subjects.
In conclusion, both macro lenses and macro rings offer photographers the opportunity to delve into the captivating world of macro photography. While macro lenses excel in terms of image quality and autofocus capabilities, they can be expensive and less versatile. On the other hand, macro rings provide an affordable option that is portable and can be used with different lenses, albeit with some compromises in terms of image quality and manual focusing. Ultimately, the choice between a macro lens and macro rings will depend on your budget, photography style, and personal preferences. Whichever option you choose, macro photography will surely open up a whole new world of creativity and beauty for you to explore.
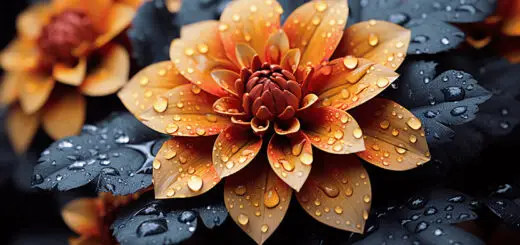
Enhancing with Water Droplets and Reflections
When it comes to adding a touch of magic and visual interest to photographs, water droplets and reflections can be a game-changer. By incorporating these elements into your images, you can create a stunning effect that captivates viewers and gives your photos that extra “wow” factor. Whether you’re a professional photographer or just someone who loves capturing moments with your camera, learning how to utilize water droplets and reflections can take your images to the next level.
Why Water Droplets and Reflections?
- Water droplets can add a sense of freshness and movement to your photos. They catch the light and create beautiful, sparkling details that draw the eye.
- Reflections provide a unique perspective by mirroring the subject or scenery. They can create symmetry, depth, and even a sense of mystery in your images.
- Both water droplets and reflections have a way of making images feel more alive and dynamic. They add an element of interest and intrigue that keeps viewers engaged and wanting to explore the photo further.
How to Capture Water Droplets and Reflections
Capturing water droplets and reflections requires a careful combination of technique, creativity, and patience. Here are a few tips to help you get started:
- Find Your Subject: Look for interesting subjects that can be enhanced by water droplets or reflections. It could be a flower, a landscape, or even an everyday object that takes on a new perspective when combined with water.
- Create the Droplets: There are a few methods you can use to create water droplets for your photos:
- Spritzing water: Use a spray bottle to create a fine mist of water droplets on your subject.
- Condensation: Place your subject in a cool, humid environment, such as a bathroom, to allow natural condensation to form on its surface.
- Capture the Reflections: To capture reflections, you’ll need a reflective surface such as a puddle, a mirror, or even a body of water. Position your subject in a way that allows the reflection to be showcased prominently in your frame.
- Experiment with Lighting: Lighting plays a crucial role in bringing out the beauty of water droplets and reflections. Play with different angles, natural or artificial light sources, and shadows to create unique effects and enhance the overall mood of your photo.
- Pay Attention to Composition: As with any photograph, composition is key. Consider the rule of thirds, leading lines, and other compositional techniques to create a visually pleasing image that effectively showcases the water droplets and reflections.
Conclusion
Incorporating water droplets and reflections into your photography can take your images from ordinary to extraordinary. By understanding the potential of these elements and applying the right techniques, you can create visually stunning photos that engage and captivate viewers. So grab your camera, find some water, and get ready to elevate your photography game to new heights!
Creating Abstract Flower Photos
Introduction
When it comes to photography, flowers are a popular subject for capturing beauty and color. But have you ever thought about taking it to the next level and creating abstract flower photos? By experimenting with different techniques and perspectives, you can transform ordinary flower shots into stunning and unique works of art. In this article, we will explore how to create captivating abstract flower photos that are sure to impress.
1. Playing with Focus
One way to create abstract flower photos is by playing with focus. By intentionally blurring certain parts of the image while keeping others in sharp focus, you can create a dreamy and ethereal effect. Here’s how to do it:
- Use a wide aperture (smaller f-stop number) to create a shallow depth of field.
- Focus on a specific area of the flower, such as the center or a single petal.
- Experiment with different angles and distances to find the most visually appealing composition.
2. Experimenting with Movement
Another technique to create abstract flower photos is by experimenting with movement. By intentionally moving the camera or the subject, you can create dynamic and expressive images. Here are some ideas to get you started:
- Use a slow shutter speed and move the camera in a sweeping motion while taking the photo.
- Capture the flower while it’s swaying in the wind or being gently blown by a fan.
- Try using a zoom lens and zooming in or out while the shutter is open.
3. Exploring Unconventional Perspectives
To create truly unique abstract flower photos, don’t be afraid to explore unconventional perspectives. Instead of capturing the flower from a traditional angle, try these ideas:
- Get up close and personal with the flower, capturing intricate details.
- Shoot from a low angle or from underneath the flower to create a sense of grandeur.
- Experiment with different framing techniques, such as shooting through other objects or using reflections.
4. Enhancing Colors and Textures
In abstract flower photography, colors and textures play a crucial role in creating visual interest. Here are some tips to enhance and highlight these elements:
- Shoot during the golden hour or under soft, diffused lighting conditions to create a warm and ethereal atmosphere.
- Use a polarizing filter to reduce glare and enhance colors.
- Get creative with post-processing techniques like increasing saturation or adding texture overlays.
Putting It All Together
Creating abstract flower photos is all about experimentation and pushing the boundaries of traditional flower photography. Don’t be afraid to play with focus, experiment with movement, explore unconventional perspectives, and enhance colors and textures. With some creativity and practice, you can transform ordinary flower shots into captivating works of art. So grab your camera, head out to your nearest botanical garden or flower market, and start capturing the beauty of flowers in a whole new way.
Learn more about composition techniques in photography to further enhance your skills and create stunning abstract flower photos.
Capturing Texture and Close-Up Shots
When it comes to photography, there’s something captivating about capturing the intricate details of textures and close-up shots. These types of photographs allow us to appreciate the beauty that often goes unnoticed in our everyday surroundings. Whether it’s the fine lines on a petal, the rough bark of a tree, or the intricate patterns on a seashell, close-up photography provides a unique perspective that can transform ordinary subjects into works of art.
To effectively capture texture and close-up shots, it’s essential to approach the process with both creativity and technical knowledge. Here are some tips to help you master the art of close-up photography:
- Use a Macro Lens: Investing in a good quality macro lens is crucial for capturing sharp and detailed close-up shots. These lenses are designed to provide a high level of magnification, enabling you to get up close to your subject without losing image quality.
- Find the Right Lighting: Lighting plays a vital role in showcasing the texture and details of your subject. Experiment with different lighting conditions to create interesting shadows, highlights, and contrasts. Soft diffused lighting, such as natural light on a cloudy day or using a diffuser, can help bring out the details without harsh shadows.
- Explore Different Angles: Don’t be afraid to get down low or try unconventional angles to capture unique perspectives. By changing your viewpoint, you can reveal hidden textures and patterns that might not be visible from a traditional standing position.
- Focus on the Details: The beauty of close-up photography lies in the tiny details. Pay attention to the smallest elements of your subject, such as the tiny droplets on a flower petal or the delicate lines on a leaf. Use a narrow aperture (higher f-number) to ensure that your entire subject is in focus from front to back.
- Experiment with Depth of Field: Controlling the depth of field can dramatically impact the composition and overall feel of your close-up shots. Use a wide aperture (lower f-number) to create a shallow depth of field, blurring the background and drawing attention to the main subject. Conversely, using a narrower aperture (higher f-number) will result in a greater depth of field, keeping more of the image in focus.
By incorporating these techniques into your close-up photography, you’ll be able to capture stunning images that highlight the beauty of texture and detail. Remember, practice makes perfect, so don’t be afraid to experiment and try new things. Enjoy the process of discovering the hidden beauty in everyday objects and let your creativity shine through your lens.
Related: Looking to improve your editing skills? Check out our guide to photo editing techniques.
Experimenting with Composition
Composition is a key aspect of photography that can greatly impact the overall quality and visual appeal of an image. By experimenting with different angles and perspectives, photographers can create unique and captivating compositions that engage viewers and tell a compelling visual story.
Top Angle
Taking photos from a top angle can provide an interesting and different perspective. This angle allows you to capture a scene from above, which can create a sense of depth and showcase the relationship between objects in the frame. Top-angle shots are great for capturing overhead views of landscapes, architecture, and group shots where you want to include everyone in the frame.
To achieve a top angle shot, you can:
- Use a drone or a pole/monopod to elevate your camera.
- Climb stairs or find an elevated position to shoot from.
- Capture the scene through a window or from a balcony.
Bottom Angle
On the opposite end of the spectrum, shooting from a bottom angle can add a unique and dramatic perspective to your photographs. This technique is particularly effective for capturing towering structures or tall subjects that you want to emphasize. Shooting from a low angle can make subjects appear more powerful and larger than life.
To capture a bottom angle shot:
- Get down low by squatting, kneeling, or lying on the ground.
- Use a wide-angle lens to exaggerate the height of the subject.
- Experiment with different camera placements to find the most impactful composition.
Side Angle
Shooting from a side angle is a versatile approach that allows you to capture both the subject and its surroundings. This angle offers a more balanced and natural view, similar to what we typically see with our own eyes. Side angle shots can be used to capture portraits, street photography, and scenes that require a balanced composition.
To capture a side angle shot:
- Position yourself perpendicular to the subject.
- Pay attention to the background and ensure it complements the subject.
- Experiment with different focal lengths to achieve the desired composition.
Underneath Angle
The underneath angle provides a unique and often captivating perspective. By shooting from below the subject, you can highlight its size, shape, and details that may go unnoticed from other angles. This technique is commonly used in architectural photography, macro photography, or when photographing objects with intricate details.
To capture an underneath angle shot:
- Get down low and point your camera upwards.
- Use a macro lens or a lens with a close focusing distance to capture fine details.
- Adjust your settings to ensure proper exposure and focus on the subject.
Experimenting with different angles and perspectives is an excellent way to expand your creative horizons as a photographer. By incorporating various angles into your compositions, you can create visually engaging images that stand out and captivate viewers. So grab your camera, explore different vantage points, and let your creativity shine.
Conclusion
In conclusion, macro flower photography is a captivating and rewarding genre that allows photographers to explore the intricate beauty of flowers up close. By employing techniques such as optimizing depth of field, utilizing a tripod for stability, and experimenting with different angles and perspectives, photographers can capture stunning and unique images that showcase the details and textures of flowers. Enhancing photos with water droplets and reflections, creating abstract compositions, and capturing close-up shots further add depth and interest to macro flower photography. With the right equipment, lighting, and creative vision, photographers can unlock endless possibilities in this genre.
For more inspiration, tips, and in-depth tutorials on photography and cameras, particularly Sony mirrorless cameras, be sure to visit Wim Arys Photography. Explore a range of helpful articles, camera reviews, and guidance for your photography projects on Wimarys.com. Happy shooting!
Frequently Asked Questions
- What is macro flower photography?
Macro flower photography is a technique that involves capturing close-up images of flowers, showcasing intricate details and textures that are often not visible to the naked eye. It is a popular genre of photography that celebrates the beauty of flowers at a magnified scale.
- What equipment do I need for macro flower photography?
To get started with macro flower photography, you will need a DSLR or mirrorless camera with a macro lens that has a high magnification ratio, a sturdy tripod for stability, and a remote shutter release for minimizing camera shake. Optional accessories include a ring light or diffused flash for illuminating the subject and a focusing rail for precise adjustments.
- What are some techniques for capturing stunning macro flower photos?
To capture stunning macro flower photos, try shooting in soft natural light to maintain delicate details, experiment with different angles and perspectives, use a wide aperture to create a shallow depth of field and emphasize certain parts of the flower, focus on the eyes or center of the subject, and utilize manual focus for precise control.
- How can I find inspiration for macro flower photography?
You can find inspiration for macro flower photography by exploring botanical gardens, visiting local flower markets, observing flowers in your own garden or neighborhood, studying the work of renowned macro photographers, and experimenting with different compositions, colors, and textures.
- Are there any post-processing tips for enhancing macro flower photos?
Yes, post-processing can greatly enhance your macro flower photos. Consider using software like Adobe Lightroom or Photoshop to adjust exposure, contrast, and color balance, apply selective sharpening to highlight details, remove any distracting elements, and experiment with creative filters or presets to add a unique touch to your images.