
Sony DSC-HX90V help guide with tips and tricks
Introduction
This is a guide for the Sony HX90V compact camera with tips and tricks. This advanced manual follows the Menu system and is easiest to use when you have your camera next to you so you can follow along page by page. If you are looking for something specific, I would suggest using the search function in a browser like google chrome or Firefox.
A quick specs overview: The Sony Cyber-shot DSC-HX90V is one of the world’s smallest superzoom cameras. It features a 30X zoom equivalent to 24-720mm, also optical image stabilization, and an excellent 18.2MP BSI CMOS sensor. If you’d think that Sony is cutting corners at this price, it features the same pop-up OLED electronic viewfinder as Sony’s RX100 III along with a 3″ LCD that tilts upward 180 degrees. Another interesting feature inherited from the RX100 is a customizable ring around the front of the lens.
The HX90V can record video at 1080/60p using the XAVC S codec, which allows for bit rates up to 50MBps. The camera also has built-in Wi-Fi with NFC as well as a GPS.
Getting the most out of your HX90V means familiarizing yourself with the features in the Menu structure, and it is also the easiest way to good your camera set-up according to your liking. The Sony manual does offer insights on this, but to be honest, it does not give you a page by page explanation as I do. So sit back, read carefully and get ready to learn. If there is a feature that you don’t want to tweak or learn, just skip it and move to the next chapter.
Diving into the MENU system
When you switch on your camera, you’ll be asked to enter a date, time and timezone. This setting is necessary, as all images captured will have a timestamp, making it easy to find your favorite pictures in the future.
After this is setup, press the MENU button. You’ll see a range of icons and pages.
We’ll start at page 1 of the camera Icon (camera settings)
(MENU → Camera Settings → page 1)
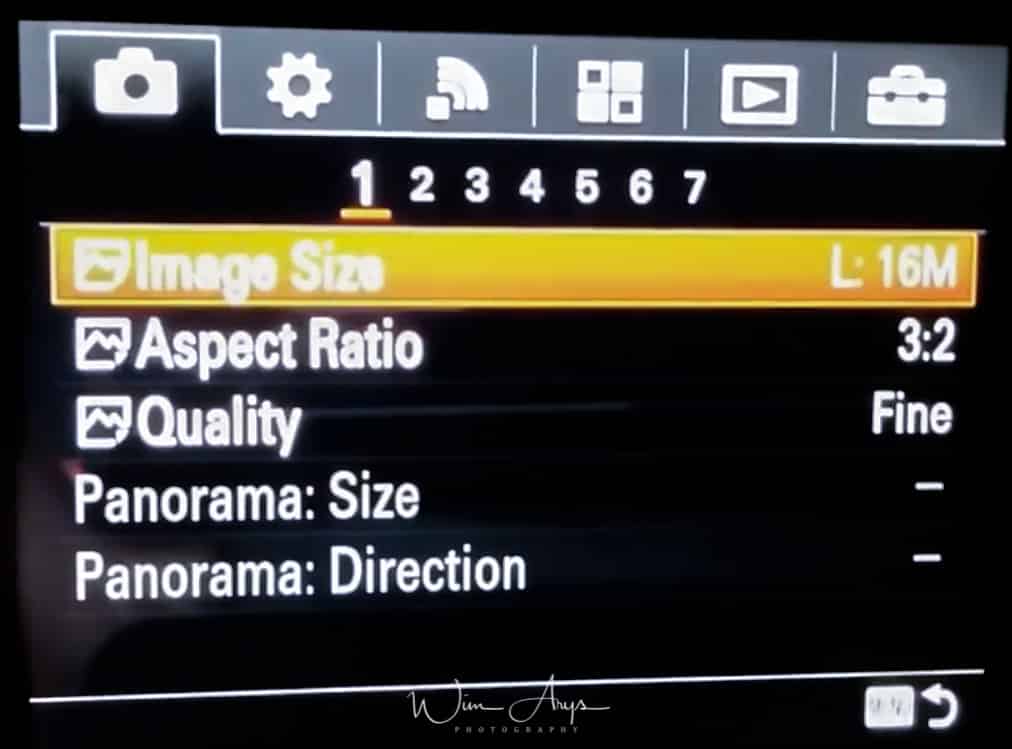
Image size:
The larger the image size, the more detail will be reproduced when the image is saved. The smaller the image size, the more images can be recorded. Much depend upon the intended use for your images, but if you can spare the extra expense of a larger SD card, I would recommend you to set the image size to large.
Knowing the size in pixels at different aspect ratios and quality levels can tell you how large you can print. An A3 print is 3508 pixels x 4961 pixels, so you can comfortably print your images on an A3 paper if you set the Image size to Large. Setting image size to medium would correspond to your image filling on a full-screen 4Kmonitor.
The size of your image in pixels when Aspect Ratio is 4:3 (RECOMMENDED):
- L: 18M 4896×3672 pixels
- M: 10M 3648×2736 pixels
- S: 5.0M 2592×1944 pixels
- VGA 640×480 pixels
The size of your image in pixels when Aspect Ratio is 16:9:
- L: 13M 4896×2752 pixels
- M: 7.5M 3648×2056 pixels
- S: 2.1M 1920×1080 pixels
The size of your image in pixels when Aspect Ratio is 1:1:
- L: 13M 3664×3664 pixels
- M: 7.5M 2736×2736 pixels
- S: 3.7M 1920×1920 pixels
Aspect Ratio
You can choose 4:3 (which uses the full sensor surface), 1:1 or 16:9 (crop but a more broad view). Unless you are not interested in editing your images later, leave as is at 4:3, you can always crop in a photo editor. Remember that if you decide to use a different aspect ratio, what is cropped out will not be saved.
Quality:
The HX90V is not capable of storing RAW images. RAW basically means that all the information captured by the camera’s sensor is saved unprocessed.
Instead, this camera saves it as a JPEG file. This Jpeg will have gone through all your settings like added sharpness, noise reduction, white balance, etc as well as being compressed to a certain degree.
You have two compression options available: FINE (larger) and STANDARD (smaller, less quality) which takes up less space on your SD card but is less suited for editing afterward.
I always recommend setting Quality to Fine. When you’re investing in a good camera like this, you don’t want to miss out on the fantastic detail in can produce.
Panorama size
(Only available when in panorama shooting mode on the mode dial) Size is selectable between standard and wide. Wide means your picture will cover a larger area. Set it to standard, having to scan an even broader area when making panoramas will take some experience with the camera to do efficiently.
Size is selectable between standard and wide. Wide means your picture will cover a larger area. Set it to standard, having to scan an even broader area when making panoramas will take some experience with the camera to do efficiently.
Set it to standard, having to scan an even broader area when making panoramas will take some experience with the camera to do efficiently.
Panorama direction
A panorama picture is a composite of several images stitched together. When in this mode, you’ll see an arrow that guides you in what direction and speed you should pan the camera to take the sequential images that will be stitched together. You can choose the path in this menu (either, up, down, left or right).
You can make panoramas while scanning your camera up-down or left-right.So what is this all about? This might sound confusing at first, but this comes down to how you hold the Sony DSC-HX90V IV when shooting panoramas: either in portrait or landscape orientation.
(MENU → Camera Settings → page 2)
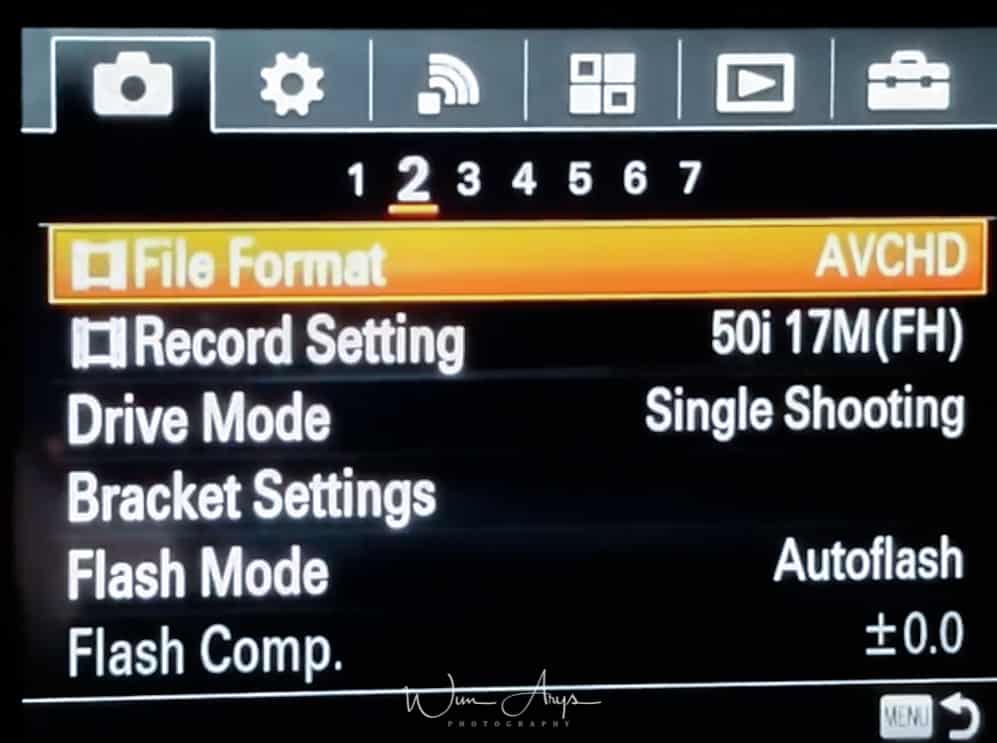
File format (for movies)
Selects the movie file format.
- XAVC S HD: Records high-definition movies in XAVC S HD. This format supports a higher bit rate. Audio: LPCM
- AVCHD: Records HD movies in AVCHD format. This file format is suitable for high-definition TV. Audio: Dolby Digital
- MP4: Records mp4 (AVC) movies. This format is suitable for playback on smartphones or tablets, web uploads, email attachments, etc. Audio: AAC.
Note that when File Format is set to AVCHD, the file size of movies is limited to about 2 GB. If the movie file size reaches approx. 2 GB during recording, a new movie file will be created automatically.
When File Format is set to MP4, the file size of movies is limited to approx. 4 GB. If the movie file size reaches approx. 4 GB during recording, recording will stop automatically.
Record setting (also for movies)
You can choose the quality of recorded video here. You can change the image size, frame rate, and image quality for movie recording. The higher the bitrate, the higher the image quality. If you’re not familiar with this, leave as is.
When File Format is set to XAVC S HD:
- This records high-definition movies by converting them to MP4 file format using the MPEG-4 AVC/H.264 codec.
When File Format is set to AVCHD:
- 60i/50i: Movies are recorded at approximately 60 fields/sec (for 1080 60i-compatible devices) or 50 fields/sec (for 1080 50i-compatible devices), in interlaced mode, with Dolby Digital audio, in AVCHD format.
- 24p/25p: Movies are recorded at approximately 24 frames/sec (for 1080 60i-compatible devices) or 25 frames/sec (for 1080 50i-compatible devices), in progressive mode, with Dolby Digital audio, in AVCHD format.
- 60p/50p: Movies are recorded at approximately 60 frames/sec (for 1080 60i-compatible devices) or 50 frames/sec (for 1080 50i-compatible devices), in progressive mode, with Dolby Digital audio, in AVCHD format.
When File Format is set to MP4:
- Movies shot are recorded in MPEG-4 format, at approximately 60 frames/sec (for 1080 60icompatible devices), approximately 50 frames/sec (for 1080 50i-compatible devices), approximately 30 frames/sec (for 1080 60i-compatible devices) or approximately 25 frames/sec (for 1080 50i-compatible devices), in progressive mode, with AAC audio, MP4 format.
Menu items details:
When File Format is set to XAVC S HD:
- 60p 50M/50p 50M: Records the movies in 1920 × 1080 (60p/50p). Bit-rate: Approx. 50 Mbps
- 30p 50M/25p 50M: Records the movies in 1920 × 1080 (30p/25p). Bit-rate: Approx. 50 Mbps
- 24p 50M: Records the movies in 1920 × 1080 (24p). This produces a cinema-like atmosphere. Bit-rate: Approx. 50 Mbps
When File Format is set to AVCHD:
- 60i 24M(FX)*: 50i 24M(FX: Records high image quality movies of 1920 × 1080 (60i/50i). Bit-rate: Approx. 24 Mbps (Max.)
- 60i 17M(FH) (default setting)*: 50i 17M(FH) (default setting)**: Records standard image quality movies of 1920 × 1080 (60i/50i). Bit-rate: Approx. 17 Mbps (Avg.)
- 60p 28M(PS): Records the highest image quality movies of 1920 × 1080 (60p/50p). Bit-rate: Approx. 28 Mbps (Max.)
- 50p 28M(PS): Records the highest image quality movies of 1920 × 1080 (60p/50p). Bit-rate: Approx. 28 Mbps (Max.)
- 24p 24M(FX): 25p 24M(FX)**: Records high image quality movies of 1920 × 1080 (24p/25p). This produces a cinema-like atmosphere. Bit-rate: Approx. 24 Mbps (Max.)
- 24p 17M(FH)*: 25p 17M(FH)**: Records standard image quality movies of 1920 × 1080 (24p/25p). This produces a cinema like atmosphere. Bit-rate: Approx. 17 Mbps (Avg.)
When [ File Format] is set to MP4:
- 1920×1080 60p 28M (default setting): Records movies of 1920 × 1080. Bit-rate: Approx. 28 Mbps (Avg.)
- 1920×1080 30p 16M (default setting): Records movies of 1920 × 1080. Bit-rate: Approx. 16 Mbps (Avg.)
- 1920×1080 30p 6M (default setting): Records movies of 1280 × 720. Bit-rate: Approx. 6 Mbps (Avg.)
General notes:
- 60p/50p movies can be played back only on compatible devices.
- Movies recorded with the [60p 28M(PS)]/[50p 28M(PS)]/[60i 24M(FX)]/[50i 24M(FX)]/ [24p 24M(FX)] /[25p 24M(FX)] setting in [ Record Setting] are converted by PlayMemories Home in order to create an AVCHD recording disc. This conversion can take a long time. Also, you cannot create a disc in the original image quality. If you want to keep the original image quality, store your movies on a Blu-ray Disc.
- To play back60p/50p/24p/25p movies on a TV, the TV must be compatible with those formats. If the TV is not compatible with the 24p/25p format, 24p/25p movies will be output as 60i/50i movies.
- You cannot create discs with movies recorded with [XAVC S] or [MP4] recording settings using PlayMemories Home.
Drive Mode
You can set the drive mode, such as continuous or self-timer shooting.
- Single Shooting (default setting): Shoots one still image. Normal shooting mode.
- Cont. Shooting: Shoots images continuously while you press and hold down the shutter button. Hi: takes about ten images per second, Lo about three.
- Self-timer: Shoots an image after 10 or 2 seconds. (selectable in sub menu) You can change the angle of the LCD screen and shoot images while monitoring the image on the screen.
- Self-timer(Cont): Shoots a specified number of images continuously after 10, 5 or seconds or 2 seconds (selectable in the sub menu).
- Cont. Bracket: Shoots images while holding the shutter button down, each with different degrees of brightness. (3 images between .3 and 3 EV difference, selectable in the sub menu.) For processing as HDR on your PC.
- Single Bracket: Shoots a specified number of images, one by one, each with a different degree of brightness. (3 images between .3 and 3 EV difference, selectable in the sub menu) For processing as HDR on your PC.
- WB bracket: Shoots a total of three images, each with a different color tone according to the selected settings for white balance, color temperature, and the color filter. (3 images with either LO small changes or Hi large changes)
- DRO Bracket: Shoots a total of three images, each at a different degree of D-Range Optimizer.
Bracket Settings
You can set the shooting order for exposure bracketing and white balance bracketing here.
- Selftimer during Brkt: Sets whether to use the self-timer during bracket shooting. Also sets the number of seconds until the shutter is released if using the self-timer. (OFF/2 Sec/5 Sec/10 Sec).
- Bracket order: Sets the order of exposure bracketing and white balance bracketing. (0→ → / →0→ ).
Flash Mode
Flash off;
obvious
Autoflash:
The flash works in dark environments or when shooting towards a bright light.
Fill-flash:
The flash works every time you trigger the shutter.
Slow sync:
Tells the camera to use a longer shutter speed along with a flash, and thus is better for night shots. In manual and shutter priority modes, there is no difference in flash power. But when using aperture priority, program, or auto, choosing slow sync tells the camera to use a longer shutter speed than it would ordinarily pick.What the slow sync flash mode actual does is first fire the flash for the subject exposure, then allow for a longer shutter speed that will allow for more ambient light to be captured by the sensor.
Rear Sync:
Capturing an image involves two shutter actions: one when the capture starts and on when it stops. Rear Sync tells the flash to fire right before the shutter closes. Moving objects will show a streak where they came from and a sharp image where they were at the end of the exposure. This conveys a sense of speed with moving objects. Rear Sync is a creative technique, if you’d like to know more about this type of photography, I’d suggest doing a Google search on ‘Rear Sync Flash Photography.’
Flash compensation:
Adjusts the amount of flash light in a range of –3.0 EV to +3.0 EV. Flash compensation changes the amount of flash light only. Exposure compensation changes the amount of flash light along with the change of the shutter speed and aperture.
Especially when using Slow Sync or Rear Sync Flash modes, you might have to lower the power of the Flash to get a decently exposed image.

(MENU → Camera Settings → page 3)
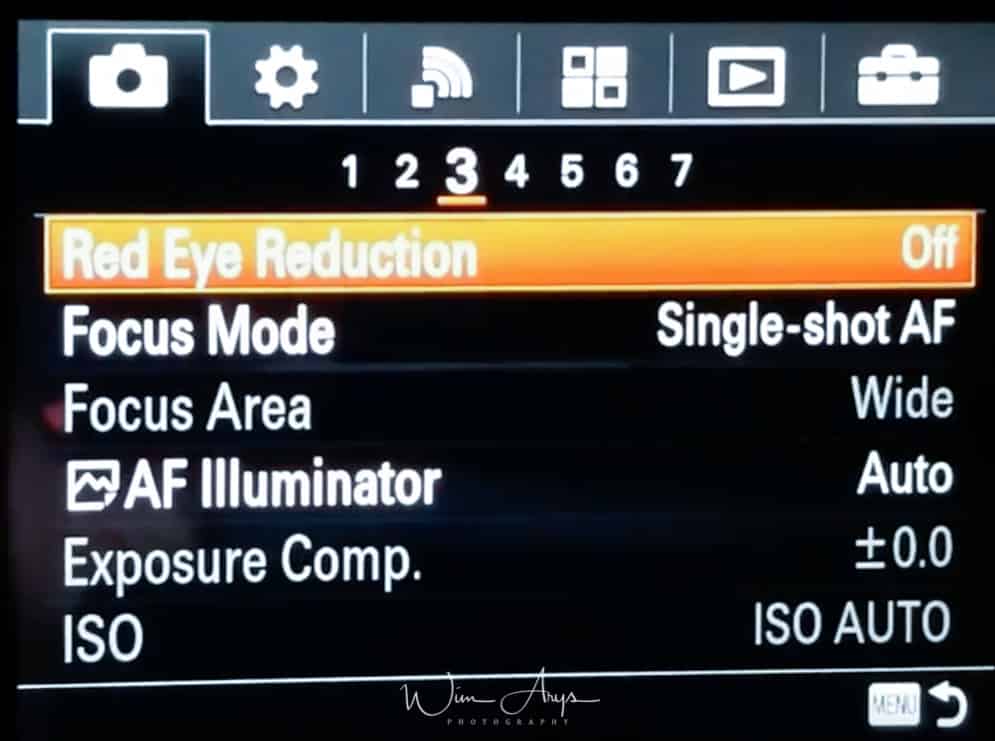
Red Eye Reduction:
This anti-Red Eye setting quickly fires the flash before your image capture starts, reducing the red-eye effect often seen when using the flash.
Focus Mode
Here, you can select how the autofocus engine will behave when you half-press the shutter button. This functionality is partly dependent on what focus area you select (see next)
AF-S:
With a half-press of the shutter button, the camera will focus only once. Suitable for capturing stills.
DMF:
The Sony DSC-HX90V focuses on your subject and allows you to fine tune your focus area further using the manual focus ring on the lens.
When focussing manually or in DMF mode, you can set the camera to magnify a part of the screen so you can check focus. This sub-menu allows you to select the part of the image that will be magnified during shooting.
MF:
No autofocus is used, and you focus manually using the focus ring on the lens.
Focus area
You might think it is best to leave it on the factory ‘wide’ setting (as this uses all AF points), but for certain scenes, it is often better to use a zone or flexible spot to get it to focus on what you want.
Wide:
Wide focus area uses all focus points on the sensor. Ideal for action scenes where there is a lot of movement going on in your frame.
Center:
Focusses on whatever is centered in your images. A fail-proof way of getting the camera to focus on what you want. If you have any problems using the autofocus and are in a situation where you don’t want to miss any shots, revert to Center and just make sure you have your subject centered.
Flexible spot:
Flexible spot area selects a spot anywhere on the screen where the camera should focus. (similar to Center spot, except not.. in the center) You can set it to small, medium or large. If you want to use this focus area, set it to medium or large, as the camera will struggle to find focus when set to small (except perhaps for close-up portraits where you’d want to focus on the iris of the eye)
Expandable flexible spot
If the Sony DSC-HX90V IV fails to focus on the single selected point, it uses the focus points around the flexible spot as the second priority area to achieve focus.
Center Lock-on AF:
When the shutter button is pressed and held halfway down, the Sony DSC-HX90V tracks the subject within the selected autofocus area. Point the cursor to Lock-on AF on the Focus Area setting screen, then select the desired tracking start area using the left/right sides of the control wheel. You can move the tracking start area to a specific point by designating the area to be the flexible spot or expand flexible spot. On the Flexible Spot shooting screen, you can change the size of the AF range finder frame by rotating the control wheel.
AF Illuminator:
The AF illuminator is a little red light allowing the camera to focus more easily when the shutter button is pressed halfway. It automatically is switched off when you fully press the shutter. Leave it on.
Exposure Comp
If you find that your image is overexposed (for instance when you are shooting at large apertures for a shallow depth-of-field in bright daylight), you can tweak the exposure compensation here in a plus or minus 3 (exact EV dependent on next step) range.
ISO
You can select at which ISO value you’d like to capture your image or change the AutoISO range
I have this range set between 80-1600 as this range is virtually noise free, and I don’t like the ISO performance above 3200. When shooting in low light, you might think of using a higher top value (factory setting goes up to 3200).
Tip: Autofocus will also work better at higher ISO.
(MENU → Camera Settings → page 4)
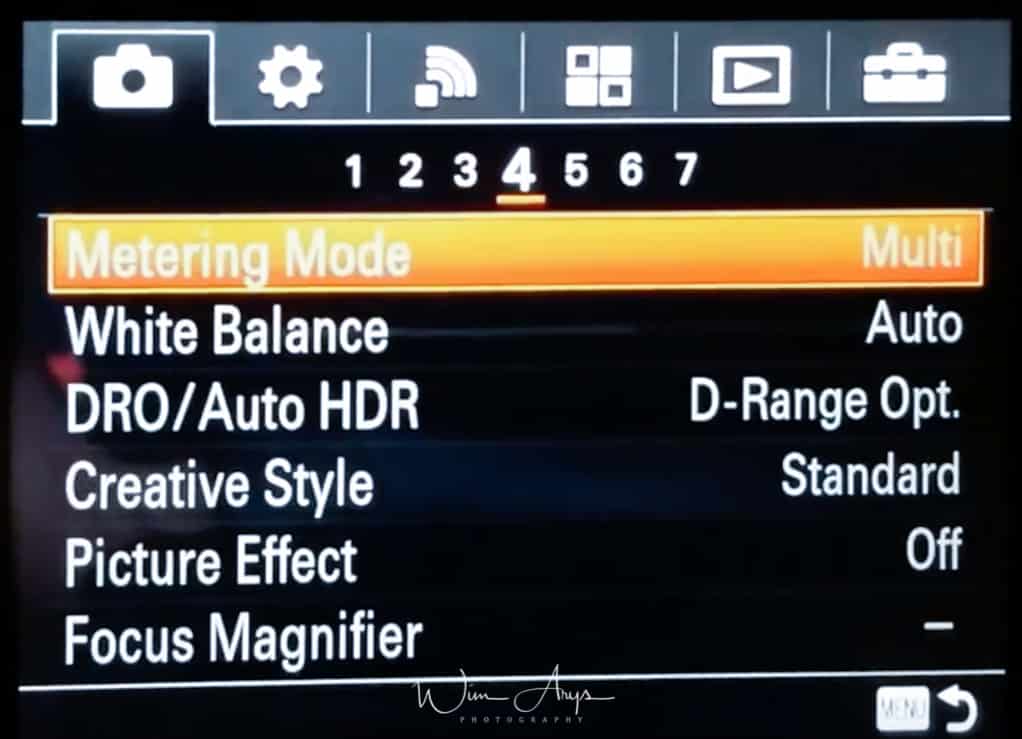
Metering Mode
Metering mode refers to the way the camera reads the light and sets the exposure.
In multi, it considers the whole frame and sets exposure according to internal algorithms programmed in camera.
In spot or center, the camera only considers what is in that spot or the center (per example, if your subject is completely black, the camera will try to compensate by overexposing the image).
If you like dark or moody portraits, try setting Metering Mode to Spot or Center, and make sure your subjects face is centrally positioned in the frame. You’ll see that the exposure will be more suitable for the face than when set to Multi.
White Balance
You can either:
- Auto (default setting): The product automatically detects the light source and adjusts the color tones.
- Daylight: The color tones are adjusted for the daylight. Shade: The color tones are adjusted for shadiness.
- Cloudy: The color temperature is adjusted for a cloudy sky. Incandescent: The color temperature is adjusted for places under an incandescent lamp, or under bright lightings, such as in a photo studio.
- Incandescent: The color temperature is adjusted for places under an incandescent lamp, or under bright lights, such as in a photo studio.
- Fluor.: Warm White: The color temperature is adjusted for warm white fluorescent lighting.
- Fluor.: Cool White: The color temperature is adjusted for white fluorescent lighting.
- Fluor.: Day White: The color temperature is adjusted for neutral white fluorescent lighting.
- Fluor.: Daylight: The color temperature is adjusted for daylight fluorescent lighting.
- Flash: The color temperature is adjusted for a flash.
- C.Temp./Filter: Adjusts the color tones depending on the light source. Achieves the effect of CC (Color Compensation) filters for photography.
- Custom: Uses the white balance setting saved in [Custom Setup].
- Custom Setup: Memorizes the basic white color under the light conditions for the shooting environment.
DRO/Auto HDR
DRO:
This stands for Dynamic range optimize and analyses the contrast of your scene in real-time. It produces an image with optimal brightness and recovered shadow detail. You can use this function even while the subject is moving or during the continuous shooting.
- D-Range Optimizer: Auto (default setting): Corrects the brightness automatically.
- D-Range Optimizer: Lv1 ― D-Range Optimizer: Lv5: Optimizes the gradation of a recorded image for each divided area. Select the optimization level from Lv1 (weak) to Lv5 (strong)
Auto HDR:
(not available for RAW captures) this feature Shoots three images with different exposures and then overlays the bright area of the underexposed image and the dark area of the over exposed image to create a picture with an extended range from highlight to shadow.
The highlight detail in auto HDR is better than that in DRO and with reduced noise. The shutter is released three times, so using this function for moving subjects is not recommended.
- Auto HDR: Exposure Diff. Auto (default setting): Corrects the exposure difference automatically. Auto HDR: Exposure Diff. 1.0EV ―
- Auto HDR: Exposure Diff. 6.0EV: Sets the exposure difference, based on the contrast of the subject. Select the optimal level between 1.0 EV (weak) and 6.0 EV (strong). For example, if you set the exposure value to 2.0 EV, three images will be composed of the following exposure levels; −1.0 EV, optimal exposure, and +1.0 EV
Creative Style
This menu setting allows you to select the desired image processing. You can adjust exposure (shutter speed and aperture) as you like with [Creative Style], unlike with [Scene Selection] where the product adjusts the exposure.
- Standard (default setting): For shooting various scenes with rich gradation and beautiful colors.
- Vivid: The saturation and contrast are heightened for shooting striking images of colorful scenes and subjects such as flowers, spring greenery, blue sky, or ocean views.
- Portrait: For shooting the skin color in a soft tone, ideally suited for shooting portraits.
- Landscape: The saturation, contrast, and sharpness are heightened for shooting vivid and crisp scenery. Distant landscapes also stand out more.
- Sunset: For shooting the beautiful red of the setting sun.
- Black & White: For shooting images in black and white monotone.
- Sepia: For shooting images in sepia monotone.
Contrast, Saturation, and Sharpness can be adjusted for each Creative Style item. Select an item to be set by pressing the right/left side of the control wheel, then set the value using the top/bottom side of the control wheel.
- Contrast: The higher the value selected, the more the difference of light and shadow is accentuated, and the bigger the effect on the image.
- Saturation: The higher the value selected, the more vivid the color. When a lower value is selected, the color of the image is restrained and subdued.
- Sharpness: Adjusts the sharpness. The higher the value selected, the more the contours are accentuated, and the lower the value selected, the more the contours are softened.
Picture Effect
Think of this menu as an Instagram app right in your camera, with all kinds of retro filters and effects. These are only available when quality is set to Jpeg (Not in RAW). You can perform detailed settings for some of the effects by using the left/right side of the control wheel.
- Off (default setting): Disables the Picture Effect function.
- Toy Camera: Creates a soft image with shaded corners and reduced sharpness.
- Pop Color: Creates a vivid look by emphasizing color tones.
- Posterization: Creates a high contrast, abstract look by heavily emphasizing primary colors, or in black and white.
- Retro Photo: Creates the look of an aged photo with sepia color tones and faded contrast.
- Soft High-key: Creates an image with the indicated atmosphere: bright, transparent, ethereal, tender, soft.
- Partial Color: Creates an image which retains a specific color, but converts others to black and white.
- High Contrast Mono.: Creates a high-contrast image in black and white.
- Soft Focus: Creates an image filled with a soft lighting effect.
- HDR Painting: Creates the look of a painting, enhancing the colors and details.
- Rich-tone Mono.: Creates an image in black and white with rich gradation and reproduction of details.
- Miniature: Creates an image which enhances the subject vividly, with the background defocused considerably. This effect may often be found in pictures of miniature models.
- Watercolor: Creates an image with ink bleed and blurring effects as if painted using watercolors.
- Illustration: Creates an illustration-like image by emphasizing the outlines.
Focus Magnifier
Another quite handy feature if you want to check if your image is in focus. It means that you can check the focus by enlarging the image before shooting. Great for shooting in manual focus or DMF. You can also set how long the magnified image will be shown in the Focus Magnif. Time setting. (custom settings).
Press on the center of the control wheel to enlarge the image and select the position you want to enlarge using up/down/left/right side of the control wheel. You can change the magnifier scaling in two steps by pressing in the center, and close the focus magnifier mode and return to the normal shooting display by pressing three times
You can change the magnifier scaling in two steps by pressing in the center, and close the focus magnifier mode and return to the normal shooting display by pressing three times.
(MENU → Camera Settings → page 5)
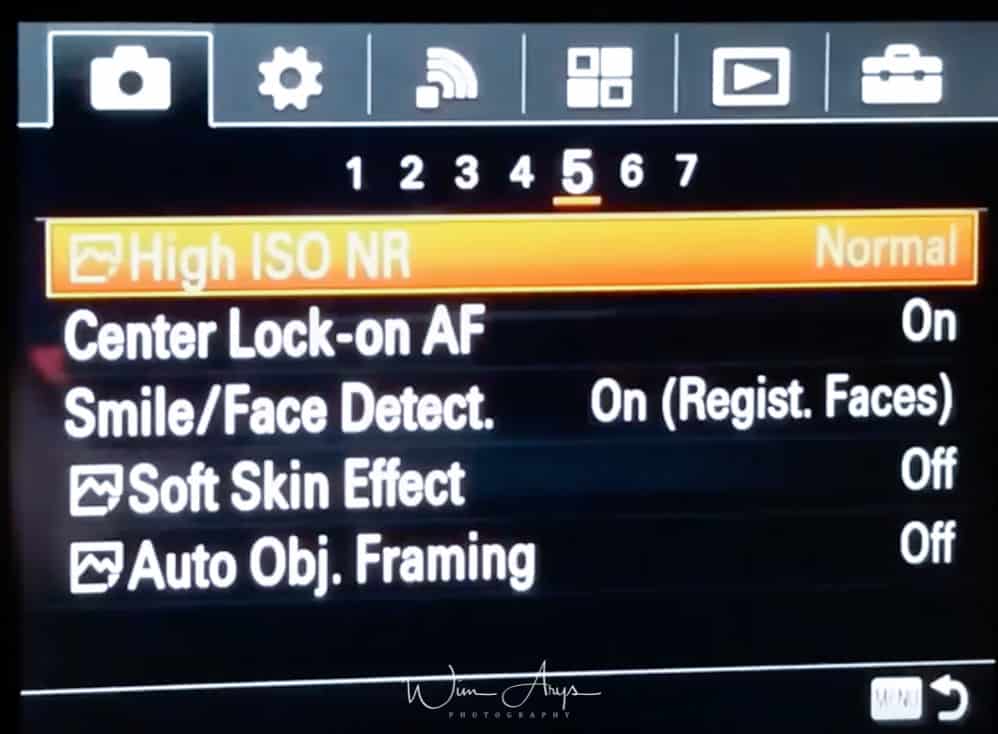
If you’ve stumbled on my guide trying to find where to turn on Long Exposure noise reduction, I’ll have to disappoint you. Although one on the most requested features, the DSC-HQ90V does not have this functionality.
High ISO NR
Here you can select the amount of noise reduction applied to images with high ISO settings (when quality is set to jpeg). As Sony has rather aggressive noise reduction, I would chance it to Low. (if not, you run the risk of getting paint-like, smeared images at higher ISO values)
Center Lock-on AF
This is a very powerful autofocus feature. When turned ON, it allows you to track a subject. In the iAuto mode, you can access this feature (when turned ON and the camera is set to AF) by pressing the Center button of the multi-controller. You’ll see a square on your screen, then center your desired tracking subject and the camera will continue to track it, even when it exits your frame and reappears.
Smile/Face Detect
This is another powerful feature. It can be set to automatically detect on focus on (registered) faces and enable a function called Smile Shutter. When the latter is enabled, the camera will automatically capture an image when a smile is detected. Did I hear you say Selfie? Yes, it’s the ultimate selfie tool, along with the pivoting screen. It’s also an excellent tool at birthday parties. You can firstly register the birthday boy or girl’s face (See face registration further down) and the camera will recognize and prioritize that face more quickly.
Soft skin effect
Sets the effect used for shooting the skin smoothly in the Face Detection function. I don’t like the results, so on my camera, it is turned off
Auto Object Framing
When enabled, the Sony DSC-HX90V will automatically crop your captured image to what it deems best. Meaning it will cut the picture for a nicer composition. A nice feature if you don’t want to bother too much with the technical side of photography.

(MENU → Camera Settings → page 6)
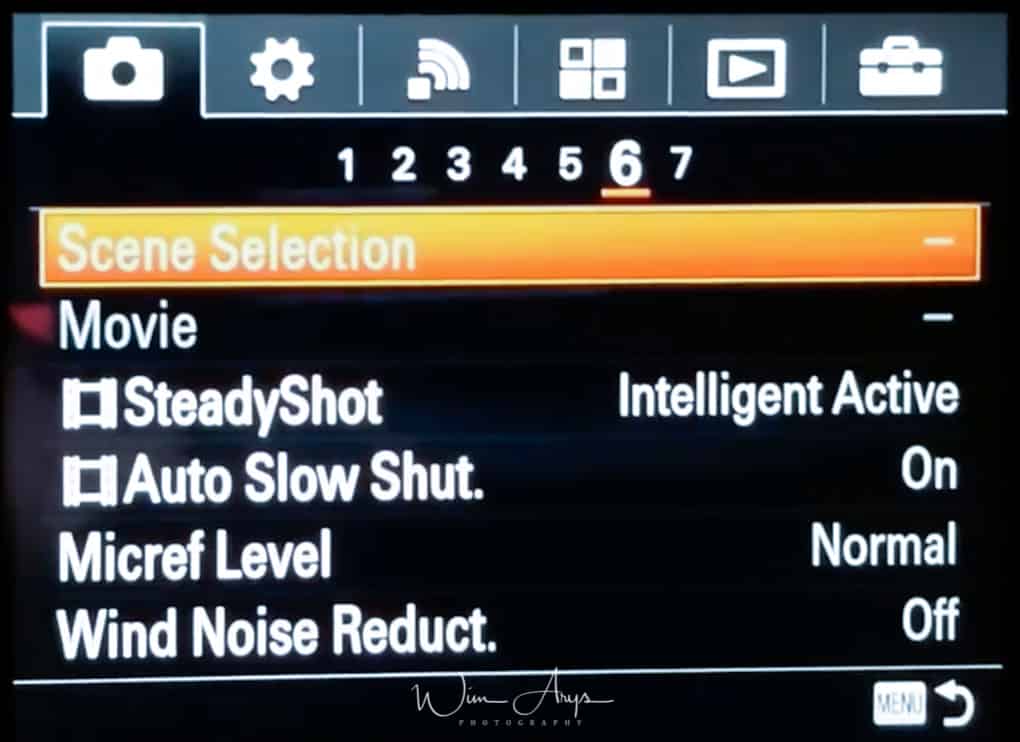
Scene Selection
This allows you to shoot with preset settings according to the scene. This is a very effective way of optimizing your camera according to what type of photography you want to do. Especially so when you’re just starting out and don’t know much about the technical side of photography. The camera will set all the appropriate settings according to you selected scene.
To change the scene, set the mode dial (on top) to SCN and simply rotate the control wheel on the shooting screen and select a new scene.
- Portrait: Blurs background and sharpens the subject. Accentuates the skin tones softly.
- Adv. Sports Shooting: Shoots a moving subject at a fast shutter speed so that the subject looks as if it is standing still. The product shoots images continuously while the shutter button is pressed.
- Landscape: Shoots the entire range of a scenery in sharp focus with vivid colors.
- Sunset: Shoots the red of the sunset beautifully.
- Night Scene: Shoots night scenes without losing the dark atmosphere.
- Hand-held Twilight: Shoots night scenes with less noise and blur without using a tripod. A burst of shots are taken, and image processing is applied to reduce subject blur, camera shake, and noise.
- Night Portrait: Shoots night scene portraits using the flash. The flash does not pop-up automatically. Pop-up the flash before shooting.
- Anti Motion Blur: Allows you to shoot indoor shots without using the flash and reduces subject blur. The product shoots burst images and combines them to create the image, reducing subject blur and noise.
- Pet: Allows you to shoot images of your pet with the best settings.
- Gourmet: Allows you to shoot food arrangements in delicious and bright colors.
- Beach: Allows you to shoot scenes on the beach in bright and vivid colors even under the sunlight.
- Snow: Allows you to shoot clear images, preventing sunken colors in snowy scenes or other places where the whole screen appears white.
- Fireworks: Allows you to shoot images of fireworks in all their splendor.
- Soft Skin: Allows you to shoot images of faces with a smoother look.
- High Sensitivity: Allows you to shoot still images even in dark locations without using the flash, and reduces subject blur. This setting also allows you to shoot dark movie scenes more brightly.
Movie
You can adjust the shutter speed or aperture value to your desired settings for recording movies. You can also check the image angle before shooting.
- Program Auto: Allows you to shoot with the exposure adjusted automatically (both the shutter speed and the aperture value).
- Aperture Priority: Allows you to shoot after adjusting the aperture value manually.
- Shutter Priority: Allows you to shoot after adjusting the shutter speed manually.
- Manual Exposure: Allows you to shoot after adjusting the exposure (both the shutter speed and the aperture value) manually
SteadyShot (for movies)
Sets SteadyShot when shooting movies.
Here you have three options:
- Intelligent Active: Provides the most powerful SteadyShot effect. I set it to this.
- Active (default setting): Provides a more powerful SteadyShot effect.
- Standard: Reduces camera shake under stable movie shooting condition.
Auto slow shut. (also a movie setting)
Sets whether or not to adjust the shutter speed automatically when recording movies if the subject is dark. Less light always means a longer shutter time in order to get a correct exposure. As when shooting stills, you might get some blur when you use this feature.
On: The shutter speed automatically slows when recording in dark locations. You can reduce noise in the movie by using a slow shutter speed when recording in the dark.
Off: The recorded movie will be darker than when On is selected, but you can record movies with smoother motion and less object blur.
Micref Level
You can select the microphone level for movie recording to Normal (for dialogue) or Low (for concerts etc).
Wind noise reduct.
Sets whether or not to reduce wind noise during movie recording.
(MENU → Camera Settings → page 7)
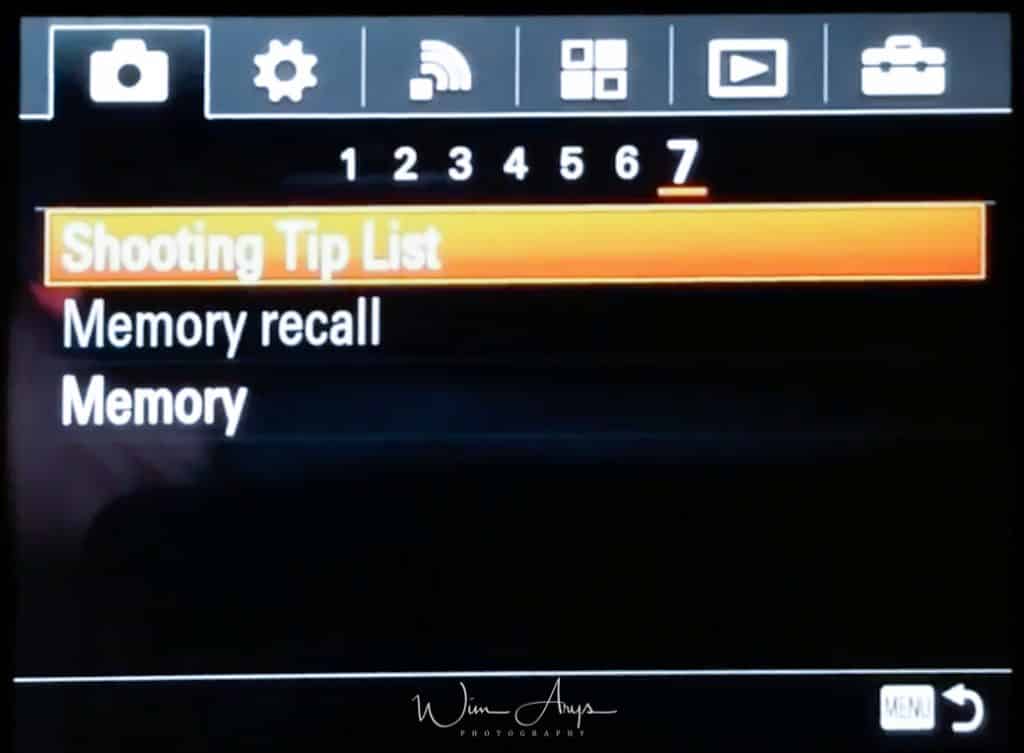
Shooting tip list
This setting basically turns the on-screen shooting tips on or off. If you’re not fully comfortable with the camera, this is an excellent tool in order to get acquainted with all the functions and settings. Once it starts getting on your nerves, it means you know enough to turn it off :).
Memory Recall
Allows you to shoot an image after recalling often-used modes or camera settings registered in advance.
- Set the mode dial to MR (Memory recall).
- Press the left/right side of the control wheel or turn the control wheel to select the desired number, then press on the center
- You can also recall registered modes or settings by selecting MENU → (Camera Settings) → Memory recall.
Memory
Allows you to register up to 3 often-used modes or product settings in the product. You can recall the settings using just the mode dial.
Items that can be registered:
- Shooting mode
- Aperture (F number)
- Shutter speed
- Camera Settings
- Optical zoom scale
To recall registered settings: Set the mode dial to MR, then press the right/left side of the control wheel or turn the control wheel to select the desired memory number.
To change registered settings: Change the setting to the desired one and re-register the setting to the same mode number
(MENU → Custom settings (wheel) → page 1)
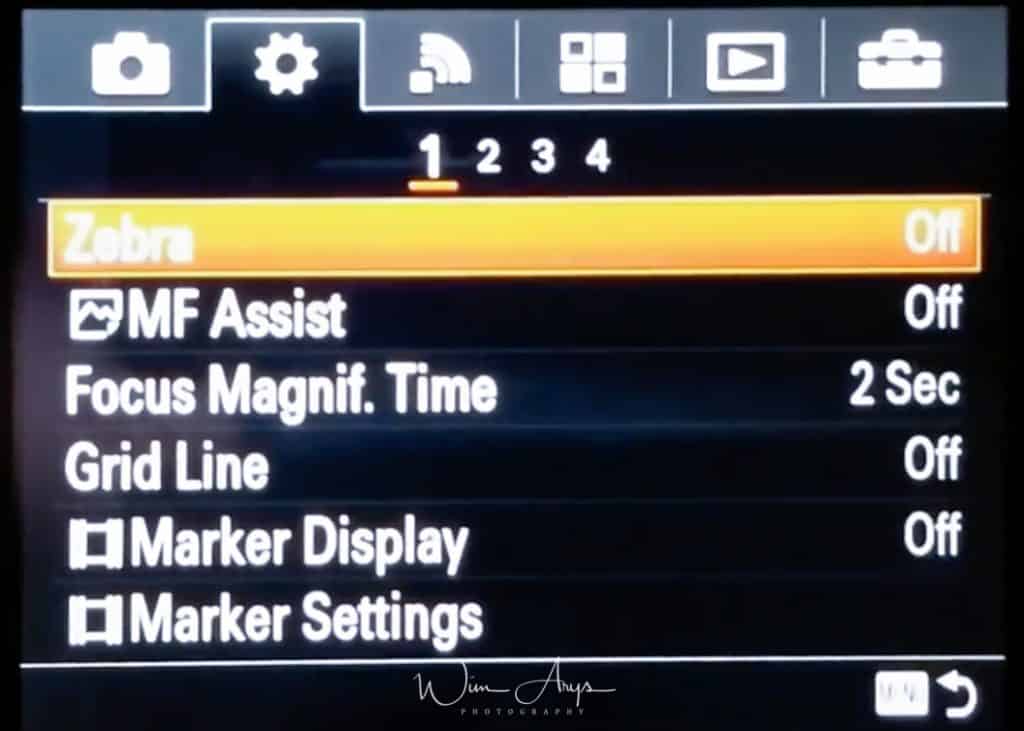
Zebra
The zebra function shows a zebra pattern on the screen while shooting in any area that is in danger of highlight clipping. You can switch this OFF or anywhere in a range between 70 and 100.
The Zebra Pattern is a highlight warning indicator that is common in video cameras. It does not control exposure but just warns you that your highlights are blown out. It is not recorded into the resulting image.
I have it set halfway at around 75, and it is a very useful indication of correct exposure of the full picture.
MF assist
This works in conjunction with the Focus Magnifier on Page 5 of the camera settings. You might remember that you can select the area to magnify there when using manual focus (MF). MF assist will need to be turned on if you want to use this feature.
Focus Magnif Time
You can set how long to hold the magnified area during MF assist. 2 sec, 5 seconds or no limit.
Two seconds is how I have it set up.
Grid Line
Having a grid line on your screen is a helpful aide for the composition of your image.
The human brain is hard-wired to recognize the structure, and most people find a well-composed image more eye-pleasing.
During photography history, rules have been developed on how to compose the different elements best within a scene. Many landscapes you’ll see have the horizon run through the middle of the image for instance, but this is just composition in its simplest form. Many photographers with a thorough understanding of these techniques go far beyond that.
A good starting point is using the in-camera grid to make your brain aware of the possibilities in composition.
The Rules of 3rds, Square and Diag +square are available in the Sony HX90V.
Marker display (for movies)
Sets whether or not to display markers set using [ Marker Settings] on the monitor while shooting movies.
Marker settings (for movies)
Sets the markers to be displayed while shooting movies. You can display all the markers at the same time.
- Center: Sets whether or not to display the center marker in the center of the shooting screen. Off / On
- Aspect: Sets the aspect marker display. Off / 4:3 / 13:9 / 14:9 / 15:9 / 1.66:1 / 1.85:1 / 2.35:1
- Safety Zone: Sets the safety zone display. This becomes the standard range that can be received by a general household TV. Off / 80% / 90%
- Guideframe: Sets whether or not to display the guide frame. You can verify whether the subject is level or perpendicular to the ground. Off / On
MENU – Custom Settings – page 2
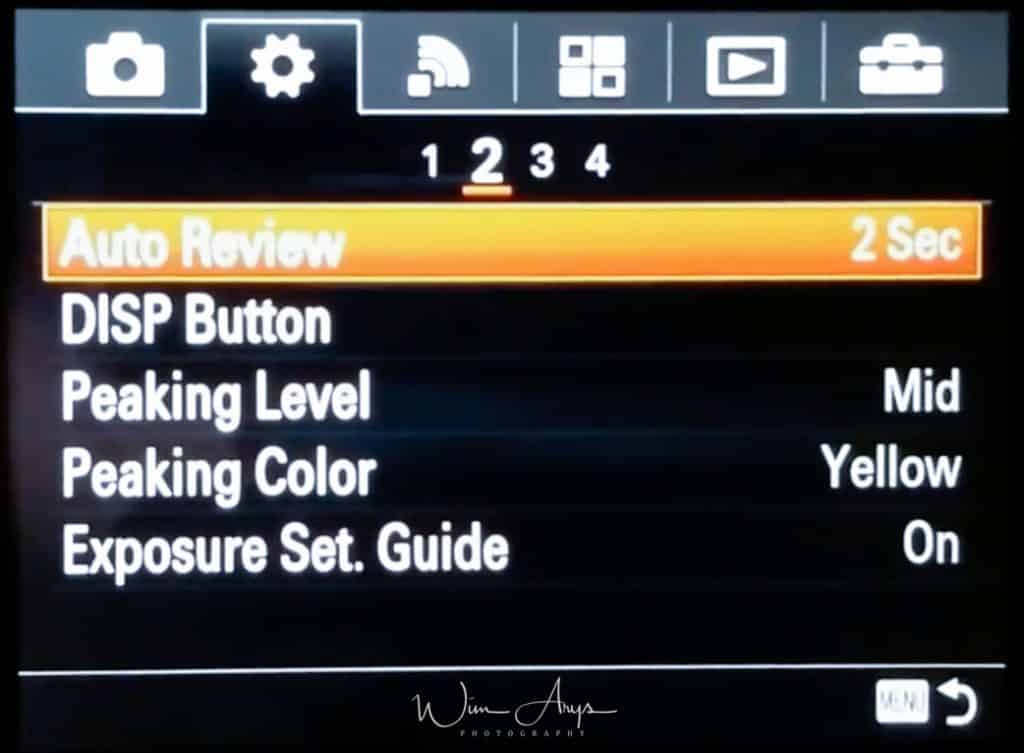
Auto Review
Select the amount of time the camera displays your image directly after capturing the image. 10, 5 and 2 sec is available, or you can turn this feature OFF if it annoys you.
Disp button
Selects the functionality (what is shown) on the screen when you press the DISP button (on the control wheel). You can choose Graphic Display, all info; no display info and histogram.
Peaking Level
- Peaking Level is a manual focusing aid that works when you have your camera set to MF or DMF.
- You’ll see a type of noise outlining the parts of your image where the focus lies; you can adjust the sensitivity to high, mid or low.
- Which setting is best depends on what lens you use, as with a sharper lens it can be configured to low, while more soft lenses benefit from a medium or high setting to clearly visualize what you’re focusing on.
Peaking Color
You can choose the color of this Peaking between Red, white and yellow. I have it set to red, as this contrasts nicely with most scenes you capture.
Exposure set guide
Sets the guide displayed when exposure settings are changed in the shooting screen. Excellent tool when you’re getting to know the functionality of your new camera. If you’re familiar with Sony’s feature, turn it OFF.
MENU – Custom Settings – page 3
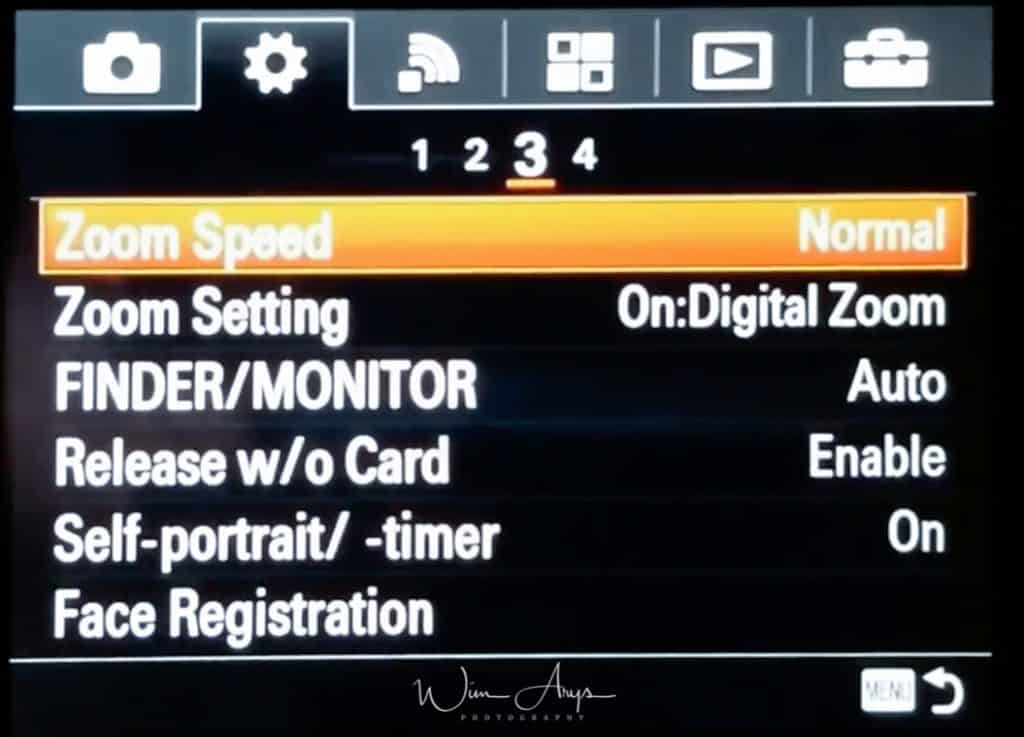
Zoom Speed
Sets the zoom speed of the camera’s zoom lever. Sets the zoom speed of the camera’s zoom lever. Be careful when you set this to Fast when recording movies, as the lens will become more noisy.
- Normal: Sets the zoom speed of the zoom lever to normal.
- Fast: Sets the zoom speed of the zoom lever to fast.
Zoom setting
Set to Optical zoom only, using the optical zoom capabilities of your lens. If you set this to digital zoom, the camera will be basically cropping pixels out.
Finder/Monitor
Sets the method for switching the display between Electronic Viewfinder and the screen.
- Auto (default setting): When you look into the Electronic Viewfinder, the display is switched to the Electronic Viewfinder automatically.
- Viewfinder: Switch between the Electronic Viewfinder display and the screen display by pushing up/down the pop-up finder. When the Electronic Viewfinder is pushed down, the image is displayed only on the screen. When the Electronic Viewfinder is pushed up, the screen is turned off and the image is displayed only in the Electronic Viewfinder.
Release w/o card
Basically telling the camera not to engage the shutter when you don’t have a memory card inserted. Set to on.
Self-portrait/ -timer
You can change the angle of the monitor and shoot images while watching the monitor. f you want to use another Drive Mode than the 3-second self-timer mode, first set Selfportrait/ -timer to Off, then tilt the monitor upward 180 degrees.
- Tilt the monitor approximately 180° upward, and then point the lens at yourself.
- Press the shutter button. The product starts the self-timer shooting after three seconds.
Face Registration
This is where you can register faces; it works only when face recognition is set to ON (registered faces). This is an interesting functionality, as you can register faces of your subject (like at a wedding the bride and groom) and the camera will automatically detect these registered faces and give autofocus priority to them. You can register up to 8 faces (by taking a picture of them within this menu) and set a priority order.
Works well, and helps to get the right people in-focus in busy shots.
MENU – Custom Settings – page 4
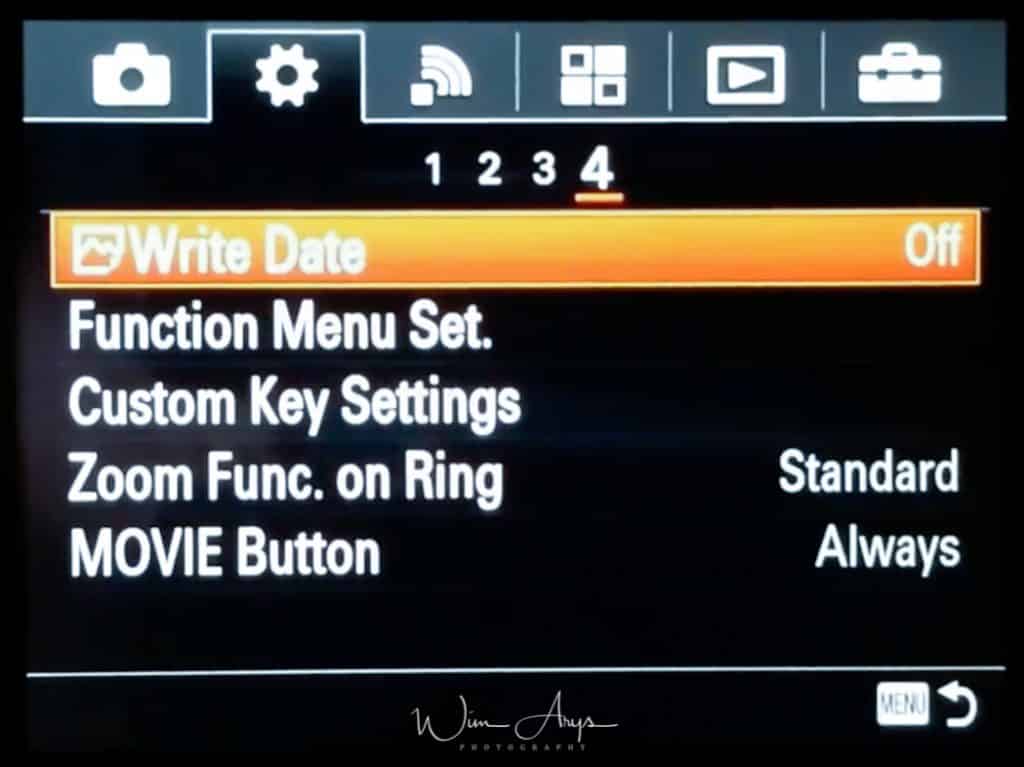
Write Date
Sets whether to record a shooting date on the still image. Remember that you won’t be able to delete the date stamp on your image if it is turned On.
Function menu set
You can assign the functions to be called up when you press the Fn (Function) button.
Custom keys setting
Assigning functions to the various keys allows you to speed up operations by pressing the appropriate key when the shooting information screen is displayed.
Zoom Func. on ring
Sets the zoom functions when using the control ring to change zoom scales. The settings for Zoom Func. on Ring are valid only when auto-focusing.
- Standard (default setting): Zooms in/out smoothly when you operate the zoom by turning the control ring.
- Step: Zooms in/out at certain angle steps when you operate the zoom by turning the control ring.
Movie button
Sets whether or not to activate the MOVIE button.
- Always (default setting): Starts movie recording when you press the MOVIE button in any mode.
- Movie Mode Only: Starts movie recording when you press the MOVIE button only if the shooting mode is set to Movie mode.

MENU – Wireless functionality – page 1

Send To Smartphone
- You can send one or several images directly to your wireless device (phone or tablet) by pressing this button.
- You can either decide to choose which images you want to transfer on the camera or on the wireless device (via the Sony PlayMemories app, available for free in the apple or android store).
- You’ll have to connect the camera via Wifi first (it makes a Wifi access point), using the instruction on the Sony DSC-HX90V screen.
- It works just like connecting to any other access point with your phone or tablet.
- You should do this as quickly as possible, just to get it out of the way.
- When your phone has wirelessly connected to the camera once, and you’ve entered the password, it will remember this, and make it a lot faster to connect later.
Send to Computer
You’ll need to physically connect the computer to the camera using the supplied USB cable, and you can push selected pictures to your Sony PlayMemories desktop software (installed from the CD or downloaded from their website). This can even be set up to continue pushing images after the camera has turned off.
View On TV
If you have a Wifi-enabled TV, you can view images and slideshows directly from your camera through your home wireless network.
One Touch NFC
Enables Quick, one-touch connection (as opposed to first accessing the camera’s wireless network and then navigating to the Playmemories app) with NFC (near-field communication) capable devices.
I have not tried this (as my iPhone does not have NFC) but it looks a lot easier to use.
Airplane Mode
Disables all wireless functionality, just like airplane mode does on your phone.
MENU – Wireless functionality – page 2
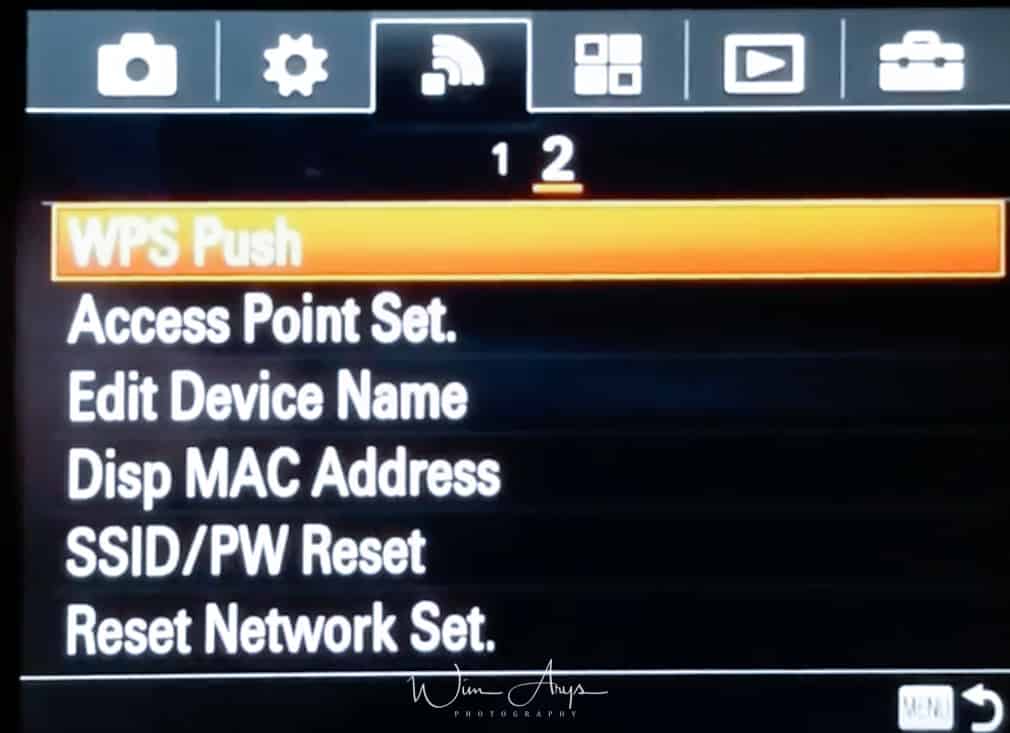
WPS Push
If your access point has the WPS button, you can register the access point to the camera easily by pushing the WPS button.
Access Point Set
Here you can setup an access point for your camera to the internet.
It enables the Sony DSC-HX90V to install PlayMemories apps from the internet directly. Works just like setting an access point (WiFi connection) on your phone.
Edit Device name
If you wish, you can change the name of the Device Access point perhaps to make it easier to identify which A6000 is yours in certain situations.
Disp MAC. address
Displays the MAC address of your Sony DSC-HX90V.
SSID/PW reset
The Sony DSC-HX90V shares the connection information for Send to Smartphone and Smart Remote Embedded with a device that has permission to connect. If you want to change the device that is permitted to connect, reset the connection information.
Reset Network set
Resets all the network settings to default settings.
MENU – Playmemories settings- page 1
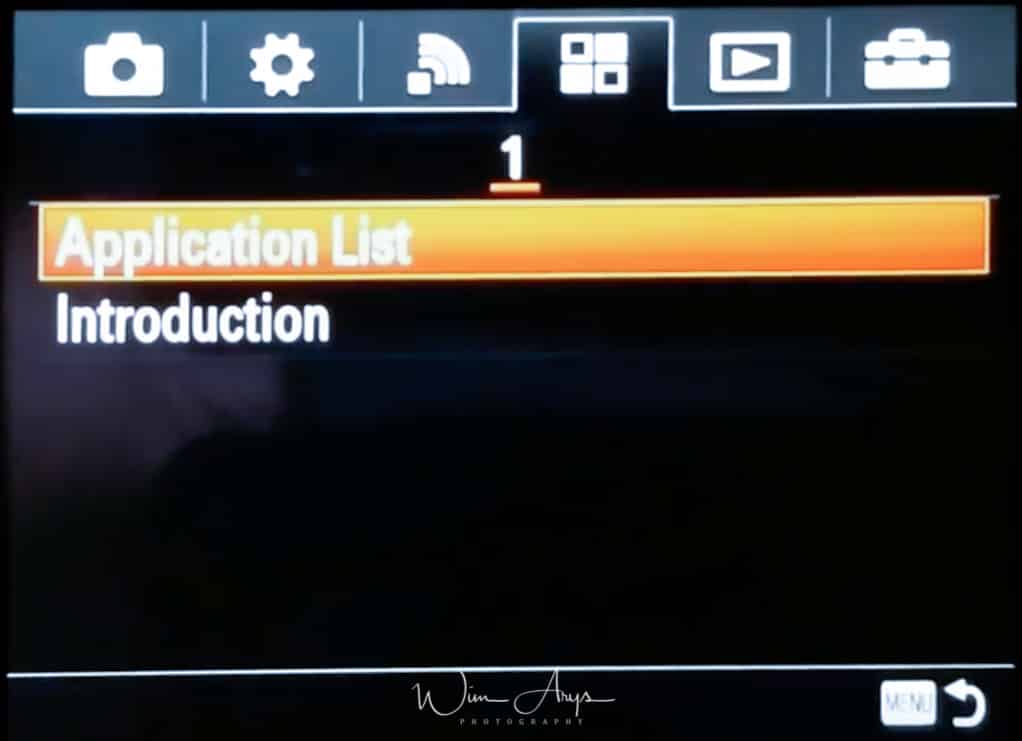
Application List
You’ll find The Smart remote control camera app (wich allows you to use your phone as a remote control via PlayMemories phone app for iPhone and Android) and the Playmemories Camera app here.
You can access your online PlayMemories account here, or create an account (once you’ve set up your camera connection with your Wifi network).
You’ll also be able to download new apps available for purchase in the Sony Playmemories online app store like the Time-lapse and smooth reflection app.
If you do not want to connect your camera to the internet, you can always install new apps (and updates) if you connect the camera to your Mac or PC with the supplied USB cable, using the Sony PlayMemories desktop application.
Introduction
You’ll find information about the service and available countries and regions here.
MENU – playback options – page 1
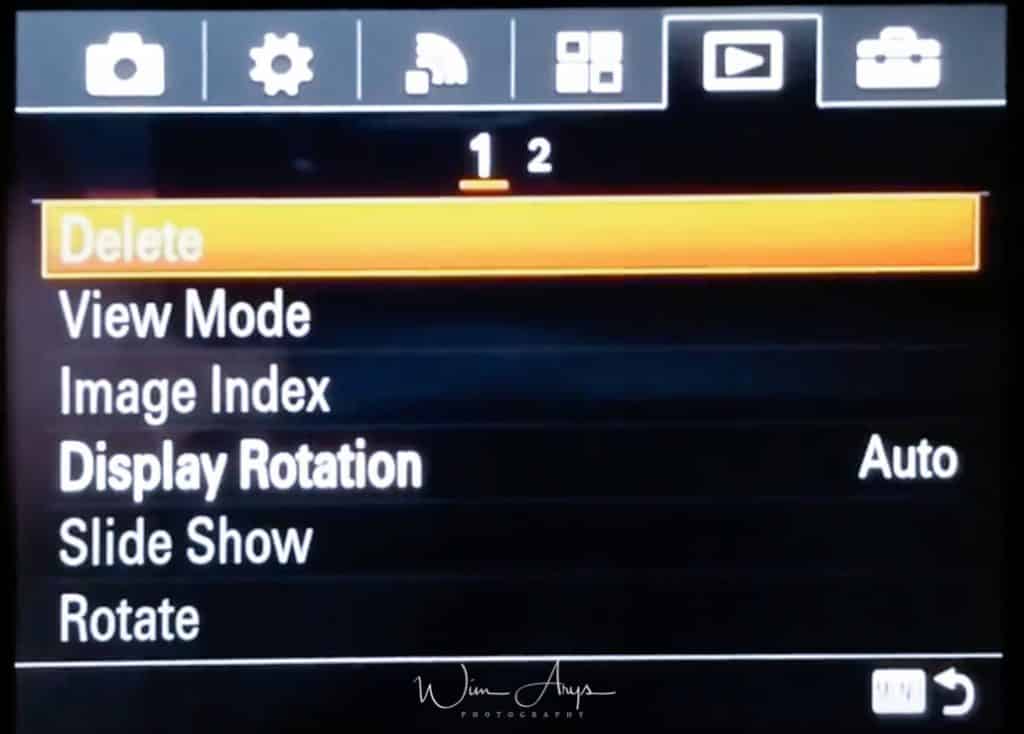
Delete
Delete on or multiple images stored on your SD card.
View Mode
select how the camera will arrange captured images in the viewing browser.
Image Index
Select whether you want the image browser to display 12 (larger) or 30 (smaller) images per page.
Display rotation
Select whether you want the camera to automatically rotate images when you rotate the camera or not.
Slide Show
Select whether you want the camera to repeat slideshows when all pictures are viewed or not, and choose the interval between slides.
Rotate
Change the orientation of images in-camera.

MENU – playback options – page 2
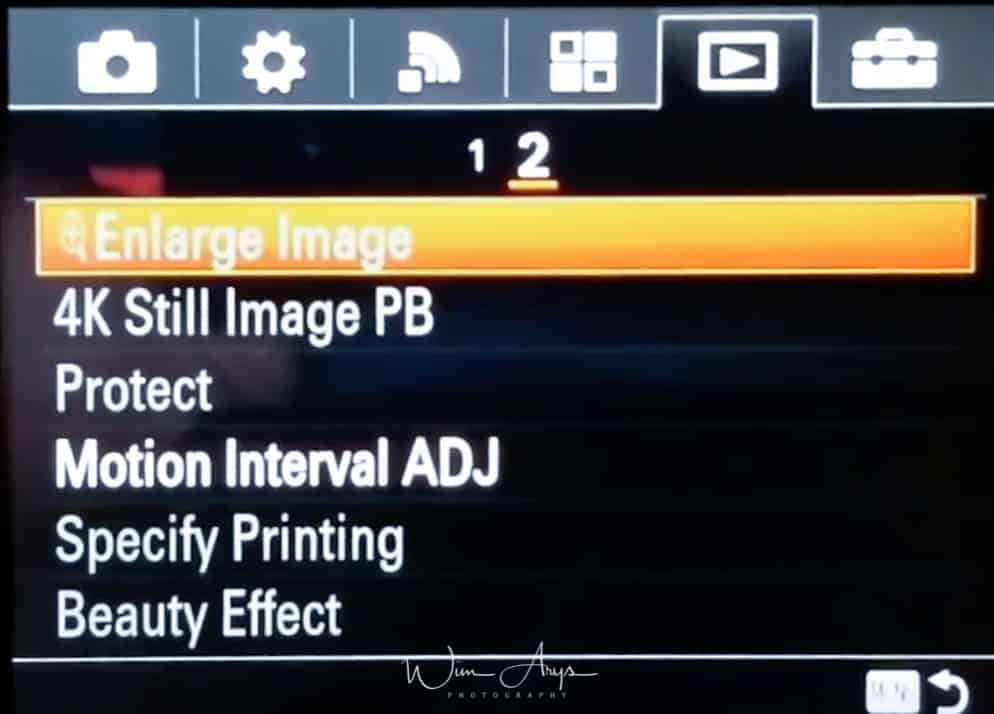
Enlarge
Select an image and enlarge a portion of that image. Useful for checking details and focus.
4K Still Image PB
Outputs still images in 4K resolution to an HDMI-connected TV that supports 4K.
Protect
Protect images (selectable or per date) from accidentally being erased.
Motion Interval ADJ
Change the interval of the image tracking of the subject’s motion in high-speed, like a stroboscopic image.
Specify Printing
Specify Printing is a feature that allows images to be marked for printing later. Registered images are displayed with the DPOF mark. (DPOF stands for Digital Print Order Format)
Beauty Effect
Allows you to apply the Beauty Effect to retouch the still image of a person and make it look better, for example, by retouching it for smoother skin, larger eyes, and whiter teeth. You can set the effects from level 1 to level 5. An image on which the Beauty Effect is used is saved as a new file. The original image is retained as it is.
- Skin Toning: Adjusts the skin color as you like.
- Skin Smoothing: Removes age spots and wrinkles from the skin.
- Shine Removal: Reduces the look of oily skin. Adjusts the skin color as you like.
- Eye Widening: Enlarges the eyes of the subject.
- Teeth Whitening: Whiten the teeth of the subject.
To use two or more effects with Beauty Effect one after another, first apply an effect to the image, then select another effect using.
MENU – Setup – page 1
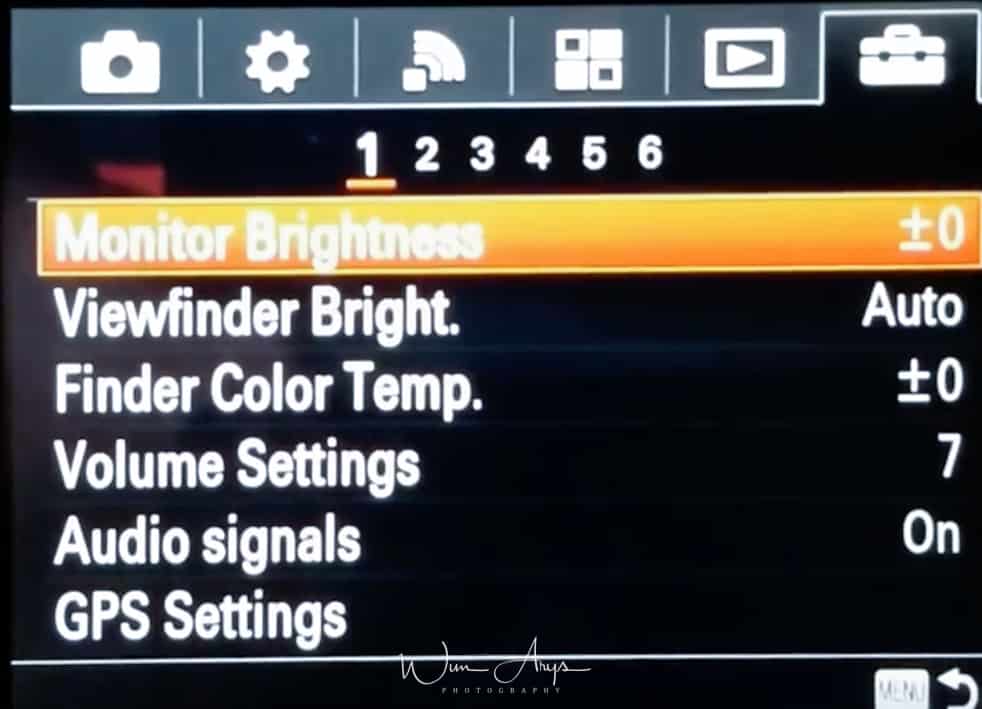
Monitor Brightness
Manually set the Monitor brightness (recommended leave to zero) or change to a brighter setting for Sunny Weather.
Viewfinder Bright.
When using an electronic viewfinder, you can adjust the brightness of the electronic viewfinder according to the surrounding environment. Leave it on Auto.
Finder Color Temp.
Adjusts the color temperature (-2 +2) of the electronic viewfinder.
Volume settings
Change the playback volume for recorded video or demos.
Audio Signals
You can turn off audio signals like the beep when te camera achieves focus. Useful if you want a more stealthy operation (although you’ll still hear the second curtain shutter).
GPS signals
You can record the location information with the images when the built-in GPS sensor of this product can acquire the location information. Using the software PlayMemories Home, you can import the images recorded with the location information to a computer and enjoy viewing them on a map which shows their shooting location. Refer to the Help of PlayMemories Home for details.
- On: The GPS function is activated.
- Off: The GPS function is turned off. The status icon on the screen may differ depending on the conditions of the signals emitted from the satellites.
- No icon is displayed: GPS is set to Off or an error has occurred.
MENU – Setup – page 2
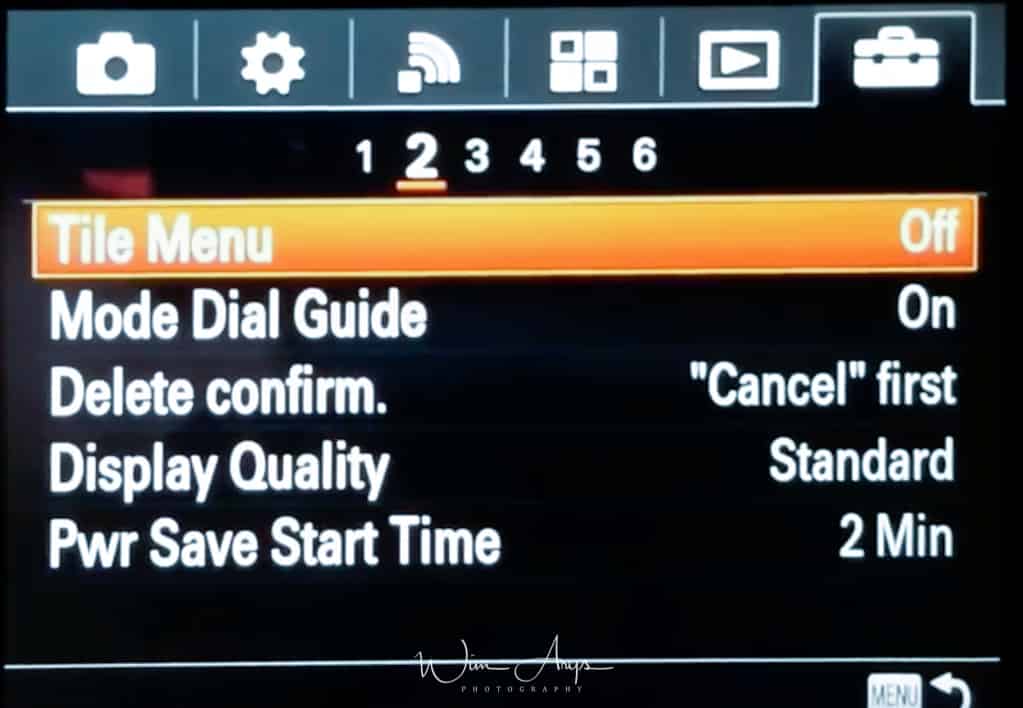
Title Menu
choose between tiles or a tiled front page when accessing the MENU or a direct tab style menu layout.
Mode Dial Guide
You can display the description of a shooting mode when you turn the mode dial and change the settings available for that shooting mode. Handy when you are learning how to use the Sony DSC-HX90V.
Delete confirm
You can set whether Delete or Cancel is selected as the default setting on the delete confirmation screen.
Display Quality
You can change the display quality. Set to standard to preserve battery life.
- High: Displays in high quality.
- Standard: Displays in standard quality.
Pwr Save Start time
Selects the time it takes for the camera to go into sleep mode if you don’t use it.
MENU – Setup – page 3
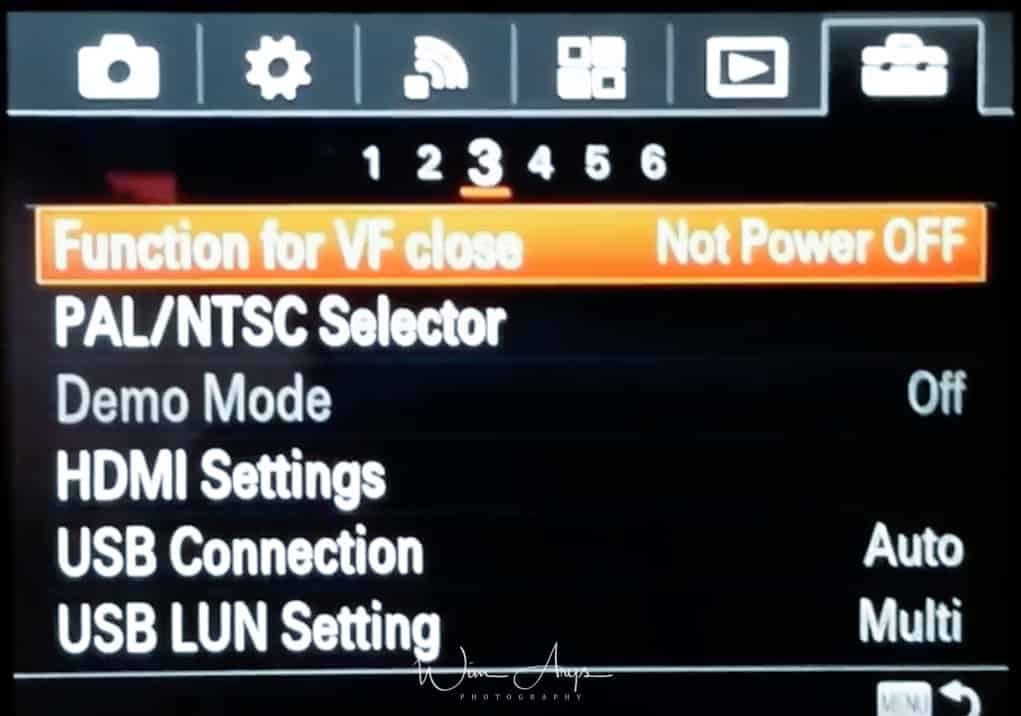
Function for VF close
Sets whether to turn the power off when the viewfinder is stowed. This was not available in earlier models, so every time you pushed the EVF inside, the camera would turn OFF. Very annoying, good that this setting is here now.
PAL/NTSC selector
Plays back movies recorded with the product on a NTSC/PAL system TV. If you insert a memory card that has previously been formatted with a different video system, a message telling you that you must reformat the card will appear. If you want to record using another system, re-format the memory card or use another memory card.
Demo Mode
Demo mode is only used in retail stores for demonstration purposes.
HDMI settings
You can find all HDMI connection settings here:
- HDMI Resolution: When you connect the product to a High Definition TV with HDMI terminals using an HDMI cable, you can select HDMI Resolution to output images to the TV. Auto, 1080p and 1080i are available.
- CTRL FOR HDMI: When connecting theSony DSC-HX90V to a “BRAVIA” Sync-compatible TV using an HDMI cable, you can operate this product by aiming the TV remote control at the TV. Turn it ON if you want to use it.
- HDMI Info. Display: Selects whether to display the shooting information when this product and the TV are connected using an HDMI cable.
USB connection
Selects what will happen when you connect your camera to your PC or MAC.
- Auto (default setting): Establishes a Mass Storage or MTP connection automatically, depending on the computer or other USB devices to be connected. Windows 7 or Windows 8 computers are connected in MTP, and their unique functions are enabled for use.
- Mass Storage: Establishes a Mass Storage connection between this product, a computer, and other USB devices.
- MTP: Establishes an MTP connection between this product, a computer, and other USB devices. Windows 7 or Windows 8 computers are connected in MTP, and their unique functions are enabled for use.
USB LUN Setting
Improves compatibility with external devices by limiting the functions of the USB connection.
Older devices that are not able to connect to the camera might work when set to single. Otherwise, use Multi.
MENU – Setup – page 4
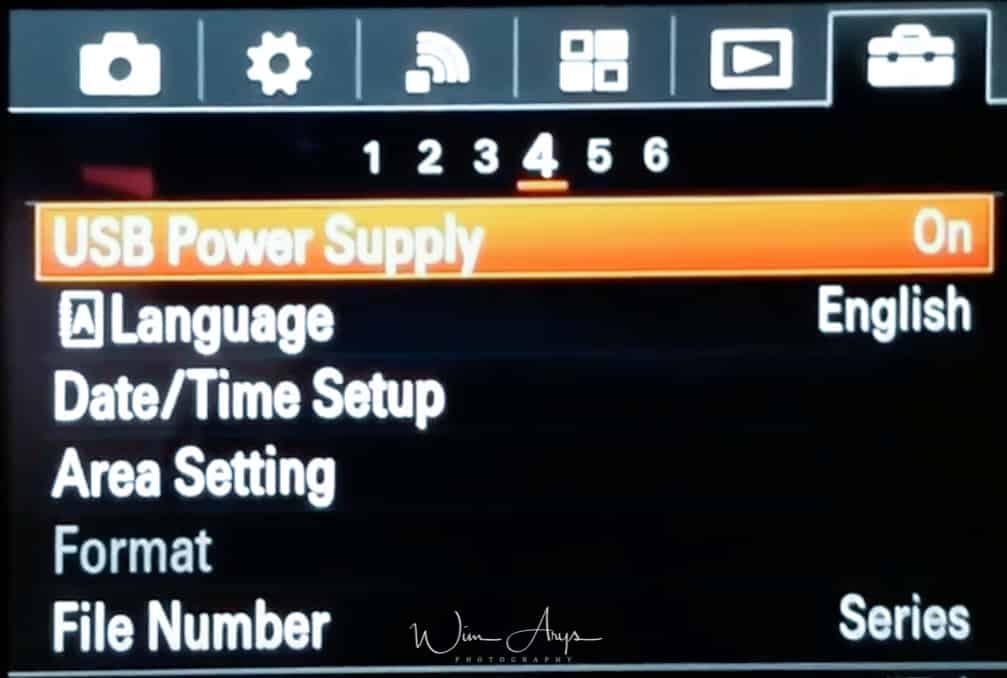
USB power supply
You can charge theSony DSC-HX90V via USB. This setting sets whether to supply power via the micro USB cable when the product is connected to a computer or an USB device.
Language
Set your preferred language. The advantage of setting it to Eglish is that you’ll find much more information online when you need any troubleshooting.
Date Time Setup
Change date, time, date format and Daylight savings time.
Area setting
Select your region, or change region when abroad, the camera will automatically change time and date for you.
Format
Format your SD card before use; this will erase any images still on the memory card.
File Number
Number your files according to a number of shots or reset it to start from 1.
MENU – Setup – page 5
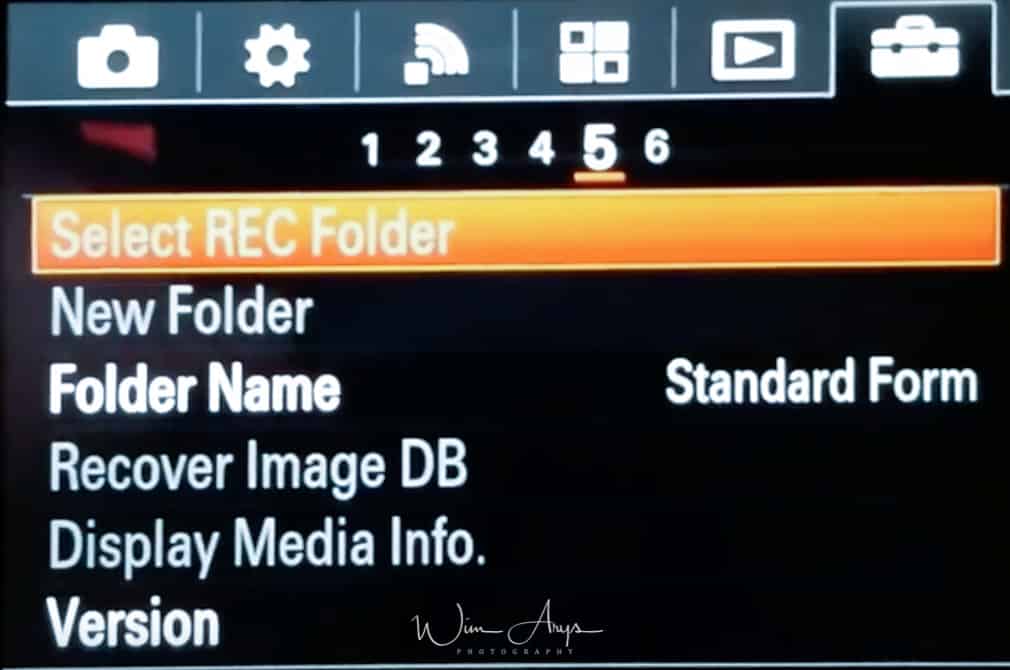
Select REC folder
Selects where the camera will store newly captured images.
New Folder
Make a new folder for easily organizing events and locations
Folder name
Choose whether to have folder names in standard form (DSC) or create a new one by date. Setting folders by date will make organizing your images easier.
Recover Image DB
If you have a storage card error, you can try to rebuild the database to possibly retrieve lost images.
Display media info
Displays the recordable time of movies and the number of recordable still images for the inserted memory card.
Version
Check what version of the operating system your camera and lens are running. Sony sporadically releases updates with new features, so it might be worth checking if any new firmware versions are available.
MENU – Setup – page 6
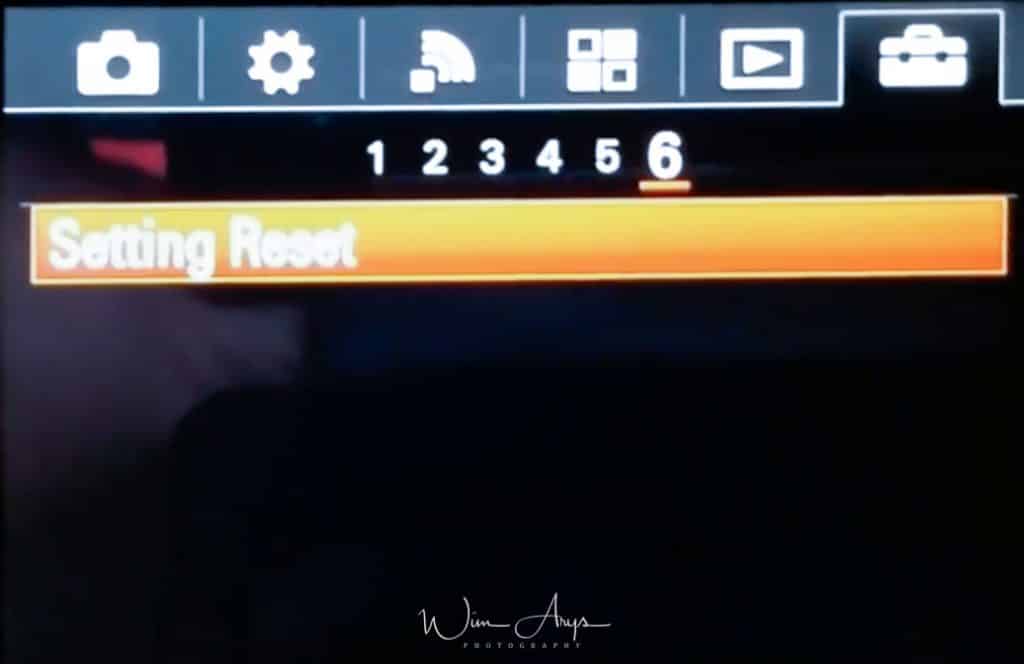
Setting Reset
Fully resets the camera to factory settings.
In the next chapter, I’ll go over all the functionality that I find most useful
Mode dial functions: what’s the difference between intelligent and superior auto?
Intelligent Auto
- This mode lets the camera detect what kind of scene you are photographing. It switches to the scene setting it finds most appropriate, including aperture, shutter speed, ISO, and AF mode.
- These different scene settings are the same you’ll find manually selectable in SCN mode.
- All Sony cameras do a good job at detecting scenes, although the advanced photographer will prefer to shoot in Aperture, Shutter priority or fully manual mode in order to have more control over things like depth-of-field, movement, and focusing area.
Superior Auto
- Does the same scene recognition and (when the camera decides it is appropriate) adds hand-held twilight, anti-motion blur, and backlight correction HDR in order to optimize dynamic range, movement and exposure.
- It uses multiple images shot in close succession at high quality and combines them into one jpeg. Works well on stills but should not be used for movement.
Zebra highlight clipping aide
- Zebra will show zebra pattern lines on blown highlights.
- The clipping detection threshold is selectable from 70 to 100+. Lower values indicate possible highlight clipping sooner than higher.
- Setting it somewhere around 90 will give you a good indication of whether you’re in danger of unrecoverable clipping without having the screen cluttered with stripes all the time.
Focus Peaking
- This works in MF and DMF focusing modes
- MENU → (Custom Settings) → [Peaking Level] → desired setting.
- It displays a color selectable noise in the regions where the focus is on.
- A low setting is recommended in enough light on the Sony DSC-HX90V.
- In dim light, you might need to go to medium to get a good idea of where the focus is at.
Center Lock-on AF
Center Lock-on AF
Depending on the options selected in [Focus Area] or [Center Lock-on AF], the available functions varies when pressing the key. Found in the Focus Area setting. When you press the key when the [Focus Area] is set to [Wide] or [Center] and [Center Lock-on AF] is [On], [Center Lock-on AF] will activate. The camera will automatically focus while pressing the key when the [Focus Area] is [Wide] or [Center], [Focus Mode] is set to other than [Manual Focus], and [Center Lock on AF] is set to [Off].
- When you press the center button, the camera detects the subject positioned in the center of the screen and continues to track the subject.
- MENU → (Camera Settings) → [Center Lock-on AF] → [On]
- Align the target frame (A) over the subject and press in the center of the control wheel. Press again to stop tracking.
- If the camera loses track of the subject, it can detect when the subject reappears on the monitor and resume tracking.
- Press the shutter button fully down to shoot the image.
Smile/face detect
When set to On, The Sony DSC-HX90V will automatically detect and focus on faces. This is a very powerful feature and can even be made faster by registering faces beforehand. You can even prioritize any of the 8 registered faces according to importance. Ideal for a wedding or family reunion when you know the persons who you are going to photograph.
- Go to MENU → (Camera Settings) → [Smile/Face Detect.] and select either
- On (Regist. Faces): Detects the registered face with higher priority using Face Registration.
- On: Detects a face without giving higher priority to the registered face.

How to register faces:
- MENU → (Custom Settings) → [Face Registration] → [New Registration].
- Align the guide frame with the face to be registered, and press the shutter button.
- When a confirmation message appears, select [Enter].
Conclusion
Welcome to the wonderful world of photography with the Sony DSC-HX90V. Although this compact camera deemed an enthusiast oriented or ‘beginner’ camera, you’ll find that it has many of the advanced features of the Sony RX and even ILC line. If you’re just starting out in photography, I would suggest taking a look at the SCN or Scene selections that give you a good starting point for any type of activity or subject you’d like to shoot. Another feature worth mentioning is Face recognition and registration that allows you to actually register someone’s face inside the camera and prioritize autofocus to that face.
There are many hidden features and functions like this inside the Sony HQ90V, and I would suggest taking some time to learn some of them. I know that and advanced guide like this looks daunting at first, but you’ll soon get the hang of it by easily following along with your camera’s menu system.

A great thanks Wim, I thought my display had developed a fault but your guide referred me to the Zebra modewhich was set to 100%
Thanks for your help.
No problem Brian, happy to help.
Thanks that made it so much easier.
I think the sensor native aspect ratio is 4:3
it IS 4:3
First class info – carefully presented so that all levels benefit. Many thanks.
However….I can’t see how to change the movie button as I’d prefer to use the right direction of the control rather than the recessed button provided. Any suggestions will be gratefully received. Thanks.
Hi Brian,
don’t know if what you’re trying to do will work, but you should first disable the Movie button on MENU – Custom Settings – page 4, and on the same page go to custom key settings and see if the movie record option is available for the right direction of the controller. Best, Wim
How can you take stills while shooting video?
Not possible.
My Sony HX-50 can do this. I love the feature. Sony said there wasn’t much demand for it, so they omitted it from the 90. You can do a frame grab from the video during editing, but it ends up as about a 2 MP pic.
Brian, thanks so much for putting this great guide together – it has helped me get a lot more out of the hx90v.
One question, is there a function to say how much memory is left on your card?
Hi Dwayne, I believe there is an indicator on screen that shows you how many images you can store on the card. Best, Wim
This guide has been very helpful as I get acquainted with my new camera. I have a question- when I try to shoot using shutter priority, once I reach 500 then the exposure dims considerably and the result is dark photos.
Thanks
it’s normal as you are letting less and less light hit the sensor.
Hi Wim, do you know if/how GPS data can be read from an MP4 movie made with this camera? In the EXIF data from the *.THM files (changed to *.JPG extension) there is some EXIF info, but no GPS.
Not possible I’m afraid Torri.
Hello. Found your article helpful. I bought a “Shutterboss 11” and for “timed exposure length” it wants me to use the “B” setting. Any suggestions? Thank you.
No B or Bulb mode on this model I’m afraid Jim.
Hi Wim,
Nice page !
I just bought one. But I’m very surprise that when I configured the image size to L:13M. Ratio16:9 and quality fine, I still have pictures in 1920×1080.
Do you have an idea about ? Maybe there are other parameters ? Hope my HX90V works fine.
Thank you for your help.
biowan
Hi Biowan, no idea really, but I wouldn’t worry too much. Do you have the same problem when set to 3:2 (2592×1728 instead of 4896×3264)?
I’ve had my 90 for over a year, and I’m still learning how to use it. Your guide is much more helpful than the Sony manual. I’m sure unsure how to figure out which Record Setting to use when shooting videos. Most of what I shoot ends up on social media, but I want the highest quality possible. I never make discs.
This is fantastic. Wish I’d found it a couple of years ago. Thanks so much
Hi Wim
love this guide
I have a problem with my hx90v whereby it will not store photos on the memory card, saying it is read only. I have tried another memory card and that is the same.
do you have any ideas. ie is it a camera fault or not
Stu
Hi Stu, do you know about the little white slider that SD cards have? Slide up or down to lock or unlock the cards. That is the most common problem here.
Great info, better than the instruction booklet. If I want to try to shoot a moving or flying bird, which setting might be best? Spots? Thank you.
Hi Marvin, first of all thanks for your kind comment. Secondly, the X90V is not the ideal camera for tracking birds in flight (BIF), but you’re right spot would be best in this case.
Thanks for the effort of putting this guide together – appreciated. I am wondering if you have found a way of using an external microphone (multi connector?). Or else to solve the problem of wind noise when recording video.
I’m afraid not David.
Unfortunately apps available for this don’t include time-lapse. 🙁
GREAT GUIDE!!!
Thanks Wayne.
Hi Wim, Excellent work. I do have a question though. I purchased, here in the USA, a Euro model camera. So its functions are all in metric. Is there a way to change my camera to US measures? Thanks, Jim
Hi Jim, I would suggest a full reset of the camera. Then, when you set it up, choose as time zone and region somewhere in the US. Let me know if it works. Best, Wim
I enjoy using this camera but miss the (previous Sony models) on-camera ability of cropping and enlarging selected parts of photos and saving them as new files on the memory stick, and from there to save to my computer. I can crop, enlarge and view them on camera but that’s all. And I haven’t figured out how to do this on either Play Memories Home or Windows Media Centre, in order to save and to print them from there. I’m missing something somewhere; can you assist?
Ian
Hi Ian, that’s right, it’s unfortunately not possible anymore to do this.
All my videos (MP4) are i black and white. Where do I change back to colour. Great site thank you, wish I had found it 4 years ago.
I think you have Creative Style on black and white Kate.
The video colour issue seems to have righted itself!
I went through the menu with your guide and hey presto all back to normal. In the meantime thanks for your site
Hi: hope you can help. HX90V driving me crazy. I focus on an owl in a tree and take a beauty. I zoom in to get a close up of the face and it won’t focus. Same with a butterfly or anything for that matter. Any ideas?
It does focus up to a point but any more zoom and it won’t. I’m standing several metres away. Thanks John
It’s probably the contrast detection autofocus system that can’t find enough contrast anymore when zooming in…
Thank you for your excellent work. My camera is under 1 month old; I took it out today, clear blue sky, set to Superior Auto. On reviewing the photos when I got home, some disappointingly dark, I discover the setting changed to Intelligent Auto – not by me, and then back to Superior Auto. Is this correct please?
Hi Sandra, yes Superior Auto is a multi-shot mode and some can be underexposed. You should be on Intelligent Auto.
Maybe it’s a typing error or misunderstanding, anyway I was a bit puzzled by this part:
“If you’ve stumbled on my guide trying to find where to turn on Long Exposure noise reduction, I’ll have to disappoint you. Although one on the most requested features, the DSC-HQ90V does not have this functionality.”
Now I’m not familiar with the HQ90V, but I do own an HX90. Mine certainly does have Long Exposure Noise reduction. Though I’m not clear on how to turn it OFF.
Simple observation of the timing shows after an exposure of say 10 seconds, there is a further delay of 10 seconds, presumably while a dark frame is captured, to subtract the noise from the actual image. Setting a different exposure time, say thirty seconds, results in an additional delay of thirty seconds after the shutter has closed. Each time, there is the actual exposure followed by an equal length delay, which is a sure sign of the noise reduction procedure.
Hi Steve, maybe a better phrasing would be how to turn it off. It’s a question I get all the time.
Thanks, your guide is very useful 🙂 Jude
Hi there and thanks for the detailed user manual. I just purchased a DSC HX90V, and I am in the process of experimenting, but there are options that I can get them to work, so I thought you might be able to help. I am trying to set the camera for shooting light trails in the dark and wet streets but trying to set it to 30″ sec shutter speed, f/8 and ISO 100 or ISO 80 is impossible. Modes M, S, and A only allow the Shutter speed and aperture set to desired value ONLY when ISO is set to AUTO. Is there a way to accomplish my desired values?
Thank you in advance.
Hi Roland, I understand the issue. But does it matter? if you set a 30 second shutter speed, the camera won’t select a high ISO.
Hello Wim. I am very close to getting a hx99
One critical option for me to to be able to disable the control dial/ joy stick on the back of the camera, do you know if this is possible
Many thanks for a good interpretation of the user guide
Thanks again
Ken
Hi Ken, I don’t think that’s possible unfortunately.
How to shoot macro?
Thanks in advance
With this camera, try to keep the lens as wide as possible, and get as close as possible. Maybe you can look into macro add-on lenses.
I bought a DSC-HX90V, and it has a “help guide ” that’s of no help. Is there any way to get the standard menu?