
Nikon Z9 advanced manual
[smartpay_product id=”3″]
Introduction
The Nikon Z9 uses a newly developed FX-format stacked CMOS sensor and new image-processing engine. This Nikon Z9 advanced camera manual is written for professionals, advanced enthusiasts and cinematographers. On the video side, the Z9 supports 8K video recording as well as various other video specifications that fulfil diverse needs and workflows.
Unlike most mirrorless cameras, the Z9 has no mechanical shutter. This allows a 12 times faster sensor readout then the average CMOS sensor, leading to almost no rolling shutter effects from electronic shutter. This is a big advantage for fully electronic shutters over traditional mechanical shutters.
These will definitely make the Nikon Z9 a more useable camera in terms of speed and functionality compared to older models. There are a few changes in the menu system when compared to previous Nikon corporation cameras. We’ll have a page-by-page look at the menus in this post. If you’re looking for a particular feature, I would suggest that you use the search function in your preferred browser, as this post is quite long. This guide uses the Nikon Z9 v2.0 firmware update.
If you’re looking for a setup guide for the Z7 II, Z6 II, Nikon Z6, you can find it here, the Z50 here and for the Z5 here.
Full Menu Overview and explanation
MENU → Photo Shooting Menu
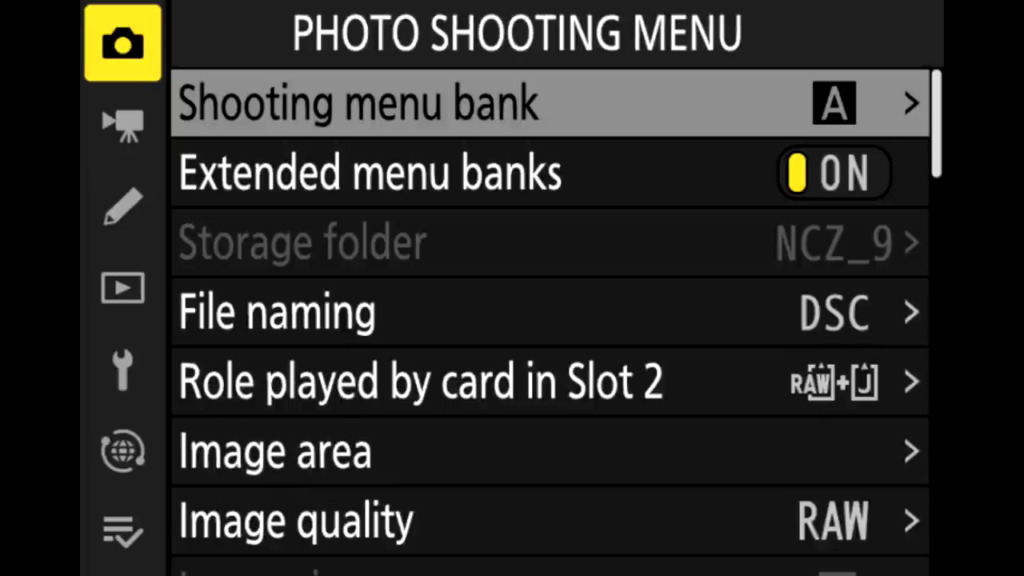
Shooting menu bank
You can save your customised presets for custom shooting scenarios in the shooting menu banks.
Extended menu banks
When enabled, Extended menu banks automatically save the Exp. Mode, Shuttle Speed and Aperture.
Storage folder
This menu defines the folder on the memory card in which new images are stored and allows to create new folders:
- Select folder by number: You choose a three digit number and the Nikon Z9 will create a folder with this number at the beginning of its name if it does not exist yet. The following five characters „Z9“ cannot be altered.
When you see a folder symbol next to the selected number a folder exists already. - Select folder from list: You choose a folder from a list of existing ones – without the possibility to create new ones.
File naming
You can replace the three letters „DSC“ which are the default beginning of file names with your own individual combination.
- an underscore _ before or after these three letters, depending on which color space you use.
- a sequential four digit number.
Role played by card in Slot 2
You can select how the secondary slot functions.
- Overflow: Recording will continue on the second card slot when the first is full.
- Backup: The Z9 will continuously make an identical copy of the first card slot to the second slot.
- RAW primary – JPEG. secondary: RAW files will be written on the first card slot, jpeg images on the second slot.
- JPEG slot 1 – JPEG slot 2: Recording in Jpeg only will continue on the second card slot when the first is full.
Image area
The Nikon Z9 offers a choice of the following image areas:
- FX (36 × 24): Images are recorded in FX format with an angle of view equivalent to a lens on a 35 mm format camera.
- DX (24 × 16): Images are recorded in DX format. To calculate the approximate focal length of the lens in 35 mm format, multiply by 1.5
- 1 : 1 (24×24): Pictures are recorded with an aspect ratio of 1 : 1.
- 16:9 (36×20): Pictures are recorded with a 16:9 image ratio.
Image quality
The Nikon Z9 supports the following image quality options:
- RAW: RAW data from the image sensor are saved without additional processing. Settings such as white balance and contrast can be adjusted after shooting.
- RAW+JPEG fine (RAW)+JPEG fine: Two images are recorded, one NEF (RAW) image and one fine-quality JPEG image.
- RAW+JPEG normal (RAW)+JPEG normal: Two images are recorded, one NEF (RAW) image and one normal-quality JPEG image.
- RAW+JPEG basic (RAW)+JPEG basic: Two images are recorded, one NEF (RAW) image and one basic-quality JPEG image.
- JPEG fine/JPEG fine: Record JPEG images at a compression ratio of roughly 1 : 4 (fine quality).
- JPEG normal/JPEG normal: Record JPEG images at a compression ratio of roughly 1 : 8 (normal quality).
- JPEG basic/JPEG basic: Record JPEG images at a compression ratio of roughly 1 : 16 (basic quality).
- TIFF (RGB): Record uncompressed TIFF-RGB images at a bit depth of 8 bits per channel (24-bit color). TIFF is supported by a wide variety of imaging applications.
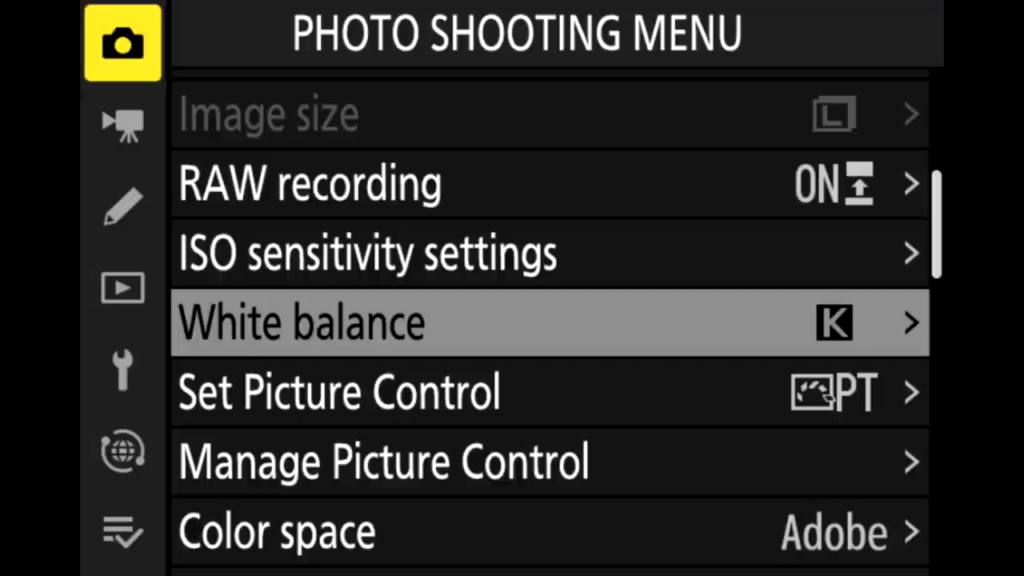
Image Size
Image size is measured in pixels. Choose from Large, Medium, or Small (note that image size varies depending on the option selected for Image area.
FX (36×24; FX format)
- Large: 8256 × 5504
- Medium: 6192 × 4128
- Small: 4128 × 2752
DX (24×16; DX format)
- Large 5408 × 3600
- Medium 4048 × 2696
- Small 2704 × 1800
1 : 1 (24×24)
- Large 5504 × 5504
- Medium 4128 × 4128
- Small 2752 × 2752
16 : 9 (36×20)
- Large 8256 × 4640
- Medium 6192 × 3480
- Small 4128 × 2320
RAW Recording
Choose a compression type and bit depth for RAW files. You can change compression type and bit depth.
NEF (RAW) Compression
- Lossless compressed: RAW images are compressed using a reversible algorithm, reducing file size by about 20–40% with no effect on image quality. Great choice if you wan to edit images in NX studio later.
- Compressed: RAW images are compressed using a non-reversible algorithm, reducing file size by about 35–55% with almost no effect on image quality.
- Uncompressed: RAW images are not compressed.
NEF (RAW) Bit Depth
- 12-bit: RAW images are recorded at a bit-depth of 12 bits.
- 14-bit: RAW images are recorded at a bit depth of 14 bits, producing files larger than those with a bit depth of 12 bits but increasing the color data recorded.
Hack: 14 bit uncompressed of course gives the ultimate image quality, but Losless Compressed is so good that is should be used in order to conserve card space. If you’re a portrait or fine art photographer, you should always shoot 14 bit in order to have the maximum color data preserved in your files. NX studio is a great alternative to Lightroom for editing Z9 raw files.
ISO sensitively settings
If the Nikon Z9 decides that it can’t properly expose the image at that ISO given your current aperture and shutter speed, it automatically adjusts ISO as necessary. Turn on the Auto ISO Sensitivity option. The camera will now override your ISO choice when it thinks a proper exposure is not possible with the settings you’ve specified.
If On is selected, the camera will automatically adjust ISO sensitivity when optimal exposure cannot be achieved at the value selected for ISO sensitivity. The options listed below are available for fine-tuning auto ISO sensitivity control.
- Maximum sensitivity: Choose an upper limit for ISO sensitivity to prevent it being raised too high.
- Maximum sensitivity with c: Choose the upper ISO sensitivity limit for photos taken using an optional flash unit.
- Minimum shutter speed: Choose the shutter speed below which auto ISO sensitivity control will kick in to prevent underexposure in modes P and A. Options range from 1/32000 s to 900 seconds, this thanks to the absence of mechanical shutters.
White Balance
White balance ensures that colors are unaffected by the color of the light source. Auto white balance is recommended with most light sources. If the desired results cannot be achieved with auto white balance, choose an option from the list below or use preset white balance.
Auto
White balance is adjusted automatically for optimal results with most light sources. For best results, use type G, E , D or Z lens. If optional flash fires, results are adjusted appropriately. Color temperature can be viewed in the playback info display after shooting.
Options:
- Keep white (reduce warm colors; 3500–8000 K)
- Normal (3500–8000 K)
- Keep warm lighting colors(3500–8000 K)
Natural light auto
White balance is adjusted for natural light, producing colors closer to those seen by the naked eye. (4500–8000 K)
Direct sunlight
Use with subjects lit by direct sunlight. (5200K)
Cloudy
Use in daylight under overcast skies. (6000 K)
Shade
Use in daylight with subjects in the shade. (8000 K)
Incandescent
Use under incandescent lighting. (3000K)
Fluorescent
- Sodium-vapor lamps (2700 K): Sodium-vapor lighting (found in sports venues).
- Warm-white fluorescent(3000 K): Warm-white fluorescent lights.
- White fluorescent(3700 K): White fluorescent lights.
- Cool-white fluorescent(4200 K): Cool-white fluorescent lights
- Day white fluorescent(5000 K): Daylight white fluorescent lights.
- Daylight fluorescent(6500 K): Daylight fluorescent lights.
- High temp. mercury-vapor (7200 K): High color temperature light sources (e.g. mercury-vapor lamps).
Flash
Use with optional flash units. (5400K)
Choose color temp.
Choose color temperature from list of values. (2500–10,000 K)
Preset manual
Use subject, light source, or existing photograph as reference for white balance
Set Picture Control
Here you can change settings for the internal processing of picture data from the image sensor into final JPG files.
It’s necessary to start with an existing configuration or set of settings that Nikon has predefined for a certain look of the final image. You can choose between:
- Auto: Your Nikon Z9 automatically detects the type of scene.
- Standard: Nikon‘s default for a neutral picture as the standard for most shooting situations.
- Neutral: A processing with slightly less sharpening, contrast improvement and saturation; for those who do these steps on their own later on.
- Vivid: Higher color saturation, sharpening and contrast.
- Monochrome: Converts into black and white.
- Portrait: Very similar to „neutral“, slightly less sharpening, contrast and color saturation than „standard“.
- Landscape: Higher contrast than „standard“.
You can modify any of these preset configurations by placing a yellow selection mark in it and use the selector to the right.
The „Quick adjust“ increases or decreases all settings in the direction of the intended picture style and is available for all configurations except „neutral“.
Alternatively you can select and change all detail settings individually:
- Sharpening: Increases contrasts at edges which improves the perceived sharpness.
- Contrast: Increases or decreases the contrast between light and dark areas.
- Brightness: Lightening or Darkening of the whole picture.
- Saturation: Changes color saturation for more intense or fainter colors.
- Hue: Changes the overall color tone in a slightly complicated manner.
And also two which are available only for the configuration „monochrome“:
- Filter effects: Simulates the effect of color filters as they are used in black and white photography to adjust contrast.
- Toning: Allows you to choose another dominating color tone than black and white.
Additionally you can create your own configurations by copying, modifying and renaming an existing one.
To do so you need the next menu option Manage Picture Control.
When you change a configuration in the Picture Control and do a Reset
your last chosen configuration will stay selected but any changes in it will be reset.
Hack: An important menu with visible impact on your photos! Only those who shoot in RAW format only and create JPG files on their own in the computer can ignore it.
The „best“ settings are a matter of your personal preferences, in this menu everyone has to find his or her best settings by experience.
On the other hand all of these settings can also be changed afterwards in image processing on the computer, you really have to get them right in the camera if you want to have the best possible results straight out of your Nikon Z9.
The configuration „neutral“ is very similar to „standard“ with slightly less contrast and saturation, the difference is really small.
The sharpening chosen by Nikon is rather weak, I prefer a higher value of 5 or 6.
When looking at your images in the proper magnification (100% zoom on the computer monitor) you will see clearer edges.
„Vivid“ has visibly more intense color and more contrast. That can improve your image but also be too much of a good thing if you have already high contrast (e.g. direct sunlight) and make your picture look unnatural.
I would not set contrast and brightness here and switch on the Active D-Lighting.
Regarding the setting „hue“: Ignore this setting, it is only a slight shift in color for which I do not see any practical relevance.
Result: All the above has brought me to the following settings that I use myself:
One own configuration, created with the next menu option Manage Picture Control, called „standard+sharper“ which is a copy of the configuration „standard“ with sharpening increased to 6.
Another configuration called „sharp+vivid“ which is the same as before plus a saturation increased by two steps.
I use the first one most of the time and switch to the second one occasionally.
Last but not least: Do not overestimate the importance of this menu, most important is still a good subject, light, exposure and
white balance for cooler or wamer color rendition. After all that the „Picture Control“ is for the final touch.
Manage Picture Control
This menu allows you to copy existing Picture Control configurations (see previous menu) and save them with personal adjustments under a new name.
To create your own configuration choose the entry „Save/edit“, pick an existing configuration and press OK. Then you can assign one of nine places in the list of possible customized entries, edit it and choose your own name.
you do not really need an own configuration and can ignore this menu. With the user settings also personal adjustments to a Picture Control will be saved.
If you do change the Picture Control settings regularly it is best to put the most commonly used settings into your own configurations.
Reset will put all Picture Control configurations back to their default settings and you need an own configuration if you do not want to tweak Picture Control each time with your setting details.
- Save/edit: Create a new custom Picture Control based on an existing preset or custom Picture Control, or edit existing custom Picture Controls.
- Rename: Rename custom Picture Controls.
- Delete: Delete custom Picture Controls.
- Load/save: Use the following options to copy custom Picture Controls to and from the memory card. Once copied to the memory card, Picture Controls can be used with other cameras or compatible software. (Copy to camera, Delete from card or Copy to card.)
Color Space
You can either choose sRGB or Adobe RGB.
- sRGB (default): This is the worldwide standard with 256 levels of brightness for each of the basic colors red, green, blue, for displaying images on computer monitors.
- Adobe RGB: A color space developed by Adobe for broader color range of printed images.
As for sRGB all colors will be stored with shares of red, green and blue with 256 levels of gradation, the difference is that the maximum saturations are higher.
The color space is relevant only for creation of JPG-files, not for the RAW format.
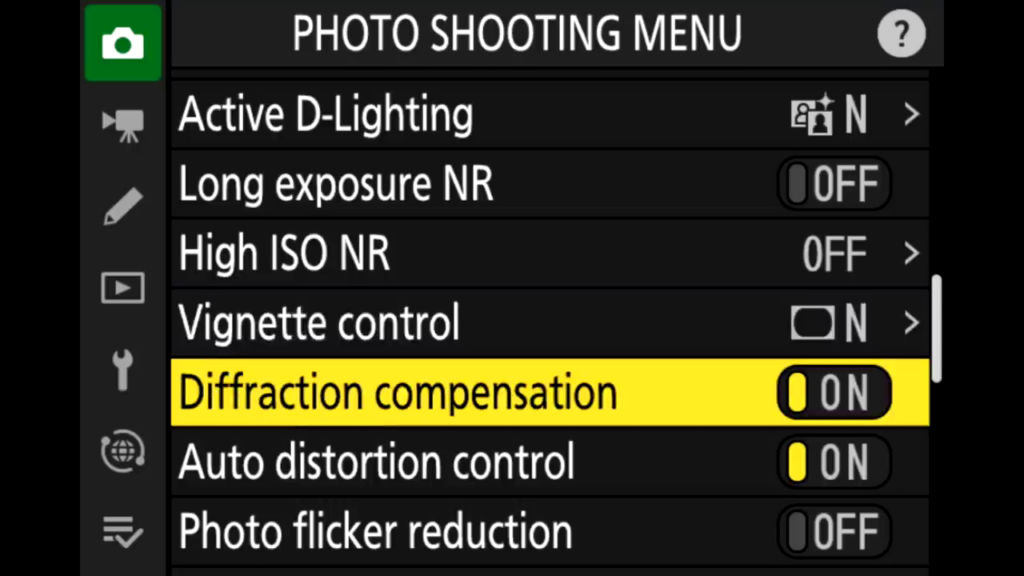
Active D-Lighting
„Active D-Lighting“ (ADL) is Nikon‘s name for an additional step in the internal image processing that mainly lightens dark areas of the picture.
It is relevant only for JPG files, not for RAW format.
You can set this to Auto, Extra High, High, Normal, Low or Off.
ADL can also darken too bright areas but lightening dark ones is more frequent and the improvements are more visible there.
You can choose an automatic adjustment that the Nikon Z9 will set stronger or weaker depending on your subject‘s contrast or four steps from low to extra high.
Hack: Turn this ON, set it to Normal, it really helps improve your images!
Long Exposure NR
If this menu option is switched on the Z9 will use an extra step in internal image processing for noise reduction if the exposure time is longer than 1 second.
Hack: switch it Off, it’s better to use advanced image noise reduction on your Mac or PC.
High ISO NR
You can choose if an additional noise reduction shall be applied in the internal image processing for shots with high ISO sensitivity. High, Natural, Low or Off are selectable.
Hack: Turn high ISO NR off, it’s better to use the superior noise reduction of your desktop image editor of choice.
Vignette Control
Vignetting is a drop in brightness at the edges of a photograph. Vignette control reduces vignetting for type G, E, D and F lenses (PC lenses excluded). So yes it works on adapted lenses with the FTZ adapter too. Its effects vary from lens to lens and are most noticeable at maximum aperture. Choose from High, Normal, Low, and Off.
Hack: Depending on the scene, shooting conditions, and type of lens, TIFF and JPEG images may exhibit noise (fog) or variations in peripheral brightness, while custom Picture Controls and preset Picture Controls that have been modified from default settings may not produce the desired effect. Take test shots and view the results in the monitor. Vignette control does not apply to movies or multiple exposures.
Diffraction Compensation
With digital cameras, if you select a small aperture to increase depth of field when shooting cityscapes or landscapes, it may cause a loss of sharpness across the image due to diffraction. .
Thanks to the new and faster EXPEED 6 processor inside the Nikon Z9, there is a new diffraction compensation function. This helps capture landscapes and cityscapes crisply even when small apertures are used(from f/11 onwards).
Auto Distortion Control
Select On to reduce barrel distortion when shooting with wide-angle lenses and to reduce pin-cushion distortion when shooting with long lenses (note that the edges of the area visible in the viewfinder may be cropped out of the final photograph, and that the time needed to process photographs before recording begins may increase).
Photo Flicker Reduction
Reduce banding or (in photos taken in continuous release modes) uneven exposure or coloration caused by the flicker of such light sources as fluorescent or mercury-vapor lamps during viewfinder photography.
Hack: Take a test shot and view the results before taking additional photographs. Flicker reduction can detect flicker at 100 and 120 Hz (associated respectively with AC power supplies of 50 and 60 Hz). Flicker may not be detected or the desired results may not be achieved with dark backgrounds, bright light sources, or decorative lighting displays and other non-standard lighting. Depending on the light source, there may be a slight delay before the shutter is released. During burst shooting, the frame rate may slow or become erratic; in addition, the desired results may not be achieved if the frequency of the power supply changes during shooting.
Flicker detection will not take effect at shutter speeds slower than 1/100 s (including Bulb and Time) or when Mup is selected for release mode or exposure delay mode is on.
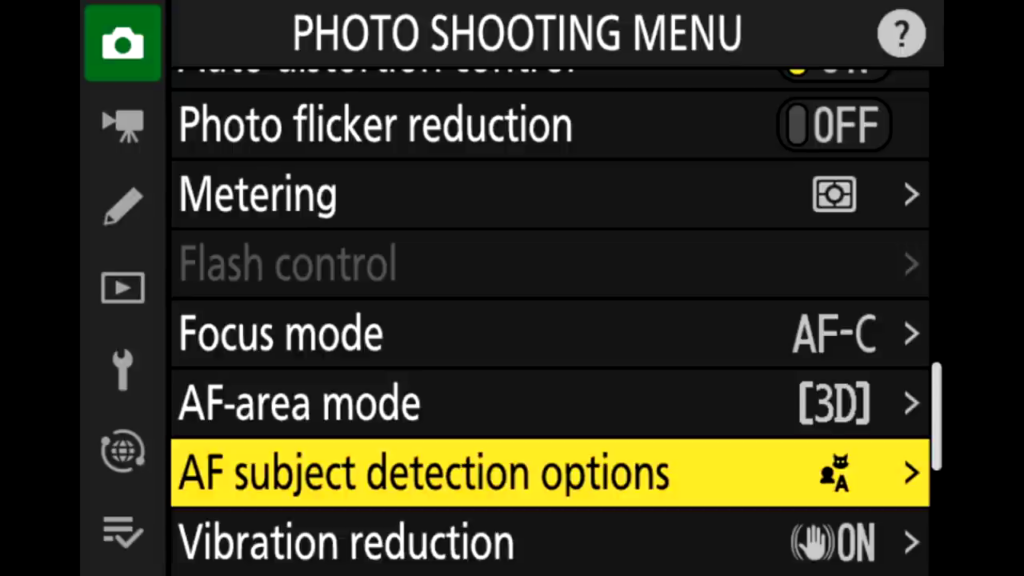
Metering
Metering determines how the camera sets exposure. The following options are available:
- Matrix: Produces natural results in most situations. Camera meters wide area of the frame and sets exposure according to tone distribution, color, composition, and, with type G, E, D or F lenses , distance information (3D color matrix metering III; with other CPU lenses, camera uses color matrix metering III, which does not include 3D distance information).
- Center-weighted: Camera meters entire frame but assigns greatest weight to center area. Classic meter for portraits; recommended when using filters with an exposure factor (filter factor) over 1×.
- Spot: Camera meters circle 4 mm (0.16 in.) in diameter (approximately 1.5% of frame). Circle is centered on current focus point, making it possible to meter off-center subjects . Ensures that subject will be correctly exposed, even when background is much brighter or darker.
- Highlight-weighted: Camera assigns greatest weight to highlights. Use to reduce loss of detail in highlights, for example when photographing spotlit performers on-stage.
Hack: Specifying the focal length and maximum aperture of non-CPU lenses using the Non-CPU lens data option in the setup menu allows the camera to use color matrix metering when matrix is selected and improves the accuracy of center-weighted and spot metering.
Flash Control
Choose the flash control mode for optional flash units mounted on the camera accessory shoe and adjust settings for off-camera flash photography.
Flash Control Mode
When an SB-5000, SB-500, SB-400, or SB-300 is mounted on the camera, the flash control mode, flash level, and other flash settings can be adjusted using the Flash control > Flash control mode item in the photo shooting menu (in the case of the SB-5000, these settings can also be adjusted using the controls on the flash unit). The options available vary with the flash used, while the options displayed under Flash control mode vary with the mode selected. Settings for other flash units can only be adjusted using flash unit controls.
- TTL: i-TTL mode. In the cases of the SB-500, SB-400, and SB-300, flash compensation can be adjusted using the W (M) button.
- Auto external flash: In this mode, output is adjusted automatically according to the amount of light reflected by the subject; flash compensation is also available. Auto external flash supports “auto aperture” (qA) and “non-TTL auto” (A) modes; non-TTL auto is selected automatically if a non-CPU lens is attached without specifying the focal length and maximum aperture using the Non-CPU lens data option in the setup menu. See the flash unit manual for details.
- Distance-priority manual: Choose the distance to the subject; flash output will be adjusted automatically. Flash compensation is also available.
- Manual: Choose the flash level manually.
- Repeating flash: The flash fires repeatedly while the shutter is open, producing a multiple-exposure effect. Choose the flash level (Output), the maximum number of times the unit fires (Times), and the number of times the flash fires per second (Frequency, measured in Hertz). The options available for Times vary depending on the options selected for Output and Frequency; see the documentation provided with the flash unit for details.
Wireless Flash Options
Adjust settings for simultaneous wireless control of multiple remote flash units. This option is available only when an SB-5000 or SB-500 flash unit or a WR-R10 wireless remote controller is mounted on the camera.
- Optical AWL: The remote flash units are controlled using low-intensity flashes emitted by the master flash. Available only with an SB-5000 or SB-500 mounted on the camera accessory shoe.
- Optical/radio AWL: This option is for flash photography using both optically- and radio-controlled flash units. Choose this option when using both a WR-R10 and an SB-500 mounted on the camera accessory shoe. Remote flash control is automatically set to Group flash.
- Radio AWL: The remote flash units are controlled by radio signals emitted by a WR-R10 attached to the camera. Available only with the WR-R10 and remote flash units that support radio AWL.
- Off: Remote flash photography disabled.
Remote Flash Control
Choose from the following remote flash photography options:
- Group flash: hoose a separate flash control mode and flash level for each group of remote flash units. If Optical AWL or Optical/radio AWL is selected for Wireless flash options you can choose the channel used by the master flash to communicate with the remote flash units.
- Quick wireless control: Choose for control of overall flash output. Use Quick wireless control options to adjust the balance between groups A and B and set the output for group C manually (the master flash does not fire). You can also adjust flash compensation for groups A and B and, if Optical AWL or Optical/radio AWL is selected for Wireless flash options choose the channel used by the master flash to communicate with the remote flash units
- Remote repeating: The flash units fire repeatedly while the shutter is open, producing a multiple-exposure effect. Choose the flash level (Output), the maximum number of times the flash units fire (Times), the number of times the units fire per second (Frequency), and, if Optical AWL or Optical/radio AWL is selected for Wireless flash options, the channel used by the master flash to communicate with the remote flash units. Note that the number of times the flash units fire in total may vary depending on the options selected for Output and Frequency; see the documentation provided with the flash unit for details.
Radio Remote Flash Info
View the flash units currently controlled using radio AWL.
Flash Mode
Some of the flash modes are set on the camera, rather than on the flash. To set most of these modes on a Nikon Z9, you keep the flash button depressed and rotate the main (rear) command wheel to cycle through the modes. The modes appear in the flash frame in the top LCD panel on the camera.
To set Auto FP on a Nikon Z9, you need to go into this menu.
Fill Flash
The flash fires with every shot. In modes P and A, shutter speed will automatically be set to values between 1/200 s (or 1/8000 s with Auto FP High-Speed Sync) and 1/60 s.
Red-eye Reduction Mode
When this mode is activated (indicated by an eye-symbol appearing on both the camera’s top LCD and the flash’s rear LCD), the flash fires three flashes at reduced output just before the picture is taken. This makes the iris of humans and animals contract which reduces the area where the red eye effect can be seen. It also introduces a shutter delay to allow the subject’s irises time to react.
The red-effect only occurs when you use the flash as key light pointing forwards and directly into the subjects eyes.
Slow-sync Flash + red-eye
As for Red-eye reduction except that shutter speed slows automatically to capture background lighting at night or under low light. Use when you want to include background lighting in portraits. Use of a tripod is recommended to prevent blurring caused by camera shake.
Slow-sync Flash
The default shutter speed when using flash is 1/60 second (you can change this default on a Z9 with custom setting #24). The flash will use a faster shutter speed if the ambient light requires it, but will not normally go below 1/60 second in the modes where camera controls the shutter speed.
When slow-sync flash is activated (on a Z9, you set this by pressing the flash button and turning the main command wheel until the word “SLOW” appears on the camera’s top LCD), shutter speeds as low as 30 seconds may be used to obtain the correct exposure for both the main subject in the foreground lit by the flash, and the background, in low-light situations or at night.
For slow shutter speeds, you may need to use a tripod to avoid camera shake.
In the Night Portrait scene mode, slow-sync flash is automatically activated.
A word on Auto FP
Auto Focal Plane is a sync mode that let you synchronise flash with higher shutter speeds than the camera’s normal maximum flash synchronisation shutter speed (often called “x-sync speed”).
To use this mode on a Nikon Z9, you need to have a CLS-compatible flash unit connected to the camera’s hot-shoe, and you must enable Auto FP on the camera. Without having Auto FP enabled, the camera will not let you set the shutter speed higher than the x-sync speed when you use a CLS-compatible flash. With Auto FP enabled, you can use any shutter speed.
In FP mode the flash will not fire once, but many times at an extremely rapid rate (typically 50 KHz) which begins with the opening of front curtain of your camera’s focal plane shutter and ends with closing of rear curtain. This permits the correct exposure to be obtained as the travelling slit of a dual curtain shutter passes over the sensor at high-speed.
Note that using FP reduces the maximum power of the flash. The only way to have FP is to illuminate the focal plane curtain, which, depending on the shutter speed, may cover a very large percentage of the focal plane. This means that the higher the shutter speed is above the shutter’s x-sync speed, the smaller the area of film that gets illuminated by each flash.
Using FP will reduce the effective GN of the flash when you exceed the x-sync speed. However, it has no effect at speeds lower than the x-sync. It does no harm to have Auto FP permanently enabled.
On a Nikon Speedlight, the FP mode can be activated in the following flash modes: TTL, TTL BL, AA, M and GN. On the Nissin Di866 the FP mode only works in TTL mode.
Note: The FP mode is mainly useful when you want to use large apertures when doing fill flash in bright daylight. The FP mode does not help you freeze motion. Normal flash photography is very good at freezing motion, since a burst of electronic flash is so incredibly brief. When the dominant light on a scene is a very short flash of light it is almost as if you used a very high shutter speed in the thousandths of a second. However when you use FP mode flash, the flash unit pulses the light output over a longer period of time in order to simulate a light being lit for the entire time the shutter travels across the focal plane. Since the flash burst is no longer very short, it becomes more difficult to freeze motion, even with high shutter speeds. And because the FP mode makes you lose so much of the power of the flash, it is not very useful when you want the flash to be the dominant light. For high speed flash photography, you instead use manual mode, and adjust the power ratio to make sure that the flash burst is short enough to “freeze” movement.
Flash Compensation
Flash compensation can be used to adjust the level of the master and remote flash units by from −3 to +1 EV in steps of 1/3 EV. To choose a value for flash compensation, press the magnifying button and rotate the sub-command dial until the desired value is displayed in the control panel.
When the master flash or a remote flash is set to TTL or Auto and flash compensation to a value other than ±0.0, an icon will be displayed in the control panel and viewfinder and the current value for flash compensation can be viewed by pressing mag. Normal flash output can be restored by setting flash compensation to ±0.0. Flash compensation is not reset when the camera is turned off.
Focus Mode
AF-S (single AF):
Designed for shooting stationary subjects, this mode locks focus when you depress the shutter button halfway. (Think S for still, stationary.) In AF-S mode, the camera insists on achieving focus before it releases the shutter.
If this behavior annoys you, open the Custom Setting menu, choose Autofocus, and then choose AF-S Priority Selection. If you change the setting to Release, the picture is then recorded when you fully depress the shutter button even if focus isn’t yet achieved.
AF-C (continuous AF):
Geared to capturing moving targets, AF-C mode adjusts focus as needed as long as the shutter button is pressed halfway. (Think C for continuous motion.) Remember that a focus-adjustment occurs only if the subject moves closer to or farther from the camera.
If the subject is moving but only shifts a short distance in a horizontal direction, no adjustment is needed because the focusing distance remains the same.
AF-F
The camera adjusts focus continuously in response to subject movement or changes in composition. Focus locks when the shutter-release button is pressed halfway. This option is only available in movie mode.
MF (manual Focus)
To focus manually, adjust the lens focus ring until the image displayed on the clear matte field in the viewfinder is in focus. Photographs can be taken at any time, even when the image is not in focus.
Hack: To decide which shutter-release option is right for you, consider whether you’d rather have any shot, even if it’s out of focus, or capture only those that are in focus. I prefer the latter, so I set both AF-S and AF-C modes to Focus. Why waste battery power, memory card space, and inevitable time deleting out-of-focus pictures? Yes, if you’re shooting rapid action, you may miss a few shots waiting for the focus to occur — but if they’re going to be lousy shots, who cares? Sports shooters who fire off hundreds of shots while covering an event, though, may want to unlock shutter release for both AF-C and AF-S modes. Again, you may wind up with lots of wasted shots, but you increase the odds that you’ll capture that split-second “highlight reel” moment.
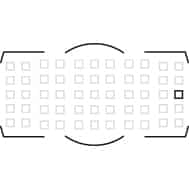
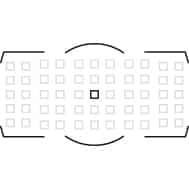
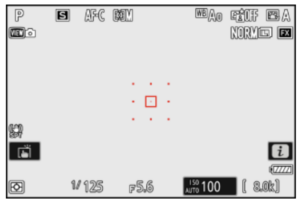
AF Area Mode
here are now 20 customisable autofocus points in the version 2 firmware.You can dial in a customisable shape for both vertical and horizontal to create to customisable size of the focus area. You can also save them to a custom bank for quick recall.
- Pinpoint AF: The pinpoint AF feature (only in AF-S mode) is great for getting a precise focus on small, static subjects. I’ve found it’s especially useful for shallow depth of field photography or when you want to focus on a smaller area than usual. I’ve found that the tradeoff for the pinpoint mode’s precision is that focus speed can be slower, especially in low light. This is expected if a smaller area is being sampled.
- Single Point AF: With Single-Point AF, you can select one of the camera’s 493 AF points to focus on, just like in Pinpoint AF mode. This mode is available in AF-S and AF-C, and is great for when you want to choose the exact point of focus, especially for stationary subject.
- Dynamic Area AF (L): The Dynamic-Area AF modes provide variously sized AF selectable area boxes – small, medium and large. The smallest Dynamic-Area box is the same size as the standard Single-Point AF mode, while the medium and large boxes are larger. This mode is ideal for fast moving subjects where you want to cover a wider area.
If you’re trying to capture a fast-moving subject and want to keep them in focus, using the Dynamic-Area AF mode is your best bet. The AF box will cover a larger portion of the frame, so even if the subject briefly leaves the AF area, the Z9 will be able to track and focus on them using the surrounding points.
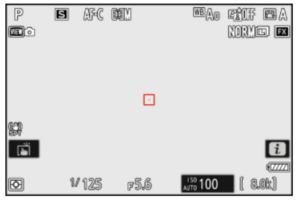
- Wide-area AF (S) and (L): As for Single-point AF except that wider focus points are used. The focus points for Wide-area AF (L) are wider than those for Wide-area AF (S).
- 3D: works in conjunction with the subject recognition system, drawing a gray box around recognised subjects near your AF point.
- Auto-area AF: (or dynamic-area AF) The camera automatically detects the subject and selects the focus area. At default settings, the camera gives priority to portrait subjects; if a portrait subject is detected, the selected subject will be indicated by a yellow border (if multiple faces are detected, you can choose your subject using the multi selector). Subject tracking can be activated by pressing the OK button.ng.
AF subject detection options
Auto: camera will automatically switch between human and animal eye autofocus.
human: camera will lock on to human eyes.
Animal: camera will lock on to animal eyes.
Vehicle AF: locks onto both two-wheeled and four-wheeled vehicles.
Vibration Reduction
The Nikon Z9 is equipped with in-camera vibration reduction (VR), other manufacturers call this sensor or image stabilisation. The VR unit provides compensation for movement along five axes. The effects of vibration reduction are equivalent to a shutter speed up to approximately 5.0 stops. This function can also be used effectively with NIKKOR F lenses, including those not equipped with a VR function, with the Mount Adapter FTZ . To use the Vibration reduction function of a non-CPU lens, set the focal length in “Non-CPU lens data” in the SETUP MENU (see later).
There is an ON (normal) and SPT (Sport) preset.
Vibration reduction may be unavailable with some lenses. When using vibration reduction, wait for the image in the display to stabilize before shooting. With some lenses, the image in the display may also jiggle after the shutter is released; this is normal and does not indicate a malfunction.
I recommend sport or On for panning shots. In Sport, Normal, and On modes, vibration reduction applies only to motion that is not part of the pan (if the camera is panned horizontally, for example, vibration reduction will be applied only to vertical shake).
To prevent unintended results, select Off when the camera is mounted on a tripod unless the tripod head is unsecured or the camera is mounted on a monopod, in which case Normal, Sport, or On is recommended.
Auto Bracketing
Vary exposure, flash level, Active D-Lighting (ADL), or white balance slightly with each shot, “bracketing” the current value. Bracketing can be used in situations in which getting the right settings is difficult and there is not time to check results and adjust settings with each shot, or to experiment with different settings for the same subject. The following options are available:
- Auto bracketing set: Choose the setting or settings bracketed when auto bracketing is in effect. Choose AE & flash bracketing to perform both exposure and flash-level bracketing, AE bracketing to bracket only exposure, Flash bracketing to perform only flash-level bracketing, WB bracketing to perform white-balance bracketing, or ADL bracketing to perform bracketing using Active D-Lighting.
- Number of shots: Choose the number of shots in the bracketing sequence.
- Increment: Choose the amount the selected settings vary with each shot (ADL bracketing excluded).
- Amount: Choose how Active D-Lighting varies with each shot (ADL bracketing only).
Multiple Exposure
Record two to ten NEF (RAW) exposures as a single photograph.
Multiple exposure mode
- On (series): Take a series of multiple exposures. Select Off to resume normal shooting.
- On (single photo): Take one multiple exposure.
- Off: Exit without creating additional multiple exposures.
Number of shotsChoose the number of exposures that will be combined to form a single photograph.Overlay mode
- Add: The exposures are overlaid without modification; gain is not adjusted.
- Average: Before the exposures are overlaid, the gain for each is divided by the total number of exposures taken (gain for each exposure is set to 1/2 for 2 exposures, 1/3 for 3 exposures, etc).
- Lighten: The camera compares the pixels in each exposure and uses only the brightest.
HDR overlay
Used with high contrast subjects, High Dynamic Range (HDR) preserves details in highlights and shadows by combining two shots taken at different exposures.
Interval Timer Shooting
Take photographs at the selected interval until the specified number of shots has been recorded. Select a release mode other than self-timer (E) when using the interval timer.
- Start: Start interval timer shooting, either after 3 s (Now selected for Choose start day/time) or at a selected date and time (Choose day/time). Shooting will continue at the selected interval until all shots have been taken.
- Choose start day/time: Choose a start option. To start shooting immediately, select Now. To start shooting at a chosen date and time, select Choose day/time.
- Interval: Choose the interval (hours, minutes, and seconds) between shots.
- Intervals×shots/interval: Choose the number of intervals and the number of shots per interval.
- Exposure smoothing: Selecting On allows the camera to adjust exposure to match previous shot in exposure modes other than M (note that exposure smoothing only takes effect in mode M if auto ISO sensitivity control is on). Large changes in subject brightness during shooting may result in apparent variations in exposure, in which case it may be necessary to shorten the interval between shots.
- Silent photography: Select On to silence the shutter during shooting.
- Interval priority: Choose whether the camera gives priority to exposure time or interval timing in exposure modes P and A. Select On to ensure photos are taken at the chosen interval, Off to ensure that photos are correctly exposed. If On is selected, be sure the Minimum shutter speed chosen for ISO sensitivity settings > Auto ISO sensitivity control in the photo shooting menu is faster than the interval. You should also focus using manual focus or, if you are using autofocus, choose Release for Custom Setting a1 (AF-C priority selection) or Custom Setting a2 (AF-S priority selection) according to whether AF-C or AF-S is selected.
- Starting storage folder: Highlight either of the following options and press 2 to select or deselect: New folder: A new folder is created for each new sequence or Reset file numbering: File numbering is reset to 0001 whenever a new folder is created.
You can also select to shoot exposure bracketing at the same time. The settings of exposure bracketing will depend on the exposure bracketing menu settings.
You can also simultaneously record a time lapse video!
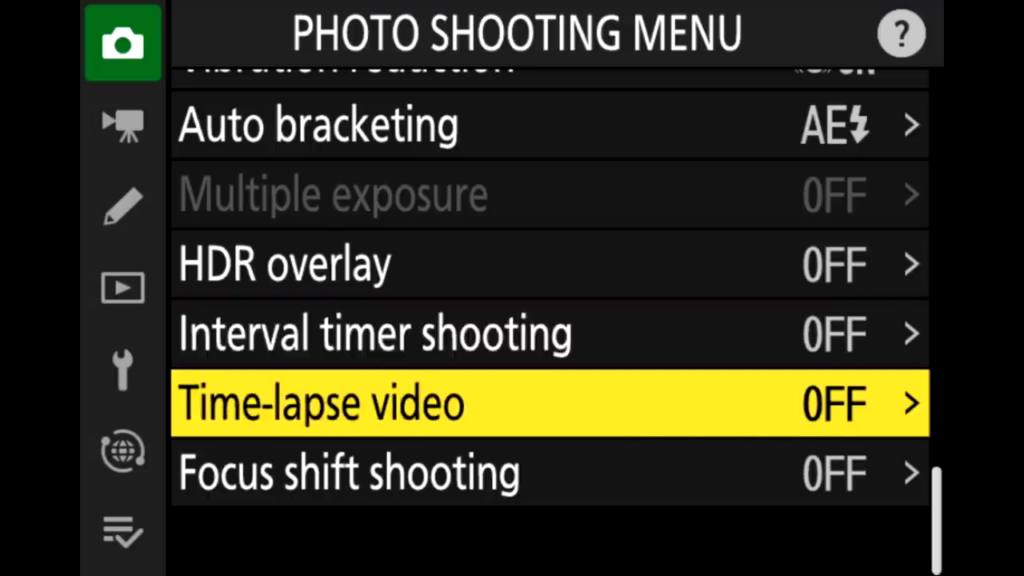
Time-Lapse Video
The camera automatically takes photos at selected intervals to create a silent time-lapse movie.
- Start: Start time-lapse recording. Shooting starts after about 3 s and continues at the selected interval for the selected shooting time.
- Interval: Choose the interval between shots in minutes and seconds.
- Shooting time: Choose the shooting time (hours and minutes).
- Exposure smoothing: Selecting On smooths abrupt changes in exposure in exposure modes other than M (note that exposure smoothing only takes effect in mode M if auto ISO sensitivity control is on). Large changes in subject brightness during shooting may result in apparent variations in exposure, in which case it may be necessary to shorten the interval between shots.
- Silent photography: Select On to silence the shutter during shooting.
- Image area: Choose an image area for time-lapse recording. The options are those for the Image area item in the movie shooting menu.
- Frame size/frame rate: Choose the frame size and rate for the final movie. The options are those for the Frame size/frame rate item in the movie shooting menu.
- Interval priority: Choose whether the camera gives priority to exposure time or interval timing in exposure modes P and A. Select On to ensure frames are taken at the chosen interval, Off to ensure that frames are correctly exposed. If On is selected, be sure the Minimum shutter speed chosen for ISO sensitivity settings > Auto ISO sensitivity control in the photo shooting menu is faster than the interval. You should also focus using manual focus or, if you are using autofocus, choose Release for Custom Setting a1 (AF-C priority selection,) or Custom Setting a2 (AF-S priority selection) according to whether AF-C or AF-S is selected.
You now also how the choice of focussing between each shot or not.
You can also select to shoot exposure bracketing at the same time. The settings of exposure bracketing will depend on the exposure bracketing menu settings.
Focus Shift Shooting
During focus shift, the camera automatically varies focus over a series of photographs. This feature can be used to take photos that will later be combined using focus stacking. Before using focus shift, rotate the focus mode selector to AF and choose a release mode other than timer.
- Start: Start shooting. Shooting will take the selected number of shots, changing the focus distance by the selected amount with each shot.
- No. of shots: Choose the number of shots (maximum 300).
- Focus step width: Choose the amount the focus distance changes with each shot.
- Interval until next shot: Choose the interval between shots. Select 00 to take photos at approximately 5 fps (release modes S, Cl, Ch, and Mup) or 3 fps (release modes Q and Qc). To ensure the correct exposure when using a flash, choose an interval long enough for the flash to charge.
- Exposure smoothing: Selecting On allows the camera to adjust exposure to match previous shot in exposure modes other than M (note that exposure smoothing only takes effect in mode M if auto ISO sensitivity control is on). Large changes in subject brightness during shooting may result in apparent variations in exposure, in which case it may be necessary to shorten the interval between shots.
- Peaking Stack Image: During Focus Shift Photography, combine the peaking information from each frame into a single image to display during playback.
- Silent photography: Select On to silence the shutter during shooting.
- Starting storage folder: Highlight either of the following options and press 2 to select or deselect: New folder: A new folder is created for each new sequence. or Reset file numbering: File numbering is reset to 0001 whenever a new folder is created.
Silent Photography
Select On to reduce vibrations caused by the shutter when shooting landscapes and other static subjects. Use of a tripod is recommended. The flash and long exposure noise reduction are disabled, as are the electronic front-curtain shutter and beep speaker, regardless of the options selected for Custom Setting d5 (Shutter type) and for Beep options in the setup menu. In continuous release modes, the frame advance rate will change.
Enabling silent photography changes the frame advance rates for continuous release modes and disables some features, including the flash, beep speaker, long exposure noise reduction, and the electronic front-curtain shutter.
MENU → Movie Shooting Menu
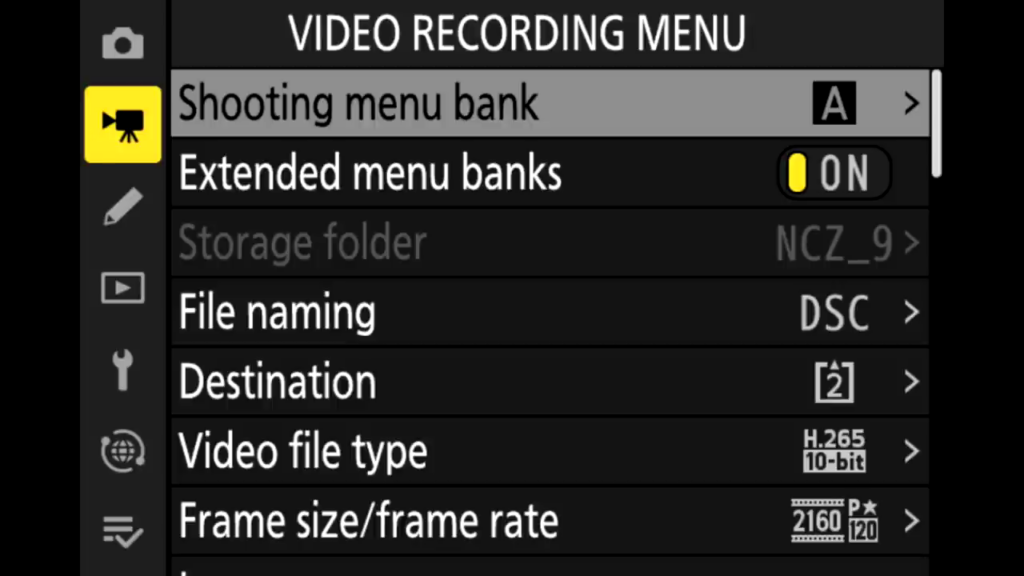
Shooting menu bank
You can save your customised presets for custom shooting scenarios in the shooting menu banks.
Extended menu banks
When enabled, Extended menu banks automatically save the Exp. Mode, Shuttle Speed and Aperture.
Storage folder
This menu defines the folder on the memory card in which new images are stored and allows to create new folders:
- Select folder by number: You choose a three digit number and the Z9 will create a folder with this number at the beginning of its name if it does not exist yet. The following five characters „Z9“ cannot be altered.
When you see a folder symbol next to the selected number a folder exists already. - Select folder from list: You choose a folder from a list of existing ones – without the possibility to create new ones.
File naming
You can replace the three letters „DSC“ which are the default beginning of file names with your own individual combination.
- an underscore _ before or after these three letters, depending on which color space you use.
- a sequential four digit number.
Destination
Select the card slot you want to use for movie recording. You can’t record to both at the same time.
Video file type
- ProRes 422 HQ 10-bit (MOV) SDR
- H265 10-bit (MOV) SDR
- H265 8-bit (MOV)
- H264 8-bit (MOV)
- H264 8-bit (MP4)
- Nikon N-RAW (Nikon proprietary compressed video format with NEV extension) (for 8K recording)
Frame Size/Frame Rate
with the Z9’s latest firmware update, you can now shoot up to 8K video.
Choose the movie frame size (in pixels) and frame rate.
- (FX) 8256×4644 60p
- (FX) 8256×4644 30p
- (FX) 8256×4644 25p
- (FX) 8256×4644 24p
- (FX) 4128×2322 120p
- (FX) 4128×2322 100p
- (FX) 4128×2322 60p
- (FX) 4128×2322 50p
- (FX) 4128×2322 30p
- (FX) 4128×2322 25p
- (FX) 4128×2322 24p
- (DX) 5392×3022 60p
- (DX) 5392×3022 50p
- (DX) 5392×3022 30p
- (DX) 5392×3022 25p
- (DX) 5392×3022 24p
- (2,3x) 3840×2160 120p
- (2,3x) 3840×2160 100p
Image Area
- FX
- DX (cropped)
DX crop alert: get an alert when shooting if DX is turned on.
ISO Sensitivity Settings
You can adjust the following ISO sensitivity settings:
- Maximum sensitivity: Choose the upper limit for auto ISO sensitivity control from values between ISO 200 and Hi 2. Auto ISO sensitivity control is used in modes P, S, and A and when On is selected for Auto ISO control (mode M) in mode M.
- Auto ISO control (mode M): Select On to enable auto ISO sensitivity control in mode M, Off to use the value selected for ISO sensitivity (mode M).
- ISO sensitivity (mode M): Choose the ISO sensitivity for mode M from values between ISO 64 and Hi 2. Auto ISO sensitivity control is used in other modes.
Hack: At high ISO sensitivities, the camera may have difficulty focusing and noise (randomly-spaced bright pixels, fog, or lines) may increase. This can be prevented by choosing a lower value for the ISO Maximum sensitivity.
White Balance
Choose the white balance for movies (same choices as for the Photo Settings)
Set Picture Control
Choose a Picture Control for movies. You’ll also find the Creative Picture Control settings here. You can find presets like Dream, Morning, Pop, Sunday, Sober, Dramatic, Silence, Bleached, Melancholic, Pure, Denim, Toy, Sepia, Blue, Red, Pink, Charcoal, Graphite, Binary and Carbon. These can off course be edited too.
Manage Picture Control
You can create custom Picture Controls here. (again same procedure as for photos)
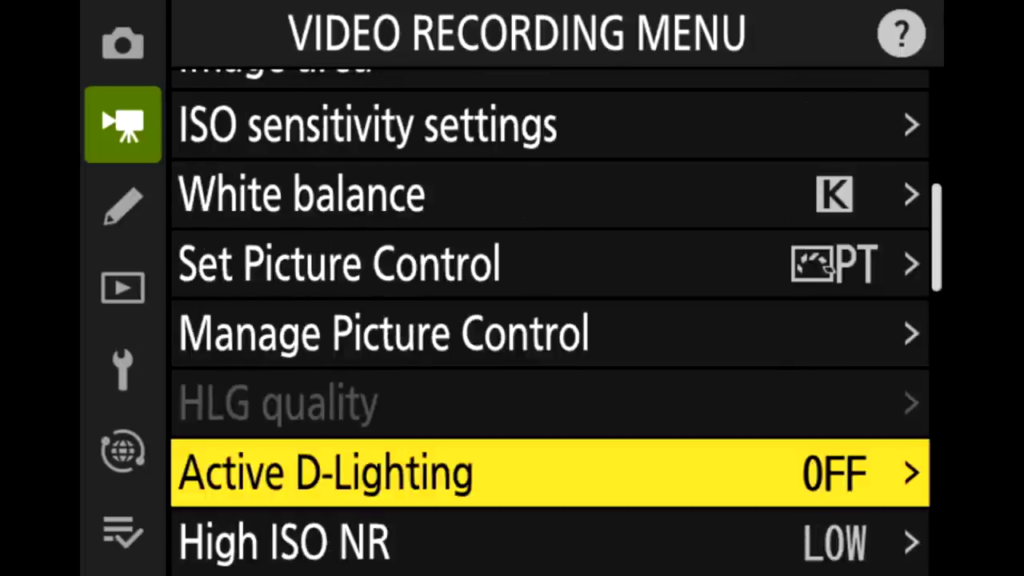
Active D-Lighting
Preserve details in highlights and shadows, creating movies with natural contrast. Select Same as photo settings to use the option currently selected for photos.
Options are Auto, Extra High, High, Normal, Low or Off.
High ISO NR
Reduce “noise” (what Nikon calls randomly-spaced bright pixels) in movies recorded at high ISO sensitivities
Vignette Control
reduce shading or lens vignetting automatically using this function.
Diffraction Compensation
Same as for stills, the Nikon Z9 can automatically reduce the loss of sharpness due to diffraction when lenses are used with an aperture above f/11.
Auto Distortion Control
Select On as required to reduce barrel distortion when shooting with wide-angle lenses and to reduce pin-cushion distortion when shooting with long lenses (note that Off may not be available with some lenses).
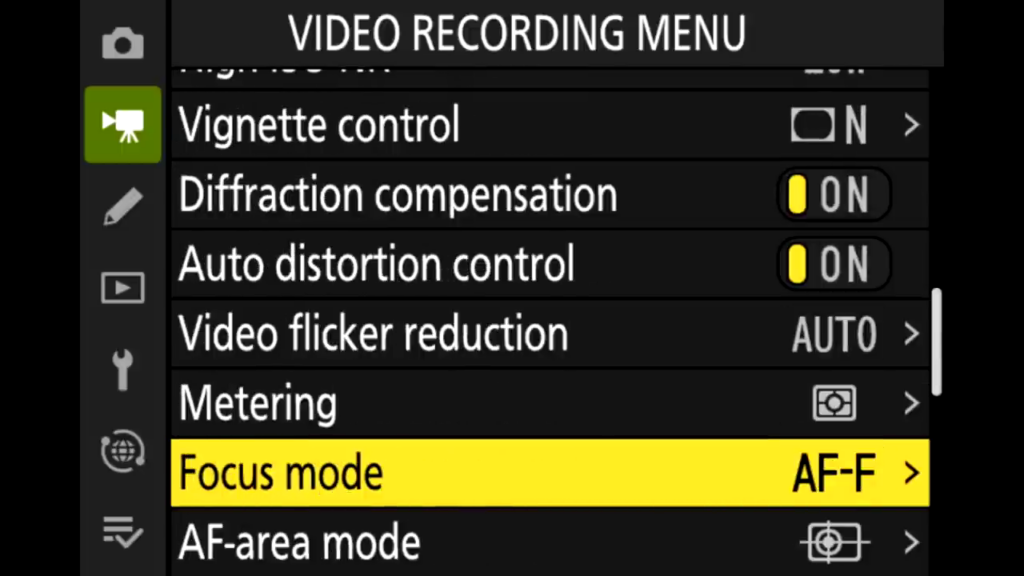
Video flicker Reduction
Reduce flicker and banding when shooting movies under fluorescent or mercury-vapor lighting. Choose Auto to allow the camera to automatically choose the correct frequency, or manually match the frequency to that of the local AC power supply.
If Auto fails to produce the desired results and you are unsure as to the frequency of the local power supply, test both the 50 and 60 Hz options and choose the one that produces the best results. Flicker reduction may not produce the desired results if the subject is very bright, in which case you should try choosing a smaller aperture (higher f-number). To prevent flicker, select mode M and choose a shutter speed adapted to the frequency of the local power supply: 1/125 s, 1/60 s, or 1/30 s for 60 Hz; 1/100 s, 1/50 s, or 1/25 s for 50 Hz.
Metering
Metering determines how the camera sets exposure. The same options as in the Photo Menu are available.
- Matrix metering: The camera meters a wide area of the frame and sets exposure according to tone distribution, color, composition, and distance for results close to those seen by the naked eye.
- Center-weighted metering: The camera meters the entire frame but assigns the greatest weight to an area in the center of the frame, the size of which can be chosen using Custom Setting b3 (Center-weighted area). This is the classic meter for portraits and is also recommended when using filters with an exposure factor (filter factor) over 1×.
- Spot metering: The camera meters a ⌀4 mm circle (equivalent to approximately 1.5% of the frame) centered on the current focus point, making it possible to meter off-center subjects (if auto-area AF is in effect, the camera will instead meter the center focus point). Spot metering ensures that the subject will be correctly exposed, even when the background is much brighter or darker.
- Highlight-weighted metering: The camera assigns the greatest weight to highlights. Use this option to reduce loss of detail in highlights, for example when photographing spotlit performers on-stage.
Focus Mode
At default settings, the focus mode can also be selected by holding the Fn2 button and rotating the main command dial.
- AF-S: For stationary subjects. Press the shutter-release button halfway to focus. If the camera is able to focus, the focus point will be displayed in green; focus will lock while the shutter-release button is pressed halfway. If the camera fails to focus, the focus point will flash red. At default settings, the shutter can only be released if the camera is able to focus (focus priority).
- AF-C: For moving subjects. The camera focuses continuously while the shutter-release button is pressed halfway; if the subject moves, the camera will predict the final distance to the subject and adjust focus as necessary. At default settings, the shutter can be released whether or not the subject is in focus (release priority).
- AF-F: The camera adjusts focus continuously in response to subject movement or changes in composition. Focus locks when the shutter-release button is pressed halfway. This option is only available in movie mode.
- Manual focus: The shutter can be released whether or not the subject is in focus.
AF-Area Mode
AF-area mode controls how the camera selects the focus-point for autofocus.
- Single-point AF: The camera focuses on a point selected by the user. Use with stationary subjects.
- Wide-area AF (S or L): As for Single-point AF except that wider focus points are used. The focus points for Wide-area AF (L) are wider than those for Wide-area AF (S).
- Subject tracking AF: Use for tracking moving subjects like people, animals or vehicles.
- Auto-area AF: The camera automatically detects the subject and selects the focus area. At default settings, the camera gives priority to portrait subjects; if a portrait subject is detected, the selected subject will be indicated by a yellow border (if multiple faces are detected, you can choose your subject using the multi selector). Subject tracking can be activated by pressing the OK button.
AF subject detection options
Auto: camera will automatically switch between human and animal eye autofocus.
human: camera will lock on to human eyes.
Animal: camera will lock on to animal eyes.
Vehicle AF: locks onto both two-wheeled and four-wheeled vehicles.
Vibration Reduction
Identical to the Photo Menu again. Only needed when your lens does not have a VR switch. If your lens does have a VR switch, turning it of will turn off both lens and sensor stabilisation.
Electronic VR
Choose whether to enable electronic vibration reduction in movie mode.
Microphone Sensitivity
Turn the built-in or external microphones on or off or adjust microphone sensitivity. Choose Auto sensitivity to adjust sensitivity automatically, Microphone off to turn sound recording off; to select microphone sensitivity manually, select Manual sensitivity and choose a sensitivity.
Attenuator
Select Enable to reduce microphone gain and prevent audio distortion when recording movies in loud environments.
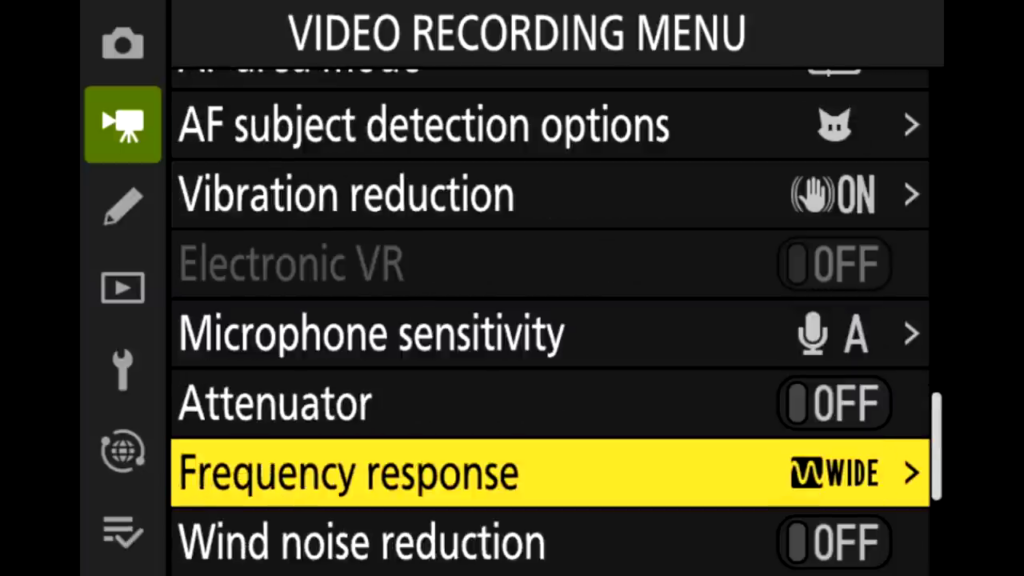
Frequency Response
If Wide range is selected, the built-in and external microphones will respond to a wide range of frequencies, from music to the bustling hum of a city street. Choose Vocal range to bring out human voices.
Wind Noise Reduction
Select On to enable the low-cut filter for the built-in microphone (optional stereo microphones are unaffected), reducing noise produced by wind blowing over the microphone (note that other sounds may also be affected). Wind-noise reduction for optional stereo microphones that support this feature can be enabled or disabled using microphone controls.
Mic jack plugin power
enables power to the mic jack for powered microphones.
Headphone Volume
Adjust the headphone volume here.
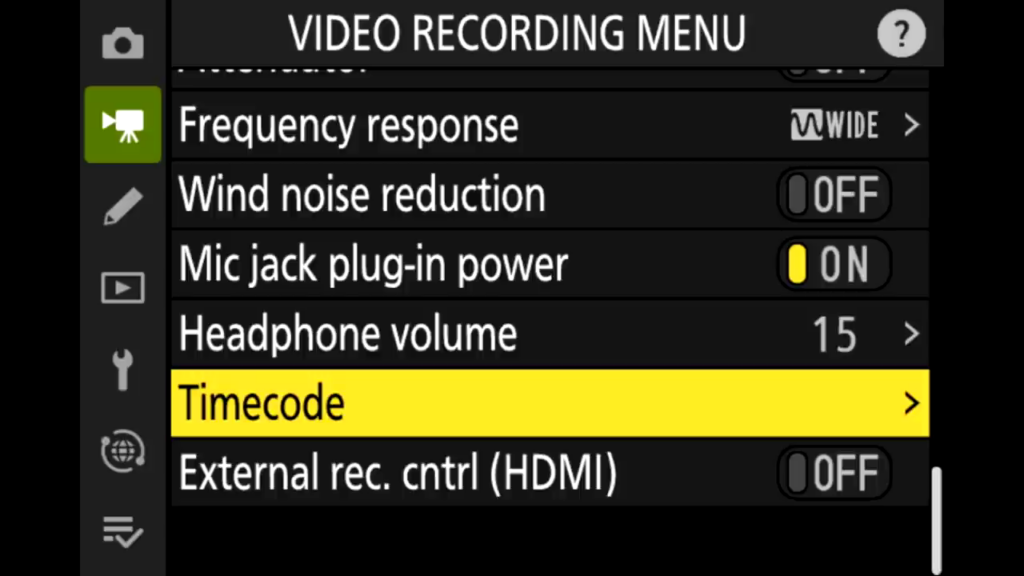
Time Code
The Nikon Z9 is quite a capable video cam. It’s possible to write time code to the movie files for alignment in software later.
Record Timecodes
- On: Time codes are recorded and appear in the display.
- On (with HDMI output): Time codes will be included with footage saved to Atomos SHOGUN, NINJA, or SUMO-series Monitor recorders connected via an HDMI cable.
- Off: Time codes are not recorded.
Count-Up Method:
- Record run: Time codes are incremented only while recording is in progress.
- Free run: Time codes are incremented continuously, including while the camera is off.
Timecode origin:
- Reset: Reset the time code to 00:00:00.00.
- Enter manually: Enter the hour, minute, second, and frame number manually.
- Current time: Set the time code to the current time as provided by the camera clock.
Drop Frame:
Select On to compensate for discrepancies between the frame count and the actual recording time at frame rates of 30 and 60 fps.
External Rec. Control (HDMI)
Atomos control protocol for external control can be enabled here.
MENU → Custom Setting Menu

Reset Custom Settings
Resets all Custom settings to the factory settings.
a Autofocus Settings
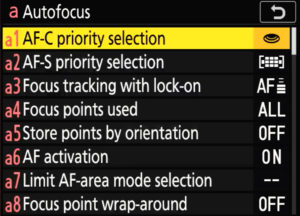
a1 AF-C Priority Selection
When AF-C is selected for photography, this option controls whether photographs can be taken whenever the shutter-release button is pressed (release priority) or only when the camera is in focus (focus priority).
- Release: Photos can be taken whenever the shutter-release button is pressed.
- Focus: Photos can be taken only when the camera is in focus.
Regardless of the option selected, focus will not lock when AF-C is selected for autofocus mode. The camera will continue to adjust focus until the shutter is released.
a2 AF-S Priority Selection
When AF-S is selected for photography, this option controls whether photographs can be taken only when the camera is in focus (focus priority) or whenever the shutter-release button is pressed (release priority).
- Release: Photos can be taken whenever the shutter-release button is pressed.
- Focus: Photos can only be taken when the in-focus indicator is displayed.
Regardless of the option selected, if the in-focus indicator is displayed when AF-S is selected for autofocus mode, focus will lock while the shutter-release button is pressed halfway. Focus lock continues until the shutter is released.
a3 Focus Tracking with Lock-on
This option controls how autofocus adjusts to changes in the distance to the subject when AF-C is selected during viewfinder photography.
Choose from values between 5 (Delayed)and 1 (Quick). The higher the value, the slower the response and the less likely you are to lose focus on your original subject. The lower the value, the quicker the response and the easier it is to shift focus to objects crossing your field of view. Note that 2 and 1 (Quick) are equivalent to 3 when auto-area AF is selected for AF-area mode.
a4 Focus Points Used
Choose the number of focus points available for manual focus-point selection.
All: Every focus point available in the current AF-area mode can be selected.
1/2: The number of available focus points is reduced by three quarters (the number of focus points available in Wide-area AF (L) mode does not change). Use for quick focus-point selection.
a5 Store Points by Orientation
Choose whether separate focus points can be selected for “wide” (landscape) orientation, for “tall” (portrait) orientation with the camera rotated 90° clockwise, and for “tall” orientation with the camera rotated 90° counterclockwise.
Select NO to use the same focus point and AF-area mode regardless of camera orientation.
 |
 |
 |
Choose YES to enable separate focus-point selection, or Focus point and AF-area mode to enable separate selection of both the focus point and the AF-area mode.
 |
 |
 |
a6 AF Activation
Choose whether the shutter-release button can be used to focus (Shutter/AF-ON) or if focus can only be adjusted using the AF-ON button or other controls to which AF-ON has been assigned (AF-ON only).
a7 Focus Point Persistence
Choose whether the focus point selected by the camera continues in use after you change AF-area modes using a control to which [] or [] has been assigned via Custom Setting f2 []. This only applies if you change AF-area modes while focusing with the shutter-release button pressed halfway.
a8 Limit AF-Area Mode Selection
Choose the AF-area modes that can be selected by pressing the focus-mode button and rotating the sub-command dial.
a9 Focus Mode restrictions
Limit focus-mode selection to a single focus mode. If an option other than is selected, rotating the main command dial while holding the focus-mode button will not change the focus mode.
a10 Focus Point Wrap-Around
Choose whether focus-point selection “wraps around” from one edge of the display to another. If is selected, focus-point selection will “wrap around” from top to bottom, bottom to top, right to left, and left to right, so that, for example, pressing right when a focus point at the right edge of the display is highlighted selects the corresponding point at the left edge.
a11 Focus Point Display
Choose from these focus point display options:
Manual Focus Mode:
- On: The focus point is displayed at all times in manual focus mode.
- Off: The focus point is displayed only during focus point selection.
Dynamic-Area AF Assist:
Choose whether both the selected focus point and the surrounding focus points are displayed in dynamic-area AF mode.
On: Display both the selected focus point and surrounding focus points.
Off: Display only the selected focus point.
AF-C In-Focus Display:
Choose whether the focus point changes color when the subject is in focus in focus mode AF-C.
- On: The focus point is displayed in green when the camera judges that the subject is in focus.
- Off: The active focus point is displayed in red or yellow at all times, whether or not the camera is in focus.
a12 Built-in AF-Assist Illuminator
Choose whether the built-in AF-assist illuminator lights to assist the focus operation in photo mode when lighting is poor.
On: In photo mode, the illuminator will light as required when AF-S is selected for focus mode.
Off: The illuminator does not light to assist the focus operation. The camera may not be able to focus when lighting is poor.
a13 Focus Peaking
When focus peaking is enabled in manual focus mode, objects that are in focus are indicated by colored outlines in the display. You can choose the color.
- Focus Peaking Display: Select to enable focus peaking.
- Focus Peaking Sensitivity: Choose focus peaking sensitivity from , and l. The higher the value, the greater the depth that will be shown as being in focus.
- Focus Peaking Highlight Color: Choose the highlight color.
a14: Manual Focus Ring in AF Mode
This item is available with compatible lenses only. It controls whether the lens focus ring can be used for manual focus in autofocus mode.
On: Autofocus can be over-ridden by rotating the lens focus ring (autofocus with manual override). The focus ring can be used for manual focus while the shutter-release button is pressed halfway. To refocus using autofocus, lift your finger from the shutter-release button and then press it halfway again.
Off: The lens focus ring cannot be used for manual focus in autofocus mode.
b Metering/Exposure Settings
b1 EV steps for exposure cntrl
Choose whether changes to ISO sensitivity are made in increments of 1/3 or 1 EV. If the value currently selected for ISO sensitivity is not available at the chosen setting, ISO sensitivity will be set to the nearest available value.
b2 EV Steps for Exposure Cntrl
Select the increments used for adjustments to shutter speed, aperture, bracketing, and exposure and flash compensation.
-
If ] is selected, changes to shutter speed, aperture, and bracketing will be made in increments of 1 EV and changes to exposure and flash compensation in increments of 1/3 EV.
b3 Easy Exposure Compensation
Choose whether the +- button is needed for exposure compensation.
On (auto reset): Exposure compensation can be adjusted using only a command dial. The setting selected with the command dial is reset when the camera turns off or the standby timer expires.
On: Exposure compensation can be adjusted using only a command dial. Exposure compensation is not reset when the camera turns off or the standby timer expires.
Off: Exposure compensation is set by pressing the E button and rotating a command dial.
b4 Matrix Metering Face Detection
Choose whether exposure is adjusted for the faces of human portrait subjects detected by the camera when is selected.
b5: Center-Weighted Area
When is selected, the camera assigns the greatest weight to an area in the center of the shooting display when setting exposure.
Small: The camera assigns the greatest weight to an area equivalent to a circle 8 mm in diameter.
Stdrd: Standard, the camera assigns the greatest weight to an area equivalent to a circle 12 mm in diameter.
Avg: Average, weighting is based on the average of the entire frame.
b6: Fine-Tune Optimal Exposure
Use this option to fine-tune the exposure value selected by the camera; exposure can be fine-tuned separately for each metering method. Exposure can be adjusted up for brighter exposures or down for darker exposures in the range +1 to –1 EV in steps of 1/6 EV. The default is zero.
b7: Keep Exp. When f/ Changes
When is selected for [] > [] in the photo shooting menu in mode M, actions such as switching to a lens with a different aperture range may cause unintended changes to aperture. If an option other than [] is selected for [], the camera will adjust shutter speed or ISO sensitivity to maintain exposure at its current value.
-
Other cases in which settings may be automatically adjusted to maintain exposure include when:
-
lenses with different maximum apertures at minimum and maximum zoom are zoomed in or out, or
-
the focus distance changes while a micro lens is attached.
-
-
The setting adjusted to maintain exposure when aperture changes can be chosen from [] and []. Select [] to disable this feature.
-
Depending on the lens, the camera may be unable to maintain current exposure at some settings.
-
Exposure maintenance is not available during video recording.
c Timers/AE Lock Settings
c1: Shutter-Release Button AE-L
Choose whether exposure locks when the shutter-release button is pressed.
- On (half press: Pressing the shutter-release button halfway locks exposure.
- On (burst mode): Exposure only locks while the shutter-release button is pressed all the way down.
- Off: Pressing the shutter-release button does not lock exposure.
c2 Self-timer
Choose the length of the shutter release delay, the number of shots taken, and the interval between shots in self-timer mode.
- Self-timer delay: Choose the length of the shutter-release delay.
- Number of shots: Press up and down to choose the number of shots taken each time the shutter-release button is pressed.
- Interval between shots: Choose the interval between shots when the Number of shots is more than 1.
c3 Power off delay
Choose how long the monitor remains on when no operations are performed during playback (Playback; defaults to 10 seconds) and image review (Image review; defaults to 4 seconds), when menus (Menus; defaults to 1 minute) or information (Information display; defaults to 10 s) are displayed, or during live view and movie recording (Live view; defaults to 10 minutes). Choose a shorter monitor-off delay for longer battery life. how you are shooting, In the real world, battery life is somewhere between 2000 and 4000 frames., not the CIPA rated 700 clicks.
d Shooting/display Settings
d1: Continuous Shooting Speed
Choose the frame advance rate for low-speed continuous release mode.
Continuous high-speed: Choose the frame rate for continuous high-speed release mode from options ranging from to .
Continuous low-speed:
Choose the frame rate for continuous low-speed release mode from options ranging from to .
(The actual frame rate when is selected is 7.5 fps.)
d2 Max. shots per burst
The maximum number of shots that can be taken in a single burst in continuous release modes can be set to any value between 1 and 200. Note that regardless of the option selected, there is no limit to the number of photos that can be taken in a single burst when a shutter speed of 4 s or slower is selected in mode S or M.
d3 Limit release mode selection
Choose the release modes that can be accessed by pressing the ![]() button and rotating the main command dial when the release mode dial is rotated to
button and rotating the main command dial when the release mode dial is rotated to ![]() .
.
d4 c30/C120 options
Another firmware v2 update, the camera will store frames before and after you’ve pressed the shutter. We call this pre- and post “cap” (capture).
Pre-release bursts: choose either 0,3 second, 0,5 second or 1 second of recording before you press the shutter.
Post-Release bursts: choose either 1 second, 2 seconds, 3 seconds or 4 seconds of recording after you’ve released the shutter.
d5 Sync. Release Mode Options
Choose whether the shutters on the remote cameras are synchronized with the shutter on the master camera when using an optional wireless remote controller or the item in the network menu.
d6 Extended Shutter Speeds (M)
Extend the range of shutter speeds available in mode M; the slowest shutter speed available when is selected is 900 s (15 minutes). Extended shutter speeds can be used for pictures of the night sky and other long exposures.
-
At speeds slower than 1s, the shutter speed displayed by the camera may differ from the actual exposure time. The actual exposure times at shutter speeds of 15 and 30 seconds, for example, are respectively 16 and 32 seconds. The exposure time will again match the selected shutter speed at speeds of 60 seconds and slower.
d7 Limit Selectable Image Area
Choose the options that can be accessed by rotating a command dial in the i menu or while pressing a control to which image area has been assigned.
d8 File Number Sequence
- On: When a new folder is created or a new memory card is inserted in the camera, file numbering will continue from the last number used. This simplifies file management by minimizing the occurrence of duplicate file names when multiple cards are used.
- Off: When a new folder is created or a new memory card is inserted, file numbering restarts from 0001. If the current folder already contains pictures, file numbering will instead continue from the highest file number in the current folder.
- If you select [] after selecting [], the camera will store the current file number. File numbering will resume from the previously-stored value the next time [] is selected.
- Reset: Reset the file numbering for []. If the current folder is empty, file numbering will restart from 0001 with the next picture taken. If the current folder contains pictures, the next picture taken will be assigned a file number by adding one to the highest file number in the current folder.
d9 File View Mode
Choose whether the camera adjusts the preview in the viewfinder or monitor to reflect how shooting settings will affect the hue and brightness of the final picture. Regardless of the option selected, the effects of camera settings are always visible in video mode.
- Show effects of settings: The effects of changes to settings such as white balance, Picture Controls, and exposure compensation are visible in the shooting display.
- Adjust for ease of viewing: The effects of changes to settings such as white balance, Picture Controls, and exposure compensation are not visible in the shooting display. Pressing 2 when [] is highlighted displays [] and [] options.
d10 Starlight View (Photo Lv)
Select [] to brighten the display for ease of viewing in dark environments (starlight view). Note that the display may become slightly jerky when starlight view is in effect.
d11 Warm Display Colors
Use warmer colors with reduced brightness in the shooting, menu, and/or playback displays. This makes the displays easier to view with vision adapted to dark environments during astronomical photography and the like.
d12 LCD Illumination
Choose when the control panel and button backlights light.
-
If is selected, the backlights will light when the power switch is rotated to D. The backlights turn off when the shutter-release button is pressed.
-
If is selected, the backlights will light while the standby timer is active. Note that this increases the drain on the battery. The backlights will turn off while the shutter-release button is pressed, but will turn on again when the button is released.
d13 View All in Continuous Mode
Choose whether image review is available during burst shooting. If Off is selected, not only the monitor but also the monitor backlight will turn off during exposures.
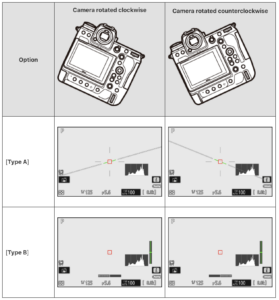
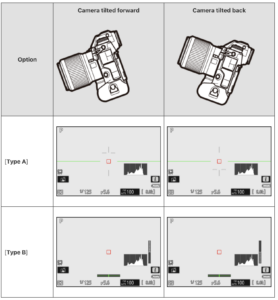
d14: Release Timing Indicator
Choose how the display responds when the shutter is released.
- Type A: The display goes dark when the shutter is released.
- Type B: Borders appear at the top, bottom, and sides of the frame when the shutter is released.
- Type C: Borders appear at the sides of the frame when the shutter is released.
- Off: A release timing indicator is not displayed when the shutter is released.
d15: Image Frame
Select to hide the white border around the shooting displays in the monitor and viewfinder.
d16: Grid Type
Choose a framing grid for the shooting display.
d17: Virtual Horizon Type
Choose a virtual horizon for the shooting display.
: A large indicator showing roll and pitch fills the display.
: A roll indicator appears at the bottom of the display and a pitch indicator at its right edge.
Roll:
Pitch:
d18: Custom Monitor Shooting Display
Choose the monitor displays accessible by pressing the DISP button during shooting.
|
A |
[] |
View the shooting mode, shutter speed, aperture, and other basic shooting info. |
|
B |
[] |
View the focus mode, AF-area mode, white balance, and other detailed shooting info. |
|
C |
[] |
View options that can be accessed via touch controls, including touch AF and the i menu. |
|
D |
[] |
Enable the virtual horizon. The display type can be selected using Custom Setting d16 []. |
|
E |
[] |
Enable the RGB histogram. |
|
b |
[] |
Enable the framing grid. The display type can be selected using Custom Setting d15 []. |
|
F |
[] |
Display crosshairs at the center of the frame. |
d19: Custom Viewfinder Shooting Display
Choose the viewfinder displays accessible by pressing the DISP button during shooting.
d20: High fps viewfinder display
tun on the 120 fps viewfinder mode, new in the Nikon Z9 v2.0 firmware update.
e Bracketing/Flash Settings
e1 Flash Sync Speed
Choose the flash sync speed.
|
Option |
Description |
|---|---|
|
[] |
Flash sync speed is set to 1/250 or 1/200 s. With compatible flash units, auto FP high-speed sync will automatically be enabled at shutter speeds faster than 1/250or 1/200 s.
|
|
[] |
|
|
[] |
Flash sync speed set to selected value, which can be from 1/200 to 1/60 s. |
|
[] |
|
|
[] |
|
|
[] |
|
|
[] |
|
|
[] |
e2 Flash Shutter Speed
Choose the slowest shutter speed available with a flash in mode P or A.
Regardless of the setting chosen for Custom Setting e2 [], shutter speeds can be as slow as 30 s in modes S and M or at flash settings of slow sync, slow rear-curtain sync, or red-eye reduction with slow sync.
e3 Exposure Comp. for Flash
Choose how the camera adjusts flash level when exposure compensation is used.
- Entire frame: Both flash level and exposure compensation are adjusted to modify exposure over the entire frame.
- Background only: Exposure compensation applies to background only.
e4 Auto ISO sensitivity control (with flash)
Choose the reference used to set exposure when a flash is used with auto ISO sensitivity control.
- Subject and background: The camera takes both the main subject and background lighting into account when adjusting ISO sensitivity.
- Subject only: ISO sensitivity is adjusted only to ensure that the main subject is correctly exposed.
e 5 Modeling Flash
If On is selected when the camera is used with an optional flash unit that supports the Nikon Creative Lighting system, pressing the button to which Preview has been assigned using Custom Setting f2 (Custom control assignment) emits a modeling flash that can be used to preview the effects of flash lighting. No modeling flash is emitted if Off is selected.
e6 Auto bracketing (mode M)
This option determines which settings are affected when AE & flash bracketing or AE bracketing is selected for the Auto bracketing set option in the photo shooting menu in manual exposure mode.
- Flash/speed: Camera varies shutter speed (AE bracketing) or shutter speed and flash level (AE & flash bracketing).
- Flash/speed/aperture: Camera varies shutter speed and aperture (AE bracketing) or shutter speed, aperture, and flash level (AE & flash bracketing).
- Flash/aperture: Camera varies aperture (AE bracketing) or aperture and flash level (AE & flash bracketing).
- Flash/ISO sensitivity: ISO sensitivity and flash level.
- Flash only:Camera varies flash level only (AE & flash bracketing).
Flash bracketing is performed only with i-TTL or qA (auto aperture) flash control. If a setting other than Flash only is selected and the flash is not used, ISO sensitivity will be fixed at the value for the first shot when auto ISO sensitivity control is on.
e7 Bracketing order
At the default setting of MTR > under > over, exposure, flash, and white balance bracketing are performed in the following order: the unmodified shot is taken first, followed by the shot with the lowest value, followed by the shot with the highest value. If Under > MTR > over (plus to minus) is selected, shooting will proceed in order from the lowest to the highest value. This setting has no effect on ADL bracketing.
e8: Flash Burst Priority
Choose whether optional flash units emit monitor pre-flashes before each shot during burst photography in high- or low-speed continuous release mode.
|
Option |
Description |
|
|---|---|---|
|
c |
[] |
The flash unit emits a monitor pre-flash before the first shot in each sequence and locks output at the metered value for the remaining shots. The frame advance rate drops less than when [] is selected. |
|
q |
[] |
The flash unit emits a monitor pre-flash before each shot and adjusts flash output as required. The frame advance rate may drop in some circumstances. |
f Controls Settings
f1 Customize i menu
Choose the items listed in the i menu displayed when the i button is pressed in photo mode.
-
Highlight a position in the i menu, press OK, and select the desired item.
-
The following items can be assigned to the i menu.
-
[]
Shooting Menu Bank
[]
Custom Settings Bank
[]
Adjusting Image Area Settings
[]
Adjusting Image Quality
[]
Choosing an Image Size
[]
View Memory Card Info
[]
Exposure Compensation
[]
ISO Sensitivity
[]
White Balance
[]
Picture Controls
[]
Color Space
[]
Active D-Lighting
[]
Long Exposure NR
[]
High ISO NR
[]
Metering
[]
Flash Modes
[]
Flash Compensation
[]
Remote Flash Photography
[]
Group Flash, Group Flash
[]
Radio AWL, Optical AWL
[]
Remote Flash Photography
[]
Radio AWL
[]
Focus Mode
[]
AF-Area Mode
[]
Vibration Reduction
[]
Auto Bracketing
[]
Multiple Exposure
[]
HDR Overlay
[]
Interval Timer Shooting
[]
Time-Lapse Video
[]
Focus Shift Shooting
[]
a3: Focus Tracking with Lock-On
[]
Silent Mode
[]
f2: Custom Controls (Shooting)
[]
d8: View Mode (Photo Lv)
[]
Split-Screen Display Zoom
[]
a13: Focus Peaking
[]
Monitor Brightness, Viewfinder Brightness
[]
Airplane Mode
[]
d10: Warm Display Colors
f2 Custom controls (shooting)
choose the operations performed in photo mode using camera or lens controls, including the camera’s programmable buttons and sub-selector and the lens control ring.
|
Options: |
|
|---|---|
|
|
[] |
|
|
[] |
|
|
[] |
|
|
[] |
|
|
[] |
|
|
[] |
|
|
[] |
|
|
[] |
|
|
[] |
|
|
[] |
|
|
[] |
|
|
[] |
|
|
[] |
|
|
[] |
|
|
[] |
|
|
[] |
|
|
[] |
The roles that can be assigned are listed below. The roles available vary with the control.
|
Role |
Description |
|
|---|---|---|
|
|
[] |
Pressing the control selects a preset focus point.
|
|
|
[] |
Pressing the control selects the center focus point. |
|
|
[] |
Holding the control selects a preset AF-area mode. The AF-area mode previously in effect is restored when the control is released.
|
|
|
[] |
Holding the control selects a preset AF-area mode and initiates autofocus. The AF-area mode previously in effect is restored when the control is released.
|
|
|
[] |
Pressing the control initiates autofocus, duplicating the function of the AF-ON button. |
|
|
[] |
Focus locks while the control is pressed. |
|
|
[] |
Exposure locks when the control is pressed. Exposure lock does not end when the shutter is released. Exposure remains locked until the control is pressed a second time or the standby timer expires. |
|
|
[] |
If [] or [] is selected for white balance, white balance will lock when the control is pressed (white-balance lock). White-balance lock does not end when the shutter is released. The lock will however be released when the control is pressed a second time or the standby timer expires. |
|
|
[] |
Exposure locks when the control is pressed. White balance will also lock provided [] or [] is selected for white balance. Exposure and white-balance lock do not end when the shutter is released. The lock will however be released when the control is pressed a second time or the standby timer expires. |
|
|
[] |
Exposure locks when the control is pressed. Exposure remains locked until the control is pressed a second time, the shutter is released, or the standby timer expires. |
|
|
[] |
Exposure locks while the control is pressed. |
|
|
[] |
Focus and exposure lock while the control is pressed. |
|
|
[] |
Press the control to lock flash value for optional flash units; press again to cancel FV lock. |
|
|
[] |
If the flash is currently enabled, it will be disabled while the control is pressed. If the flash is currently off, front-curtain sync will be selected while the control is pressed. |
|
|
[] |
While the control is pressed, the shooting display will show how color, exposure, and depth of field are affected by current photo settings. |
|
|
[] |
Hold the control to recall previously-selected settings.
|
|
|
[] |
|
|
|
[] |
When [] is selected for [] in the network menu, or when a wireless remote controller is used for synchronized release, the chosen control can be used to toggle between remote release and master or synchronized release. The options available depend on the setting chosen for Custom Setting d4 [].
|
|
|
[] |
|
|
|
[] |
Press the control to enable silent mode. Press again to disable. |
|
|
[] |
Press the control to hide icons and other information in the shooting display. Press again to view. |
|
|
[] |
Press the control to display a framing grid. To hide the grid, press the control again. The display type can be selected using Custom Setting d15 []. |
|
|
[] |
Press the control to zoom the display in on the area around the current focus point. Press again to cancel zoom. |
|
|
[] |
Press the control to enable the virtual horizon display. Press again to hide the display. The display type can be selected using Custom Setting d16 []. |
|
|
[] |
Press the control to toggle starlight view on. Press again to end starlight view. |
|
|
[] |
Press the control once to enable focus peaking when MF is selected for focus mode. Press again to end focus peaking. |
|
|
[] |
Press the control to display “MY MENU”. |
|
|
[] |
Press the control to jump to the top item in “MY MENU”. Select this option for quick access to a frequently-used menu item. |
|
|
[] |
Press the control to start playback. |
|
|
[] |
Press the control to view only pictures that meet the criteria selected for [] in the playback menu. |
|
|
[] |
The control performs the role currently selected for the AF-ONbutton. |
|
|
[] |
Press the control and rotate a command dial to choose a shooting menu bank. |
|
|
[] |
Press the control and rotate the main command dial to choose a shooting mode. |
|
|
[] |
Press the control and rotate a command dial to choose the image area. |
|
|
[] |
Press the control and rotate the main command dial to choose an image quality option and the sub-command dial to select image size. |
|
|
[] |
Press the control and rotate a command dial to choose a Picture Control. |
|
|
[] |
Press the control and rotate a command dial to adjust Active D-Lighting. |
|
|
[] |
Press the control and rotate a command dial to choose a metering option. |
|
|
[] |
Hold the control and rotate the main command dial to choose the focus mode, the sub-command dial to choose the AF-area mode. |
|
|
[] |
Press the control and rotate the main command dial to choose the number of shots and the sub-command dial to select the bracketing increment or Active D-Lighting amount. |
|
|
[] |
Press the control and rotate the main command dial to choose the mode and the sub-command dial to choose the number of shots. |
|
|
[] |
Press the control and rotate the main command dial to choose the mode and the sub-command dial to adjust HDR strength. |
|
|
[] |
|
|
|
[] |
Make adjustments to shutter speed and aperture in increments of 1 EV, regardless of the option selected for Custom Setting b2 [].
|
|
|
[] |
Press the control and rotate a command dial to choose a lens number saved using the [] item in the setup menu. |
|
|
[] |
Autofocus can be over-ridden by rotating the lens control ring (autofocus with manual override). The control ring can be used for manual focus while the shutter-release button is pressed halfway. To refocus using autofocus, lift your finger from the shutter-release button and then press it halfway again. |
|
|
[] |
Rotate the lens control ring to adjust aperture. |
|
|
[] |
|
|
|
[] |
Rotate the lens control ring to adjust ISO sensitivity. |
|
[] |
The control has no effect. |
|
Command Dials
The following roles can be assigned to the command dials. To view options, highlight items and press 2.
|
Role |
Description |
|---|---|
|
[] |
Reverse the roles of the main and sub-command dials in selected modes. Press 4 or 2 to highlight a mode and 1 or 3 to switch roles. |
|
[] |
Switch the roles played by rotating the main and sub-command dials while the focus-mode button is pressed. |
|
[] |
Choose the role played by the sub-command dial in the zoom display.
|
f3 Custom Controls (Playback)
Choose the operations performed during playback using the cameras controls listed below.
|
Option |
|
|---|---|
|
|
[] |
|
|
[] |
|
|
[] |
|
|
[] |
|
|
[] |
|
|
[] |
|
|
[] |
|
|
[] |
|
|
[] |
|
|
[] |
|
|
[] |
|
|
[] |
|
|
[] |
-
The roles that can be assigned to these controls are listed below. The roles available vary with the control.
|
Role |
Description |
|
|---|---|---|
|
|
[] |
Press the control to toggle protection for the current picture on or off. |
|
|
[] |
Press the control to zoom the display in on the area around the current focus point (the zoom ratio is selected in advance). Press again to cancel zoom.
|
|
|
[] |
Press the control to view only pictures that meet the criteria selected for [] in the playback menu. |
|
|
[] |
Use the control for voice memo operations. |
|
|
[] |
Press the control to upload the current picture to a computer or FTP server with which the camera is currently connected.
|
|
|
[] |
|
|
|
[] |
To rate the current picture in playback mode, press the control and rotate the main command dial.
|
|
|
[] |
Press the control to toggle between full-frame and 4-, 9-, or 72-frame thumbnail playback. |
|
|
[] |
A histogram is displayed while the control is pressed. The histogram display is available in both full-frame and thumbnail playback. |
|
|
[] |
Press the control to display the [] dialog, where you can then choose a slot and folder for playback. |
|
[] |
Press the multi selector for vertical shooting up or down to view other pictures, left or right to page through photo information. |
|
|
] |
Press the multi selector for vertical shooting up or down to page through photo information, left or right to view other pictures. |
|
|
[] |
The control has no effect. |
|
Command Dials
The following roles can be assigned to the command dials. To view options, highlight items and press 2.
Frame Advance
Choose the number of frames that can be skipped by rotating the command dials during full-frame playback.
|
Option |
Description |
|
|---|---|---|
|
[] |
Skip forward or back 1 frame at a time. |
|
|
[] |
Skip forward or back 10 frames at a time. |
|
|
[] |
Skip forward or back 50 frames at a time. |
|
|
|
[] |
Skip to the next or previous picture with the selected rating. |
|
|
[] |
Skip to the next or previous protected picture. |
|
|
[] |
Skip to the next or previous photo. |
|
|
[] |
Skip to the next or previous video. |
|
|
[] |
Rotate the dial to select a folder. |
|
|
[] |
View the next or previous page of thumbnails. |
Video Playback
Choose the roles played by the command dials during video playback.
|
Option |
Description |
|---|---|
|
[] |
Advance or rewind a frame at a time. |
|
[] |
Advance or rewind 5 frames at a time. |
|
[] |
Advance or rewind 10 frames at a time. |
|
[] |
Skip forward or back 2 s at a time. |
|
[] |
Skip forward or back 5 s at a time. |
|
[] |
Skip forward or back 10 s at a time. |
|
[] |
Skip to the first or last frame. |
Customise the functionality if the OK button.
Shooting mode: Choose from the options below. Regardless of the option selected, the OK button can be used for focus tracking when auto-area AF is selected for AF-area mode.
- Select center focus point: Pressing OK selects the center focus point.
- Zoom on/off: Press OK to zoom the display in on the area around the current focus point (to choose the zoom ratio, highlight Zoom on/off and press right).
- None: Pressing J during shooting has no effect.
Playback mode: Choose from the options below. Regardless of the option selected, pressing OK when a movie is displayed full frame starts movie playback.
- Thumbnail on/off: Toggle between full-frame and thumbnail playback.
- View histograms: In both full-frame and thumbnail playback, a histogram is displayed while the OK button is pressed.
- Zoom on/off: Toggle between full-frame or thumbnail playback and playback zoom (to choose the zoom ratio, highlight Zoom on/off and press right). The zoom display is centered on the active focus point.
- Choose folder: A folder-selection dialog will be displayed; highlight a folder and press OK to view the pictures in the selected folder.
f4 Control Lock
Lock exposure settings or focus-point selection.
|
Option |
Description |
|---|---|
|
[] |
Select [] to lock shutter speed at its current value in modes S and M.
|
|
[] |
Select [] to lock aperture at its current value in modes A and M.
|
|
[] |
Select [] to lock focus-point selection on the currently-selected focus point.
|
f5 Reverse Dial Rotation
Reverse the direction of rotation of the command dials for selected operations.
-
Highlight [] or [] and press right to select.
-
Press Menu to save changes and exit.
-
The changes also apply to the command dial for vertical shooting.
f6 Release Button to use dial
Selecting Yes allows adjustments that are normally made by holding a button and rotating a command dial to be made by rotating the command dial after the button is released. This setting applies to the plus/minus, ISO, and timer buttons and also to controls to which the following roles have been assigned using Custom Settings f2 or g2 (Custom control assignment): Choose image area, Image quality/size, White balance, Set Picture Control, Active D-Lighting, Metering, Flash mode/compensation, Focus mode/AF-area mode, Auto bracketing, Multiple exposure, HDR (high dynamic range), Exposure delay mode, Shutter spd & aperture lock, Peaking highlights, Choose non-CPU lens number, and Microphone sensitivity.
f7 Reverse indicators
If (-0+) is selected, the exposure indicators in the control panel, viewfinder, and information display are displayed with negative values on the left and positive values on the right. Select (-0+) to display positive values on the left and negative values on the right.
f7 Reverse ring for focus
Select [] to reverse the direction of rotation for the focus or control rings on Z mount lenses during manual focus.
-
This option does not support:
-
certain Z mount lenses that can only be focused manually, or
-
F mount lenses connected via an FTZ II/FTZ mount adapter.
-
Choose how far the focus or control rings on Z mount lenses must be rotated to go all the way from the minimum focus distance to infinity.
|
Option |
Description |
|---|---|
|
[] |
The focus distance changes by a large amount when the ring is rotated rapidly and by a small amount when the ring is rotated slowly, without regard to how far the ring is rotated. |
|
[] |
Choose how far the ring must be rotated to go all the way from the minimum focus distance to infinity. To take focus from the minimum distance to infinity when, for example, [] is selected, the ring need only be rotated 90°. Larger values permit finer adjustments. |
|
[] |
|
|
[] |
|
|
[] |
|
|
[] |
|
|
[] |
|
|
[] |
|
|
[] |
|
|
[] |
|
|
[] |
|
|
[] |
|
|
[] |
|
|
[] |
Taking focus from the minimum focus distance to infinity requires rotating the ring the maximum distance permitted at current lens settings. |
Choose how responsive the lens control ring is when assigned the [], [], [], or [] using Custom Setting f2 [] or g2 [].
f11: Full-Frame Playback Flicks
Choose the role assigned to the flick up and down or flick left and right gestures during full-frame playback.
Flick Up/Flick Down
Choose the operation performed by flicking up or down.
|
Option |
Description |
|
|---|---|---|
|
c |
[] |
Assign the current picture a pre-selected rating. The rating can be chosen by pressing 2. |
|
K |
[] |
Mark the current picture for priority upload to a computer. |
|
N |
[] |
Mark the current picture for priority upload to an FTP server. |
|
g |
[] |
Protect the current picture. |
|
W |
[] |
Flick to start recording a voice memo. If a memo already exists for the current picture, flicking instead begins playback of the existing memo. Press J to end recording or playback. |
|
[] |
Flicking up or down has no effect. |
|
Flick Advance Direction
Choose the gesture used for frame advance.
|
Option |
Description |
|
|---|---|---|
|
S |
[] |
Flick from right to left to view the next picture. |
|
T |
[] |
Flick from left to right to view the next picture. |
g Movie Settings
g1 Customize i Menu
Choose the functions assigned to camera controls, whether used individually or in combination with the command dials, when you press i.
|
Option |
0 |
|
|---|---|---|
|
|
[] |
Shooting Menu Bank |
|
|
[] |
Custom Settings Bank |
|
|
[] |
Video Image Area Options |
|
|
[] |
Video Frame Size and Rate Options |
|
|
[] |
Destination |
|
|
[] |
Exposure Compensation |
|
|
[] |
ISO Sensitivity |
|
|
[] |
White Balance |
|
|
[] |
Picture Controls |
|
|
[] |
HLG Quality |
|
|
[] |
Active D-Lighting |
|
|
[] |
Metering |
|
|
[] |
Focus Mode |
|
|
[] |
AF-Area Mode |
|
|
[] | Focus Mode |
|
[] |
Electronic VR |
|
|
|
[] |
Microphone Sensitivity |
|
|
[] |
Attenuator |
|
|
[] |
Frequency Response |
|
|
[] |
Wind Noise Reduction |
|
|
[] |
Headphone Volume |
|
|
[] |
Silent Mode |
|
|
[] |
g2: Custom Controls |
|
|
[] |
a13: Focus Peaking |
|
|
[] |
g9: Zebra Pattern |
|
|
[] |
Monitor Brightness, Viewfinder Brightness |
|
|
[] |
Airplane Mode |
|
[] |
Multi-Selector Power Aperture |
|
|
|
[] |
Multi Selector Exposure Comp. |
|
|
[] |
|
Multi Selector Exposure Comp.
Choose whether the multi selector can be used to adjust exposure compensation. Selecting [] allows exposure compensation to be set by pressing up or down.
Multi-Selector Power Aperture
Choose whether the multi selector can be used for power aperture. When [] is selected, holding 1 widens the aperture. Holding 3 narrows the aperture.
g2 Custom control assignment
Assign the custom controls for operation when in movie mode. Power aperture is available only in modes A and M. The display may flicker while aperture is adjusted.
Lock exposure settings or focus-point selection.
|
Option |
Description |
|---|---|
|
[] |
Select [] to lock shutter speed at its current value in mode M.
|
|
[] |
Select [] to lock aperture at its current value in modes A and M.
|
|
[] |
Select [] to lock focus-point selection on the currently-selected focus point.
|
Choose the AF-area modes that can be selected by pressing the focus-mode button and rotating the sub-command dial.
g5: Focus Mode Restrictions
Limit focus-mode selection to a single focus mode. If an option other than [] is selected, rotating the main command dial while holding the focus-mode button will not change the focus mode.
g6: AF Speed
Choose the focus speed for video mode.
Always; The camera focuses at the selected speed at all times in video mode.
Only While recording: Focus is adjusted at the selected speed only while video recording is in progress. At other times, the camera focuses as quickly as possible.
g7 AF tracking sensitivity
There are 7 degrees of customisation available between high and low.
g8 Fine ISO control (mode M)
For fine ISO control you can set ISO to 1/6 stop instead of the normal 1/3 stop.
g9 Extended shutter speeds (mode M)
Extend the range of shutter speeds available in mode M; the slowest shutter speed available when ] is selected is 900. Extended shutter speeds can be used for pictures of the night sky and other long exposures.
g10 View assist
Turning on the ‘View Assist’ HDMI option applies Nikon’s built-in LUT to the previewed N-Log footage in LV, which may fix the AF issue if it indeed is caused by the lower contrast of the LV video feed that’s also used by the AF system.
g11 zebra pattern
You can select the pattern tone aide, pattern, highlight threshold and midtown range.
g12: Limit Zebra Pattern Tone Range
Choose the tone range shown by a zebra pattern when a control previously assigned [] is pressed. If [] or [] is selected, pressing the control will display a zebra pattern only over areas in the selected tone range; pressing the button a second time hides the zebra pattern.
g13: Grid Type
Choose a framing grid for video mode. The selected grid can be displayed.
g14: Custom Monitor Shooting Display
Choose the monitor displays accessible by pressing the DISP button in video mode.
g15: Custom Viewfinder Shooting Display
Choose the viewfinder displays accessible by pressing the DISP button in video mode.
MENU → Playback Menu
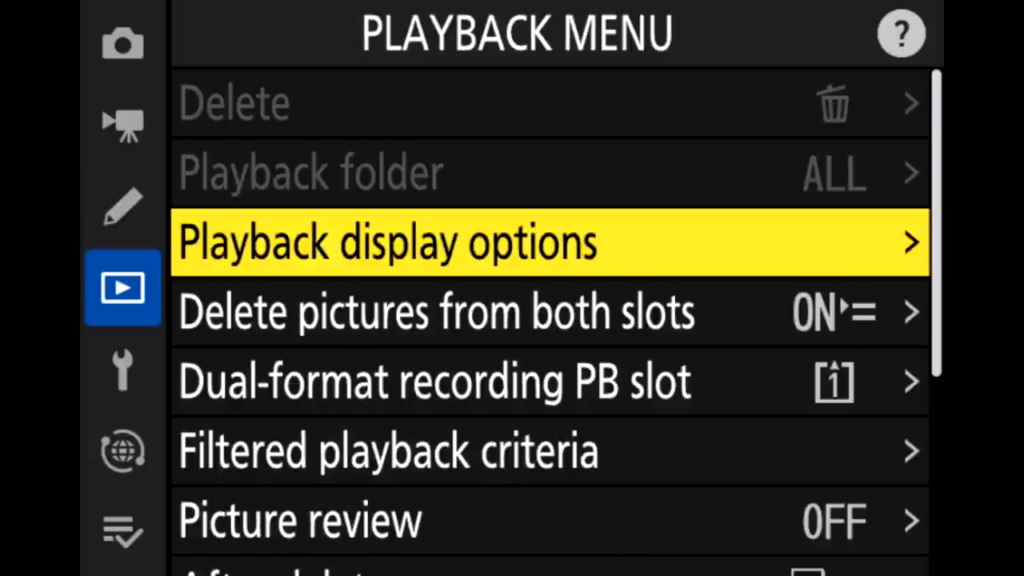
Delete
Here you can:
- Delete selected pictures.
- Delete all pictures taken on selected dates.
- Delete all pictures in the folder currently selected for playback.
Note the hints at the bottom of the monitor that tell you which keys have to be used.
Hack: The main advantage of this menu is the option to delete by shooting date.
Playback Folder
If there are several folders on your memory card you can choose here from which folders images will be displayed in playback mode:
- Pictures in all folders created with the camera will be visible during playback. Folders can be renamed using the Storage folder > Rename option in the photo shooting menu.
- Pictures in all folders of the Nikon Z9 will be visible during playback.
- Only pictures in the current folder will be visible during playback.
Hack: Ignore. I would not exchange memory cards between cameras without formatting them to reduce the risk of write errors (=loss of pictures!).
Playback Display Options
You can add Focus point info to the playback display here as well as add additional photo info like Exposure Info, Highlights, RGB Histogram, Shooting Data…
Choose the information available in the playback photo information display. Highlight options and press the right arrow to select or deselect; items selected for display during full-frame playback are indicated by v icons. To return to the playback menu, press OK.
Image Review
If you turn this on, each new image will appear automatically on the monitor just after shooting.
On: Pictures appear in the currently-selected display (monitor or viewfinder) as they are taken.
On (monitor only): Pictures are displayed after shooting only when the monitor is used to frame shots. Pictures are not displayed in the viewfinder during shooting.
Off: Pictures can only be viewed by pressing the Play button.
Hack: I prefer to switch off this option because the regular flickering of the monitor is annoying if you leave the camera close to the eye.
After Delete
This menu defines which image will be displayed after you delete one:
- Show next (default): The next newer one.
- Show previous: The next older one.
- Continue as before: The next picture will be displayed if you have scrolled forward before deleting the picture and the previous picture will be displayed if you have scrolled backward before.
Hack: I prefer the last option because I delete images both while browsing forward or backward and then it is nice if the display adapts to the direction you are using.
After Burst, Show
The After burst, show option in the playback menu controls whether the photo displayed at the end of a burst of shots is the first or last in the burst. It takes effect only when Image review is off.
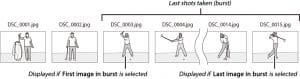
Rotate All
If you switch on this option photos taken in upright format will be rotated during preview.
Slide Show
View a slide show of the pictures in the current playback folder. Hidden images are not displayed.
Options:
- Start: Start slide show.
- Image type: Choose type of image displayed from Still images and movies, Still images only, and Movies only.
- Frame interval: Choose how long each picture will be displayed.
- Skip back/skip ahead: Press left to return to previous frame, right to skip to next frame.
- View additional photo info: Press up or down to change or hide photo info displayed (still images only).
- Pause: Press OK to pause the slide show. To restart, highlight Restart and press OK.
- Adjust volume: Press magnifier during movie playback to increase volume, mag+flash to decrease.
- Exit to playback menu: Press Menu to end the slide show and return to the playback menu.
- Exit to playback mode: Press Play to end the slide show and exit to playback mode.
- Exit to shooting mode: Press shutter-release button halfway to return to shooting mode.
Rating
Rate pictures or mark them as candidates for later deletion. Ratings can also be viewed in View NX-i and Capture NX-D. Rating is not available with protected images.
Procedure:
-
- Select an image: Display the image or highlight it in the thumbnail list in thumbnail playback.
- Display playback options. Press the info button to display playback options.
- Select Rating: Highlight Rating and press right.
-
Choose a rating.Press left or right to choose a rating of from zero to five stars, or select trash can to mark the picture as a candidate for later deletion. Press OK to complete the operation.
Hack: If Rating is selected for Custom Setting f1 (Custom control assignment) > Fn2 button, pictures can be rated by keeping the Fn2 button pressed and pressing left or right.
MENU → Setup Menu
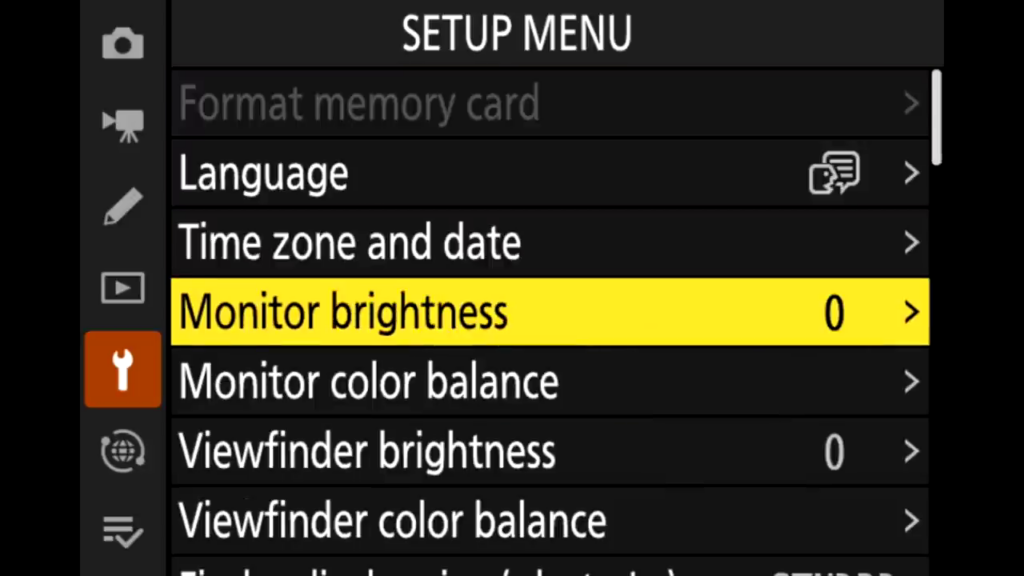
Format Memory Card
To begin formatting, choose a memory card slot and select Yes. Note that formatting permanently deletes all pictures and other data on the card in the selected slot. Before formatting, be sure to make backup copies as required.
Save User Settings
Frequently-used combinations of settings can be assigned to the U1, U2, and U3 positions on the mode dial.
Follow the steps below to save settings:
- Select a mode: Rotate the mode dial to the desired mode.
- Adjust settings: Choose a focus point and make the desired adjustments to flexible program (mode P), shutter speed (modes S and M), exposure and flash compensation, aperture (modes A and M), and settings in the photo shooting, movie shooting, and Custom Settings menus.
- Select Save user settings: Highlight Save user settings in the setup menu and press 2.
- Select a position: Highlight Save to U1, Save to U2, or Save to U3 and press 2.
- Save user settings: Highlight Save settings and press J to assign the settings selected in Steps 1 and 2 to the mode dial position selected in Step 4.
Reset User Settings
Reset settings for U1, U2, and U3 to default values.
Language
Choose a language for camera menus and messages.
Time Zone And Date
Change time zones, set the camera clock, synchronize the clock with the clock on a smart device, choose the date display order, and turn daylight saving time on or off.
- Time zone: Choose a time zone. The camera clock is automatically set to the time in the new time zone.
- Date and time: Set the camera clock.
- Date format: Choose the order in which the day, month, and year are displayed.
- Daylight saving time: Turn daylight saving time on or off. The camera clock will automatically be advanced or set back one hour. The default setting is Off.
Monitor Brightness
Press the up or down arrow to adjust monitor brightness. Choose higher values for increased brightness, lower values for reduced brightness.
Note that monitor brightness can only be adjusted when the monitor is the active display; it cannot be adjusted in the “viewfinder only” monitor mode or when your eye is to the viewfinder.
Monitor Color Balance
Use the multi selector as shown below to adjust monitor color balance with reference to a sample image. The sample image is the last photograph taken or, in playback mode, the last photograph displayed; to choose a different image, press the mag/question button and select an image from a thumbnail list (to view the highlighted image full frame, press and hold magnify). If the memory card contains no photographs, an empty frame with a gray border will be displayed in place of the sample image. Press OK to exit when adjustments are complete.
Note that monitor color balance can only be adjusted when the monitor is the active display; it cannot be adjusted in the “viewfinder only” monitor mode or when your eye is to the viewfinder. Monitor color balance applies only to the shooting, playback, and menu displays; pictures taken with the camera are not affected.
Viewfinder Brightness
Adjust viewfinder brightness. If Auto is selected, viewfinder brightness will be adjusted automatically in response to lighting conditions; to adjust brightness manually, select Manual and press up or down (choose higher values for increased brightness, lower values for reduced brightness). Note that viewfinder brightness can only be adjusted when the viewfinder is the active display; it cannot be adjusted when the viewfinder is off or in the “monitor only” monitor mode.
Viewfinder Color Balance
Use the multi selector to adjust viewfinder color balance as described in Monitor Color Balance.
Control Panel Brightness
The control pannel is located on the top of the camera housing. You can change the brightness of this monochrome LED pannel. If Auto is selected, control panel brightness will be adjusted automatically in response to lighting conditions; to adjust brightness manually, select Manual and press up or down. Selecting Off turns the control panel off.
Hack: Set to Auto, this will dim the panel in low light.
Limit Monitor Mode Selection
Choose the monitor modes that can be selected using the monitor mode button. Highlight the desired options and press right to select or deselect. Press OK to save changes when settings are complete.
Information Display
If Auto (AUTO) is selected, the color of the lettering in the information display will automatically change from black to white or white to black to maintain contrast with the background. To always use the same color lettering, select Manual and choose Dark on light (B; black lettering) or Light on dark (W; white lettering). Monitor brightness will automatically be adjusted for maximum contrast with the selected text color.
AF fine-tune
Fine-tune focus for up to 20 lens types. Use only as required; AF tuning is not recommended in most situations and may interfere with normal focus. Auto fine-tuning is available in live view. We recommend that you perform fine-tuning at a focus distance you use frequently; if you perform focus-tuning at a short focus distance, for example, you may find it less effective at longer distances.
- AF fine-tune (On/Off): Choose On to turn AF tuning on, Off to turn it off.
Saved value: Tune AF for the current lens. Press 1 to move focal point away from camera or 3 to move focal point toward camera; choose from values between +20 and –20. The camera can store values for up to 30 lens types. Only one value can be stored for each type of lens.
- Default: Choose the AF tuning value used when no previously saved value exists for the current lens.
List saved values: List previously saved AF tuning values. To delete a lens from the list, highlight the desired lens and press O. To change a lens identifier (for example, to choose an identifier that is the same as the last two digits of the lens serial number to distinguish it from other lenses of the same type in light of the fact that Saved value can be used with only one lens of each type), highlight the desired lens and press the trash icon. A menu will be displayed; press up or down to choose an identifier and press OK to save changes and exit.
You can also use AF fine tune for zoom lenses now.
Non CPU Lens Data
Record the focal length and maximum aperture of non-CPU lenses, allowing them to be used with functions normally reserved for CPU lenses.
- Lens number: Choose a number to identify the lens.
- Focal length (mm): Enter the focal length.
- Maximum aperture: Enter the maximum aperture.
Save focus position
The focus position won’t reset when you turn off the camera if you set this menu to on.
Clean Image Sensor
Dirt or dust entering the camera when lenses are exchanged or the body cap is removed may adhere to the image sensor and affect your photographs. The Clean image sensor option vibrates the sensor to remove dust.
Clean now: Perform image sensor cleaning immediately.
Automatic cleaning:
- Clean at shutdown: The image sensor is automatically cleaned during shutdown each time the camera is turned off.
- Cleaning off: Automatic image sensor cleaning off.
Hack: Set to Automatic Cleaning. You’ll notice that mirrorless cameras like the Nikon Z9 collect a lot of dust on the sensor due to the fact that there is no mirror. This makes life easier and will reduce the amount of wet sensor cleaning you’ll have to do.
Image Dust Off ref
Acquire reference data for the Image Dust Off option in Capture NX-D (for more information, refer to Capture NX-D online help). Image Dust Off cannot be used with small or medium-sized NEF (RAW) images.
An FX lens with a focal length of at least 50 mm is recommended when recording Image Dust Off reference data. When using a zoom lens, zoom all the way in.
Frame a featureless white object in the display: With the lens about ten centimeters (four inches) from a well-lit, featureless white object, frame the object so that it fills the display and then press the shutter-release button halfway. In autofocus mode, focus will automatically be set to infinity; in manual focus mode, set focus to infinity manually.
Acquire dust off reference data: Press the shutter-release button the rest of the way down to acquire Image Dust Off reference data. The monitor turns off when the shutter-release button is pressed. If the reference object is too bright or too dark, the camera may be unable to acquire Image Dust Off reference data and a message will be displayed. Choose another reference object and repeat the process from Step 1.
Pixel mapping
Pixel mapping allows you to refresh the pixels on the sensor. This maps out dead or damaged pixels that might appear as coloured dots on your final image.
Image Comment
Add a comment to new photographs as they are taken. Comments can be viewed as metadata in ViewNX-i or Capture NX-D. The comment is also visible on the shooting data page in the photo information display. The following options are available:
-
- Input comment: Input a comment as described in “Text Entry”. Comments can be up to 36 characters long.
- Attach comment: Select this option to attach the comment to all subsequent photographs. Attach comment can be turned on and off by highlighting it and pressing 2. After choosing the desired setting, press OK to exit.
Copyright Information
Add copyright information to new photographs as they are taken. Copyright information is included in the shooting data shown in the photo information display and can be viewed as metadata in ViewNX-i or in Capture NX-D. The following options are available:
-
- Artist: Enter a photographer name as described in “Text Entry”. Photographer names can be up to 36 characters long.
- Copyright: Enter the name of the copyright holder as described in “Text Entry”. Copyright holder names can be up to 54 characters long.
-
Attach copyright information: Select this option to attach copyright information to all subsequent photographs. Attach copyright information can be turned on and off by highlighting it and pressing 2. After choosing the desired setting, press J to exit.
Beep Options
Choose the pitch and volume of the beep that sounds when:
- The self-timer is in operation
- Time-lapse recording ends
- The camera focuses in photo mode (AF-S selected for focus mode; Focus selected for Custom Setting a2, AF-S priority selection; and Off selected for Silent photography)
- The touch screen is used for keyboard entry
The Beep options menu contains the following items:
- Beep on/off: Turn the beep speaker on or off, or select Off (touch controls only) to disable the beep during keyboard entry while enabling it for other purposes.
- Volume: Adjust beep volume.
- Pitch: Choose the pitch of the beep from High and Low.
Touch Controls
Adjust monitor touch control settings.
-
- Enable/Disable Touch Controls: Select Disable to prevent accidental use of touch-screen controls, or Playback only to enable touch-screen controls in playback mode only.
- Full-Frame Playback Flicks: Choose the gesture used to display the next image in full-frame playback: a flick from right to left or a flick from left to right.
HDMI
Adjust settings for connection to HDMI devices. The camera can record video directly to connected HDMI recorders. Some recorders will even start and stop recording in response to camera controls. Use the HDMI option in the setup menu to adjust settings for HDMI output.
- Output Resolution: Choose the format for images output to the HDMI device. If Auto is selected, the camera will automatically select the appropriate format.
-
Advanced: Adjust the settings below.
- Output range: Auto is recommended in most situations. If the camera is unable to determine the correct RGB video signal output range for the HDMI device, you can choose Limited range for devices with an RGB video signal input range of 16 to 235 or Full range for devices with an RGB video signal input range of 0 to 255. Choose Limited range if you notice a loss of detail in shadows, Full range if shadows are “washed out” or too bright.
- External recording control: Enabling external recording control allows camera controls to be used to start and stop recording when the camera is connected via HDMI to a third-party recorder that supports the Atomos Open Protocol (Atomos SHOGUN, NINJA, or SUMO-series Monitor recorders). An icon will be displayed in the camera monitor: A is displayed in movie live view, while B is displayed during movie recording. During recording, check the recorder and recorder display to ensure that footage is being saved to the device (note that the footage output to the device may be disrupted while external recording control is in effect). The camera display will turn off automatically when the standby timer expires, ending HDMI output; when recording movies to an external device, select Standby timer for Custom Setting c3 (Power off delay) and choose No limit or a time longer than the anticipated recording time. See the manual provided with the recorder for more information on device features and operation.
- Output data depth: Choose from 8 bit and 10 bit.
- N-Log setting: Select On (cannot record to card) to preserve details in highlights and shadows and avoid over-saturated colors when recording movies. Choose this option (available only when 10 bit is selected for Output data depth) when recording footage that will later be color-corrected. The footage will be recorded directly to the external device and cannot be saved to the camera memory card. The ISO sensitivity settings > Maximum sensitivity and ISO sensitivity (Mode M) options in the movie shooting menu can be set to values of from ISO 1600 to 25600 and ISO 800 to 25600, respectively.
- View assist: Choose On for a live preview of video footage recorded with On (cannot record to card) selected for N-Log setting. The colors in the preview will differ from those of the final movie, but this has no effect on the footage actually recorded.
HDMI Output:
HDMI output is not available at movie frame sizes of 1920 × 1080 120p, 1920 × 1080 100p, or 1920 × 1080 slow-mo or when the camera is connected to a device running SnapBridge or Camera Control Pro 2.
10-Bit Output Data Depth:
10 bit can be used only with compatible recorders. Regardless of the display mode selected, the camera monitor will turn on and the viewfinder will remain blank. No photos can be taken; during movie recording, the following additional restrictions apply when 3840 × 2160 is selected for frame size:
- Movies are not recorded to memory cards inserted in the camera.
- Icons and characters in the monitor will display at low resolution.
- Selecting the DX image area reduces the angle of view to about 90%.
Zoom
Movies filmed at a frame size of 3840 × 2160 are displayed at a size of 1920 × 1080 when zoomed in.
Location Data
Adjust settings for use when the camera is connected to a device that provides location data, namely a GPS receiver or a smart device running the SnapBridge app (for more information on SnapBridge, see the app’s online help).
- Standby timer: If Enable is selected when a GPS receiver is connected, the exposure meters will turn off automatically if no operations are performed for the period specified Custom Setting c3 (Power off delay) > Standby timer, reducing the drain on the battery.
- Position: View the location data supplied by the GPS receiver or smart device (the items displayed vary with the source).
- Set clock from satellite: Select Yes to synchronize the camera clock with the time reported by the GPS device.
Wireless Remote (WR) Options
Adjust settings for optional WR-R10 wireless remote controllers and for optional radio-controlled flash units that support Advanced Wireless Lighting.
LED Lamp:
Enable or disable the status LEDs on a WR-R10 wireless remote controller mounted on the camera. For more information, see the documentation supplied with the wireless remote controller.
Link Mode:
Choose a link mode for WR-R10 wireless remote controllers mounted on other cameras or radio-controlled flash units that support Advanced Wireless Lighting. Be sure that the same mode is selected for the other devices.
Pairing: To pair the camera with a WR-R10, mount the WR-R10 on the camera and press the pairing button.
PIN: Connect using a four-digit PIN code. Press 4 or 2to highlight digits and press 1 or 3 to change, then press J to enter and display the selected PIN.
Regardless of the option selected for Link mode, signals from paired wireless remote controllers will always be received by the WR-R10. Users of the WR-1 wireless remote controller will need to select pairing as the WR-1 link mode.
Assign remote (WR) Fn Button
Choose the role played by the Fn button on optional wireless remote controllers equipped with an Fn button.
Airplane Mode
Select Enable to disable the wireless features of Eye-Fi cards and Bluetooth and Wi-Fi connections to smart devices. Connections to other devices using a wireless transmitter can only be disabled by removing the transmitter from the camera.
Connect To Smart Device
Adjust settings for connection to smart devices.
- Start: Follow on-screen instructions to connect to the smart device.
- Password protection: Choose a password for smart device connections and turn password protection on or off.
Use SnapBridge to control the camera remotely from a smart device and download pictures from the camera. SnapBridge is available free-of-charge from the Apple App Store and on Google Play.
Connect To PC
If On is selected, new photos will automatically be uploaded to the PC.
Connecting via USB:
If the supplied USB cable is used to connect the camera to a computer running ViewNX-i, you can copy pictures to the computer, where they can be viewed, edited, and organized.
Installing ViewNX-i:
Download the ViewNX-i installer from the following website and follow the on-screen instructions to complete installation (existing users should be sure to download the latest version, as earlier versions may not support the camera). An Internet connection is required. For system requirements and other information, see the Nikon website for your region.
Copying Pictures to the Computer
For detailed instructions, see the online help for ViewNX-i.
-
-
Connect the USB cable.
-
After turning the camera off and ensuring that a memory card is inserted, connect the supplied USB cable as shown.
-
USB Hubs: Connect the camera directly to the computer; do not connect the cable via a USB hub or keyboard. Use a Reliable Power Source.
-
To ensure that data transfer is not interrupted, be sure the camera battery is fully charged.
-
Connecting Cables: Be sure the camera is off when connecting or disconnecting interface cables. Do not use force or attempt to insert the connectors at an angle.
-
Turn the camera on.
-
The Nikon Transfer 2 component of ViewNX-i will start (if a message is displayed prompting you to choose a program, select Nikon Transfer 2).
-
Windows 7: If the following dialog is displayed, select Nikon Transfer 2 as described below.
- Under Import pictures and videos, click Change program. A program selection dialog will be displayed; select Nikon Transfer 2 and click OK.
- Double-click .
Windows 10 and Windows 8.1 may display an AutoPlay prompt when the camera is connected. Tap or click the dialog and then tap or click Nikon Transfer 2 to select Nikon Transfer 2.
macOS/OS X: If Nikon Transfer 2 does not start automatically, confirm that the camera is connected and then launch Image Capture (an application that comes with macOS or OS X) and select Nikon Transfer 2 as the application that opens when the camera is detected.
Wireless Networks (Wi-Fi)
The following methods can be used to connect to a computer via Wi-Fi. For more information.
Built-in Wi-Fi
Use the Connect to PC option in the camera setup menu to connect to computers either directly or via a wireless router.
Connection via a wireless route or a direct wireless connection.
Wireless Transmitter (WT-7)
Adjust settings for optional WT-7 wireless remote controllers and for optional radio-controlled flash units that support Advanced Wireless Lighting.
When the camera is connected to an optional WT-7 wireless transmitter, the Wireless transmitter (WT-7) option in the setup menu can be used for connection to computers or ftp servers.
Use the WT-7 for connection to Ethernet networks and for more reliable connections to wireless networks. With Camera Control Pro 2 (available separately), the camera can be controlled remotely and pictures saved directly to the computer as they are taken.
Conformity Marking
View a selection of the standards with which the camera complies.
Battery Info
View information on the battery currently inserted in the camera.
- Charge: The current battery level expressed as a percentage.
- No. of shots: The number of times the shutter has been released with the current battery since the battery was last charged. Note that the camera may sometimes release the shutter without recording a photograph, for example when measuring preset white balance.
- Battery age: A five-level display showing battery age. 0 (k) indicates that battery performance is unimpaired, 4 (l) that the battery has reached the end of its charging life and should be replaced. Note that fresh batteries charged at temperatures under about 5 °C (41 °F) may show a temporary drop in charging life; the battery age display will however return to normal once the battery has been recharged at a temperature of about 20 °C (68 °F) or higher.
USB Power delivery
Turn this setting on if you want to be able to charge your Nikon Z9 whilst connected through USB.
Energy saving
The energy saving mode changes how quickly your camera will go into standby. You can also decide to drom the frame rate of the Electronic Viewfinder.
Slot Empty Release Lock
Selecting Enable release allows the shutter to be released when no memory card is inserted, although no pictures will be recorded (they will however be displayed in the monitor in demo mode). If Release locked is selected, the shutter-release button is only enabled when a memory card is inserted in the camera.
Save/Load Settings
Select Save settings to save the following settings to the memory card (if the card is full, an error will be displayed). Use this option to share settings among Nikon Z9 cameras.
Reset All Settings
Reset all settings except Language and Time zone and date to their default values. Copyright information and other user-generated entries are also reset. We recommend that you save settings using the Save/load settings option in the setup menu before performing a reset.
Firmware Version
View the current camera firmware version of your Nikon Z9 and attached lens.
MENU → Network menu
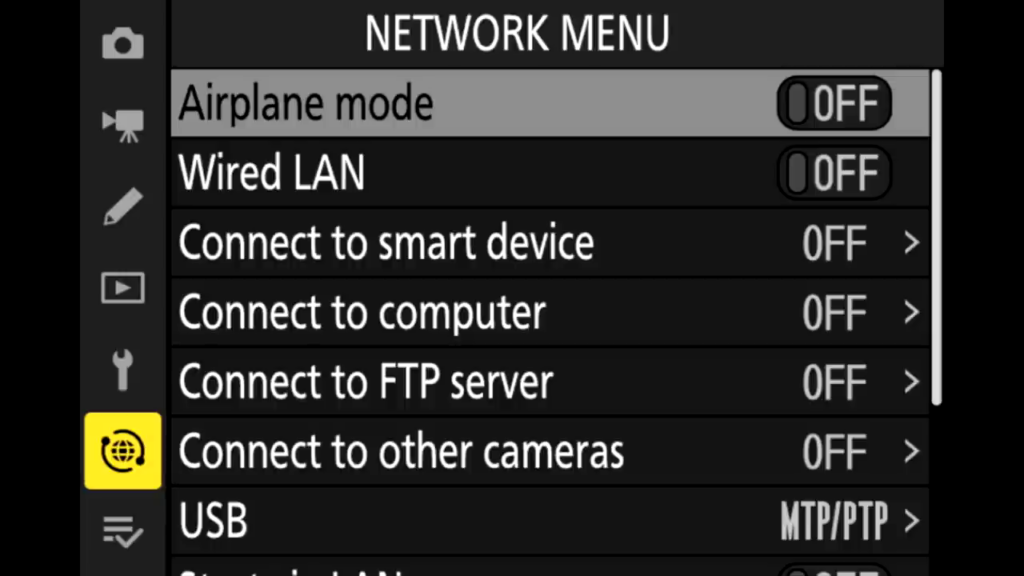
Airplane Mode
Wired Lan
Connect to smart device
- Bluetooth pairing: pair with a Bluetooth capable device for transfer of images
- Select pictures for upload: select which images you want to upload
- Wi-Fi Connection: enable the WiFi connection
- Upload While off: continue uploading when the camera is turned off
Connect to computer
Network settings: create a connection profile, end a connection. Copy a profile to and from a card.
Connection type: either select PC transfer to transfer images or Camera control for tethered shooting/
Connect to FTP server
Enter your network settings in order to enable connection to an ftp server.
Connect to other cameras
Connect to other cameras in order to enable synchronised release and select the master/remote camera.
USB
Select either MTB or PTB protocol.
Start via LAN
Enable to startup your Z9 via a LAN connection.
Router frequency Band
Select whether you have a 2,4 Ghz or 5 Ghz WiFi network.
MAC address
See your camera’s MAC address
Conclusion
There is always a learning curve with every new camera you purchase. Luckily, Nikon decided to keep the hierarchy and the logic of their DSLR series cameras in the new Nikon Z9. This makes art easier to navigate at least for photographers experienced with those cameras. The Nikon Z9 is fairly new so I’ll add more tips and tricks to this post as I get more and more familiar with it. If you have any comments or questions, or just want to write about your experience with the Z9, feel free to post them in the comment section below.

Wim I have a Z7ii and it is very challenging to consistently focus in low light event photography which is my niche. I have been using an 18-200 nikon Dx as it was a carry over from previous bodies, The laser on the Z7ii seems to help very little.
Also do you feel that the Z9 may solve this focusing issue?
Thank you so much in advance!
Hi Bob, I totally understand this issue . the Z9 will not help here?
In practice as far as my tests go the Z9 will certainly focus better than the the Z7II
Can I hand hold for focus shift (stacking) and view live through the viewfinder?
On the Z9 that is.
Thank you for providing this. As a newly photographer, I really appreciate your help.
Jon
Greetings Wim, Thank you for the in-depth manual, the Z9’s a beast! I did not see anything in your post about the Picture Control factory settings and the affect on RAW files. This is what I have found, it is a real issue esp. when there’s nothing documented by Nikon. Thank you!
“Adobe Lightroom or Camera Raw, various default settings for RAW (NEF) files in Lightroom are affected by the settings you choose on the Nikon Z 9.”
“Specifically, the following settings on your Nikon Z 9 will impact default settings in Lightroom and Camera Raw:
Picture Control
High ISO Noise Reduction (High ISO NR)
Active D-Lighting
ISO
Auto Distortion Control “
Sounds serious indeed Nana.
Not a comment, but a question. Do you intend to update your Advanced Settings Blog for the Z9 reflecting the new firmware updage?
Thank you
Dr Steven Gottlieb
I do Steven, Updated just now.
The paid download link for the pdf did not ask for an address. You offered a printed manual, not a download. Options?
Hi Bertram, no this is only available as za download as stated.
I loved your article! Thanks for sharing it, it was very useful for me
hello, a very simple question to which I can’t find the answer: in video mode, how can I change the time code display to duration from the beginning of the clip? Thank you