Mastering Landscape Photography: Tips and Techniques for Breathtaking Shots
Landscape photography is a captivating and rewarding pursuit, allowing photographers to capture the beauty of nature and create stunning images that evoke emotion and transport viewers to breathtaking locations. Whether you’re a seasoned photographer looking to sharpen your skills or a beginner eager to dive into this art form, this article will provide you with valuable tips and techniques to master landscape photography.
In this comprehensive guide, we will explore the latest photography trends for 2023, composition techniques, lighting techniques, essential equipment and gear, location scouting strategies, post-processing tips, and advice for capturing different types of landscapes. We will also delve into the importance of photography ethics and conservation, encouraging responsible practices while photographing the natural world.
Whether you prefer shooting real film, exploring the Y2K aesthetic, or utilizing the power of drone photography, we have you covered. In each section, we will break down the techniques and concepts in an accessible and conversational manner, empowering you to take your landscape photography to new heights.
So, let’s grab our cameras, venture into the great outdoors, and embark on a journey to create breathtaking landscape images that showcase the wonders of our planet. Get ready to unleash your creativity, capture stunning compositions, and uncover the secrets of mastering landscape photography.
Photography Trends for 2023
The world of photography is ever-evolving, with new techniques and styles constantly emerging. As we approach 2023, it’s time to take a look at some of the top photography trends that will dominate the scene. From embracing nostalgia to experimenting with unique angles, photographers are finding innovative ways to capture captivating images. So, let’s dive into the exciting photography trends for 2023!
Shooting Real Film
In the digital age, shooting on film may seem like a thing of the past. However, there’s a growing fascination with the timeless, nostalgic feel that film photography brings. Photographers are dusting off their vintage cameras and experimenting with different types of film to achieve distinctive looks. Shooting on film adds an element of unpredictability and challenges photographers to slow down and be more intentional with their shots.
Blurred Motion Photography
Capturing movement in a photograph adds a dynamic and visually striking element. Blurred motion photography is a technique that involves intentionally blurring certain parts of the image to convey a sense of motion. It’s particularly effective in sports, dance, and street photography, where freezing action isn’t always desirable. By embracing the blur, photographers can create evocative and artistic images that capture the essence of a moment.
Vibrant Colors and Bold Patterns
In 2023, expect to see a surge in vibrant colors and bold patterns in photography. This trend celebrates the use of vivid hues and eye-catching patterns to create visually striking images. Photographers are experimenting with color grading techniques and incorporating bold elements into their compositions to make their photos pop. Whether it’s capturing a stunning sunset or showcasing vibrant street art, this trend is all about making a bold statement.
Y2K Aesthetic
Nostalgia is a powerful force, and in 2023, we’ll see a major trend focused on the Y2K aesthetic. This nostalgic nod to the early 2000s brings back the vibrant and eclectic styles of the era. From neon lights and low-resolution imagery to futuristic fashion and retro-inspired compositions, the Y2K aesthetic offers a fresh take on vintage vibes. Photographers are incorporating elements like glitch art and vintage filters to transport viewers back in time.
Drone Photography
Thanks to advancements in technology, drone photography has become more accessible than ever before. In 2023, expect to see breathtaking aerial views that were once only possible for professionals with access to helicopters or planes. Drones enable photographers to capture stunning landscapes, architectural marvels, and urban cityscapes from unique perspectives. This trend allows for a whole new level of creativity and offers a fresh way to experience the world from above.
Harnessing Natural Light
In the world of fashion photography, there’s a shift towards harnessing the power of natural light. Photographers are embracing the beauty of sunlight, using it to create soft and ethereal images. With the right positioning and timing, natural light can accentuate the model’s features and bring a sense of warmth to the photographs. This trend celebrates the authenticity of natural lighting, resulting in captivating and organic visuals.
Candid Moments and Film Photography
In an age dominated by digital perfection, there’s a growing desire for authenticity and spontaneity. Candid moments and film photography are making a comeback in 2023. Photographers are striving to capture genuine emotions and raw moments by turning to film, which inherently adds a sense of nostalgia and imperfection. This trend embraces the beauty of unpredictability and showcases the art of storytelling through candid shots.
Vertical Photography
Social media platforms and mobile devices have led to the rise of vertical photography. This trend focuses on capturing images in a portrait orientation, optimized for scrolling on smartphones. Vertical photography allows photographers to create visually appealing images that fit perfectly into the vertical format of social media feeds. It’s all about finding creative ways to make the most of the vertical space and engaging viewers with captivating visuals.
High-Contrast Photography
High-contrast photography is a trend that commands attention. By playing with stark contrasts between light and dark, photographers can create striking images with a dramatic impact. This technique emphasizes the interplay of shadows and highlights, adding depth and dimension to photographs. It’s a bold and visually captivating trend that draws the viewer’s eye and leaves a lasting impression.
With these exciting photography trends for 2023, photographers have ample inspiration to push the boundaries of their craft. Whether it’s embracing nostalgia, experimenting with new techniques, or capturing candid moments, these trends offer endless creative possibilities. So grab your camera, step out into the world, and let your vision unfold through the lens. The possibilities are truly limitless!
Composition Techniques
Photography is not just about capturing a moment; it’s about telling a story and creating visually captivating images. One way to enhance the visual appeal of your photographs is by applying composition techniques. These techniques help you arrange the elements within your frame in a way that draws the viewer’s attention and creates a harmonious, engaging image. In this section, we will explore some popular composition techniques that can take your photography to the next level.
Rule of Thirds
The rule of thirds is perhaps the most well-known and widely used composition technique in photography. It involves dividing your frame into a grid of nine equal sections by two horizontal and two vertical lines. The idea is to place your main subject or points of interest along these lines or at their intersection points. By doing so, you create a visually appealing balance in your image, rather than placing your subject dead center.
Imagine you’re taking a landscape photo with a stunning mountain range. Instead of placing the mountains right in the middle of the frame, try positioning them along one of the vertical lines, and see how it adds depth and interest to your composition.
Leading Lines
Leading lines are another powerful composition technique that guides the viewer’s eye through the image. These lines could be anything from roads, fences, or rivers to architectural elements like staircases or pathways. By incorporating these lines into your composition, you create a visual pathway that leads the viewer to the main subject or focal point of the image.
For instance, if you’re photographing a beautiful staircase in an old building, position yourself in a way that the staircase guides the viewer’s eye from the bottom of the frame to the top, creating a sense of depth and visual flow.
Foreground Interest
Including foreground interest is a composition technique that adds depth and dimension to your photographs. By incorporating interesting elements in the foreground, you create a sense of scale and draw the viewer’s eye into the image.
For example, if you’re shooting a landscape with a captivating sunset in the background, try including a striking rock formation or a field of flowers in the foreground. This will not only add visual interest but also create a more dynamic composition.
Symmetry and Patterns
Symmetry is a composition technique that can create visually pleasing and balanced images. When you have symmetrical elements in your frame, you can create a sense of harmony and order. This can be achieved through buildings, reflections, or natural formations like flowers or trees.
Patterns, on the other hand, can add rhythm and repetition to your images. Look for patterns in nature, architecture, or even everyday objects, and try to incorporate them into your compositions. Patterns can create a sense of visual interest and engage the viewer’s eye.
Depth of Field
Depth of field refers to the area of your image that is in focus. By controlling the depth of field, you can draw attention to your subject and create a sense of depth in your composition. This is done by adjusting your aperture settings, with a wider aperture (smaller f-number) giving you a shallow depth of field and a narrower aperture (larger f-number) giving you a deeper depth of field.
Consider photographing a bouquet of flowers where you want to isolate one specific flower in focus while blurring out the rest. By using a wide aperture, like f/2.8, you can create a shallow depth of field, making your subject stand out against a beautiful, blurred background.
Remember, while these composition techniques can be incredibly effective in creating visually captivating photographs, photography is also an art form that allows for creativity and experimentation. So, go out there, explore different techniques, and don’t be afraid to break the rules to create stunning visuals that tell your unique story.
Lighting Techniques
Lighting is a crucial element in photography, whether you’re shooting portraits, landscapes, or still life. The way you light your subject can dramatically impact the mood and overall feel of your image. In this article, we will explore some popular lighting techniques that can help you capture stunning photos. Let’s dive in!
Golden Hour
One of the most sought-after times for photographers is the Golden Hour. This magical time occurs during sunrise and sunset when the sun is low on the horizon, casting a warm and soft light on everything it touches. Here are a few reasons why shooting during the Golden Hour can elevate your photos:
- Soft and Golden Light: The low angle of the sun creates a soft and warm glow, which is incredibly flattering for portraits and adds a beautiful warmth to landscapes.
- Long Shadows: The long shadows created by the low sun can add depth and dimension to your images, creating a more interesting composition.
- Vibrant Colors: The warm light of the Golden Hour can intensify the colors in your scene, making them more vibrant and eye-catching.
To make the most of the Golden Hour, it’s important to plan your shoot in advance and arrive at your location early. The light changes quickly during this time, so be ready to capture those breathtaking moments.
Blue Hour
Another enchanting time for photography is the Blue Hour, which occurs right before sunrise and after sunset. During this time, the sky takes on a deep blue hue, creating a serene and dreamy atmosphere. Here’s why you should consider shooting during the Blue Hour:
- Mysterious and Tranquil Atmosphere: The cool blue tones can add a sense of calmness and tranquility to your images, making them more visually appealing.
- Contrast with Artificial Lights: During the Blue Hour, the ambient light blends beautifully with artificial lights, such as city lights or street lamps, creating a captivating contrast.
- Glowing Skies: The deep blue sky acts as a stunning backdrop, allowing other elements in your composition to stand out.
To capture the best of the Blue Hour, make sure to use a tripod to avoid camera shake in the low-light conditions. Experiment with longer exposure times to capture the movement of light and create a magical effect.
Backlighting
Backlighting is a technique where the main light source is positioned behind your subject, creating a beautiful halo effect and emphasizing their silhouette. Here’s why you should give backlighting a try:
- Emotional Impact: Backlighting can evoke feelings of warmth, nostalgia, and mystery, adding an emotional element to your photos.
- Rim Light: The light streaming from behind your subject can create a stunning rim light, outlining their figure and giving them an ethereal glow.
- Controlling Exposure: Backlighting can be a bit challenging in terms of exposure. Experiment with exposure compensation or manually adjust settings to achieve the desired effect.
Remember to use spot metering or exposure lock to ensure that your subject is correctly exposed, as the bright background can fool your camera’s metering system.
Silhouette
Silhouettes are a powerful and artistic way to tell a story through your photos. By placing your subject against a bright background, such as the sky or a sunset, you can create striking and dramatic silhouettes. Here’s why you should try capturing silhouettes:
- Simplicity and Minimalism: Silhouettes often rely on simple and recognizable shapes, which can evoke a sense of minimalism and elegance in your images.
- Strong Contrast: The stark contrast between the dark subject and the bright background creates visual impact, drawing the viewer’s attention to the shape and form of your subject.
- Creative Expression: Silhouettes allow you to play with composition and create unique and artistic images that tell a story without revealing all the details.
To capture a silhouette, ensure that your subject is properly exposed against the bright background. Use spot metering or manual mode to achieve the desired result.
Remember, these lighting techniques are just tools in your photographic arsenal. Experiment with them, adapt them to your style, and let your creativity guide you. Happy shooting!
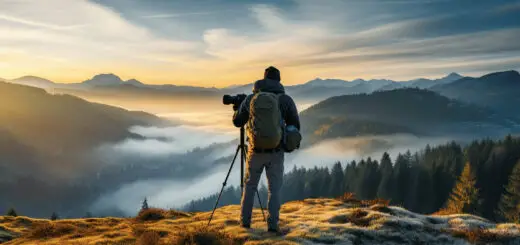
Equipment and Gear
Are you a photography enthusiast looking to take your skills to the next level? Or maybe you’re a professional photographer searching for the best equipment to capture those perfect shots. Whatever your level of expertise, having the right equipment and gear is essential for capturing stunning photographs. In this section, we’ll explore some key items every photographer should consider investing in: a camera, lenses, tripod, and filters.
Camera
The camera is the heart and soul of every photographer’s arsenal. It’s the tool that allows you to transform your vision into a tangible image. When choosing a camera, there are a few factors to consider:
- Sensor Size: The size of the camera’s sensor affects image quality and low-light performance. Full-frame sensors offer excellent image quality but tend to be more expensive. APS-C and Micro Four Thirds sensors are smaller and more affordable, making them great choices for beginners.
- Megapixels: While megapixels aren’t everything, they do play a role in image resolution. Higher megapixel counts allow for more significant enlargements without sacrificing quality.
- Autofocus System: A robust autofocus system ensures that you can quickly and accurately focus on your subject. Look for cameras with advanced autofocus systems, including multiple focus points and subject-tracking capabilities.
- Video Capabilities: If you’re interested in videography, consider a camera that offers high-quality video recording options, such as 4K resolution and various frame rates.
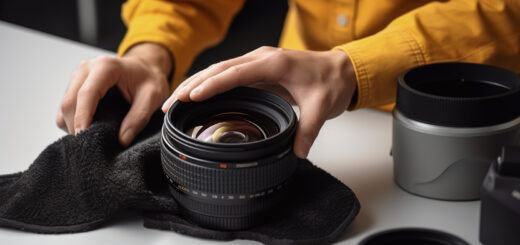
Lenses
The lens you choose has a significant impact on the quality and versatility of your photographs. Here are a few types of lenses to consider:
- Prime Lenses: Prime lenses have a fixed focal length, meaning they don’t zoom in or out. They are known for their excellent image quality and wide aperture capabilities, allowing for beautiful background blur (bokeh).
- Zoom Lenses: Zoom lenses offer a range of focal lengths, allowing you to zoom in or out without changing lenses. They provide versatility and convenience, making them popular among photographers.
- Wide-angle Lenses: These lenses have a shorter focal length, allowing you to capture a wider field of view. They’re perfect for landscapes, architecture, and group shots.
- Telephoto Lenses: Telephoto lenses have a longer focal length, enabling you to zoom in on distant subjects. They’re ideal for wildlife photography, sports, and portraits.
Tripod
A tripod is an essential accessory that provides stability and eliminates camera shake, especially in low-light situations or when shooting long exposures. Here are a few reasons why every photographer should own a tripod:
- Stability: A tripod prevents camera shake, resulting in sharper images, particularly in low-light conditions or when using slower shutter speeds.
- Composition: With a tripod, you can take your time to compose your shot precisely. It allows you to position your camera at various angles and heights, giving you more creative freedom.
- Long Exposures: When shooting long exposures, a tripod is a must. It keeps your camera steady for the entire duration of the exposure, ensuring a sharp image with smooth water or light trails.
Filters
Filters are fantastic accessories that can enhance your photographs and give you creative control. Here are a few popular types of filters:
- UV Filters: UV filters protect your lens from dust, scratches, and UV rays. They have little effect on image quality and are mainly used for lens protection.
- Polarizing Filters: Polarizing filters reduce glare and reflections, making colors appear more vibrant. They’re perfect for landscapes and outdoor photography.
- Neutral Density (ND) Filters: ND filters reduce the amount of light entering the lens, allowing you to use slower shutter speeds or wider apertures in bright conditions. They’re commonly used for long exposures and achieving motion blur.
Remember, when investing in equipment and gear, always choose items that suit your specific needs and shooting style. Quality gear can make a significant difference in your photography, allowing you to capture breathtaking images that you’ll cherish for years to come.
Location Scouting
Introduction
When it comes to filmmaking or photography, finding the perfect location can make all the difference. Location scouting is an essential step in the pre-production process, as it sets the stage for the story you want to tell. It involves exploring various places to find the ideal backdrop that aligns with the vision of the project. From scenic landscapes to urban settings, the right location can enhance the overall aesthetic and add depth to the narrative.
Why Location Scouting Matters
Location scouting is not just about finding a beautiful spot to shoot; it serves a much deeper purpose. Here’s why location scouting is crucial for any production:
- Visual Appeal: One of the primary reasons to scout for locations is to find visually appealing settings that align with the overall look and feel of the project. Whether it’s a breathtaking natural landscape or a gritty urban street, the right location can elevate the visual storytelling and captivate the audience.
- Authenticity: Locations play a significant role in conveying the authenticity of a story. A well-chosen location can make the audience feel like they are a part of the narrative, immersing them in the world you’ve created. For example, shooting a historical film in an actual historical site adds a sense of realism and credibility to the project.
- Logistics: Apart from aesthetics, location scouting also involves practical considerations. It allows filmmakers and photographers to assess logistical aspects such as access, permits, parking, facilities, and any potential challenges associated with shooting in a specific location. This preparatory work helps ensure a smooth production process.
The Location Scouting Process
Location scouting involves a systematic approach to finding the perfect location for your project. Here are the general steps involved:
- Defining the Vision: Before starting the scouting process, it’s essential to have a clear vision of what you’re looking for. Consider the mood, atmosphere, and specific requirements of the script or creative concept.
- Research: Conduct thorough research to identify potential locations that match your vision. Utilize online resources, location databases, and even seek recommendations from locals who are familiar with the area.
- Scouting: Visit the selected locations in person to evaluate their suitability. Pay attention to factors like lighting conditions, space, acoustics, and any potential distractions or obstacles that might affect the shoot.
- Documenting: Take detailed notes, photos, and videos of each location you visit. This documentation will help you compare and make informed decisions later on.
- Collaboration: Share your findings and discuss potential locations with your production team. Seek their input and narrow down the options based on practical considerations and creative vision.
- Permission and Permits: If you find the perfect location, check the necessary permissions and permits required to shoot there. Some locations may have specific regulations or fees associated with filming.
Conclusion
Location scouting is a vital aspect of any production that can greatly impact the final outcome. By carefully selecting locations that align with the creative vision, filmmakers and photographers can create a visually stunning and authentic narrative. The process of location scouting involves research, on-site visits, and collaboration with the production team to find the perfect backdrop. So, next time you embark on a new project, don’t underestimate the power of location scouting. It’s a journey that can take your work to new heights.
Post-Processing Tips
When it comes to post-processing your photos, having the right tools and techniques can make all the difference. Whether you’re a seasoned pro or just getting started, these post-processing tips will help take your images to the next level. From choosing the right editing software to mastering basic adjustments and exploring creative editing techniques, we’ve got you covered.
Editing Software
Choosing the right editing software is essential for any photographer looking to enhance their images. With so many options available, it can be overwhelming to know where to start. Here are a few popular editing software choices to consider:
- Adobe Lightroom: Widely regarded as the industry standard, Lightroom offers a comprehensive set of tools for organizing and editing photos. Its user-friendly interface and powerful features make it a favorite among photographers.
- Capture One: Known for its exceptional RAW processing capabilities, Capture One offers advanced tools that provide precise control over every aspect of an image. It’s a top choice for professionals working with high-quality RAW files.
- Luminar: This all-in-one photo editing software has gained popularity for its AI-powered features that simplify complex editing tasks. Luminar offers a range of creative filters and tools that can transform your images with just a few clicks.
Basic Adjustments
Once you have your editing software set up, it’s time to dive into basic adjustments. These are the foundation of any post-processing workflow and can greatly improve the overall quality of your images. Here are some key adjustments to focus on:
- White Balance: Adjusting the white balance ensures that the colors in your image appear accurate and natural. Use the temperature and tint sliders to eliminate any unwanted color casts.
- Exposure: Adjusting the exposure can make your image brighter or darker, depending on your preference. Use the exposure slider to balance the overall brightness of your image.
- Contrast: Increasing the contrast can add depth and dimension to your photos. Use the contrast slider to enhance the difference between light and dark areas.
- Saturation/Vibrance: Adjusting the saturation or vibrance can bring out the colors in your image. Be careful not to overdo it, as excessive saturation can make your images appear unnatural.
Creative Editing
Once you’ve mastered the basics, it’s time to get creative with your post-processing. This is where you can experiment with different effects and techniques to give your images a unique look. Here are a few creative editing techniques to try:
- Selective Adjustments: Use adjustment brushes or masks to selectively edit specific areas of your image. This allows you to make targeted adjustments without affecting the entire image.
- Filters and Presets: Apply pre-made filters or presets to quickly transform the look and mood of your photos. Experiment with different styles to find the one that best suits your vision.
- Texture and Clarity: Enhance the texture and clarity of your images to add extra detail and visual interest. Use the texture and clarity sliders to make your subjects stand out.
- Creative Cropping: Experiment with different cropping ratios and compositions to give your image a fresh perspective. Don’t be afraid to break the rules and explore unconventional framing.
Remember, post-processing should enhance your images, not disguise them. Use these tips as a starting point and let your creativity guide you as you experiment and develop your own unique style. Happy editing!
Want to learn more about post-processing techniques? Check out this comprehensive guide to post-processing for in-depth tips and tricks.
Tips for Capturing Different Types of Landscapes
Landscape photography is a popular genre that allows photographers to capture the beauty of nature in all its forms. Whether you’re an amateur or a seasoned professional, there’s always something new to learn when it comes to capturing different types of landscapes. From majestic mountains to serene beaches, each landscape presents its own unique challenges and opportunities. In this article, we’ll share some valuable tips to help you make the most of your landscape photography, no matter what type of landscape you’re shooting.
Mountains
Mountains are often a favorite subject for landscape photographers. Their towering peaks, dramatic slopes, and ever-changing weather conditions present a thrilling challenge and offer breathtaking views. Here are some tips to help you capture stunning mountain landscapes:
- Choose the right time: Pay attention to the lighting conditions and plan your shoot accordingly. Opt for golden hours, such as early morning or late afternoon, when the sunlight is softer and creates a warm and magical atmosphere.
- Consider the weather: Weather plays a crucial role in mountain photography. Clouds, fog, and mist can add depth and drama to your images. Keep an eye on the forecast and be prepared for unexpected changes in weather conditions.
- Find a focal point: Look for interesting elements in your composition that can act as a focal point, such as a winding trail, a pristine lake, or a solitary tree. This will add depth and visual interest to your images.
- Use leading lines: Mountains often have strong lines and shapes that can guide the viewer’s eye through the image. Utilize these lines, such as ridges or trails, to create a sense of depth and to lead the viewer’s gaze into the frame.
Beaches
Beaches offer a completely different landscape photography experience. With their vast expanse of sand, crashing waves, and stunning sunsets, they provide an array of creative opportunities. Here are some tips for capturing beautiful beach landscapes:
- Experiment with long exposures: Long exposures can create a dreamy and ethereal effect in your beach photographs. Use a neutral density (ND) filter to slow down the shutter speed and capture the movement of the waves or clouds, resulting in a smooth and serene atmosphere.
- Play with reflections: Take advantage of the wet sand and shallow water to capture reflections of the sky, clouds, or other interesting elements. Look for calm and still areas where the reflections are clearer and more pronounced.
- Highlight textures: Beaches are rich in textures, from the smooth sand to the rugged rocks. Get up close and capture the details of shells, pebbles, or patterns in the sand to add visual interest to your images.
- Utilize the golden hour: The golden hour, which occurs shortly after sunrise or before sunset, is a magical time to photograph beaches. The soft, warm light enhances the colors and brings out the textures of the sand and water. It’s also a great time to capture silhouettes against the stunning sky.
Forests
Forests are a haven for landscape photographers, offering lush greenery, enchanting paths, and a sense of tranquility. To capture the beauty and essence of forests, keep these tips in mind:
- Plan your composition: Forests can be chaotic and overwhelming, so it’s important to plan your composition carefully. Look for leading lines, such as tree branches or winding paths, that can guide the viewer’s eye through the image. Consider the rule of thirds and find a strong focal point to anchor your composition.
- Capture the details: Forests are full of intricate details, from moss-covered rocks to delicate flowers. Don’t forget to focus on the small wonders of the forest, as they can add depth and visual interest to your images.
- Play with light and shadows: Explore the interplay of light and shadows in the forest. Use dappled light filtering through the canopy to create an ethereal and mysterious atmosphere. Look for interesting patterns created by sun rays shining through the trees.
- Embrace mist and fog: Mist and fog can add a sense of mystery and moodiness to forest photographs. Be patient and wait for these atmospheric conditions to appear, as they can enhance the overall mood of your images.
Deserts
Deserts offer a unique and challenging landscape to photograph. With their vast emptiness, sand dunes, and rugged rock formations, they provide endless possibilities for creative compositions. Follow these tips to capture the beauty of desert landscapes:
- Emphasize the vastness: Deserts are known for their wide-open spaces. Use wide-angle lenses to capture the expansive landscapes and emphasize the sense of scale. Include interesting elements, such as a lone tree or a distant mountain range, to provide a focal point in the vastness.
- Capture the textures: Desert landscapes are full of intriguing textures, from the rippled sand dunes to the weathered rock formations. Get up close and capture the details to showcase these unique features.
- Experiment with shadows: The harsh sunlight in the desert creates strong and contrasting shadows. Use these shadows creatively to add depth and drama to your images. Pay attention to the direction and angle of the light to maximize the impact of the shadows.
- Shoot during golden hour and blue hour: The golden hour and blue hour are magical times in the desert. The soft, warm light during golden hour and the cool, blue tones during blue hour can transform the landscape and create a captivating atmosphere.
Waterfalls
Waterfalls are a captivating subject for landscape photographers. The rushing water, cascading down cliffs, and creating mesmerizing patterns offer endless creative possibilities. To capture stunning waterfall landscapes, consider these tips:
- Use slow shutter speeds: Slow shutter speeds can create a silky smooth effect on the waterfall, capturing its motion and creating a sense of serenity. Use a tripod to keep your camera steady and experiment with different shutter speeds until you achieve the desired effect.
- Compose with foreground and background: Include interesting elements in the foreground, such as rocks or foliage, to create depth and add visual interest to your images. Pay attention to the background as well, ensuring that it complements the waterfall and enhances the overall composition.
- Adjust your camera’s white balance: Waterfalls often have a cool and blueish tint due to the water. Adjust your camera’s white balance settings to capture the natural colors accurately. Experiment with different white balance settings to achieve the desired mood in your images.
- Capture the details: Don’t just focus on the entire waterfall. Look for smaller details, such as water droplets or textures on rocks, to add variety and visual interest to your compositions.
With these tips in your photography arsenal, you’ll be well-equipped to capture the unique beauty of different types of landscapes. Remember to experiment, be patient, and most importantly, enjoy the process of capturing nature’s wonders through your lens. Happy shooting!
Photography Ethics and Conservation
Photography Ethics and Conservation
Introduction
Photography is a powerful medium that has the ability to capture stunning images and tell compelling stories. It allows us to document moments in time, preserve memories, and share experiences with others. However, along with this power comes responsibility. As photographers, we have an ethical duty to consider the impact of our work on the environment, wildlife, and local communities. In this article, we will explore the importance of photography ethics in the context of conservation efforts.
The Role of Photography in Conservation
Photography has long played a crucial role in raising awareness about conservation issues. Through captivating images, photographers have the ability to highlight the beauty of nature, as well as the threats it faces. These images can inspire action, foster empathy, and drive people to support conservation initiatives.
Ethical Considerations for Nature Photographers
When capturing images in natural habitats, it is essential for photographers to prioritize ethical practices to ensure minimal disruption to the environment and wildlife. Here are some key considerations:
- Environmentally Friendly Gear: Opt for lightweight and non-intrusive equipment to minimize the environmental impact of your presence.
- Respect Wildlife: Keep a safe distance from animals to avoid causing distress or altering their natural behavior. Never bait, disturb, or harm animals for the sake of a photograph.
- Leave No Trace: Follow the principles of Leave No Trace, such as packing out your trash, staying on designated trails, and respecting protected areas.
- Respect Local Communities: When photographing in indigenous communities or remote areas, seek permission and engage respectfully with the locals. Be mindful of cultural sensitivities and traditions.
The Power of Responsible Storytelling
Photographers have the ability to shape public opinion and influence policy decisions through their visual storytelling. By responsibly portraying conservation issues, photographers can drive positive change. Here are some key points to consider:
- Accuracy: Ensure that the images you capture are a true representation of the situation. Avoid misrepresenting facts or staging scenes that could mislead viewers.
- Context: Provide context and information alongside your images to help viewers understand the conservation challenges and potential solutions.
- Diversity: Showcase the diversity of conservation efforts, highlighting the work of scientists, local communities, and organizations making a difference.
Conclusion
In conclusion, mastering landscape photography requires a combination of technical skill, artistic vision, and an understanding of your equipment. By applying composition and lighting techniques, scouting locations, and honing your post-processing skills, you can capture breathtaking shots that truly showcase the beauty of nature.
Remember, photography is not just about capturing an image. It’s about telling a story and evoking emotions through your photographs. With practice and experimentation, you can develop your unique style and create stunning landscapes that leave a lasting impression on your viewers.
To continue your photography journey and explore more tips, tutorials, and camera reviews, be sure to visit Wim Arys Photography. Run by Wim Arys, a talented portrait and landscape photographer, the website offers a wealth of resources and inspiration for photographers of all levels. Whether you’re a beginner or an experienced photographer, you’ll find valuable insights and guidance to help you elevate your craft.
So, what are you waiting for? Grab your camera, venture into the great outdoors, and unleash your creativity. With dedication and a passion for photography, there’s no limit to what you can achieve. Happy shooting!
Visit Wimarys.com for more photography tips, camera reviews, and inspiration.
Frequently Asked Questions
- What are some essential tips for mastering landscape photography?
Some essential tips for mastering landscape photography include: 1. Research and scout locations beforehand, 2. Use a tripod for stability, 3. Pay attention to composition and framing, 4. Utilize the golden hour for optimal lighting, and 5. Experiment with different perspectives and angles.
- What camera settings are ideal for landscape photography?
Ideal camera settings for landscape photography can vary depending on the situation, but generally, it’s recommended to use a narrow aperture (high f-stop number) for maximum depth of field, a low ISO for minimum noise, and a slower shutter speed for capturing movement in water or clouds.
- Should I use filters for landscape photography?
Using filters can greatly enhance landscape photography. A polarizing filter helps reduce glare and enhance colors, a neutral density filter allows for longer exposures, and a graduated neutral density filter helps balance exposure between the sky and the foreground.
- What is the rule of thirds in landscape photography?
The rule of thirds is a composition technique where you divide your frame into a 9-part grid (3×3) and place key elements along the grid lines or at their intersections. This helps create a balanced and visually appealing composition in landscape photography.
- Is post-processing necessary for landscape photography?
Post-processing is not mandatory, but it can significantly enhance your landscape photos. Basic adjustments like adjusting exposure, contrast, and saturation, as well as cropping and sharpening, can help bring out the best in your images. But remember to maintain a natural look and avoid excessive editing.