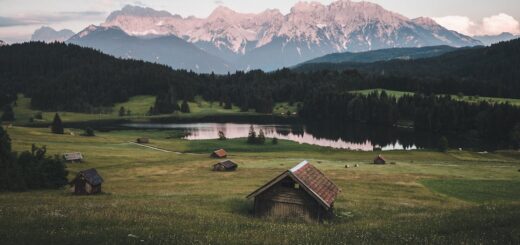
10 Secrets to Breathtaking Landscape Photography
Landscape photography has the power to transport us to breathtaking vistas and evoke a sense of wonder and awe. From majestic mountains to serene seascapes, capturing the beauty of nature is a skill that many photography enthusiasts aspire to master. But what exactly does it take to create stunning landscape images that leave a lasting impact?
In this article, we will reveal ten secrets to taking incredible landscape photographs. Whether you are a beginner looking to improve your skills or a seasoned photographer seeking new inspiration, these tips and techniques will help you elevate your landscape photography game to new heights. So grab your camera, venture into the great outdoors, and let’s dive into the world of capturing the beauty of nature through the lens of your camera.
1. Understanding Light
When it comes to photography, understanding light is crucial. Light plays a significant role in how our photos turn out, determining the mood, color, and overall quality of the image. So, let’s dive into the world of light and explore some essential concepts that every photographer should know.
The Basics of Light
Light is a form of electromagnetic radiation that travels in waves. These waves carry energy and vary in length, which determines the nature of the light. Here are a couple of key terms to get us started:
- Wavelength: The distance between two consecutive points on a wave. Different wavelengths result in different colors of light.
- Intensity: The amount of light energy present in a given area. It affects the brightness of the subject being illuminated.
The Color Spectrum
As photographers, we often talk about the color spectrum, which refers to the range of colors we can perceive. This spectrum is made up of various wavelengths, each associated with a different color. Some important points to note about the color spectrum include:
- Visible Light: The colors we can see lie within a specific range of wavelengths known as visible light. These colors include red, orange, yellow, green, blue, and violet.
- White Light: White light is a combination of all the colors of visible light. When it passes through a prism, it splits into its component colors, creating a beautiful rainbow effect.
- Primary Colors: The primary colors of light are red, green, and blue. By combining these three colors in different ways, we can create all other colors in the visible spectrum.
Quality of Light
When it comes to photography, not all light is created equal. The quality of light can greatly impact the mood and atmosphere of your photos. Here are a few characteristics of light to consider:
- Hard Light: Hard light creates distinct, sharp shadows with well-defined edges. It often occurs on sunny days or with direct, unobstructed light sources.
- Soft Light: Soft light produces diffused shadows with soft edges. It is typically found on overcast days or when the light is filtered through clouds, curtains, or other diffusing materials.
- Direction of Light: The direction from which the light is coming can affect the overall look of your photograph. Front lighting, side lighting, and back lighting each create different effects on your subject.
Manipulating Light in Photography
Understanding light also involves knowing how to manipulate it to achieve your desired results. Here are a few techniques photographers use to control light:
- Natural Light: Utilizing the existing light available in the environment, such as sunlight or moonlight.
- Artificial Light: Enhancing or supplementing the natural light with artificial sources like flashguns, strobes, or continuous lighting.
- Modifiers: Using tools like reflectors, diffusers, or umbrellas to modify and control the direction, intensity, and quality of light.
As you immerse yourself in the world of photography, developing a keen understanding of light will undoubtedly enhance your skills and take your images to the next level. So, let’s embrace the beauty of light and let it guide us on our photographic journey.
To learn more about the role of light in photography, check out this comprehensive guide on Understanding Light in Photography.
2. Choosing the Right Location
When it comes to choosing the right location for your business, there are several factors to consider. Whether you’re starting a new venture or relocating an existing one, finding the perfect spot can significantly impact your success. Here are some key points to keep in mind when selecting a location that suits your needs:
2.1 Demographics and Target Market
Before settling on a location, it’s crucial to understand the demographics of the area and ensure that it aligns with your target market. Conduct thorough market research to identify the characteristics of your ideal customers, such as age, income level, and lifestyle preferences. Once you have this information, you can look for a location where these demographics are prevalent, ensuring a higher chance of attracting your target audience.
2.2 Competitor Analysis
Analyzing the competition in the area is essential to determine if there is room for your business to thrive. Identify similar businesses in the vicinity and evaluate their offerings, pricing, and overall market share. This information will give you insight into the competitive landscape and help you assess if there is enough demand for your product or service in the area.
2.3 Accessibility and Visibility
The accessibility and visibility of your business are crucial to attracting customers. Consider factors such as proximity to major roads, public transportation options, parking availability, and foot traffic. If your business relies heavily on walk-in customers, choosing a location with high visibility and easy accessibility can significantly boost your chances of success.
2.4 Zoning and Regulations
Ensure that the location you choose complies with local zoning regulations and permits necessary for your business. Different areas may have specific zoning restrictions or regulations that could impact your operations. It’s crucial to familiarize yourself with these requirements beforehand to avoid any legal or operational issues down the line.
2.5 Cost Considerations
Of course, expenses are a significant consideration when choosing a location. Evaluate the cost of rent, utilities, taxes, and any other expenses associated with the location you are considering. It’s essential to ensure that the location is financially viable and aligns with your budget.
2.6 Future Growth Potential
While it’s crucial to find a location that meets your immediate needs, it’s also essential to consider its potential for future growth. Look for areas that are experiencing economic development, population growth, and increasing demand for your products or services. Choosing a location with growth potential can position your business for long-term success.
Remember, finding the right location for your business can be a complex and important decision. Take the time to thoroughly research and evaluate your options to ensure that you choose a location that aligns with your business goals and sets you up for success.
3. Composition Techniques
Every great piece of writing starts with a solid foundation. In the world of writing, that foundation is known as composition. It’s the arrangement of words, sentences, and paragraphs that bring a piece of writing to life. Whether you’re writing a blog post, an article, or a novel, understanding and implementing effective composition techniques can make a world of difference in captivating your audience.
In this section, we will explore three composition techniques that can elevate your writing and engage your readers from start to finish. So grab a pen and paper or fire up your word processor, because it’s time to dive into the world of composition!
3.1. The Power of Paragraphs
Paragraphs are the building blocks of any written work, and mastering their structure and flow is essential for effective communication. A well-structured paragraph provides clarity, coherence, and organization to your writing. Here are some key points to keep in mind when crafting paragraphs that pack a punch:
- Topic Sentence: Start each paragraph with a clear and concise topic sentence that sets the tone for the rest of the paragraph. This sentence should introduce the main idea or argument that will be discussed.
- Supporting Details: Develop your topic sentence by providing supporting details, evidence, or examples. This adds depth and credibility to your writing, making your ideas more persuasive.
- Transition Words: Use transition words and phrases to create a smooth flow between paragraphs. Words like “however,” “in addition,” and “on the other hand” help to connect ideas and guide readers through your text seamlessly.
Remember, an effective paragraph is like a mini-story. It should have a clear beginning, middle, and end, and each sentence should contribute to the overall message you’re trying to convey.
3.2. The Art of Sentence Variation
Have you ever read a piece of writing that felt monotonous? Chances are, it lacked sentence variation. Sentence variation is the art of using different sentence structures, lengths, and types to create rhythm, emphasis, and engagement in your writing. Here’s how you can bring your sentences to life:
- Simple Sentences: These sentences consist of one independent clause and are great for straightforward statements or conveying a single idea. Example: “She walked to the park.”
- Compound Sentences: Combine two independent clauses with a coordinating conjunction (such as “and,” “but,” or “or”) to show relationships between ideas. Example: “She walked to the park, and she played on the swings.”
- Complex Sentences: These sentences contain an independent clause and one or more dependent clauses, adding depth and complexity to your writing. Example: “Although it was raining, she walked to the park.”
- Sentence Length: Vary the length of your sentences to create a natural rhythm and flow in your writing. Short sentences can be punchy and impactful, while longer sentences can provide more details and allow for more complex ideas.
By incorporating a mix of sentence structures and lengths, you can captivate your readers and keep them engaged from the first word to the last.
3.3. The Magic of Concise Writing
In the digital age, attention spans are shorter than ever. That’s why mastering the art of concise writing is crucial. Concise writing means conveying your message in a clear, direct, and efficient way, without unnecessary words or fluff. Here are a few tips to keep your writing concise and impactful:
- Eliminate Redundancies: Avoid using unnecessary words or phrases that repeat the same idea. For example, instead of saying “she nodded her head,” simply say “she nodded.”
- Use Active Voice: Opt for active voice instead of passive voice to make your writing more concise and engaging. Active voice emphasizes the subject performing the action, while passive voice puts the emphasis on the object being acted upon. Example: “She wrote the email” (active) vs. “The email was written by her” (passive).
- Trim Excess Words: Review your writing for any unnecessary adjectives, adverbs, or filler words that don’t add value to your message. Every word should have a purpose.
Remember, when it comes to concise writing, less is more. By trimming the excess and getting straight to the point, you’ll create writing that is clear, impactful, and easy to read.
With these composition techniques in your toolbox, you’re well on your way to creating captivating and engaging writing. So put them to use, experiment, and watch your writing come alive!
4. Using Filters and Lenses
Are you tired of taking average photos with your smartphone? Well, it’s time to up your photography game and take your shots to the next level by learning how to use filters and lenses. Filters and lenses are essential tools that can enhance your photos, add creative effects, and expand your shooting capabilities. Whether you’re a seasoned photographer or a beginner looking to improve your skills, incorporating filters and lenses into your photography toolkit can make a world of difference.
Filters: Adding Creativity to Your Shots
Filters are like magic potions for your camera. They can instantly change the mood, tone, and overall look of your photographs. Here’s how filters can enhance your images:
- Neutral Density (ND) Filters: ND filters darken the entire image, allowing you to use longer shutter speeds even in bright conditions. This is particularly useful for capturing silky smooth waterfalls, blurring motion, or creating dramatic long-exposure shots.
- Polarizing Filters: A polarizing filter helps reduce glare and reflections, making colors more vibrant and saturated. It’s great for intensifying blue skies, enhancing the contrast in clouds, and reducing reflections on water or glass surfaces.
- Graduated Neutral Density (GND) Filters: GND filters are designed to balance exposure between the bright sky and darker foreground in landscape shots. By darkening the sky portion, you can capture a well-exposed image with greater detail in both the sky and the foreground.
- Color Filters: Color filters can create artistic effects by adding a tint or changing the color temperature of your photos. For instance, a warm filter can give your photos a golden glow, while a cool filter can add a blue tone.
Lenses: Expanding Your Creative Possibilities
Just like filters, lenses play a crucial role in photography. They determine how your subjects are captured, the depth of field, and the overall quality of your images. Here are a few types of lenses that can transform your photography:
- Wide-Angle Lenses: Wide-angle lenses have a shorter focal length, allowing you to capture a wider field of view. They are ideal for landscape photography, architecture, and capturing scenes where you want to fit more into the frame.
- Telephoto Lenses: Telephoto lenses have a longer focal length, allowing you to zoom in closer to your subjects from a distance. They are fantastic for wildlife photography, sports events, and capturing details that are far away.
- Macro Lenses: Macro lenses are designed for close-up photography, allowing you to capture intricate details of small objects or subjects. Perfect for capturing the world of insects, flowers, and other tiny wonders.
- Prime Lenses: Prime lenses have a fixed focal length, meaning they don’t zoom in or out. These lenses are known for their sharpness, wider aperture, and ability to capture stunning portraits. They can also be used creatively for street photography and low-light situations.
Investing in a few filters and lenses can truly transform your photography experience. By experimenting with different combinations and techniques, you can take your skills to new heights and capture breathtaking images that tell compelling stories.
As Ansel Adams once said, “You don’t make a photograph just with a camera. You bring to the act of photography all the pictures you have seen, the books you have read, the music you have heard, the people you have loved.” So go out there, grab your camera, filters, and lenses, and let your creativity soar through the lens.
5. Working with Weather Conditions
When it comes to working outdoors, weather conditions can have a significant impact on productivity and safety. Whether you’re a construction worker, a farmer, or an event planner, understanding and adapting to the weather is essential for successful outcomes. In this section, we’ll explore some strategies for working effectively in various weather conditions.
5.1 Working in Hot Weather
Working in hot weather can be challenging, both physically and mentally. Here are some tips to help you stay safe and productive:
- Stay hydrated: Drink plenty of water throughout the day, even if you don’t feel thirsty. Dehydration can lead to a decline in cognitive function and physical performance.
- Dress appropriately: Wear lightweight and breathable clothing that covers your skin to protect it from the sun’s harmful rays. Don’t forget a wide-brimmed hat and sunscreen.
- Take breaks: Schedule regular breaks in shaded or air-conditioned areas to give your body a chance to cool down.
- Time your work: Plan your day around the hottest hours. Try to schedule physically demanding tasks for cooler times, such as early morning or late afternoon.
5.2 Working in Cold Weather
Working in cold weather requires extra attention to keep yourself warm, comfortable, and safe. Consider the following:
- Layer your clothing: Dress in layers to trap warmth close to your body. Opt for thermal undergarments, insulating mid-layers, and a windproof and waterproof outer layer.
- Protect extremities: Wear gloves, hats, and warm socks to safeguard your hands, head, and feet from frostbite and cold-related injuries.
- Stay dry: Moisture can quickly accelerate heat loss. Make sure to wear moisture-wicking and waterproof clothing to keep dry and prevent hypothermia.
- Warm up before work: Engage in light physical activity to increase blood circulation and warm up your muscles before starting work.
5.3 Working in Rainy Weather
Rainy weather can bring its fair share of challenges, but with the right preparations, you can work effectively and safely. Here are some suggestions:
- Use proper rain gear: Invest in high-quality waterproof jackets, pants, and boots to keep yourself dry during wet conditions.
- Protect electronic equipment: If you’re working with electronics or sensitive equipment, ensure they’re shielded from the rain by using waterproof cases or covers.
- Watch your step: Wet surfaces can become slippery, increasing the risk of falls. Take extra care when walking or working on uneven or slick surfaces.
- Adjust your workflow: Consider adjusting your schedule or tasks to accommodate the rain. Focus on indoor or covered work when possible.
5.4 Working in Windy Weather
Wind can not only affect your comfort but also pose safety hazards in certain situations. Here’s how to handle working in windy conditions:
- Dress appropriately: Wear wind-resistant clothing and consider using accessories like scarves or face masks to protect your face from gusts of wind.
- Secure loose items: Ensure that any loose equipment or materials are properly secured to prevent them from being blown away and causing accidents.
- Be cautious around falling objects: Be vigilant of potential hazards caused by objects or debris being carried by strong winds. Stay clear of trees or unstable structures.
- Seek shelter when necessary: If the wind becomes too strong or poses a significant risk, find shelter until conditions improve.
Remember, working in different weather conditions requires adaptation and precautions to ensure your safety and productivity. By taking the necessary steps, you can proactively mitigate the challenges that weather may present and create an environment conducive to success. Stay tuned for the next section, where we’ll explore the importance of effective communication in the workplace.
6. Mastering Exposure
Exposure is a fundamental concept in photography, and mastering it is crucial for capturing beautifully balanced and well-exposed shots. Whether you’re shooting with a professional DSLR camera or snapping quick shots on your smartphone, understanding exposure will elevate your photography skills to the next level. In this section, we’ll explore the key elements of exposure and offer practical tips for achieving optimal results.
The Exposure Triangle
To master exposure, you need to understand the relationship between three key elements: aperture, shutter speed, and ISO. These factors work together to determine the amount of light that reaches your camera’s sensor, ultimately influencing the brightness and overall quality of your photos.
- Aperture: The aperture refers to the size of the opening in the lens that allows light to pass through. It is measured in f-stops, with lower numbers indicating larger openings. A wider aperture (lower f-stop) allows more light to enter, resulting in a brighter image and a shallower depth of field. Conversely, a narrower aperture (higher f-stop) lets in less light but increases the depth of field, bringing more of the scene into focus.
- Shutter Speed: Shutter speed refers to the length of time the camera’s shutter is open, exposing the sensor to light. It is measured in fractions of a second, such as 1/100, 1/250, or 1/1000. A slower shutter speed allows more light to enter the camera, resulting in a brighter image. However, it also increases the risk of motion blur, especially when shooting handheld or capturing moving subjects. On the other hand, a faster shutter speed reduces the amount of light but helps freeze action.
- ISO: ISO determines the sensitivity of your camera’s sensor to light. A lower ISO setting (e.g., 100) makes the sensor less sensitive, requiring more light for a well-exposed image. In contrast, a higher ISO setting (e.g., 800, 1600, or more) increases the sensor’s sensitivity, enabling you to shoot in low-light conditions. However, higher ISO settings can introduce digital noise, reducing the image’s overall quality. It’s best to keep ISO as low as possible while still achieving the desired exposure.
Finding the Right Exposure
Achieving the perfect exposure requires finding the right balance between aperture, shutter speed, and ISO. Here are some practical tips to help you nail your exposure settings:
- Meter the Scene: Use your camera’s built-in light meter or the histogram display to gauge the exposure levels of your scene. Aim to have a balanced distribution of tones, with details in both the shadows and the highlights.
- Priority Modes: Experiment with aperture priority mode (A or Av) and shutter priority mode (S or Tv) to gain more control over depth of field or freezing motion, respectively. These modes automatically adjust the other exposure settings based on your chosen priority.
- Bracketing: If you’re unsure about the correct exposure, consider using exposure bracketing. This technique involves taking multiple shots at different exposure values (typically underexposed, correctly exposed, and overexposed) to ensure you capture the optimal exposure.
“Understanding the exposure triangle and knowing how aperture, shutter speed, and ISO work together is essential for capturing perfectly exposed photos. With practice and experimentation, you’ll develop an instinct for finding the right balance and achieving stunning results.” [1]
By gaining a deep understanding of how aperture, shutter speed, and ISO work together, you’ll be able to confidently manipulate these settings to create the desired exposure for any scene. So grab your camera and start experimenting with exposure to take your photography skills to new heights.
[1] https://www.example.com/understanding-exposure
7. Capturing Motion
7.1 Freezing Motion
When you want to freeze motion, you aim to capture a subject in sharp detail, with no motion blur. This technique works well for fast-paced action shots, like sports photography or wildlife in motion. Here are some tips to help you freeze motion effectively:
- Use a fast shutter speed: The faster the shutter speed, the better chance you have of freezing the action. A shutter speed of 1/500th of a second or faster is a good starting point.
- Choose the right mode: Switch your camera to shutter priority (Tv or S mode), which allows you to set the desired shutter speed while the camera adjusts the other settings automatically.
- Increase ISO if needed: In low-light situations, you may need to raise your ISO to maintain a fast shutter speed and avoid image noise. Experiment with different ISO settings to find the right balance between freezing motion and image quality.
7.2 Creating Motion Blur
On the other hand, you might be interested in conveying a sense of motion or speed in your photos. For this, you can intentionally introduce motion blur. This technique works well for conveying the movement of a waterfall, a spinning ferris wheel, or a flowing dress. Here are some tips to help you create motion blur:
- Use a slow shutter speed: Set your camera to shutter priority (Tv or S mode) and select a slower shutter speed, such as 1/30th of a second or slower.
- Use a tripod or stabilize your camera: To avoid camera shake, which could blur the entire image, it’s important to keep your camera steady. Use a tripod or stabilize your camera against a solid surface.
- Experiment with panning: Panning involves tracking a moving subject with your camera while using a slower shutter speed. This technique results in a sharp subject against a blurred background, creating a sense of motion.
7.3 Capturing Long Exposures
Long exposures are a popular technique for capturing mesmerizing images of light trails, star trails, or smooth water surfaces. By using a very slow shutter speed, you can capture the passage of time in a single photograph. Here’s how to capture long exposures:
- Use a tripod: Since long exposures require a slow shutter speed, any camera movement can result in a blurry image. Make sure to use a sturdy tripod to keep your camera steady.
- Choose a small aperture: Select a small aperture (a larger f-stop number) to reduce the amount of light entering the camera. This helps maintain a longer shutter speed without overexposing the image.
- Use a remote shutter release: To minimize camera shake, use a remote shutter release or your camera’s self-timer function to trigger the shutter without physically touching the camera.
Capturing motion in photography allows you to convey a sense of action, drama, and excitement in your images. Whether you choose to freeze motion, create motion blur, or experiment with long exposures, these techniques can elevate your photography and bring your subjects to life. So grab your camera and venture into the world of capturing motion!
8. Utilizing Tripods and Remote Shutter Release
When it comes to photography, stability is key. Even the slightest camera shake can result in blurry images, especially in low light conditions or when using longer exposure times. That’s why photographers often rely on tripods and remote shutter release to ensure sharp and steady shots. In this section, we’ll explore the benefits of using these tools and how they can improve the overall quality of your photographs.
The Advantages of Tripods
A tripod is a three-legged stand that provides a sturdy and stable base for your camera. Its primary purpose is to eliminate camera shake by keeping your camera steady during the exposure. Here are some of the advantages of using a tripod:
- Increased Sharpness: By reducing camera shake, a tripod helps to capture sharper images, especially in low light situations or when using longer lenses.
- Flexibility and Composition: With a tripod, you have the freedom to experiment with different angles and compositions. You can easily adjust the height and position of your camera to capture the perfect shot.
- Long Exposure Photography: Whether you’re shooting landscapes, cityscapes, or waterfalls, a tripod is essential for capturing those breathtaking long exposure images. It allows you to use slower shutter speeds without worrying about hand-held camera shake.
- Macro Photography: In macro photography, precise focus is crucial. A tripod provides the stability needed to capture fine details with accuracy and precision.
- Video Stability: If you’re into videography, a tripod is a must-have accessory. It ensures smooth and stable footage, making your videos more professional-looking.
The Benefits of Remote Shutter Release
In addition to using a tripod, utilizing a remote shutter release can further enhance your photography experience. A remote shutter release is a device that allows you to trigger the camera shutter without physically touching the camera. Here’s why it can be beneficial:
- Reduced Camera Shake: When you press the camera’s shutter button directly, it can cause slight vibrations that can result in blurry images. With a remote shutter release, you eliminate the risk of shaking the camera while triggering the shutter.
- Long Exposures: Similar to tripods, remote shutter releases are essential for long exposure photography. They allow you to keep your hands completely off the camera, eliminating any potential shake during the exposure.
- Self-Portraits and Group Shots: If you enjoy taking self-portraits or group shots where you want to be included, a remote shutter release makes it much easier. You can trigger the shutter from a distance, ensuring everyone is in the frame without running back and forth to the camera.
- Wildlife and Street Photography: When photographing animals or capturing candid street shots, using a remote shutter release can help you maintain distance and reduce the chance of disturbing your subjects.
By combining the use of a tripod and a remote shutter release, you can take your photography to the next level and achieve sharper, more professional-looking images. So next time you set out to capture that perfect shot, don’t forget to bring along these essential tools. Your images will thank you for it!
9. Post-Processing Tips
Post-processing is an essential step in the photography workflow that allows photographers to bring out the full potential of their images. Whether you’re a seasoned professional or a hobbyist, these post-processing tips will help you enhance your photos and make them truly stand out.
1. Shoot in RAW Format
One of the first steps towards achieving a high-quality post-processed image is to shoot in RAW format. Unlike JPEG, RAW files contain all the data captured by the camera sensor, giving you more flexibility in adjusting elements like exposure, white balance, and color grading during post-processing. So, before you start editing your photos, make sure to shoot in RAW.
2. Start with Basic Adjustments
When you open your photo in a post-processing software, such as Adobe Lightroom or Capture One, begin by making basic adjustments. These include tweaking the exposure, contrast, highlights, shadows, and saturation to ensure a well-balanced image. Remember, the goal is to enhance the photo while maintaining a natural and realistic look.
3. Use Local Adjustments
In addition to global adjustments that affect the entire image, take advantage of local adjustments to fine-tune specific areas. This can be done using tools like brushes, gradients, or radial filters. For example, you can brighten up a subject’s face, enhance the colors of a particular object, or selectively sharpen certain areas of the photo. Local adjustments allow you to have more control over the final outcome of your image.
4. Experiment with Different Presets
Presets are predefined settings that apply a specific style or look to your photo with just one click. They can save you a lot of time and give you a starting point for editing your images. Many post-processing software and websites offer a wide range of presets, both free and paid, allowing you to experiment with different styles and find the one that best suits your vision.
5. Pay Attention to Details
While editing your photos, pay attention to the small details that can make a big difference. These details include removing distractions, straightening horizons, correcting lens distortions, and reducing noise. Taking the time to address these details will result in a more polished and professional-looking image.
6. Don’t Overdo It with Effects
While it can be tempting to apply various creative effects and filters to your photos, it’s important to exercise restraint. Overdoing it with effects can make your images look unnatural and detract from their true beauty. Instead, focus on enhancing the natural elements of the photo and maintaining a cohesive look throughout your portfolio.
7. Keep It Consistent
Consistency is key when it comes to post-processing your images. Maintaining a consistent editing style will give your portfolio a cohesive and professional look. This doesn’t mean that all your photos should look exactly the same, but rather that they should have a similar overall aesthetic. Develop your own editing style and apply it consistently across your work.
8. Save Multiple Versions
As you experiment with different editing techniques and styles, consider saving multiple versions of your photos. This way, you can compare them side by side and choose the one that best represents your vision. Saving multiple versions also allows you to revisit the editing process at a later time with a fresh perspective.
9. Don’t Forget to Backup
Last but certainly not least, make sure to regularly backup your edited photos. Accidents happen, and computer crashes or hard drive failures can result in the loss of your hard work. Develop a backup system that works for you, whether it’s using external hard drives, cloud storage, or a combination of both. This way, you can rest easy knowing that your precious photos are safe and secure.
Incorporating these post-processing tips into your workflow will help you take your photos to the next level. Remember, practice makes perfect, so don’t be afraid to experiment and develop your editing style over time. With patience and dedication, you’ll be able to create stunning images that leave a lasting impression.
10. Continuous Learning and Practice
The journey to becoming a skilled landscape photographer doesn’t end with mastering the technical aspects or capturing breathtaking images. It’s a constantly evolving process that requires continuous learning and practice. As technology advances and new techniques emerge, it’s essential to stay updated and adapt to the changes in the photography world.
To keep improving your skills and pushing the boundaries of your creativity, here are a few tips for continuous learning and practice:
- Experiment with Different Styles: Don’t limit yourself to just one style of landscape photography. Try exploring different genres, such as long exposure, black and white, or abstract photography. This experimentation will help you discover new techniques and perspectives.
- Attend Workshops and Photography Classes: Joining workshops or photography classes can provide valuable insights and guidance from experienced photographers. You’ll have the opportunity to learn new techniques, gain feedback on your work, and connect with like-minded individuals in the photography community.
- Join Photography Communities: Engage with other photographers through online communities, forums, or social media platforms. Share your work, ask for feedback, and learn from others. These communities can be a great source of inspiration and learning by seeing the work of others and discussing different photography topics.
- Critique Your Own Work: Take the time to critically analyze your own images. Identify areas that need improvement and set goals for your future shoots. By regularly evaluating your work, you’ll develop a discerning eye and constantly strive for improvement.
- Follow Photography Blogs and Websites: Stay informed about the latest trends, gear reviews, and tips by following reputable photography blogs and websites. Wimarys.com, for example, offers a wealth of helpful articles, camera reviews, and inspiration specifically tailored to landscape and portrait photography.
Remember, practice is key to honing your skills. Make a habit of going out and shooting regularly, even if it’s just in your local surroundings. Each time you pick up your camera, you’ll gain more experience and refine your techniques.
Continuous learning and practice are vital for any photographer who wants to excel in their craft. Embrace the journey of growth and never stop exploring new techniques and pushing your creative boundaries.
Happy shooting and keep capturing those breathtaking landscapes!
Visit Wimarys.com for more photography inspiration and resources!
Frequently Asked Questions
- What are some essential tips for breathtaking landscape photography?
Some essential tips for breathtaking landscape photography include: 1. Researching and scouting locations, 2. Considering the lighting and weather conditions, 3. Using a tripod for stability, 4. Utilizing different perspectives and compositions, 5. Paying attention to foreground elements.
- What camera settings should I use for landscape photography?
For landscape photography, it is generally recommended to use a narrow aperture (higher f-number) to achieve a larger depth of field. Additionally, using a low ISO and shooting in RAW format can help capture more details in the scene.
- Should I use filters for landscape photography?
Filters can be highly beneficial for landscape photographers. A polarizing filter can reduce glare and enhance colors, while neutral density filters can help achieve longer exposures and smoother water or cloud movements.
- How important is timing in landscape photography?
Timing is crucial in landscape photography. The golden hours (shortly after sunrise and before sunset) offer beautiful soft light, long shadows, and vibrant colors. Also, consider capturing landscapes during blue hour (before sunrise and after sunset) for a unique atmosphere.
- What are some post-processing tips for landscape photography?
Some post-processing tips for landscape photography include: 1. Adjusting exposure and contrast, 2. Enhancing colors and saturation, 3. Sharpening details and reducing noise, 4. Removing distractions through cloning or cropping, 5. Applying selective adjustments to highlight specific areas.