
Topaz Sharpen AI review
Introduction
As the screens of our PC’s, smartphones and tablets have gotten better and better over time, our image processing had to evolve too to adhere to these new standards. Often this process includes sharpening. There is also a need to sharpen images for resizing, for instance, for posting to Instagram. There are many plug-ins and methods for doing this, but Topaz labs have chosen the route of machine learning to get an advantage over competitors.
Topaz ‘Sharpen AI’ claims to be the first sharpening and shake reduction software that can tell the difference between detail and Noise. They trained it with millions of images so it could learn two characteristics of detail versus noise. It’s available as a standalone software product or a plugin for topaz Studio, Photoshop and Lightroom.
Let’s have a look at the interface and go through all the features and functionality.
Sharpen AI interface
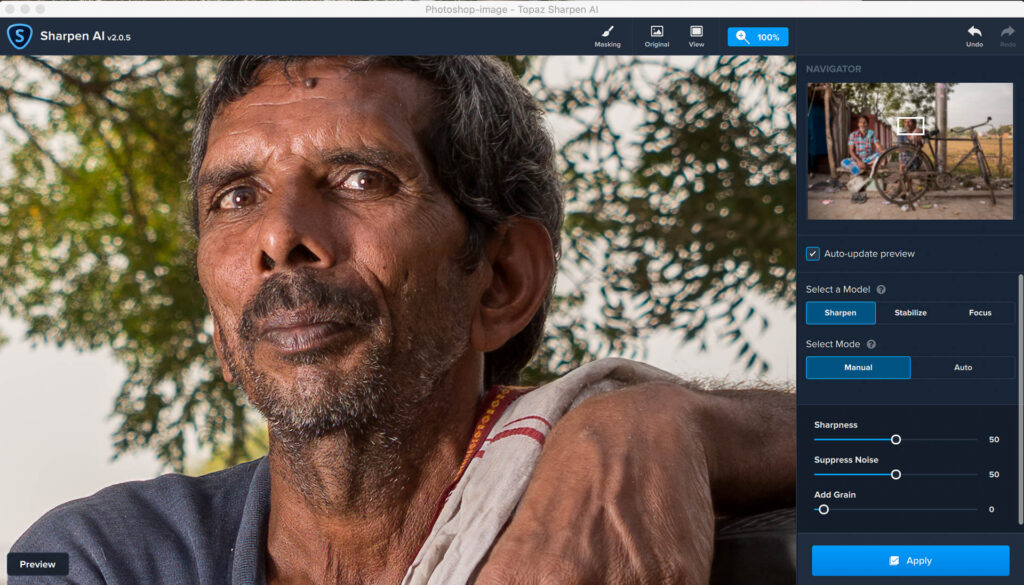
The easiest way to see how ‘Sharpen AI’ works is through the application interface itself. The main window is largely occupied by a preview of your selected image. On your right you’ll find the application settings and the top bar includes other interesting features that we’ll talk about later.
Importing images in the standalone version
Click open and import single image or multiple images into ‘Sharpen AI’ standalone version. You can also drag-and-drop images from the desktop or folder of your choice. It’s also possible to batch process files, either processing all images with the same settings or individually.
Navigator and settings
On your right-hand side, you’ll find the navigator and the process settings. The navigator allows you to magnify your subject, always a splendid idea when applying sharpening.
I should draw your attention to the Auto-update preview switch below the navigator. Although ‘Sharpen AI’ is optimized for Intel CPU and iGPU’s and you can get up to five times faster processing speeds Intel graphics card of the 6th generation and the higher, we don’t all have those. When Auto-update preview is turned on, ‘Sharpen AI’ will continually update the preview according to the changes you make. This can be annoying since even rendering the preview takes some computing. If it takes too long, turn it off.
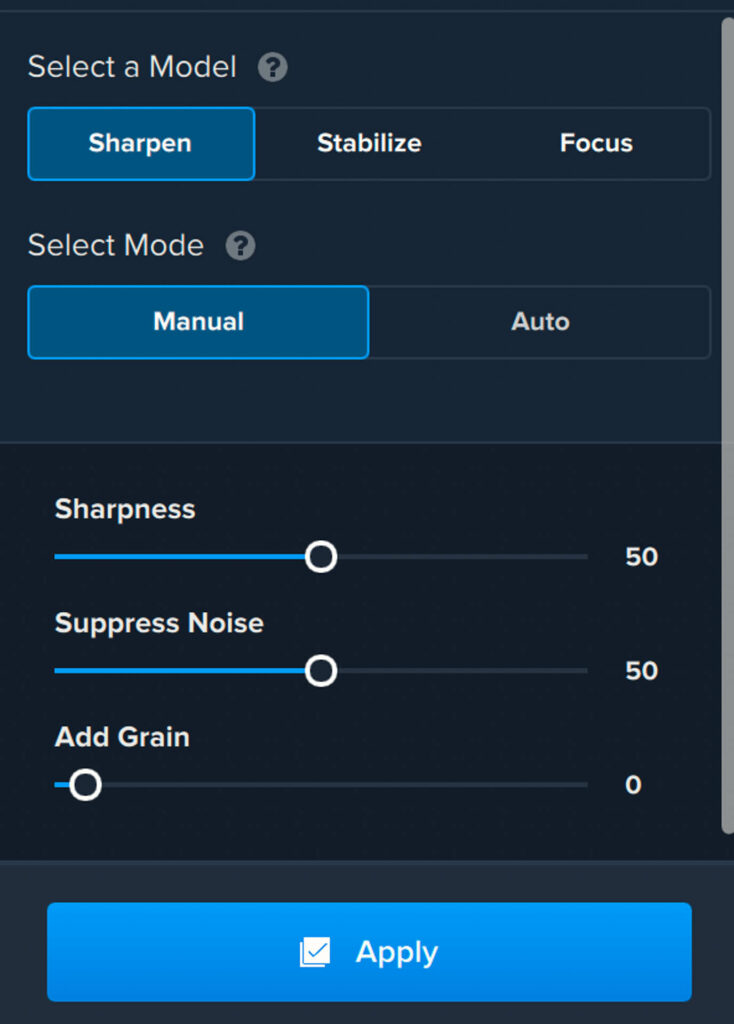
Sharpening models
There are three different sharpening models, and these relate directly to the most common reasons images are unsharp or blurry at 100%. These problems are lens softness, movement and missed focus.
Sharpen mode
Unfortunately, not all lenses are tack sharp, especially when shooting wide open or with high megapixel cameras. The ‘Sharpen’ mode machine learning model will correct this softness without adding artifacts or halos. You’ll have a tack sharp image that won’t need any sharpening when resizing.
[bafis_image before_img=”https://www.wimarys.com/wp-content/uploads/2020/06/before-sharpen-ai.jpeg.jpg” after_img=”https://www.wimarys.com/wp-content/uploads/2020/06/after-sharpen-ai.jpg” orientation=”horizontal” offset=”0.5″ before_label=”Sharpen mode before” after_label=”Sharpen mode after”]
Stabilize mode
Even the slightest movement of your subject or camera shake can lead to motion blur. They have trained the ‘Stabilize’ model to fix motion blur and camera shake in handheld images. We can use this model for a diverse rage of images from handheld landscapes to birds-in-flight. Check out this example to see what it is capable of.
[bafis_image before_img=”https://www.wimarys.com/wp-content/uploads/2020/06/stabise-before.jpg” after_img=”https://www.wimarys.com/wp-content/uploads/2020/06/stabilise-after.jpg” orientation=”horizontal” offset=”0.5″ before_label=”Stabilze mode before” after_label=”Stabilize mode after”]
Focus mode
Focus correction is a tough problem that’s ruined many great shots. In portraits, for instance, we want the iris to be tack sharp, but because of the shallow depth of field, it’s easy to be slightly off.The ‘Focus’ mode is ideal for these issues and can sometimes salvage an otherwise lost image. It does not always work as well though.
[bafis_image before_img=”https://www.wimarys.com/wp-content/uploads/2020/06/focus-mode-before.jpg” after_img=”https://www.wimarys.com/wp-content/uploads/2020/06/focus-mode-after.jpg” orientation=”horizontal” offset=”0.5″ before_label=”Focus mode before” after_label=”Focus Mode After”]
Sharpen AI top bar

The most interesting function on the top bar is ‘Masking’. We’re used to having masking technology in Photoshop but it’s not that common in plug-ins yet. A mask allows you to apply selective adjustments to parts of the image.
I’ve noticed, for instance, that using sharpening with images taken with cameras with stabilised sensors can cause strange effects. The stabilised sensor will attempt to keep the focussed part as stable as possible. But with a shallow depth-of-field, this can leave out-of -focus parts somewhat warped. Sharpening these parts leads to all kinds of weird artefacts.And yes artificial intelligence has apparently not caught up with this phenomenon either.

This would be a brilliant use for the ‘masking’ tool where you’d be able to ask out these areas and only apply sharpening to the focussed parts.This is done by selecting the brush at the top of the screen. Then select show at the bottom of the screen to apply sharpening to a certain area or hide to brush away sharpening. There are different brush settings available like radius; softness and opacity.
Output options
In the standalone version, we can save output to either the location of the source image or a custom folder in. You can also change the suffix to be added to the file name and convert file format to JPEG, jpeg, TIF, TIFF, PNG and DNG. You can select additional output quality compression too, and a color profile.
Conclusion
I have to admit, I’m a bit of a nerd for a technology like what we find in ‘Sharpen AI’. Artificial intelligence, or machine learning really, is slowly changing image processing as we know it. And it’s making it easier and faster to get top-notch results. Even more interesting is that the AI training part of ‘Sharpen AI’ is a continuous process. With each software update, the software gets smarter.
[bafis_image before_img=”https://www.wimarys.com/wp-content/uploads/2020/06/Sharpen-AI-Ethibefore.jpg” after_img=”https://www.wimarys.com/wp-content/uploads/2020/06/Sharpen-AI-Ethiafter.jpg” orientation=”horizontal” offset=”0.5″ before_label=”Sharpen mode before” after_label=”Sharpen mode after”]
Are We There Yet? Is Topaz ‘Sharpen AI’ capable of better results than a human? No I think not, it will take quite some time to train this app to see things like human eyes and train it to do as good a job as a Photoshop pro. It is however very convenient and the resulting sharpening effect is fantastic 90% of the time. I’d say it can do a better job than most intermediate photographers and even well-seasoned wedding photographers will find a use for quickly batch processing hundreds of images with excellent results. What’s your opinion on this artificial intelligence trend in image processing? Let me know in the comments below.


Hello, I would like to talk to people who use Topaze DeNoise. Here is my problem: I have been using it for some time and I was really happy with it, the noise was really well suppressed. But I just updated Topaze DeNoise version 3.0.3 and I have a problem: when I run the noise processing of my photos, there is no change in the final photo compared to the original photo. I didn’t have this problem with older versions of Topaze DeNoise. Too bad I can’t send you a screenshot for you to see. Thank you for your help. Best regards.
———————————–
Bonjour, J’aimerais échanger avec des personnes qui utilisent Topaze DeNoise. Voici mon problème : je l’utilise depuis quelques temps et j’en étais vraiment satisfaite, le bruit était vraiment bien supprimé. Mais je viens de mettre à jour Topaze DeNoise version 3.0.3 et je rencontre un problème : quand je lance le traitement du bruit de mes photos, il ne se produit aucun changement sur la photo finale par rapport à la photo originale. Je n’avais pas ce problème avec les versions plus anciennes de Topaze DeNoise. Dommage, je ne peux pas vous envoyer de copie d’écran pour que vous vous rendiez compte. Je vous remercie pour votre aide. Bien cordialement.
Hi Evelyne, I would suggest uninstalling the app and reinstalling it.