
Sony A77 II advanced features guide
Besides the advanced customizable autofocus functions (find the guide here), The Sony A77 II has some more hidden features and functions that you might want to familiarize yourself with.
I’ll start with some of my settings after a few months’ experience with the A77 M2.
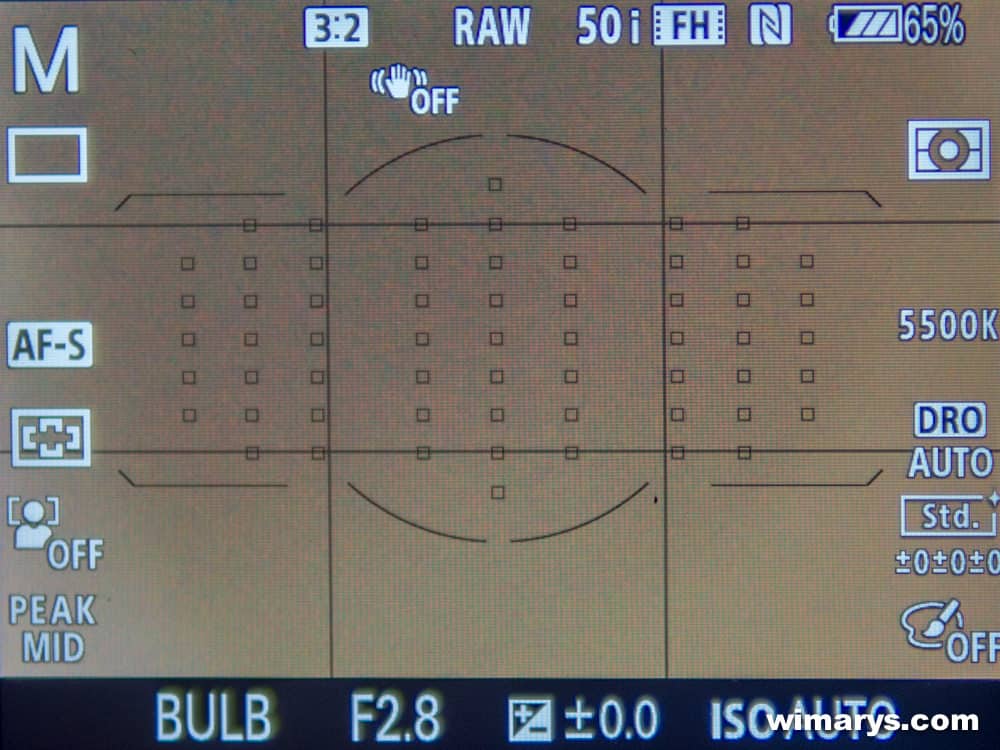
12fps and Bulb Mode
Cont. Priority AE (12fps dial)
This modes uses a fixed fast aperture (camera does not change the aperture during shooting) and allows you to shoot images continuously at high speed. Pressing the middle button of the multi-selector (even while the shutter button is pressed) changes your focus from whatever focus area mode you’re in (like wide) to the center of your image. This way, you can switch from wide mode to the center your subject and follow technique during shooting. A very powerful feature.
Make sure you set the mode dial (front lower left dial) to C (Cont. Priority AE). The camera will lock on focus and exposure while shooting. If the focus mode dial is set to MF or S (Single-shot AF), the focus is locked on the first image.
Remember that ISO Auto range can be changed in this mode dial function, so I’d advise setting the upper limit to ISO 3200 or 1600.
besides that I have my camera set to:
AF drive speed to slow (the camera takes a bit more care with AF, resulting in a larger number of in-focus shots)
AF track duration is set to 3 or 4
Bulb Mode
Setting the A77II to Bulb mode is also an often requested feature. This mode allows you to shoot trails of light with a long exposure.
You should use a tripod to get good results.
- Set the mode dial to M
- Turn the rear dial clockwise until Bulb is indicated.
- Select the aperture value (like f/8) using the front dial.
- Press the shutter button halfway down to adjust the focus.
- Press and hold the shutter button for the duration of the shooting.
After shooting, noise reduction will take about as long as the time that the shutter was open. Remember cannot shoot any more while noise reduction is in progress.
If Bulb mode isn’t accessible, make sure:
- Cont. Priority AE is OFF
- Smile Shutter is OFF
- Auto HDR is OFF
- Picture Effect is not set to HDR Painting or Rich-tone Mono.
- Multi-Frame NR is OFF
- Drive Mode is NOT set to Cont. Shooting, Cont. Bracket or Self-timer Continuous
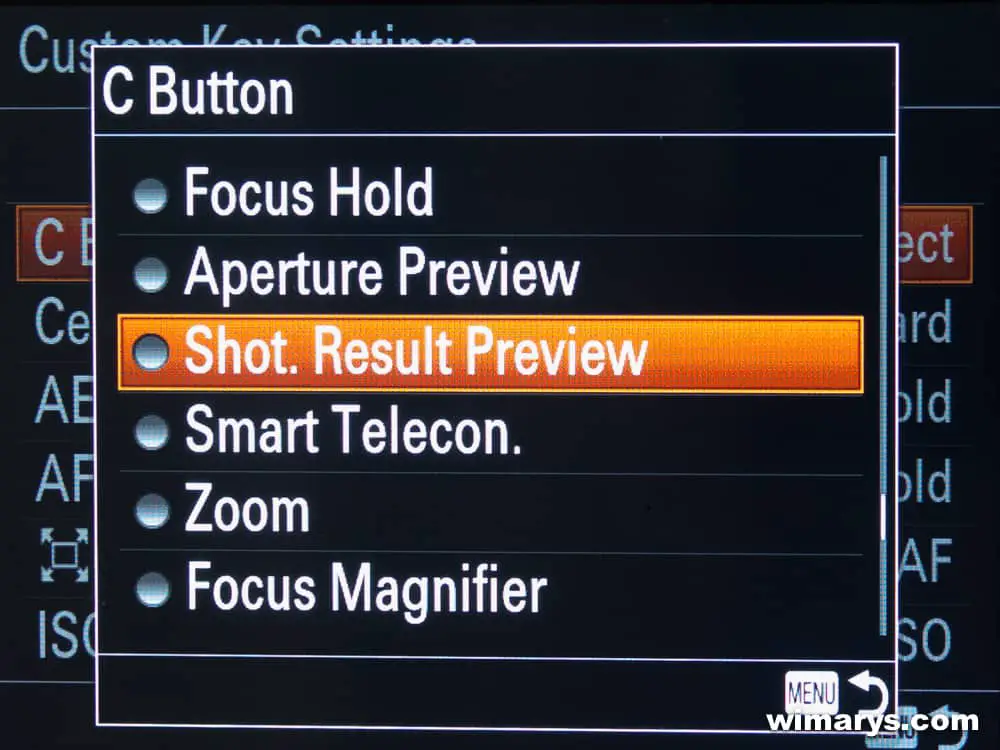
Eye AF

You’ll need to assign this function to a button for it to work.
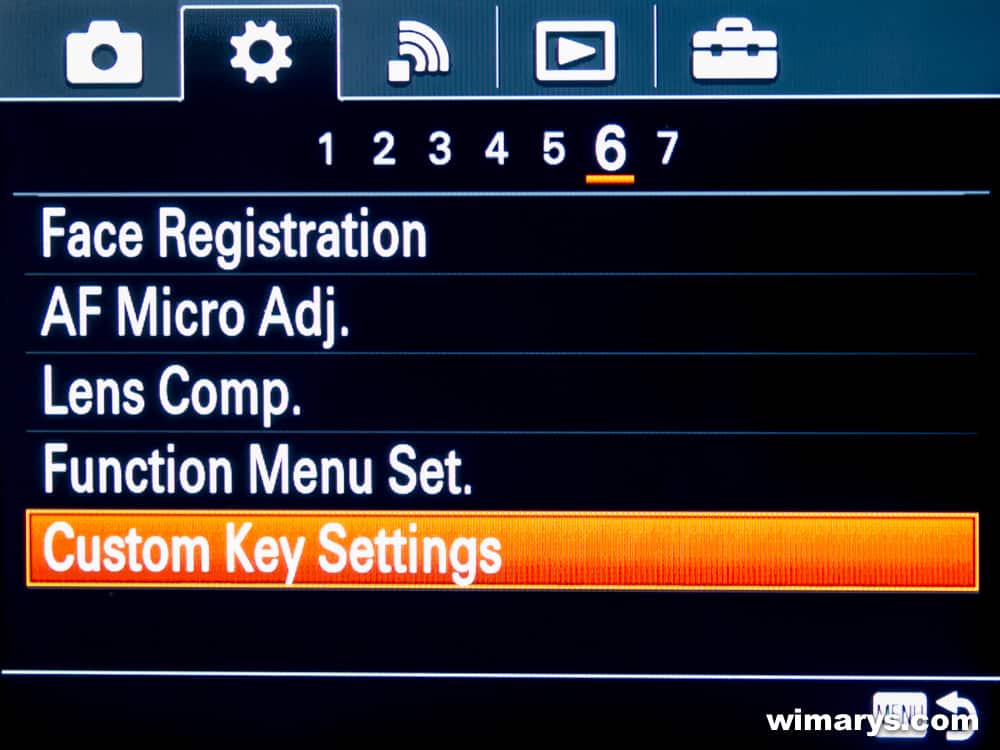
MENU – Custom Settings (the wheel pictogram) – page 6 – Custom Key Settings – assign the Eye AF function to the desired button.
The Eye AF feature will let the camera focus on the subject’s eyes while you keep the button pressed.
- Point the camera at a face, and push the button to which you have assigned the Eye AF
- Press the shutter button while pressing the button
The Sony A77II may not be able to focus on the eyes depending on the circumstances, like when no
Eyes can be detected within the autofocus area. In such cases, the camera focuses on the face.
You cannot use Eye AF when the focus mode is set to C, set it to A.
When the camera focuses on the eyes and Smile/Face Detect is on, a detection frame is.
Displayed on the face after it is displayed on the eyes. When Smile/Face Detect is of, a detection frame is shown on the eyes.
Auto Obj. Framing (not available in RAW)
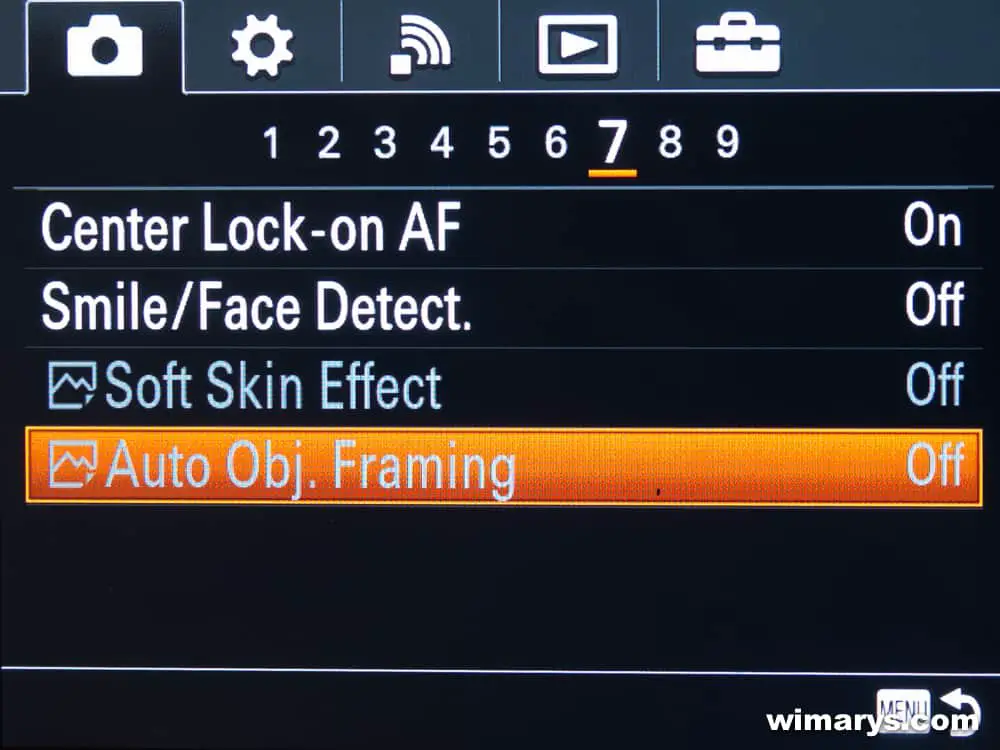
Menu – Camera Settings – page 7 – Auto Obj. Framing – desired setting (On or Off)
When the A77II detects and shoots faces, macro shooting subjects or subjects that are tracked by Lock-on AF, the A77 M2 automatically trims the image into an appropriate composition and saves it.
Live View Display
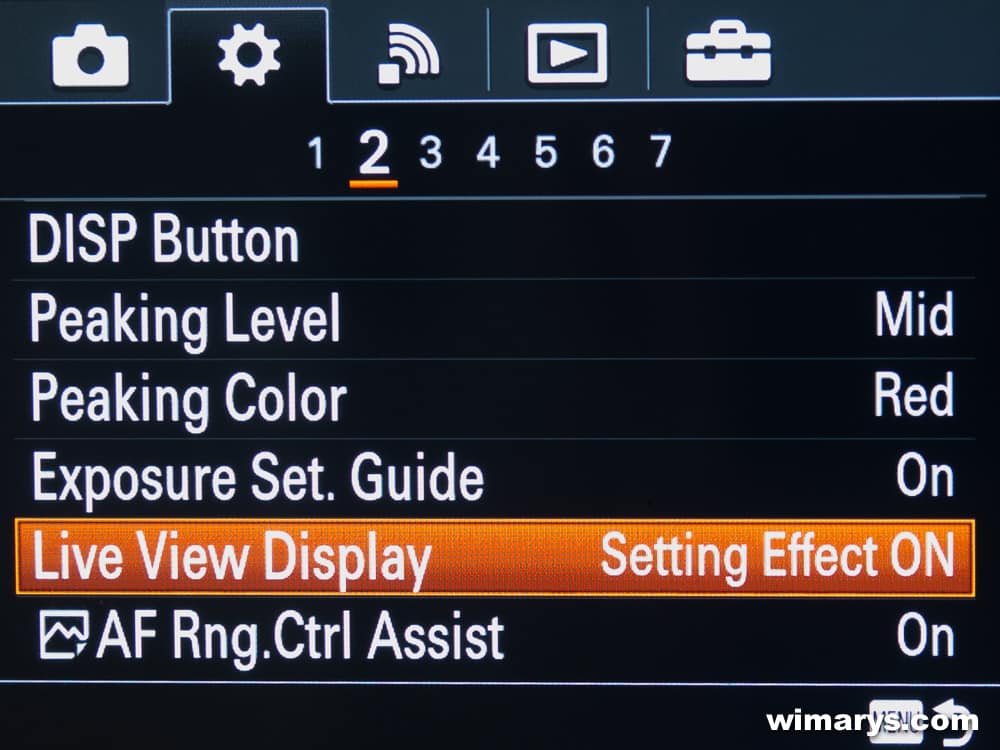
MENU – Custom Settings (the wheel pictogram) – page 2 – Live View Display – desired setting
Live view shows your images as they’ll appear out of the camera, with effects of the exposure compensation, white balance, Creative Style, or Picture Effect on the screen.
- Setting Effect ON (default setting and intelligent Auto, Superior Auto, Sweep Panorama, Movie or Scene Selection): Displays Live View in conditions close to what your picture will look like as a result of applying all your settings. This setting is useful when you want to shoot pictures while checking the results of the shot on the Live View screen. Live View is always displayed with the appropriate brightness even in Manual Exposure mode.
- Setting Effect OFF: Shows Live View without the effects of exposure compensation, white balance, Creative Style, or Picture Effect. This is useful for precisely checking your composition in particular conditions. Like when you use a third-party Flash, such as a studio flash, Live View Display may be dark for some shutter speed settings.
Aperture Preview
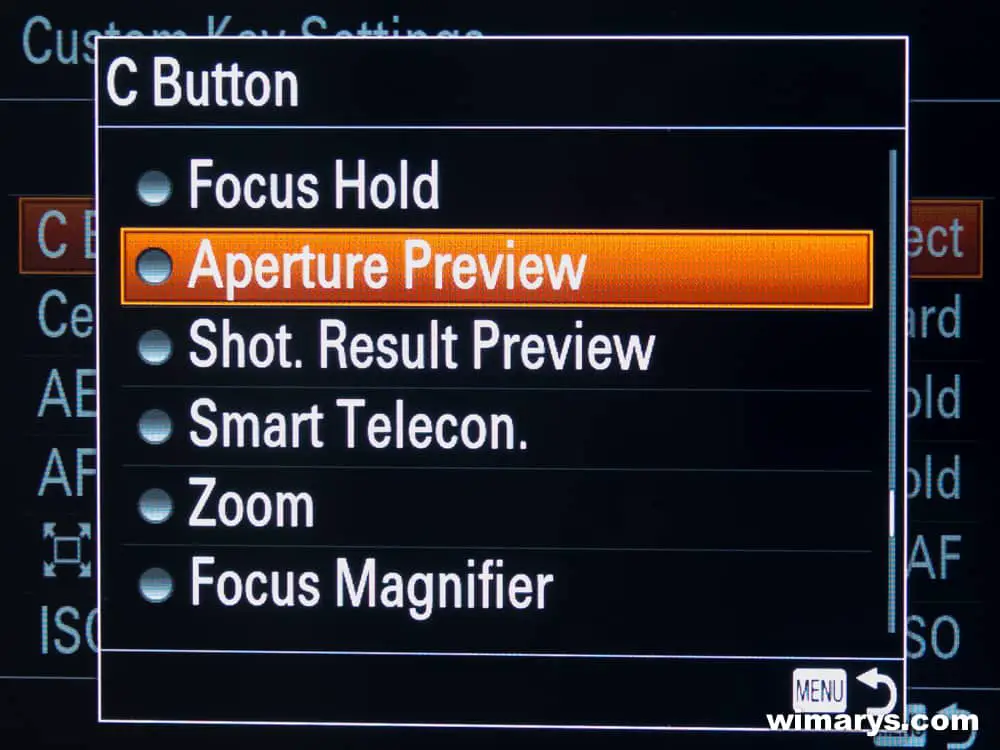
You’ll need to assign this function to a button for it to work. Can be useful for portraiture or macro shots where you want to have full control over the effects of your aperture settings.
MENU – Custom Settings (the wheel pictogram) – page 6 – Custom Key Settings – set the Aperture Preview function to the desired key.
With the screen or viewfinder, you may see an image with an aperture that differs from the shooting result. Since the blurring of a subject changes, if the aperture is changed, the blurriness of the actual picture will vary from the image you were viewing prior to shooting.
While you press and hold the key to which you assigned the [Aperture Preview] function, the aperture is stopped down to the set aperture value, and you can check the blurriness prior to shooting.
Shot. Result Preview
MENU – Custom Settings (the wheel pictogram) – page 6 – Custom Key Settings – set the Shot. Result Preview to desired key
With the monitor or viewfinder, you may see an image with an aperture that differs from the shooting result. Since the blurring of a subject changes, if the aperture is changed, the blurriness of the actual picture will vary from the image you were viewing prior to shooting. While pressing down the key to which Shot. Result Preview is assigned; you can check the picture preview with the DRO, shutter speed, aperture and ISO sensitivity settings applied. Verify the shooting effect preview before shooting.
Some effects cannot be previewed depending on the shooting settings. Even in that case, the settings you have selected will be applied to the images you shoot.
e-Front Curtain Shut.
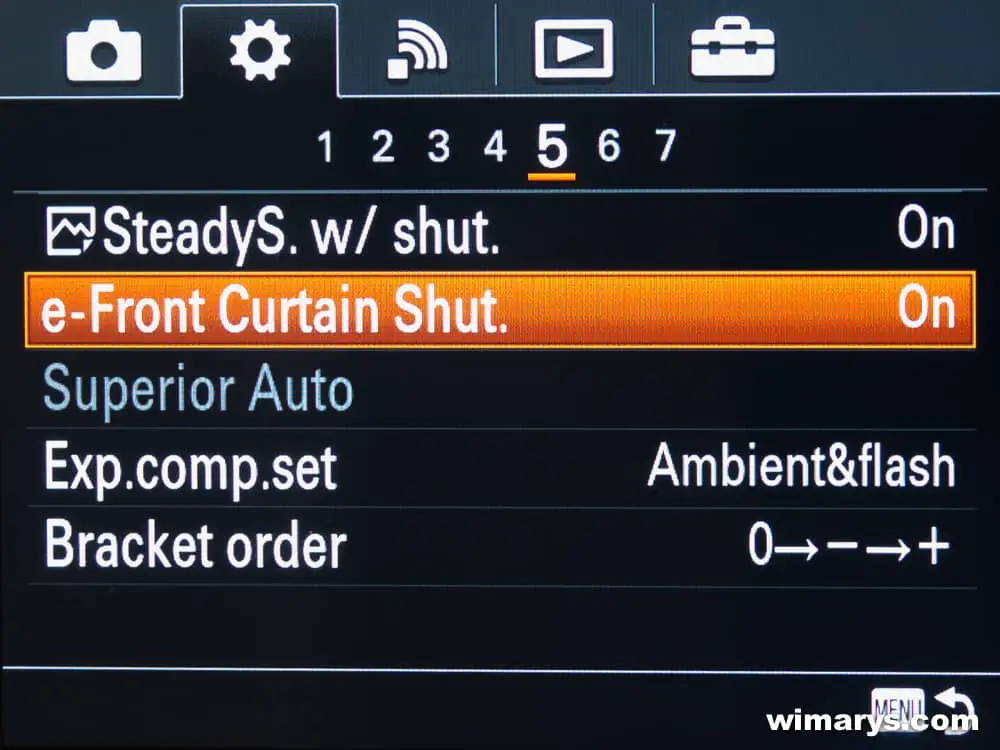
MENU – Custom Settings (the wheel pictogram) – page 5 – e-Front Curtain Shut – desired setting ON or OFF
Yes the Sony A77 II has an electronic front curtain shutter! This shortens the time lag between shutter releases.
Remember that when you shoot at high shutter speeds with a large diameter lens attached, the ghosting of a blurred area may occur, depending on the subject or shooting conditions.
When a lens made by another manufacturer (including a Minolta/Konica-Minolta lens) is used, turn this function off. If you set this function to On, the correct exposure will not be set or the image brightness will be uneven.
Lens compensation features
The Sony A77 II has a range of built-in lens compensation features. I can see this being useful for journalism and sports shooters who want to quickly get their jpegs to their editors with the minimum amount of editing.
Shading Comp.
MENU – Custom Settings (the wheel pictogram) – page 6 – Lens Comp – Shading Comp – desired setting ( Auto or Off)
Compensates for the shaded corners of the screen, caused by certain lenses.
The Shading Comp function is only available with certain A-mount lenses.
Chromatic Aberration Compensation
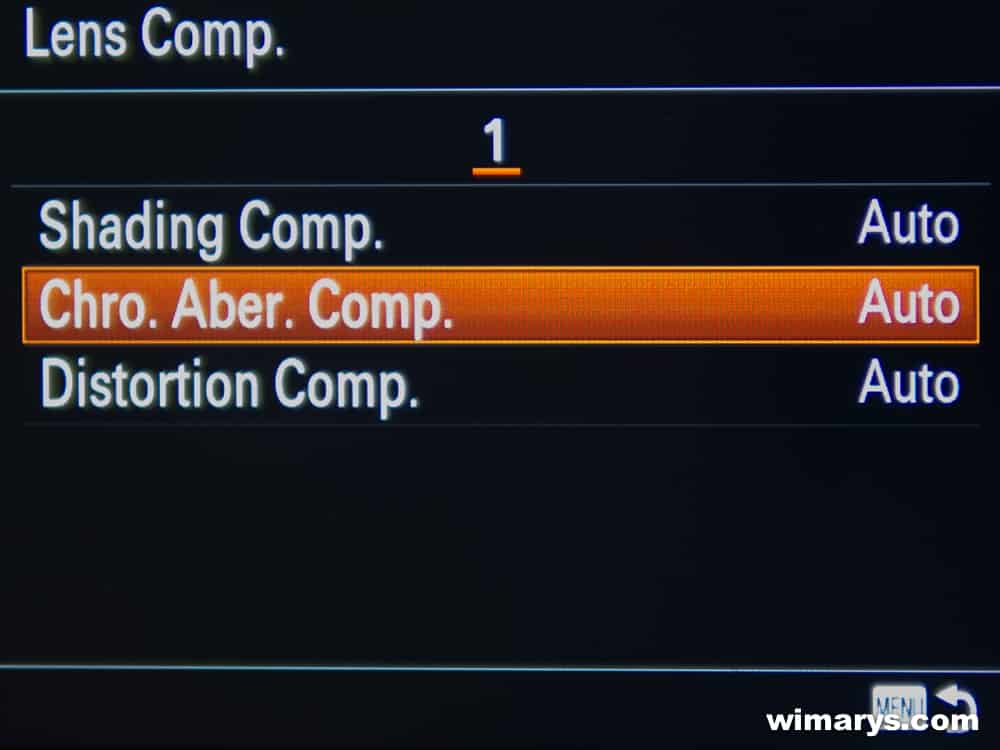
MENU – Custom Settings (the wheel pictogram) – page 6 – Lens Comp – Chro. Aber. Comp – desired setting (Auto or Off)
Reduces the color deviation at the corners of the screen, caused by certain lens characteristics.
The Shading Comp function is only available with certain A-mount lenses.
Distortion Compensation
MENU – Custom Settings (the wheel pictogram) – page 6 – Lens Comp – Distortion Comp – desired setting (Auto or Off)
Compensates for the distortion of the screen, caused by certain lens characteristics.
The Shading Comp function is only available with certain A-mount lenses and with some cannot be turned Off.
Memory card issues
Some people have reported problems with certain memory cards. These issues include:
- Unable to magnify images on the card.
- Buffer related problems.
- Inability to read the memory card.
SD, SDHC, SDXC memory card and Memory Stick PRO Duo, Pro-HG Duo, PRO-HG HX Duo media are all supported.
Before contacting Sony support desk, make sure you:
- Format the memory card once you’ve inserted in the camera.
- If you’re using fast burst speeds, use a fast card (32GB 95MB/s read and 45mB/s) write is my recommendation to take advantage of A77 II FR and Buffer.
- If you’re using larger cards (64 or 138GB), make sure you get the fastest available.
- An SDHC UHS-I card (stands for “Ultra High Speed”) is recommended for best performance in burst mode.
- Sandisk Extreme Pro SDHC UHS-I cards seem to work very well.
Conclusion
There you have it, Sony A77 II advanced features guide late 2014. The more I use it, the more I realise how customisable this camera actually is.
There is a steep learning curve though, but referring back to the manual and reading tutorials like this one will help you grasp its’ full potential.
If you have any more questions on the Sony A77 II, feel free to comment.


beste Wim, ik kreeg via Sonycenter Deinze jou gegevens en daar ben ik erg blij mee, ik heb sinds kort de Sony A77 MII ( heb ook de A77 en RX10) en gebruik deze voornamelijk voor vogelfotografie, na het lezen van jou info over scherpstellen Expanded Flexible Spot heb ik toch een paar problemen die ik niet echt begrijp en hoop dat je me wegwijs kunt maken (Sony zelf weet het blijkbaar niet, helpdesc, Sony Oostende en Deinze) ik probeer dus een speciefieke vogel te fotograferen tussen andere vogels en druk dus hals de ontspanknop in maar het resultaat is niet de vogel die ik wens maar alles ernaast, om me te behelpen druk ik dan op het stuurhendeltje om het beeld opnieuw te centreren en herbegin, soms met goed resultaat maar verre van wat ik eigenlijk hed verwacht toen ik het toestel kocht. ben zelfs terug naar gewoon centraal (breed) focussen terug gestapt om toch maar zeker te zijn van een goed shot, voor alle duidelijkheid om 1 vogel te volgen in een open hemel is dit prachtig en werkt het dus wel, op een video van Garry Fong zie je hem een voetballer volgen en dat ziet er dus poepsimpel uit maar het lukt gewoon niet in een groep vogels om zelf te bepalen welke vogel de camera rekening moet mee houden. kun je me helpen? ben gerust bereid om tot bij jou te komen gezien je in België woont, vraag me trouwens af of jij workshops organiseerd? Mijn Engels is goed genoeg om te lezen (90%) en spreken maar het schrijven is niet super, sorry
mvg
Redgy
Hi Redgy, I hope you can understand this in English (so other readers can understand), if not, let me know.
I’m guessing he is using Focus Area set to lock-on AF in the menu. This will lock-on to your subject when you press the shutter button and track it.
It is available in i-Auto mode, but more custimisable in P, A, S, M (or 12Fps mode which might be best suited for your bird tracking).
In those modes, you can set Lock-on AF to zone or center (with the ‘joystick’left-right). If you for example set it to centre, it will lock-on to the bird in the centre, and expand the AF points as needed to continue tracking it.
You might have to play around with the tracking speed settings to get the best results for your type of photography. But start with changing Focus area to lock-on AF.
I think the market as well as Sony herself has missed a uniqueness of her A&&MKII , It is the ONLY camera that provides fast focusing with the articulated screen in use, and shot 12 FPS. This is invaluable for small pets owner (I am a owner of 4 Guniea pigs , a snake and a turtle ) This camera give me some pictures that no even a D4s can deliver. The lens I used most with this camera is my Tokina 11-16 2.8 , sigma 50-150 2.8 and sigma 24mm 1.8 Marco . Have they not produced in Sony A mount, I would not have buy this A77II nor my previous A350
Actually, if you want interesting angle with sport photography, i believe this combo will be handy as well. I went to Sony Showroom in Hong Kong yesterday and all A mount cameras were left in the dark corner. SAD….
Great review btw, and thanks for your tips on A77II focusing , this is the first camera in 10 years that need me to drill into the manual.
Hi John, 4 Guinea Pigs, a snake and a turtle, do they all get along? 🙂
Yes, apparently mirror-less is selling so well, that A-mount has been left in the cold. Part of the problem is that few professionals use Sony cameras, so these unique features go largely unnoticed.
hello.
I recently bought the Sony a77 ii and was wondering how to shoot using bracket order. Do you have a tutorial on that function?
Sorry Jeff, I don’t.
I need to know how costumaze de bottons becouse i cant do that and the memory of the bottons dont save mine customs. Thank you
Hi Victor,
first go to Menu -> First Tab -> Page 9 -> Memory
Choose the Register you want to store, then press Enter.
Hey!
Been using the A77ii along with the Tamron 150-600 for about 5 years essentially to click birds.
The E front curtain setting has been in “On” position right from the day I got the lens.
As per your article I should be keeping it in the “Off” position isn’t it?
Every now and then I keep coming back to your articles and everytime I understand something new!
Thanks in advance!
Of course you can decide for yourself. I never use the EFCS on any camera. Of course, I’m not a sports photographer so frame rate does not matter that much to me. Firstly, it affects the quality of the bokeh and secondly you can get all kinds of nasty image distortion.