
Fujifilm Fujifilm X-H1 manual with settings, tips and trips
Introduction
The Fujifilm X-H1 mirrorless camera has characteristics of both the X-T2 and the medium format GFX 50s. For the first time, sensor stabilization is present in an Fujifilm X series body. Furthermore, the Fujifilm X-H1 has extensive video capabilities and Fujifilm focuses with this camera on the serious videographer.
The Fujifilm X-H1 is the first in a new line within their X range. According to Fujifilm, the H in the name could stand for the word Hybrid. It’s also a camera that offers plenty of opportunities in both photo and film.
IBIS
Fujifilm sees this X-H1 really as a professional body. This is expressed in the fact that the body has been given extra strength at various points and is also sealed in 94 locations for good weather resistance.
The most important innovation in the Fujifilm X-H1 is the presence of built-in image stabilization. Where this was not previously found possible by Fujifilm, a completely new system has apparently been developed that can receive the approval of both photo and video technicians. This in body stabilization in combination with a selection of lenses ensures a stabilization of 5.5 stops.
A specially developed dual processor controls three axial accelerometers and three axial gyro sensors. In total, up to 10,000 calculations per second can be performed. Necessary for an extremely precise control of the mechanisms that ensure the stabilization.
Sensor and processor
The Fujifilm X-H1 uses the same 24.3 megapixel APS-C X-Trans CMOS III sensor and X-Processor Pro image processor as already used in the Fujifilm X-Pro2 and X-T2. The large electronic viewfinder has a magnification factor of 0.75x which consists of a high resolution EFF of 3.69 million dots. Unprecedentedly large for a system camera. The viewfinder looks very smooth with its 100Hz refresh and its delay is only 0.005 seconds.
Video
The image quality of the video recordings has increased further because recordings can now be made in a bitrate of 200Mbps. The Fujifilm X-H1 has more than 20 areas for improvement in this area, including 1080 / 120P high-speed video mode. Making slow-motion recordings can be made with a delay of 1/2, 1/4 and 1/5 of the speed.
It is also possible to write F-log recordings directly to the SD card of the Fujifilm X-H1, which will bring an improved workflow for many people. Other improvements include DCI 4K recording capability (4096 * 2160), a 400% dynamic range setting (approximately 12 stops), 200 Mbps high bitrate recording, an improved internal microphone (24 bit / 48 Khz) and verbal time codes.
We’ll go over the Menu system and see what has changed, and I’ll give some tips on settings along the way.
Image Quality
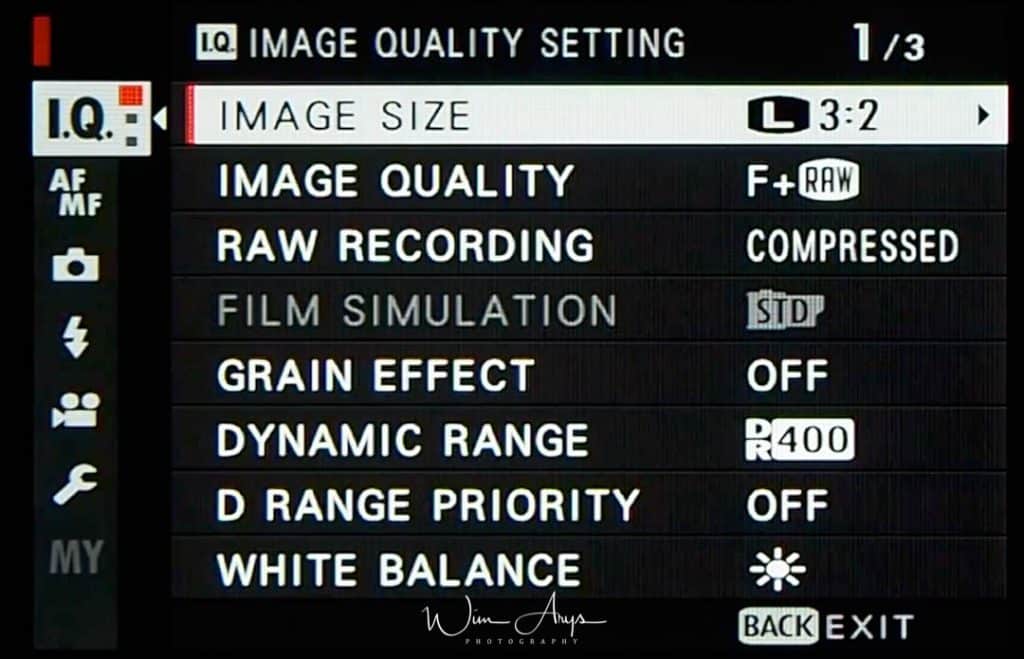
Image Quality Setting page 1 of 3 (I.Q. icon)
Image Size
You can choose the size and aspect ratio here. Either 3:2, 16:9 or 1:1 aspect ratios are available, and you can select Large, Medium and Small sizes for these aspect ratios.Images with an aspect ratio of 3:2 have the same proportions as a frame of 35 mm film, while an aspect ratio of 16:9 is suited to display on HD devices. Pictures with an aspect ratio of 1:1 are square (ideal for instagram or other blogging mediums). Remember that image size is not reset when the Fujifilm X-H1 is turned off or another shooting mode is selected.
3 : 2 aspect ratio
Large: 6000 × 4000 pixels.
Medium: 4240 × 2832 pixels.
Small: 3008 × 2000 pixels.
16 : 9 aspect ratio
Large: 6000 × 3376 pixels.
Medium: 4240 × 2384 pixels.
Small: 3008 × 1688 pixels.
1 : 1 aspect ratio
Large: 4000 × 4000 pixels.
Medium: 2832 × 2832 pixels.
Small: 2000 × 2000 pixels.
Image Quality
Choose a file format and compression ratio. Select FINE or NORMAL to record JPEG images, RAW to record RAW images, or FINE+RAW or NORMAL+RAW to record both JPEG and RAW images. FINE and FINE+RAW use lower JPEG compression ratios for higher-quality JPEG images, while NORMAL and NORMAL+RAW use higher JPEG compression ratios to increase the number of images that can be stored.
- If a JPEG option is currently selected for image quality, pressing the button temporarily selects the equivalent JPEG+RAW option.
- If a JPEG+RAW option is currently selected, pressing the button temporarily selects the equivalent JPEG option, while if RAW is selected, pressing the button temporarily selects FINE.
- Taking a picture or pressing the button again restores the previous setting.
- RAW Recording
RAW recording
Choose whether to compress RAW images.
- Uncompressed: RAW images are not compressed.
- Lossless Compressed: RAW images are compressed using a reversible algorithm that reduces file size with no loss of image data.
Film Simulation
Simulate the effects of different kinds of film, including black-and-white (with or without color filters). Choose a palette according to your subject and creative intent. Film simulation options can be combined with tone and sharpness settings.
| PROVIA/STANDARD | Standard color reproduction. Suited to a wide range of subjects, from portraits to landscapes. |
|---|---|
| Velvia/VIVID | A high-contrast palette of saturated colors, suited to nature photos. |
| ASTIA/SOFT | Enhances the range of hues available for skin tones in portraits while preserving the bright blues of daylight skies. Recommended for outdoor portrait photography. |
| CLASSIC CHROME | Soft color and enhanced shadow contrast for a calm look. |
| PRO Neg. Hi | Offers slightly more contrast than PRO Neg. Std. Recommended for outdoor portrait photography. |
| PRO Neg. Std | A soft-toned palette. The range of hues available for skin tones is enhanced, making this a good choice for studio portrait photography. |
| ACROS | Take black-and-white photos with rich gradation and outstanding sharpness. |
| MONOCHROME | Take pictures in standard black and white. |
| SEPIA | Take pictures in sepia. |
Grain Effect
Add a film grain effect. Select an amount (STRONG or WEAK) or choose OFF to turn film grain off.
Dynamic Range
Control contrast. Choose lower values to increase contrast when shooting indoors or under overcast skies, higher values to reduce loss of detail in highlights and shadows when photographing high-contrast scenes. Higher values are recommended for scenes that include both sunlight and deep shade, for such high-contrast subjects as sunlight on water, brightly-lit autumn leaves, and portraits taken against a blue sky, and for white objects or people wearing white; note, however, that mottling may appear in pictures taken at higher values.
D Range Priority
When dynamic range is likely the priority, this mode quickly shifts the Fujifilm X-H1 into full dynamic range priority. The resulting frames have great depth when post processing.
White Balance
For natural colors, choose a white balance option that matches the light source.
| AUTO | White balance is adjusted automatically. |
|---|---|
| Measure a value for white balance. | |
| Choose a color temperature. | |
| For subjects in direct sunlight. | |
| For subjects in the shade. | |
| Use under “daylight” fluorescent lights. | |
| Use under “warm white” fluorescent lights. | |
| Use under “cool white” fluorescent lights. | |
| Use under incandescent lighting. | |
| Reduces the blue cast typically associated with underwater lighting. |
Fine-Tuning White Balance
Pressing MENU/OK after selecting a white balance option displays the dialog shown at right; use the selector to fine-tune white balance or press DISP/BACK to exit without fine-tuning.
Custom White Balance
Adjust white balance for unusual lighting conditions. White balance measurement options will be displayed; frame a white object so that it fills the display and press the shutter button all the way down to measure white balance (to select the most recent custom value and exit without measuring white balance, press DISP/BACK, or press MENU/OK to select the most recent value and display the fine-tuning dialog).
- If “COMPLETED!” is displayed, press MENU/OK to set white balance to the measured value.
- If “UNDER” is displayed, raise exposure compensation and try again.
- If “OVER” is displayed, lower exposure compensation and try again.
Color Temperature
Color temperature is an objective measure of the color of a light source, expressed in Kelvin (K). Light sources with a color temperature close to that of direct sunlight appear white; light sources with a lower color temperature have a yellow or red cast, while those with a higher color temperature are tinged with blue. You can match color temperature to the light source, or choose options that differ sharply from the color of the light source to make pictures “warmer” or “colder.”
Selecting in the white balance menu displays a list of color temperatures; highlight a color temperature and press MENU/OK to select the highlighted option and display.
Setting page 2 of 3 (I.Q. icon)
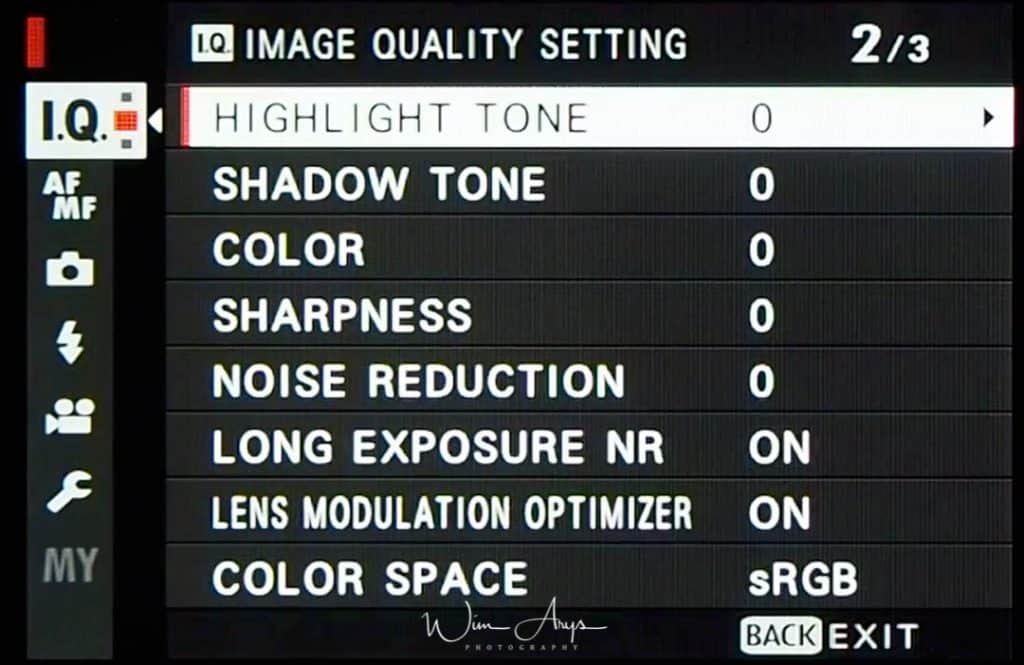
Highlight Tone
Adjust the appearance of highlights. Choose from seven options between +4 and −2.
Shadow Tone
Adjust the appearance of shadows. Choose from seven options between +4 and −2.
Color
Adjust color density. Choose from nine options between +4 and −4.
Sharpness
Sharpen or soften outlines. Choose from nine options between +4 and −4.
Noise Reduction
Reduce noise in pictures taken at high sensitivities. Choose from nine options between +4 and −4.
Long Exposure NR
Select ON to reduce mottling in long time-exposures.
Lens Modulation Optimize
Select ON to improve definition by adjusting for diffraction and the slight loss of focus at the periphery of the lens.
Color Space
Choose the gamut of colors available for color reproduction.
sRGB: use sRGB unless you are shooting images for print with calibration software.
Adobe RGB: For advanced commercial printing. You might think this is the best option, but you’ll always need to convert to sRGB for any online media if you don’t want to get ugly color shifts.  Image Quality Setting page 1 of 3 (I.Q. icon)
Pixel Mapping
Use this option if you notice bright spots in your pictures. These are dead pixels and can be remapped to pixels nearby using this setting.
- Press MENU/OK in the shooting display and select the IMAGE QUALITY SETTING tab.
- Highlight PIXEL MAPPING and press MENU/OK to perform pixel mapping. Processing may take a few seconds.
Select Custom Setting
Recall settings saved with EDIT/SAVE CUSTOM SETTING. Settings can be recalled from any of the seven custom settings banks.
Edit/Save Custom Setting
Save up to 7 sets of custom camera settings for commonly-encountered situations. Saved settings can be recalled using IMAGE QUALITY SETTING > SELECT CUSTOM SETTING.
To store current Fujifilm X-H1 settings in the selected bank, highlight SAVE CURRENT SETTINGS in Step 3 and press MENU/OK. Banks can be renamed using EDIT CUSTOM NAME.
To restore default settings for the current bank, select RESET.
- Press MENU/OK in shooting mode to display the shooting menu. Select the IMAGE QUALITY SETTING tab, then highlight EDIT/SAVE CUSTOM SETTING and press MENU/OK.
- Highlight a custom settings bank and press MENU/OK to select.
- Adjust the following as desired: DYNAMIC RANGE, FILM SIMULATION, GRAIN EFFECT, WHITE BALANCE, HIGHLIGHT TONE, SHADOW TONE, COLOR, SHARPNESS, NOISE REDUCTION/
- Press DISP/BACK. A confirmation dialog will be displayed; highlight OK and press MENU/OK.
Autofocus and Manual Focus Settings
AF/MF Setting page 1 of 3
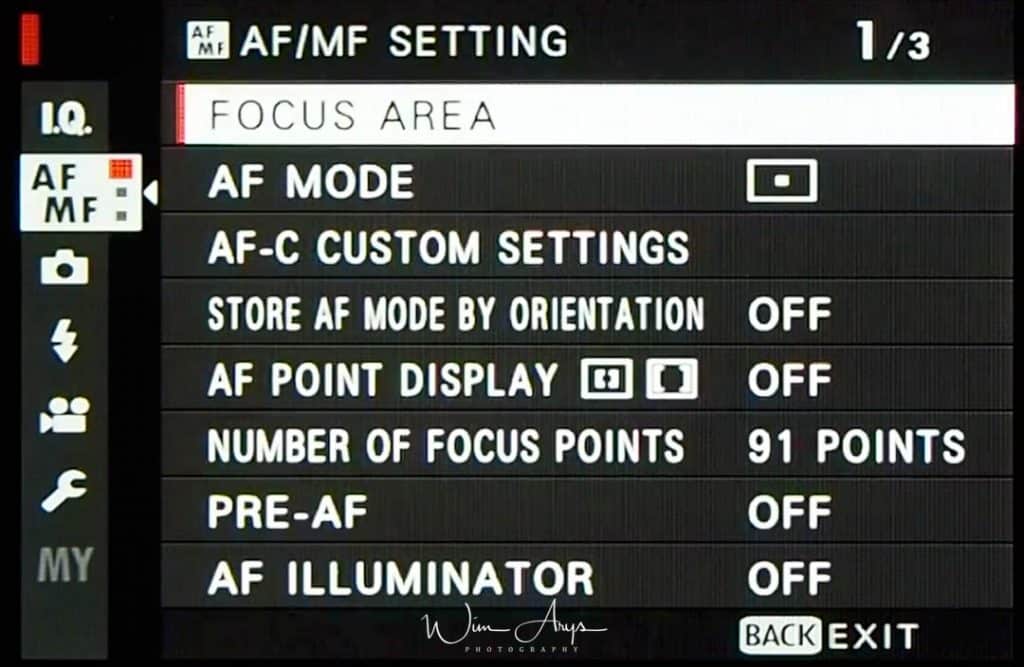
Focus Area
Choose the focus area for autofocus, manual focus, and focus zoom.
AF Mode
Choose the AF mode for focus modes S and C.
| Option | Description | |
|---|---|---|
|
SINGLE POINT |
The Fujifilm X-H1 focuses on the subject in the selected focus point. The number of focus points available can be selected using AF/MF SETTING > NUMBER OF FOCUS POINTS. Use for pin-point focus on a selected subject. | |
|
ZONE |
The Fujifilm X-H1 focuses on the subject in the selected focus zone. Focus zones include multiple focus points, making it easier to focus on subjects that are in motion. | |
|
WIDE/TRACKING |
In focus mode C, the Fujifilm X-H1 tracks focus on the subject in the selected focus point while the shutter button is pressed halfway. In focus mode S, the camera automatically focuses on high-contrast subjects; the areas in focus are shown in the display. The Fujifilm X-H1 may be unable to focus on small objects or subjects that are moving rapidly. | |
|
ALL |
Rotate the rear command dial in the focus-point selection display to cycle through AF modes in the following order: SINGLE POINT, ZONE, and WIDE/TRACKING. | |
AF-C Custom Settings
Select focus-tracking options for focus mode C. Choose from Sets 1–5 according to your subject or select Set 6 for custom focus-tracking options.
| SET 1 MULTI PURPOSE | A standard tracking option that works well with the typical range of moving subjects. |
|---|---|
| SET 2 IGNORE OBSTACLES & CONTINUE TO TRACK SUBJECT | The focus system attempts to track the chosen subject. Choose with subjects that are hard to keep in the focus area or if other objects are likely to enter the focus area with the subject. |
| SET 3 FOR ACCELERATING/DECELERATING SUBJECT | The focus system attempts to compensate for subject acceleration or deceleration. Choose for subjects prone to rapid changes in velocity. |
| SET 4 FOR SUDDENLY APPEARING SUBJECT | The focus system attempts to focus quickly on subjects entering the focus area. Choose for subjects that appear abruptly or when rapidly switching subjects. |
| SET 5 FOR ERRATICALLY MOVING & ACCEL./DECEL. SUBJECT | Choose for hard-to-track subjects prone not only to sudden changes in velocity but also to large movements front to back and left to right. |
| SET 6 CUSTOM | Adjust TRACKING SENSITIVITY, SPEED TRACKING SENSITIVITY, and ZONE AREA SWITCHING to suit your preferences based on the values for Sets 1–5. |
Focus Tracking Options
TRACKING SENSITIVITY: This parameter determines how long the Fujifilm X-H1 waits to switch focus when an object enters the focus area behind or in front of the current subject. The higher the value, the longer the camera will wait. The higher the value, the longer it takes the Fujifilm X-H1 to refocus when you attempt to switch subjects. The lower the value, the more likely the camera is to switch focus from your subject to other objects in the focus area.
SPEED TRACKING SENSITIVITY: This parameter determines how sensitive the tracking system is to changes in subject velocity. The higher the value, the greater the precision with which the system attempts to respond to sudden movement.
ZONE AREA SWITCHING: This parameter determines the focus area given priority in zone AF.
| Option | Description |
|---|---|
| CENTER | Zone AF assigns priority to subjects in the center of the zone. |
| AUTO | The Fujifilm X-H1 locks focus on the subject at the center of the zone and then switches focus areas as necessary to track it. |
| FRONT | Zone AF assigns priority to the subjects closest to the Fujifilm X-H1. |
This option takes effect only when ZONE is selected for AF mode.
Set Values
Parameter values for the different sets are listed below.
| TRACKING SENSITIVITY | SPEED TRACKING SENSITIVITY | ZONE AREA SWITCHING | |
|---|---|---|---|
| SET 1 | 2 | 0 | AUTO |
| SET 2 | 3 | 0 | CENTER |
| SET 3 | 2 | 2 | AUTO |
| SET 4 | 0 | 1 | FRONT |
| SET 5 | 3 | 2 | AUTO |
Custom Focus Tracking Options:
- Select AF-C CUSTOM SETTINGS > SET 6 CUSTOM.
- Press the selector up or down to highlight items and rotate the front command dial to change. To reset settings to their original values, press.
- Press DISP/BACK when settings are complete.
Store AF Mode by Orientation
Choose whether the focus mode and focus area used when the Fujifilm X-H1 is in portrait orientation are stored separately from those used when the camera is in landscape orientation.
| Option | Description |
|---|---|
| OFF | The same settings are used in both orientations. |
| FOCUS AREA ONLY | The focus area for each orientation can be selected separately. |
| ON | The focus mode and focus area can be selected separately. |
AF Point Display
Choose whether individual focus frames are displayed when ZONE or WIDE/TRACKING is selected for AF/MF SETTING > AF MODE.
Number of AF Points
Choose the number of focus points available for focus-point selection in manual focus mode or when SINGLE POINT is selected for AF MODE.
| Option | Description |
|---|---|
| 91 POINTS (7 × 13) | Choose from 91 focus points arranged in a 7- by 13-point grid. |
| 325 POINTS (13 × 25) | Choose from 325 focus points arranged in a 13- by 25-point grid. |
Pre-AF
If ON is selected, the Fujifilm X-H1 will continue to adjust focus even when the shutter button is not pressed halfway. Note that this increases the drain on the battery.
AF Illuminator
If ON is selected, the AF-assist illuminator will light to assist autofocus.
The Fujifilm X-H1 may be unable to focus using the AF-assist illuminator in some cases. If thecamera is unable to focus, try increasing the distance to the subject. Avoid shining the AF-assist illuminator directly into your subject’s eyes.
AF/MF Setting page 2 of 3
Face/Eye Detection Setting
Intelligent Face Detection sets focus and exposure for human faces anywhere in the frame, preventing the Fujifilm X-H1 from focusing on the background in group portraits. Choose for shots that emphasise portrait subjects. Faces can be detected with the camera in vertical or horizontal orientation; if a face is detected, it will be indicated by a green border. If there is more than one face in the frame, the Fujifilm X-H1 will select the face closest to the center; other faces are indicated by white borders. You can also choose whether the camera detects and focuses on eyes when Intelligent Face Detection is on. Choose from the following options:
| Option | Description |
|---|---|
| FACE ON/EYE OFF | Intelligent Face Detection only. |
| FACE ON/EYE AUTO | The Fujifilm X-H1 automatically chooses which eye to focus on when a face is detected. |
| FACE ON/RIGHT EYE PRIORITY | The Fujifilm X-H1 focuses on the right eye of subjects detected using Intelligent Face Detection. |
| FACE ON/LEFT EYE PRIORITY | The Fujifilm X-H1 focuses on the left eye of subjects detected using Intelligent Face Detection. |
| FACE OFF/EYE OFF | Intelligent Face Detection and eye priority off. |
n some modes, the Fujifilm X-H1 may set exposure for the frame as a whole rather than the portrait subject.
If the subject moves as the shutter button is pressed, the face may not be in the area indicated by the green border when the picture is taken.
If the Fujifilm X-H1 is unable to detect the subject’s eyes because they are hidden by hair, glasses, or other objects, the camera will instead focus on faces.
AF+MF
If ON is selected in focus mode S, focus can be adjusted manually by rotating the focus ring while the shutter button is pressed halfway. Both standard and focus peaking MF assist options are supported.
Lenses with a focus distance indicator must be set to manual focus mode (MF) before this option can be used. Selecting MF disables the focus distance indicator. Set the focus ring to the center of the focus distance indicator, as the Fujifilm X-H1 may fail to focus if the ring is set to infinity or the minimum focus distance.
AF+MF Focus Zoom
When ON is selected for AF/MF SETTING > FOCUS CHECK and SINGLE POINT selected for AF MODE, focus zoom can be used to zoom in on the selected focus area. The zoom ratio (2.5× or 6×) can be selected using the rear command dial.
MF Assist
Choose how focus is displayed in manual focus mode.
| Option | Description |
|---|---|
| STANDARD | Focus is displayed normally (focus peaking and digital split image are not available). |
| DIGITAL SPLIT IMAGE | Displays a black-and-white (MONOCHROME) or color (COLOR) split image in the center of the frame. Frame the subject in the split-image area and rotate the focus ring until the three parts of the split image are correctly aligned. |
| FOCUS PEAK HIGHLIGHT | The Fujifilm X-H1 heightens high-contrast outlines. Choose a color and peaking level. |
Focus Check
If ON is selected, the display will automatically zoom in on the selected focus area when the focus ring is rotated in manual focus mode.
Interlock Spot AE &c Focus Area
Select ON to meter the current focus frame when SINGLE POINT is selected for AF MODE and SPOT is selected for PHOTOMETRY.
Instant AF Setting
Choose whether the Fujifilm X-H1 focuses using single AF (AF‑S) or continuous AF (AF‑C) when the AF‑L button is pressed in manual focus mode.
Depth-Of-Field Scale
Choose FILM FORMAT BASIS to help you make practical assessments of depth of field for pictures that will be viewed as prints and the like, PIXEL BASIS to help you assess depth of field for pictures that will be viewed at high resolutions on computers or other electronic displays.
Release/Focus Priority
Choose how the Fujifilm X-H1 focuses in focus mode AF-S or AF-C.
| Option | Description |
|---|---|
| RELEASE | Shutter response is prioritized over focus. Pictures can be taken when the Fujifilm X-H1 is not in focus. |
| FOCUS | Focus is prioritised over shutter response. Pictures can be only taken when the Fujifilm X-H1 is in focus. |
AF/MF Setting page 3 of 3
Touch Screen Mode
Use touch controls for shooting or playback.
Shooting Touch Controls
Touch controls can be used for such operations as choosing the focus area and taking photographs. The operation performed can be selected by tapping the touch screen mode indicator in the display to cycle through the following options:
| Mode | Description |
|---|---|
|
TOUCH SHOOTING
|
Tap your subject in the display to focus and release the shutter. |
|
AF
|
Tap to select a focus point. In focus mode S (AF-S), focus will lock, while in focus mode C(AF-C), the Fujifilm X-H1 will continually adjust focus in response to changes in the distance to the subject. |
|
AREA
|
Tap to select a point for focus or zoom. The focus frame will move to the selected point. |
|
OFF
|
Touch controls off . The display does not respond when tapped. |
Touch control settings can be adjusted using AF/MF SETTING > TOUCH SCREEN MODE. To disable touch controls and hide the touch screen mode indicator, select OFF for BUTTON/DIAL SETTING > TOUCH SCREEN SETTING.
Playback Touch Controls
When ON is selected for BUTTON/DIAL SETTING > TOUCH SCREEN SETTING, touch controls can be used for the following playback operations:
- Swipe: Swipe a finger across the display to view other images.
- Pinch-out: Place two fingers on the display and spread them apart to zoom in.
- Pinch-in: Place two fingers on the display and slide them together to zoom out.
- Double-tap:Tap the display twice to zoom in on the selected area.
- Drag: View other areas of the image during playback zoom.
Shooting Settings
Adjust shooting options in these menus.
Shooting Setting Page 1 of 2
Drive Setting
Adjust settings for the various drive modes.
| Option | Description |
|---|---|
| BKT SETTING | Choose the settings used when the drive dial is rotated to BKT. |
| CH HIGH SPEED BURST | Select the frame rate used when the drive dial is rotated to CH (continuous high speed): 14, 11, or 8 fps. Note that 14 fps is available only with the electronic shutter and 11 fps only with the electronic shutter or a power booster grip (available separately). |
| CL LOW SPEED BURST | Select the frame rate used when the drive dial is rotated to CL (continuous low speed): 5, 4, or 3 fps. |
| ADV. FILTER SETTING | Choose the filter used when the drive dial is rotated to ADV. |
BKT SETTING
Use BKT SELECT to choose a bracketing type and the AE BKT, ISO BKT, FILM SIMULATION BKT, and WHITE BALANCE BKT options to choose the bracketing amount for each type.
Self-Timer
Choose a shutter release delay.
| Option | Description |
|---|---|
| 2 SEC | The shutter is released two seconds after the shutter button is pressed. Use to reduce blur caused by the Fujifilm X-H1 moving when the shutter button is pressed. The self-timer lamp blinks as the timer counts down. |
| 10 SEC | The shutter is released ten seconds after the shutter button is pressed. Use for photographs in which you wish to appear yourself. The self-timer lamp blinks immediately before the picture is taken. |
| OFF | Self-timer off. |
If an option other than OFF is selected, the timer will start when the shutter button is pressed all the way down. The display in the monitor shows the number of seconds remaining until the shutter is released. To stop the timer before the picture is taken, press DISP/BACK.
Interval Timer Shooting
Configure the Fujifilm X-H1 to take photos automatically at a preset interval.
- Highlight INTERVAL TIMER SHOOTING in the (SHOOTING SETTING) tab and press MENU/OK.
- Use the selector to choose the interval and number of shots. Press MENU/OK to proceed.
- Use the selector to choose the starting time and then press MENU/OK. Shooting will start automatically.
Interval timer photography can not be used at a shutter speed of B (bulb) or with multiple exposure photography. In burst mode, only one picture will be taken each time the shutter is released.
Shutter Type
Choose the shutter type. Choose the electronic shutter to mute the shutter sound.
Mechanical Shutter: uses the mechanical shutter exclusively
Electronic Shutter: uses the electronic shutter exclusively
Mechanical + Electronic: switches between electronic and mechanical shutter automatically according to shutter speed
Electronic First Curtain Shutter: uses the electronic shutter as first curtain (open) and mechanical shutter to close the exposure.
Flicker Reduction
Detects flickering/blinking from artificial light sources such as fluorescent lighting and times the shooting of images to moments when flickering will have less of an impact.
This function reduces differences in the exposure and color tone caused by flickering between the upper area and the lower area of an image shot with fast shutter speed and during continuous shooting.
ISO Auto Setting
Choose the base sensitivity, maximum sensitivity, and minimum shutter speed for the A position on the sensitivity dial. Settings for AUTO1, AUTO2, and AUTO3 can be stored separately.
| Item | Options | Default | ||
|---|---|---|---|---|
| AUTO1 | AUTO2 | AUTO3 | ||
| DEFAULT SENSITIVITY | 12800–200 | 200 | ||
| MAX. SENSITIVITY | 12800–400 | 800 | 1600 | 3200 |
| MIN. SHUTTER SPEED | 1⁄500–1/4 SEC, AUTO | 1/60 SEC | ||
IS Mode
Reduce blur thanks to the new sensor stabilisation system (which allows for up to 5.5 stops of compensation) and optical stabilisation with supported lenses.
| ption | Description |
|---|---|
| CONTINUOUS | Image stabilization on. |
| SHOOTING ONLY | Image stabilization enabled only when the shutter button is pressed halfway (focus mode C) or the shutter is released. |
| OFF | Image stabilization off; appears in the display. Recommended when the Fujifilm X-H1 is on a tripod. |
Remember to set the focal length of your adapted lenses in MOUNT ADAPTER SETTING when using a Mount Adapter.
Mount Adapter Setting
Adjust settings for M-mount lenses connected using an optional adapter.
Choosing a Focal Length
If the lens has a focal length of 21, 24, 28, or 35 mm, choose a matching option in the MOUNT ADAPTOR SETTING menu. For other lenses, select option 5 or 6 and use the selector to enter the focal length.
Distortion Correction
Choose from STRONG, MEDIUM, or WEAK options to correct BARREL or PINCUSHION distortion.
Color Shading Correction
Color (shading) variations between the center and edges of the frame can be adjusted separately for each corner.
To use color shading correction, follow these steps:
- Rotate the rear command dial to choose a corner. The selected corner is indicated by a triangle.
- Use the selector to adjust shading until there is no visible difference in color between the selected corner and the center of the image. Press the selector left or right to adjust colors on the cyan–red axis. Press the selector up or down to adjust colors on the blue–yellow axis.
Shooting Setting Page 2 of 2
Multi Exposure
Automatically vary settings over a series of pictures.
First, rotate the drive dial to.
Take the first shot, Press MENU/OK. The first shot will be shown superimposed on the view through the lens and you will be prompted to take the second shot. Take the second shot, using the first frame as a guide. Press MENU/OK to create the multiple exposure, or press the selector left to return to Step 4 and retake the second shot.
There are 5 different Bracket Styles that you can select here:
- AE BKT: Select a bracketing amount (options range from ±1/3 to ±2 EV in increments of 1/3 EV). Each time the shutter button is pressed, the Fujifilm X-H1 will take three shots: one using the metered value for exposure, the second overexposed by the selected amount, and the third underexposed by the same amount.
- ISO BKT: Select a bracketing amount (±1, ±2/3, or ±1/3). Each time the shutter is released, the Fujifilm X-H1 will take a picture at the current sensitivity and process it to create two additional copies, one with sensitivity raised and the other with sensitivity lowered by the selected amount.
- FILM SIMULATION BKT: Each time the shutter is released, the Fujifilm X-H1 takes one shot and processes it to create copies with different film simulation settings, chosen using SHOOTING SETTING > BKT SETTING > FILM SIMULATION BKT.
- WHITE BALANCE BKT: Select a bracketing amount (±1, ±2, or ±3). Each time the shutter is released, the Fujifilm X-H1 takes one shot and processes it to create three copies: one at the current white balanced setting, one with fine-tuning increased by the selected amount, and another with fine-tuning decreased by the selected amount.
- DYNAMIC RANGE BKT: Each time the shutter button is pressed, the Fujifilm X-H1 takes three shots with different dynamic ranges: 100% for the first, 200% for the second, and 400% for the third. While dynamic range bracketing is in effect, sensitivity will be restricted to a minimum of ISO 800 (or to a minimum of ISO 200 to 800 when an auto option is selected for sensitivity); the sensitivity previously in effect is restored when bracketing ends.
Wireless Communication
Connect to smartphones running the “FUJIFILM Fcamera Remote” app. The smartphone can be used to browse the images on the Fujifilm X-H1, download selected images, control the camera remotely, or upload location data to the Fujifilm X-H1.
Flash Settings
Adjust flash-related settings in these menus.
Flash Setting Page 1 of 1

Flash Function Setting
Choose a flash control mode, flash mode, or sync mode or adjust the flash level. The options available vary with the flash.
SYNC TERMINAL
Available with units connected via the sync terminal and with third-party and other units that use only the X-contact on the hot shoe. Also displayed if no flash unit is connected.
The following options are available when a flash unit is connected via the sync terminal:
Flash control mode:
Choose from the following options:
- M: A trigger signal is transmitted from the sync terminal and hot shoe when a picture is taken. Choose a shutter speed slower than the sync speed; even slower speeds may be required if the unit uses long flashes or has a slow response time.
- (OFF): The sync terminal and hot shoe do not transmit a trigger signal.
Sync:
Choose whether the flash is timed to fire immediately after the shutter opens (/1ST CURTAIN) or immediately before it closes (/2ND CURTAIN). 1ST CURTAIN is recommended in most circumstances.
SUPPLIED FLASH
The following options are available with the supplied EF‑X8 shoe-mounted flash unit.
Flash control mode:
- Choose from the following options:
- TTL: TTL mode. Adjust flash compensation () and choose a flash mode ().
- M: The flash fires at the selected output () regardless of subject brightness or Fujifilm X-H1 settings. Output is expressed in fractions of full power, from 1/1 to 1/64. The desired results may not be achieved at low values if they exceed the limits of the flash control system; take a test shot and check the results.
- (COMMANDER): Choose if the flash is being used to control remote synced flash units, for example as part of a studio flash system.
- (OFF): The flash does not fire. Flash units connected via the sync terminal will still fire when the shutter is released, but can be disabled by lowering the EF‑X8 and turning the units off in the flash settings menu.
Flash compensation/output:
Adjust flash level. The options available vary with the flash control mode.
Flash mode (TTL):
Choose a flash mode for TTL flash control. The options available vary with the shooting mode (P, S, A, or M) selected.
- (FLASH AUTO): The flash fires only as required; flash level is adjusted according to subject brightness. A icon displayed when the shutter button is pressed halfway indicates that the flash will fire when the photo is taken.
- (STANDARD): The flash fires with every shot if possible; flash level is adjusted according to subject brightness. The flash will not fire if not fully charged when the shutter is released.
- (SLOW SYNC.): Combine the flash with slow shutter speeds when photographing portrait subjects against a backdrop of night scenery. The flash will not fire if not fully charged when the shutter is released.
Sync:
Choose whether the flash is timed to fire immediately after the shutter opens (/1ST CURTAIN) or immediately before it closes (/2ND CURTAIN). 1ST CURTAIN is recommended in most circumstances.
SHOE MOUNT FLASH
The following options are available when an optional shoe-mounted flash unit is attached and turned on:
Flash control mode:
The flash control mode selected with the flash unit. This can in some cases be adjusted from the Fujifilm X-H1; the options available vary with the flash.
- TTL: TTL mode. Adjust flash compensation ().
- M: The flash fires at the selected output regardless of subject brightness or camera1 settings. Output in some cases can be adjusted from the Fujifilm X-H1 .
- MULTI: Repeating flash. Compatible shoe-mounted flash units will fire multiple times with each shot.
- (OFF): The flash does not fire. Some flash units can be turned off from the Fujifilm X-H1.
Flash compensation/output:
The options available vary with flash control mode.
- TTL: Adjust flash compensation (the full value may not be applied if the limits of the flash control system are exceeded). In the cases of the EF‑X20, EF‑20, and EF‑42, the selected value is added to the value selected with the flash unit.
- M/MULTI: Adjust flash output (compatible units only). Choose from values expressed as fractions of full power, from 1/1 (mode M) or 1/4 (MULTI) down to 1/512 in increments equivalent to 1/3 EV. The desired results may not be achieved at low values if they exceed the limits of the flash control system; take a test shot and check the results.
Flash mode (TTL):
Choose a flash mode for TTL flash control. The options available vary with the shooting mode (P, S, A, or M) selected.
- (FLASH AUTO): The flash fires only as required; flash level is adjusted according to subject brightness. An icon displayed when the shutter button is pressed halfway indicates that the flash will fire when the photo is taken.
- (STANDARD): The flash fires with every shot if possible; flash level is adjusted according to subject brightness. The flash will not fire if not fully charged when the shutter is released.
- (SLOW SYNC.): Combine the flash with slow shutter speeds when photographing portrait subjects against a backdrop of night scenery. The flash will not fire if not fully charged when the shutter is released.
Sync:
Control flash timing.
- (1ST CURTAIN): The flash fires immediately after the shutter opens (generally the best choice).
- (2ND CURTAIN): The flash fires immediately before the shutter closes.
- (AUTO FP(HSS)): High-speed sync (compatible units only). The Fujifilm X-H1 automatically engages front-curtain high-speed sync at shutter speeds faster than the flash sync speed. Equivalent to 1ST CURTAIN when MULTI is selected for flash control mode.
Zoom:
The angle of illumination (flash coverage) for units that support flash zoom. Some units allow the adjustment to be made from the Fujifilm X-H1. If AUTO is selected, zoom will automatically be adjusted to match coverage to lens focal length.
Lighting:
If the unit supports this feature, choose from:
- (FLASH POWER PRIORITY): Gain range by slightly reducing coverage.
- (STANDARD): Match coverage to picture angle.
- (EVEN COVERAGE PRIORITY): Slightly increase coverage for more even lighting.
LED light:
Choose how the built-in LED light functions during still photography (compatible units only): as a catchlight (/CATCHLIGHT), as an AF-assist illuminator (/AF ASSIST), or as both a catchlight and an AF-ASSIST illuminator (/AF ASSIST+CATCHLIGHT). Choose OFF to disable the LED during photography.
Number of flashes:
Choose the number of times the flash fires each time the shutter is released in MULTI mode.
Frequency:
Choose the frequency at which the flash fires in MULTI mode. The full value may not be applied if limits of flash control system are exceeded.
MASTER (OPTICAL)
The options at right will be displayed if the unit is currently functioning as master flash for optical wireless remote flash control.
The master and remote units can be placed in up to three groups (A, B, and C) and flash mode and flash level adjusted separately for each group. Four channels are available for communication between the units; separate channels can be used for different flash systems or to prevent interference when multiple systems are operating in close proximity.
| Setting | Description |
|---|---|
|
Flash control mode |
Choose flash control modes for groups A, B, and C. TTL% is available for groups A and B only.
TTL: The units in the group fire in TTL mode. Flash compensation can be adjusted separately for each group. TTL%: If TTL% is selected for either group A or B, you can specify the output of the selected group as a percentage of the other and adjust overall flash compensation for both groups. M: In mode M, the units in the group fire at the selected output (expressed as a fraction of full power) regardless of subject brightness or camera settings. MULTI: Choosing MULTI for any group sets all the units in all groups to repeating flash mode. All units will fire multiple times with each shot. (OFF): If OFF is selected, the units in the group will not fire. |
|
Flash control mode |
|
|
Flash control mode |
|
|
Flash compensation/ |
Adjust flash level for the selected group according to option selected for flash control mode. Note that the full value may not be applied if the limits of the flash control system are exceeded.
TTL: Adjust flash compensation. M/MULTI: Adjust flash output. TTL%: Choose the balance between groups A and B and adjust overall flash compensation. |
|
Flash compensation/ |
|
|
Flash compensation/ |
|
|
Flash mode (TTL) |
Choose a flash mode for TTL flash control. The options available vary with the shooting mode (P, S, A, or M) selected.
(FLASH AUTO): The flash fires only as required; flash level is adjusted according to subject brightness. A icon displayed when the shutter button is pressed halfway indicates that the flash will fire when the photo is taken.(STANDARD): The flash fires with every shot if possible; flash level is adjusted according to subject brightness. The flash will not fire if not fully charged when the shutter is released. (SLOW SYNC.): Combine the flash with slow shutter speeds when photographing portrait subjects against a backdrop of night scenery. The flash will not fire if not fully charged when the shutter is released. |
|
Sync |
Control flash timing.
(1ST CURTAIN): The flash fires immediately after the shutter opens (generally the best choice). (2ND CURTAIN): The flash fires immediately before the shutter closes. (AUTO FP(HSS)): High-speed sync (compatible units only). The Fujifilm X-H1 automatically engages front-curtain high-speed sync at shutter speeds faster than the flash sync speed. Equivalent to 1ST CURTAIN when MULTI is selected for flash control mode. |
|
Zoom |
The angle of illumination (flash coverage) for units that support flash zoom. Some units allow the adjustment to be made from the Fujifilm X-H1. If AUTO is selected, zoom will automatically be adjusted to match coverage to lens focal length. |
|
Lighting |
If the unit supports this feature, choose from:
(FLASH POWER PRIORITY): Gain range by slightly reducing coverage. (STANDARD): Match coverage to picture angle. (EVEN COVERAGE PRIORITY): Slightly increase coverage for more even lighting. |
|
Master |
Assign the master flash to group A (Gr A), B (Gr B), or C (Gr C). If OFF is selected, output from the master flash will be held to a level that does not affect the final picture. Available only if the unit is mounted on the Fujifilm X-H1 hot shoe as a master flash for FUJIFILM optical wireless remote flash control in TTL, TTL%, or M mode. |
|
Number of flashes |
Choose the number of times the flash fires each time the shutter is released in MULTI mode. |
|
Channel |
Choose the channel used by the master flash for communication with the remote flash units. Separate channels can be used for different flash systems or to prevent interference when multiple systems are operating in close proximity. |
|
Frequency |
Choose the frequency at which the flash fires in MULTI mode. |
Red Eye Removal
Remove red-eye effects caused by the flash.
| Option | Description |
|---|---|
| FLASH + REMOVAL | A red-eye reduction pre-flash is combined with digital red-eye removal. |
| FLASH | Flash red-eye reduction only. |
| REMOVAL | Digital red-eye removal only. |
| OFF | Flash red-eye reduction and digital red-eye removal off. |
TTL-Lock Mode
Instead of adjusting flash level with each shot, TTL flash control can be locked for consistent results across a series of photographs.
| Option | Description |
|---|---|
| LOCK WITH LAST FLASH | The value metered for the most recent photo taken using TTL will be used for subsequent photos. An error message will be displayed if no previously metered value exists. |
| LOCK WITH METERING FLASH | The value metered with the next series of pre-flashes will be used for subsequent photos. |
To use TTL lock, assign TTL-LOCK to a Fujifilm X-H1 control and then use the control to enable or disable TTL lock.
Flash compensation can be adjusted while TTL lock is in effect.
LED Light Setting
Choose whether to use the flash unit’s LED video light (if available) as a catchlight or AF-assist illuminator when taking photos.
| Option | Role of LED video light in still photography |
|---|---|
| CATCHLIGHT | Catchlight |
| AF ASSIST | AF-assist illuminator |
| AF ASSIST + CATCHLIGHT | AF-assist illuminator and catchlight |
| OFF | None |
Master Setting
Choose a flash group (A, B, or C) for the flash mounted on the Fujifilm X-H1 hot shoe when it functions as a master flash controlling remote flash units via FUJIFILM wireless optical flash control, or choose OFF to limit master flash output to a level that does not affect the final picture.
| Options | |||
|---|---|---|---|
| Gr A | Gr B | Gr C | OFF |
CH Setting
Choose the channel used for communication between the master flash and remote flash units when using FUJIFILM optical wireless flash control. Separate channels can be used for different flash systems or to prevent interference when multiple systems are operating in close proximity.
| Options | |||
|---|---|---|---|
| CH1 | CH2 | CH3 | CH4 |
Movie Settings
Movie Setting Page 1 of 4
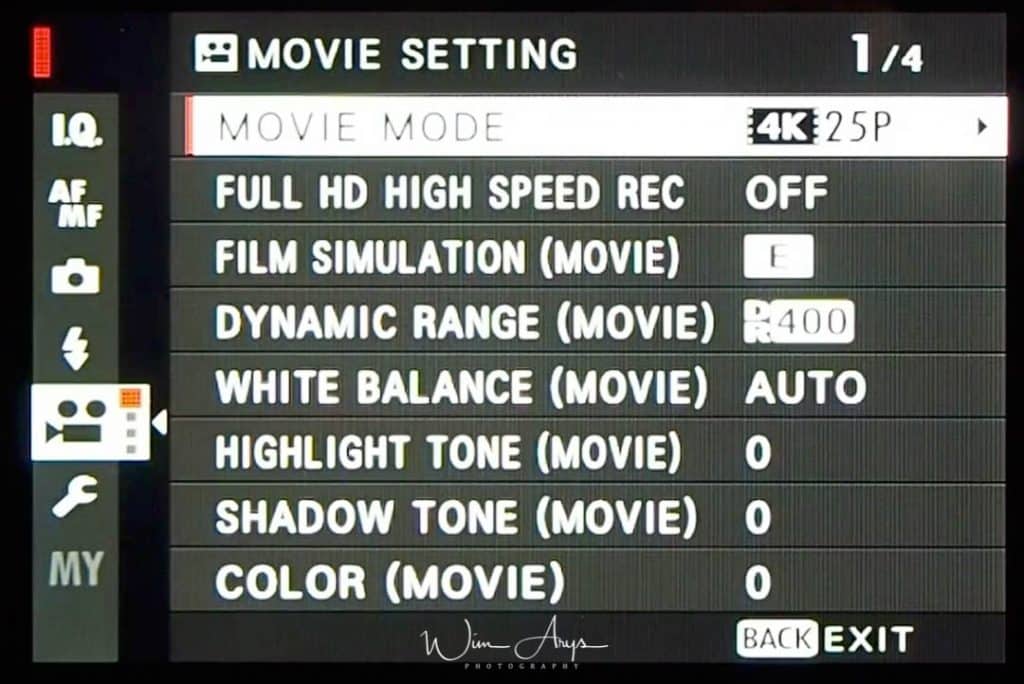
Movie Mode
Choose a frame size and rate for movie recording.
- 4096 x 2160p at 23.98, 24 fps (50, 100, 200 Mb/s MOV via MPEG-4)
- 3840 x 2160p at 23.98, 24, 25, 29.97 fps (50, 100, 200 Mb/s MOV via MPEG-4)
- 2048 x 1080p at 23.98, 24, 25, 29.97, 50, 59.94 fps (50, 100 Mb/s MOV via MPEG-4)
- 1920 x 1080p at 23.98, 24, 25, 29.97, 50, 59.94, 100, 120 fps (200 Mb/s MOV via MPEG-4)
- 1280 x 720p at 23.98, 24, 25, 29.97, 50, 59.94 fps (50 Mb/s MOV via MPEG-4)
Full HD High Speed Rec
For Recording high-speed movies, these are the options available:
- 2 x playback at 59.94p, record at 120p.
- 2 x playback at 2 x 50p, record at 100p.
- 4 x playback at 29.97p, record at 120p.
- 4 x playback at 25p, record at 100p.
- 5 x playback at 24p, record at 120p.
- 5 x playback at 23.98p, record at 120p.
Film Simulation (movie)Full HD High Speed Rec
Simulate the effects of different kinds of film, including black-and-white (with or without color filters). Choose a palette according to your subject and creative intent. Film simulation options can be combined with tone and sharpness settings.
| PROVIA/STANDARD | Standard color reproduction. Suited to a wide range of subjects, from portraits to landscapes. |
|---|---|
| Velvia/VIVID | A high-contrast palette of saturated colors, suited to nature photos. |
| ASTIA/SOFT | Enhances the range of hues available for skin tones in portraits while preserving the bright blues of daylight skies. Recommended for outdoor portrait photography. |
| CLASSIC CHROME | Soft color and enhanced shadow contrast for a calm look. |
| PRO Neg. Hi | Offers slightly more contrast than PRO Neg. Std. Recommended for outdoor portrait photography. |
| PRO Neg. Std | A soft-toned palette. The range of hues available for skin tones is enhanced, making this a good choice for studio portrait photography. |
| ACROS | Take black-and-white photos with rich gradation and outstanding sharpness. |
| MONOCHROME | Take pictures in standard black and white. |
| SEPIA | Take pictures in sepia. |
Dynamic Range (movie)
Control contrast. Choose lower values to increase contrast when shooting indoors or under overcast skies, higher values to reduce loss of detail in highlights and shadows when photographing high-contrast scenes. Higher values are recommended for scenes that include both sunlight and deep shade, for such high-contrast subjects as sunlight on water, brightly-lit autumn leaves, and portraits taken against a blue sky, and for white objects or people wearing white; note, however, that mottling may appear in pictures taken at higher values.
White Balance (movie)
For natural colors, choose a white balance option that matches the light source.
| AUTO | White balance is adjusted automatically. |
|---|---|
| Measure a value for white balance. | |
| Choose a color temperature. | |
| For subjects in direct sunlight. | |
| For subjects in the shade. | |
| Use under “daylight” fluorescent lights. | |
| Use under “warm white” fluorescent lights. | |
| Use under “cool white” fluorescent lights. | |
| Use under incandescent lighting. | |
| Reduces the blue cast typically associated with underwater lighting. |
Fine-Tuning White Balance
Pressing MENU/OK after selecting a white balance option displays the dialog shown at right; use the selector to fine-tune white balance or press DISP/BACK to exit without fine-tuning.
Custom White Balance
Choose to adjust white balance for unusual lighting conditions. White balance measurement options will be displayed; frame a white object so that it fills the display and press the shutter button all the way down to measure white balance (to select the most recent custom value and exit without measuring white balance, press DISP/BACK, or press MENU/OK to select the most recent value and display the fine-tuning dialog).
- If “COMPLETED!” is displayed, press MENU/OK to set white balance to the measured value.
- If “UNDER” is displayed, raise exposure compensation and try again.
- If “OVER” is displayed, lower exposure compensation and try again.
Color Temperature
Color temperature is an objective measure of the color of a light source, expressed in Kelvin (K). Light sources with a color temperature close to that of direct sunlight appear white; light sources with a lower color temperature have a yellow or red cast, while those with a higher color temperature are tinged with blue. You can match color temperature to the light source, or choose options that differ sharply from the color of the light source to make pictures “warmer” or “colder.”
Selecting in the white balance menu displays a list of color temperatures; highlight a color temperature and press MENU/OK to select the highlighted option and display.
Highlight Tone (Movie)
Adjust the appearance of highlights. Choose from seven options between +4 and −2.
Shadow Tone (Movie)
Adjust the appearance of shadows. Choose from seven options between +4 and −2.
Color (Movie)
Adjust color density. Choose from nine options between +4 and −4.
Movie Setting Page 2 of 4
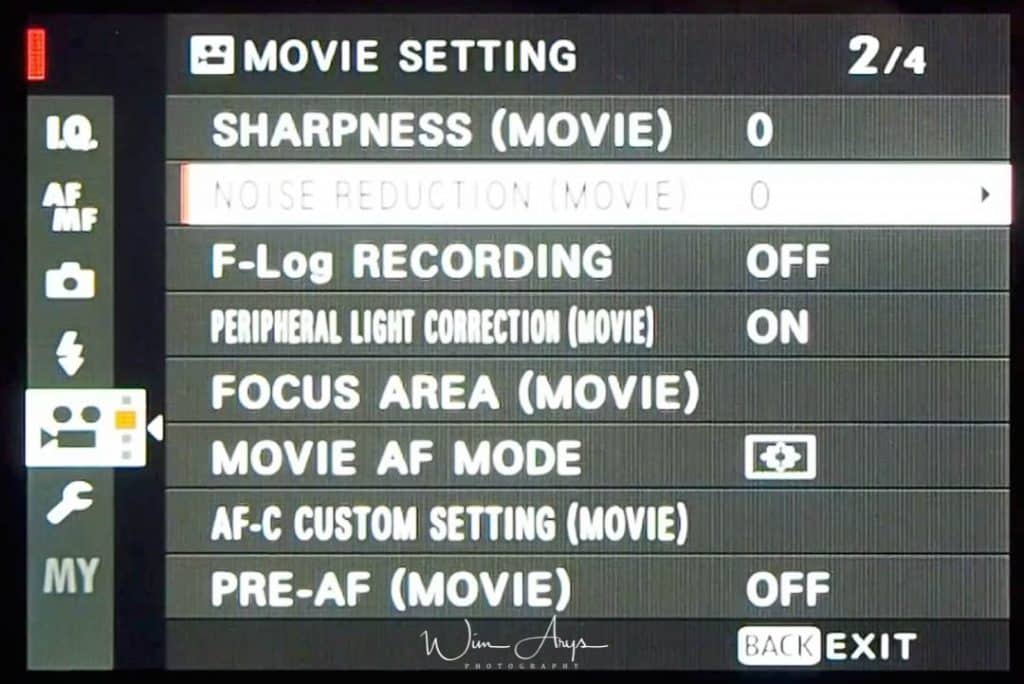
Sharpness (Movie)
Sharpen or soften outlines. Choose from nine options between +4 and −4.
Noise Reduction (Movie)
Reduce noise in pictures taken at high sensitivities. Choose from nine options between +4 and −4.
F-Log Recording
Enable F-Log recording to the SD card.
Peripheral Light Correction (Movie)
Enable vignetting compensation for movies.
Focus Area (Movie)
Choose the focus area for autofocus, manual focus, and focus zoom.
Movie AF Mode
Choose the AF mode for focus modes S and C.
| Option | Description | |
|---|---|---|
|
SINGLE POINT |
The Fujifilm X-H1 focuses on the subject in the selected focus point. The number of focus points available can be selected using AF/MF SETTING > NUMBER OF FOCUS POINTS. Use for pin-point focus on a selected subject. | |
|
ZONE |
The Fujifilm X-H1 focuses on the subject in the selected focus zone. Focus zones include multiple focus points, making it easier to focus on subjects that are in motion. | |
|
WIDE/TRACKING |
In focus mode C, the Fujifilm X-H1 tracks focus on the subject in the selected focus point while the shutter button is pressed halfway. In focus mode S, the camera automatically focuses on high-contrast subjects; the areas in focus are shown in the display. The Fujifilm X-H1 may be unable to focus on small objects or subjects that are moving rapidly. | |
|
ALL |
Rotate the rear command dial in the focus-point selection display to cycle through AF modes in the following order: SINGLE POINT, ZONE, and WIDE/TRACKING. | |
AF-C Custom Settings (Movie)
Select focus-tracking options for focus mode C. Choose from Sets 1–5 according to your subject or select Set 6 for custom focus-tracking options.
| SET 1 MULTI PURPOSE | A standard tracking option that works well with the typical range of moving subjects. |
|---|---|
| SET 2 IGNORE OBSTACLES & CONTINUE TO TRACK SUBJECT | The focus system attempts to track the chosen subject. Choose with subjects that are hard to keep in the focus area or if other objects are likely to enter the focus area with the subject. |
| SET 3 FOR ACCELERATING/DECELERATING SUBJECT | The focus system attempts to compensate for subject acceleration or deceleration. Choose for subjects prone to rapid changes in velocity. |
| SET 4 FOR SUDDENLY APPEARING SUBJECT | The focus system attempts to focus quickly on subjects entering the focus area. Choose for subjects that appear abruptly or when rapidly switching subjects. |
| SET 5 FOR ERRATICALLY MOVING & ACCEL./DECEL. SUBJECT | Choose for hard-to-track subjects prone not only to sudden changes in velocity but also to large movements front to back and left to right. |
| SET 6 CUSTOM | Adjust TRACKING SENSITIVITY, SPEED TRACKING SENSITIVITY, and ZONE AREA SWITCHING to suit your preferences based on the values for Sets 1–5. |
Focus Tracking Options
TRACKING SENSITIVITY: This parameter determines how long the Fujifilm X-H1 waits to switch focus when an object enters the focus area behind or in front of the current subject. The higher the value, the longer the camera will wait. The higher the value, the longer it takes the Fujifilm X-H1 to refocus when you attempt to switch subjects. The lower the value, the more likely the camera is to switch focus from your subject to other objects in the focus area.
SPEED TRACKING SENSITIVITY: This parameter determines how sensitive the tracking system is to changes in subject velocity. The higher the value, the greater the precision with which the system attempts to respond to sudden movement.
ZONE AREA SWITCHING: This parameter determines the focus area given priority in zone AF.
| Option | Description |
|---|---|
| CENTER | Zone AF assigns priority to subjects in the center of the zone. |
| AUTO | The Fujifilm X-H1 locks focus on the subject at the center of the zone and then switches focus areas as necessary to track it. |
| FRONT | Zone AF assigns priority to the subjects closest to the Fujifilm X-H1. |
This option takes effect only when ZONE is selected for AF mode.
Set Values
Parameter values for the different sets are listed below.
| TRACKING SENSITIVITY | SPEED TRACKING SENSITIVITY | ZONE AREA SWITCHING | |
|---|---|---|---|
| SET 1 | 2 | 0 | AUTO |
| SET 2 | 3 | 0 | CENTER |
| SET 3 | 2 | 2 | AUTO |
| SET 4 | 0 | 1 | FRONT |
| SET 5 | 3 | 2 | AUTO |
Custom Focus Tracking Options:
- Select AF-C CUSTOM SETTINGS > SET 6 CUSTOM.
- Press the selector up or down to highlight items and rotate the front command dial to change. To reset settings to their original values, press .
- Press DISP/BACK when settings are complete.
Pre-AF
If ON is selected, the Fujifilm X-H1 will continue to adjust focus even when the shutter button is not pressed halfway. Note that this increases the drain on the battery.
Movie Setting Page 3 of 4
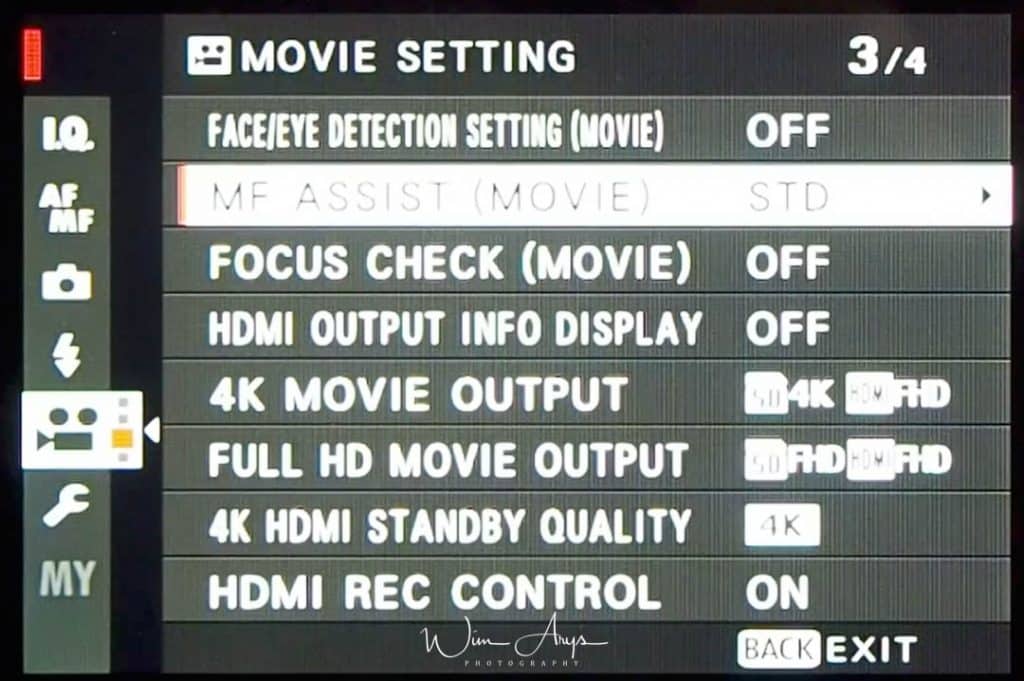
Face/Eye Detection Setting (Movie)
Intelligent Face Detection sets focus and exposure for human faces anywhere in the frame, preventing the Fujifilm X-H1 from focusing on the background in group portraits. Choose for shots that emphasise portrait subjects. Faces can be detected with the camera in vertical or horizontal orientation; if a face is detected, it will be indicated by a green border. If there is more than one face in the frame, the Fujifilm X-H1 will select the face closest to the center; other faces are indicated by white borders. You can also choose whether the camera detects and focuses on eyes when Intelligent Face Detection is on. Choose from the following options:
| Option | Description |
|---|---|
| FACE ON/EYE OFF | Intelligent Face Detection only. |
| FACE ON/EYE AUTO | The Fujifilm X-H1 automatically chooses which eye to focus on when a face is detected. |
| FACE ON/RIGHT EYE PRIORITY | The Fujifilm X-H1 focuses on the right eye of subjects detected using Intelligent Face Detection. |
| FACE ON/LEFT EYE PRIORITY | The Fujifilm X-H1 focuses on the left eye of subjects detected using Intelligent Face Detection. |
| FACE OFF/EYE OFF | Intelligent Face Detection and eye priority off. |
n some modes, the Fujifilm X-H1 may set exposure for the frame as a whole rather than the portrait subject.
If the subject moves as the shutter button is pressed, the face may not be in the area indicated by the green border when the picture is taken.
If the camera is unable to detect the subject’s eyes because they are hidden by hair, glasses, or other objects, the Fujifilm X-H1 will instead focus on faces.
MF Assist (Movie)
Choose how focus is displayed in manual focus mode.
| Option | Description |
|---|---|
| STANDARD | Focus is displayed normally (focus peaking and digital split image are not available). |
| DIGITAL SPLIT IMAGE | Displays a black-and-white (MONOCHROME) or color (COLOR) split image in the center of the frame. Frame the subject in the split-image area and rotate the focus ring until the three parts of the split image are correctly aligned. |
| FOCUS PEAK HIGHLIGHT | The Fujifilm X-H1 heightens high-contrast outlines. Choose a color and peaking level. |
Focus Check (Movie)
If ON is selected, the display will automatically zoom in on the selected focus area when the focus ring is rotated in manual focus mode.
HDMI Output Info Display
Turn on on-screen information of the HDMI output. If ON is selected, HDMI devices to which the camera is connected will mirror the information in the Fujifilm X-H1 display.
4K Movie Output
Choose the destination for 4K movies shot while the Fujifilm X-H1 is connected to an HDMI recorder or other device that supports 4K.
| Option | Description |
|---|---|
| CARD | 4K movies are recorded to a Fujifilm X-H1 memory card in 4K and output to the HDMI device in Full HD. |
| HDMI | 4K movies are output to the HDMI device in 4K, starting when the shutter button is pressed. The Fujifilm X-H1 does not record 4K movies to a memory card. |
| HDMI | The Fujifilm X-H1 outputs 4K movies to the HDMI device and does not record them to a memory card. Low gamma and a color space with a wide gamut are used to create footage suitable for post-processing. Minimum sensitivity is set to ISO 800. |
Full HD Movie Output
When you connect the product to a High Definition (HD) TV with HDMI terminals using an HDMI cable (sold separately), you can select HDMI Resolution to output images to the TV.
- Auto: The product automatically recognizes an HD TV and sets the output resolution.
- 2160p/1080p: Outputs signals in 2160p/1080p.
- 1080p: Outputs signals in HD picture quality (1080p).
- 1080i: Outputs signals in HD picture quality (1080i).
4K HDMI Standby Quality
Reduce the bitrate of the HDMI output when in standby to reduce heating of the Fujifilm X-H1 body.
HDMI Rec Control
Choose whether the Fujifilm X-H1 sends movie start and stop signals to the HDMI device when the shutter button is pressed to start and stop movie recording.
Movie Setting Page 4 of 4
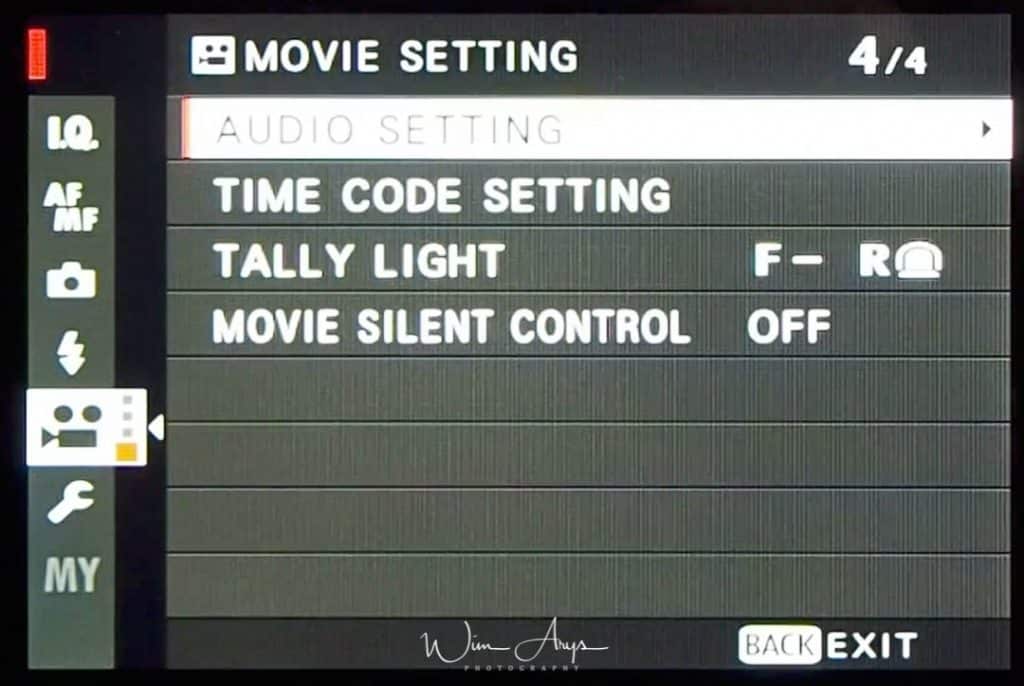
Audio Setting
Internal Mic Level Adjustment
Adjust the recording level for the built-in and external microphones.
| Option | Description |
|---|---|
| 20—1 | Choose a recording level. |
| OFF | Disable the microphone. |
External Mic Level adjustment
Adjust the recording level for the built-in and external microphones.
Mic Level Limiter
The Fujifilm X-H1 adjusts the sound input level automatically, minimising sound distortion (clipping noise) when the volume is too high.
Wind Filter
This will reduce the wind noise coming into the built-in microphone while maintaining sound quality. You can choose either High, Standard or Off. This function works only with the built-in microphone.
Low Cut Filter
Cuts low frequency hum.
Headphone Volume
If you’re using a headphone, you can adjust the volume here.
Tally Light
Change settings for the tally light (signal lamp).
Movie Silent Control
Turn on the silent shooting for movie recording.
The Set Up Menus
Much functionality in regards to customisation is hidden in this very large menu with many sub pages.
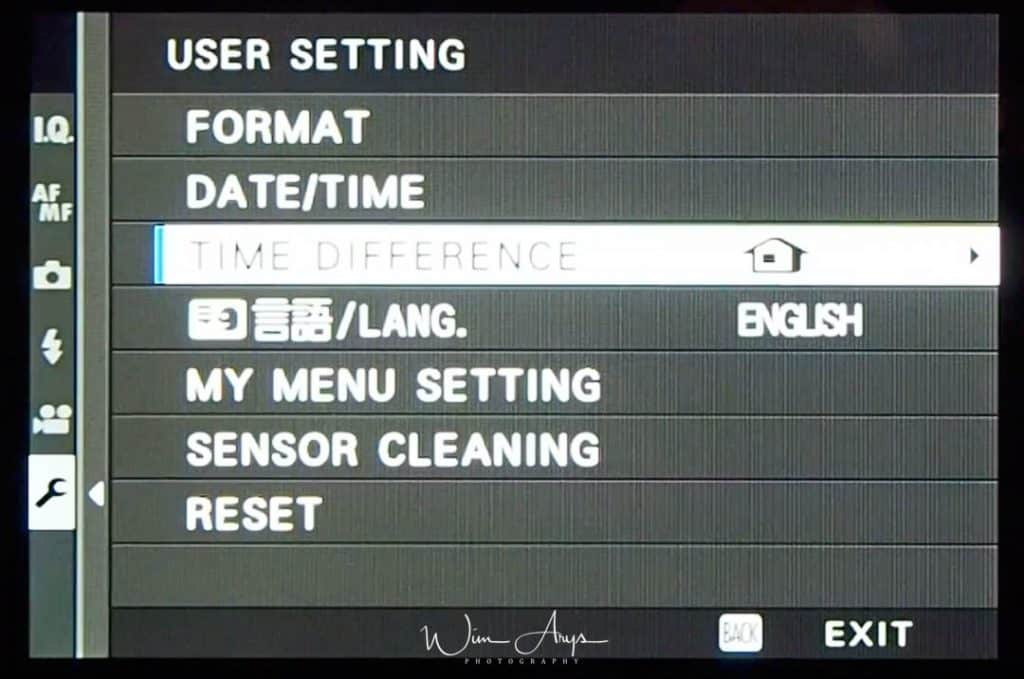
User Setting
Format
Before using your Fujifilm X-H1, you should always format your memory card. This will erase all data that is on the SD card(s).
- Highlight the slot containing the card you wish to format and press MENU/OK.
- A confirmation dialog will be displayed. To format the memory card, highlight OK and press MENU/OK. To exit without formatting the memory card, select CANCEL or press DISP/BACK.
Date/Time
To set the Fujifilm X-H1 clock.
Time Difference
Switch the Fujifilm X-H1 clock instantly from your home time zone to the local time at your destination when traveling. To specify the difference between your local and home time zone.
Language
Choose a language for the menus.
My Menu Setting
Edit the items listed in the (MY MENU) tab, a personalized custom menu of frequently-used options.
-
Highlight USER SETTING > MY MENU SETTING in the (SET UP) tab and press MENU/OK to display the options at right.
-
Press the selector up or down to highlight ADD ITEMS and press MENU/OK. Options that can be added to “my menu” are highlighted in blue.
Items currently in “my menu” are indicated by check marks.
-
Highlight an item and press MENU/OK to add it to “my menu”.
- Press MENU/OK to return to the edit display.
- Repeat Steps 3 and 4 until all the desired items have been added.
Sensor Cleaning
Remove dust from the Fujifilm X-H1 image sensor.
- OK: Clean the sensor immediately.
- WHEN SWITCHED ON: Sensor cleaning will be performed when the Fujifilm X-H1 is turned on.
- WHEN SWITCHED OFF: Sensor cleaning will be performed when the Fujifilm X-H1 turns off (sensor cleaning is not however performed if the camera turns off in playback mode).
Reset
Reset shooting or setup menu options to default values.
- Highlight the desired option and press MENU/OK.
Option Description SHOOTING MENU RESET Reset all shooting menu settings other than custom white balance and custom settings banks created using EDIT/SAVE CUSTOM SETTING to default values. SET-UP RESET Reset all setup menu settings other than DATE/TIME, TIME DIFFERENCE, and CONNECTION SETTING to default values. - A confirmation dialog will be displayed; highlight OK and press MENU/OK.
Sound Settings
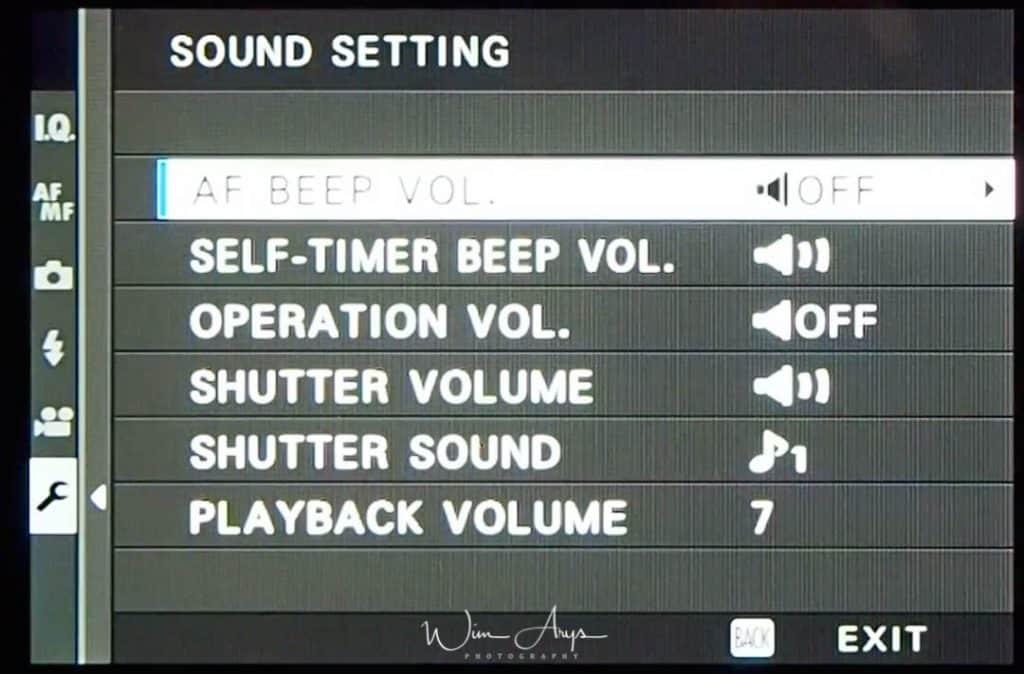
AF Beep Vol.
Choose the volume of the beep that sounds when the Fujifilm X-H1 focuses. The beep can be muted by selecting.
| Options | |||
|---|---|---|---|
| (high) | (medium) | (low) | (mute) |
Self-Timer Beep Vol.
Choose the volume of the beep that sounds while the self-timer is active. The beep can be muted by selecting .
| Options | |||
|---|---|---|---|
| (high) | (medium) | (low) | (mute) |
Operation Vol.
Adjust the volume of the sounds produced when Fujifilm X-H1 controls are operated. Choose to disable control sounds.
| Options | |||
|---|---|---|---|
| (high) | (medium) | (low) | (mute) |
Headphones Volume
Adjust the volume of headphones connected via a VPB‑XT2 power booster grip (available separately). Choose from 10 options between 10 (high) and 1 (low) or select 0 to mute the headphones.
| Options | ||||||||||
|---|---|---|---|---|---|---|---|---|---|---|
| 10 | 9 | 8 | 7 | 6 | 5 | 4 | 3 | 2 | 1 | 0 |
Shutter Volume
Adjust the volume of the sounds produced by the electronic shutter. Choose to disable the shutter sound.
| Options | |||
|---|---|---|---|
| (high) | (medium) | (low) | (mute) |
Shutter Sound
Choose the sound made by the electronic shutter.
Playback Volume
Adjust the volume for movie playback. Choose from 10 options between 10 (high) and 1 (low) or select 0 to mute audio during movie playback.
Screen Settings page 1 of 3
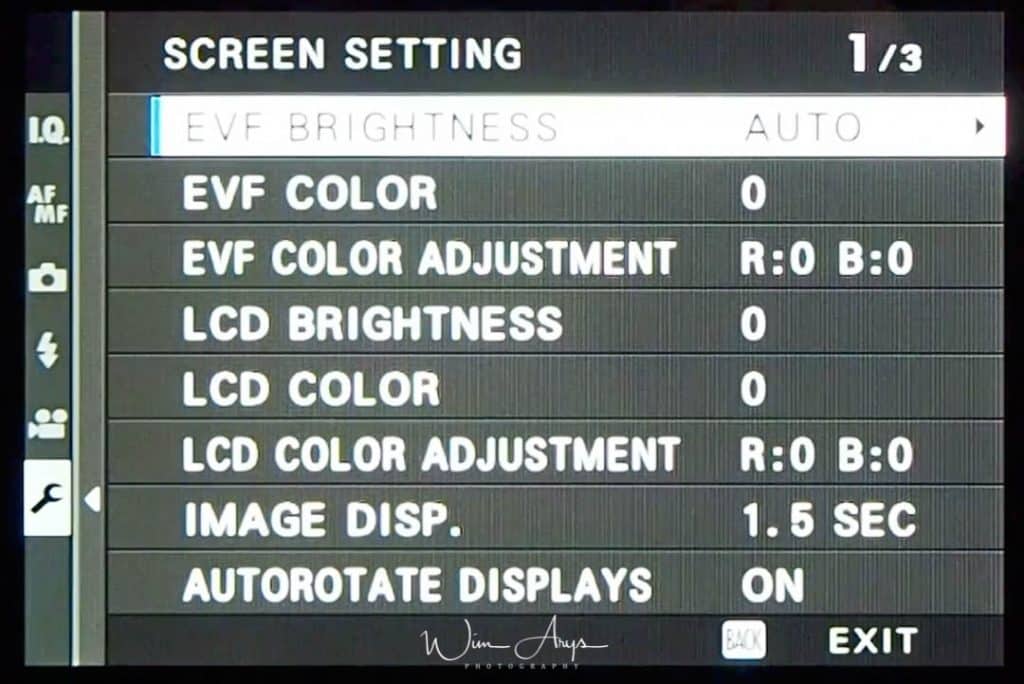
EVF Brightness
Adjust the brightness of the display in the electronic viewfinder. Select MANUAL to choose from 11 options from +5 (bright) to −5 (dark), or select AUTO for automatic brightness adjustment.
EVF Color
Adjust the hue of the electronic viewfinder. +/-5
EVF Color Adjustment
Adjust EVF brightness. +/-5
LCD Brightness
Adjust monitor brightness. +/-5
LCD Color
Adjust the hue of the display in the LCD. +/-5
LCD Color Adjustment
Adjust LCD brightness. +/-5
Image Disp.
Choose how long images are displayed after shooting. Colors may differ slightly from those in the final image and “noise” mottling may be visible at high sensitivities.
| Option | Description |
|---|---|
| CONTINUOUS | Pictures are displayed until the MENU/OK button is pressed or the shutter button is pressed halfway. To zoom in on the active focus point, press the center of the rear command dial; press again to cancel zoom. |
| 1.5 SEC | Pictures are displayed for the selected time or until the shutter button is pressed halfway. |
| 0.5 SEC | |
| OFF | Pictures are not displayed after shooting. |
Autorotate Displays
Choose whether the indicators in the viewfinder and LCD monitor rotate to match Fujifilm X-H1 orientation.
Screen Settings page 2 of 3
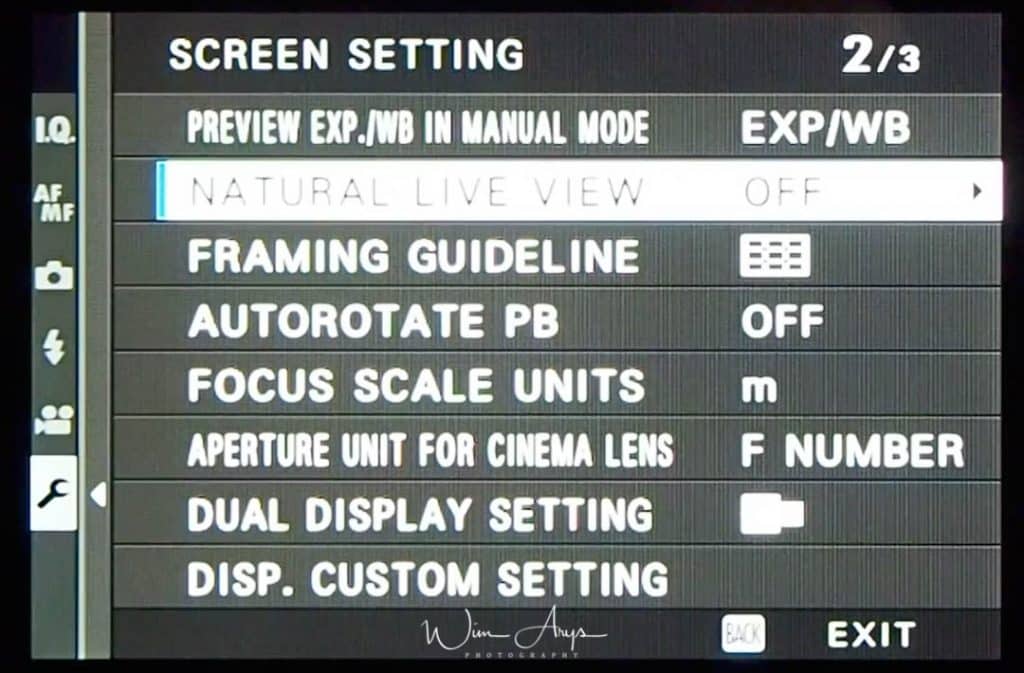
Preview Exp./WB in Manual Mode
Select PREVIEW EXP./WB to enable exposure and white balance preview in manual exposure mode, or choose PREVIEW WB to preview only white balance (PREVIEW WB is recommended in situations in which exposure and white balance are likely to change during shooting, as may be the case when you use a flash with an incandescent monitoring lamp). Select OFF when using a flash or on other occasions on which exposure may change when the picture is taken.
| Options | ||
|---|---|---|
| PREVIEW EXP./WB | PREVIEW WB | OFF |
Framing Guideline
Choose a framing grid for shooting mode.
| Option | |||
|---|---|---|---|
| GRID 9 | GRID 24 | HD FRAMING | |
| Display | |||
| For “rule of thirds” composition. | A six-by-four grid. | Frame HD pictures in the crop shown by the lines at the top and bottom of the display. Framing guides can be changed as desired for tethered shooting. | |
Autorotate PB
Choose ON to automatically rotate “tall” (portrait-orientation) pictures during playback.
Focus Scale Units
Choose the units used for the focus distance indicator between meter or feet.
Aperture Unit for cinema lens
Choose between T-stop or Aperture stops for lenses.
Dual Display Settings
- In shooting mode, press DISP/BACK until standard indicators are displayed.
- Press MENU/OK and select SCREEN SETTING > DISP. CUSTOM SETTING in the (SET UP) tab.
- Highlight items and press MENU/OK to select or deselect.
Item Default FRAMING GUIDELINE ELECTRONIC LEVEL FOCUS FRAME AF DISTANCE INDICATOR MF DISTANCE INDICATOR HISTOGRAM LIVE VIEW HIGHLIGHT ALERT SHOOTING MODE APERTURE/S-SPEED/ISO INFORMATION BACKGROUND Expo. Comp. (Digit) Expo. Comp. (Scale) FOCUS MODE PHOTOMETRY SHUTTER TYPE FLASH CONTINUOUS MODE DUAL IS MODE TOUCH SCREEN MODE WHITE BALANCE FILM SIMULATION DYNAMIC RANGE FRAMES REMAINING IMAGE SIZE/QUALITY MOVIE MODE & REC. TIME MIC LEVEL ADJUSTMENT BATTERY LEVEL FRAMING OUTLINE - Press DISP/BACK to save changes.
- Press DISP/BACK as needed to exit the menus and return to the shooting display.
Disp. Custom Setting
Choose the items shown in the standard indicator display.
Screen Settings page 3 of 3
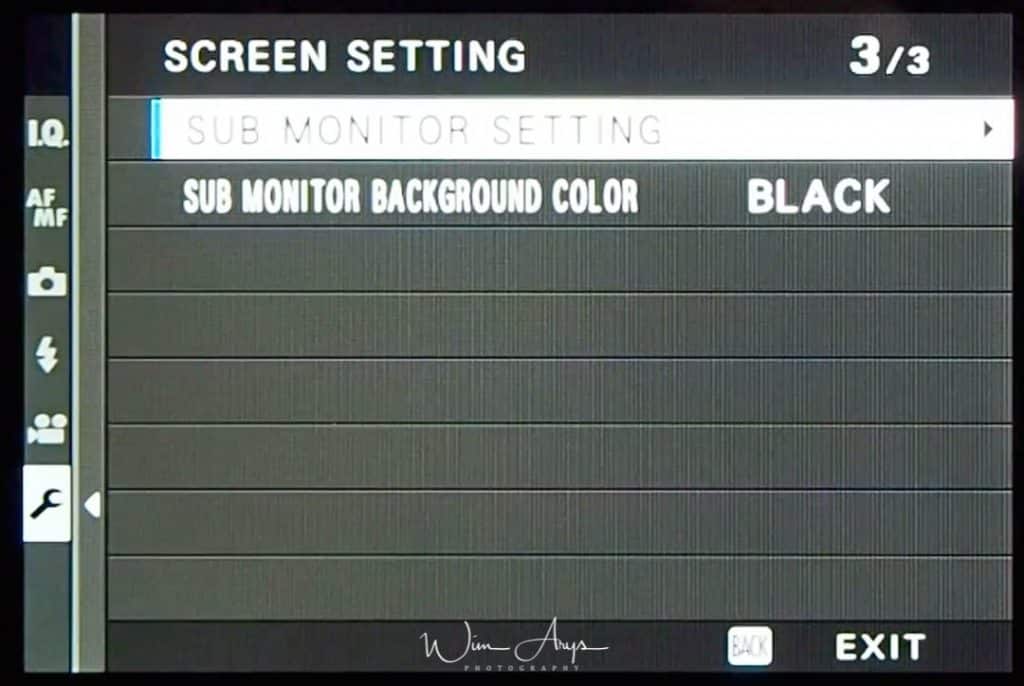
Sub Monitor Settings
Choose the items shown in the secondary LCD monitor (the screen on the top plate).
- Press MENU/OK and select SCREEN SETTING > SUB MONITOR SETTING in the (SET UP) tab.
- Select STILL MODE or MOVIE MODE.
-
Highlight items for display in positions and press MENU/OK to select or deselect. Items not available when MOVIE MODE is selected are indicated by asterisks (“*”).
Text: SHUTTER SPEED, APERTURE, EXPO. COMP, ISO, MOVIE MODE, FRAMES REM., REC. TIME, NONE
Icons: FILM SIMULATION, WHITE BALANCE, IMAGE SIZE , SHOOTING MODE, PHOTOMETRY, DRIVE MODE , FOCUS MODE, IMAGE QUALITY * BATTERY LEVEL, CARD SLOT OPTIONS, SHUTTER TYPE , DYNAMIC RANGE , MOVIE MODE , NONE
Sub Monitor Background Color
Choose the color of the Sub Monitor B-background.
Button/Dial Setting page 1 of 3
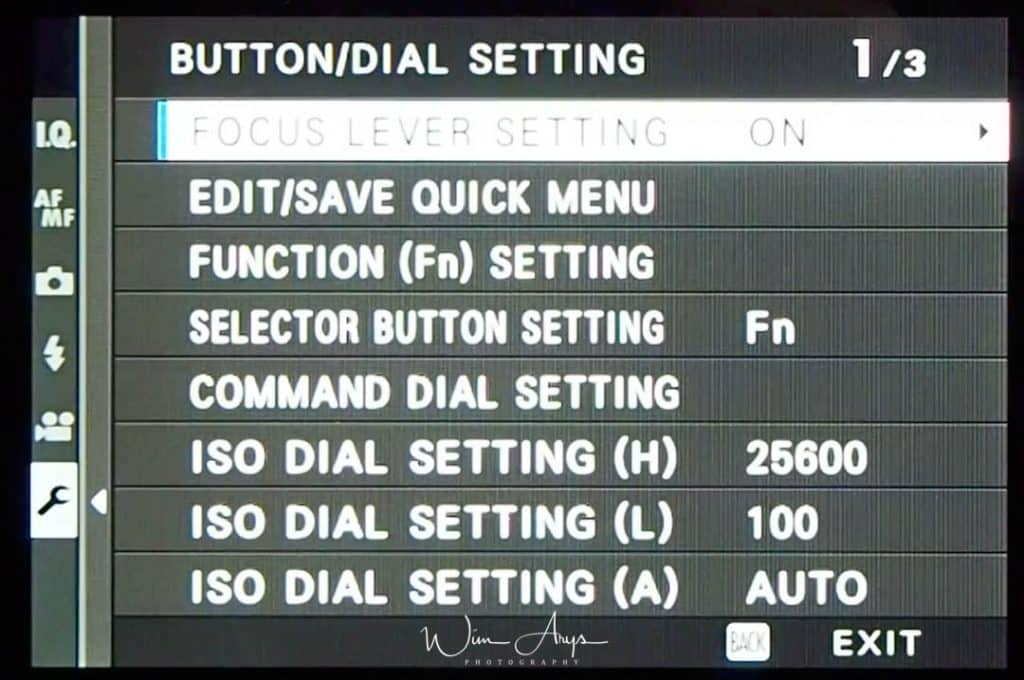
Focus/Lever Setting
Choose the functions performed by the focus stick (focus lever).
| Option | Description |
|---|---|
| LOCK (OFF) | The focus stick can not be used during shooting. |
| PUSH TO UNLOCK | Press the stick to view the focus-point display and tilt the stick to select a focus point. |
| ON | Tilt the stick to view the focus-point display and select a focus point. |
Edit/Save Quick Menu
Choose the items displayed in the quick menu.
- Select BUTTON/DIAL SETTING > EDIT/SAVE QUICK MENU in the (SET UP) tab.
- The current quick menu will be displayed; use the selector to highlight the item you wish to change and press MENU/OK.
- Highlight any of the following options and press MENU/OK to assign it to the selected position.
IMAGE SIZE
IMAGE QUALITY
FILM SIMULATION *
GRAIN EFFECT *
COLOR CHROME EFFECT
DYNAMIC RANGE *
WHITE BALANCE *
HIGHLIGHT TONE *
SHADOW TONE *
COLOR *
SHARPNESS *
NOISE REDUCTION *
SELECT CUSTOM SETTING *
AF MODE
AF-C CUSTOM SETTINGS
FACE/EYE DETECTION SETTING
MF ASSIST
TOUCH SCREEN MODE
SELF-TIMER
PHOTOMETRY
SHUTTER TYPE
FLASH FUNCTION SETTING
FLASH COMPENSATION
MOVIE MODE
MIC LEVEL ADJUSTMENT
EVF/LCD BRIGHTNESS
EVF/LCD COLOR
NONE
* Stored in custom settings bank.
Select NONE to assign no option to the selected position. When SELECT CUSTOM SETTING is selected, current settings are shown in the quick menu by the label BASE.
- Highlight the desired item and press MENU/OK to assign it to the selected position.
Function (Fn) Setting)
Choose the roles played by the function buttons.
- Select BUTTON/DIAL SETTING > FUNCTION (Fn) SETTING in the (SET UP) tab.
- Highlight the desired control and press MENU/OK.
Highlight any of the following options and press MENU/OK to assign it to the selected control.
EXP. COMPENSATION
IMAGE SIZE
IMAGE QUALITY
RAW
FILM SIMULATION
GRAIN EFFECT
COLOR CHROME EFFECT
DYNAMIC RANGE
WHITE BALANCE
SELECT CUSTOM SETTING
FOCUS AREA
FOCUS CHECK
AF MODE
RAPID AF
FACE/EYE DETECTION SETTING
SELF-TIMER
AE BKT SETTING
PHOTOMETRY
SHUTTER TYPE
ISO AUTO SETTING
WIRELESS COMMUNICATION
FLASH FUNCTION SETTING
TTL-LOCK
MODELING FLASH
MIC LEVEL ADJUSTMENT
PREVIEW DEPTH OF FIELD
PREVIEW EXP./WB IN MANUAL MODE
PREVIEW PIC. EFFECT
HISTOGRAM
ELECTRONIC LEVEL
AE LOCK ONLY
AF LOCK ONLY
AE/AF LOCK
AF-ON
LOCK SETTING
PLAYBACK
NONE (control disabled)
AF‑ON
If AF‑ON is selected, you can press the control instead of keeping the shutter button pressed halfway.
MODELING FLASH
If MODELING FLASH is selected when a compatible shoe-mounted flash unit is attached, you can press the control to test-fire the flash and check for shadows and the like (modeling flash).
TTL-LOCK
If TTL-LOCK is selected, you can press the control to lock flash output according to the option selected for FLASH SETTING > TTL-LOCK MODE
Selector Button Setting
Choose the roles played by the up, down, left, and right buttons on the selector.
| Option | Description |
|---|---|
| Fn BUTTON | The selector buttons serve as function buttons. |
| FOCUS AREA | The selector buttons can be used to position the focus area. |
Selecting FOCUS AREA prevents you accessing the functions assigned to the function buttons.
Command Dial Setting
Choose the roles played by the command dials.
| Option | Description |
|---|---|
| F S.S. | The front command dial controls aperture, the rear command dial shutter speed. |
| S.S. F | The front command dial controls shutter speed, the rear command dial aperture. |
ISO Dial Setting (H)
ISO Dial Setting (L)
ISO Dial Setting (A)
Button/Dial Setting page 2 of 3 (Button/dial Setting)
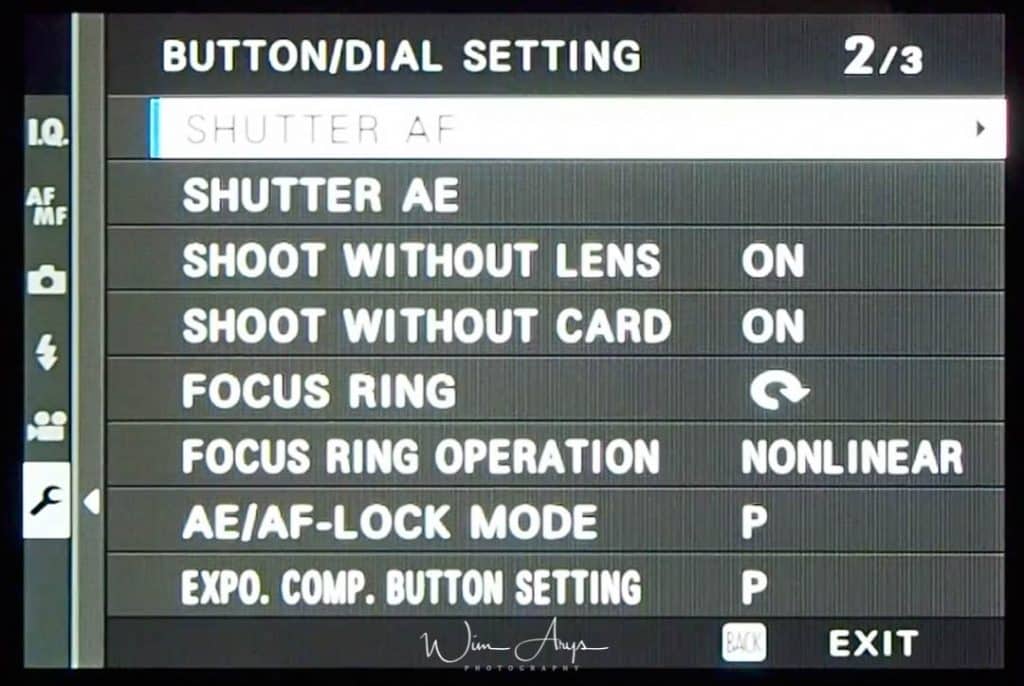
Shutter AF
Choose whether the Fujifilm X-H1 focuses when the shutter button is pressed halfway.
| Option | Description |
|---|---|
| ON | In focus mode S (AF‑S), the Fujifilm X-H1 focuses when the shutter button is pressed halfway and locks focus while the button remains in this position. In focus mode C (AF‑C), focus is adjusted continually while the button is pressed halfway. |
| OFF | The Fujifilm X-H1 does not focus when the shutter button is pressed halfway. |
Shutter AE
If ON is selected, exposure will lock while the shutter button is pressed halfway.
Shoot Without LensSelect OFF to allow the Fujifilm X-H1 to adjust exposure before each shot taken in burst mode.
Shoot Without Lens
Choose ON to enable the shutter release when no lens is attached.
Shoot Without Card
Make sure this is set to Off. If not, you’ll be able to shoot without recording.
Focus Ring
Choose the function of the focus ring.
Focus Ring Operation
Choose the direction in which the focus ring is rotated to increase the focus distance.
AE/AF-Lock Mode
If AE & AF ON WHEN PRESSING is selected, exposure and/or focus will lock while you press the button to which exposure or focus lock is assigned. If AE & AF ON/OFF SWITCH is selected, exposure and/or focus will lock when the button is pressed and remain locked until it is pressed again.
Expo. Comp. Button Setting
Control the behavior of the rear command dial and the button to which exposure compensation is assigned. If ON WHEN PRESSING is selected, exposure compensation can be adjusted by holding the button while rotating dial; if ON/OFF SWITCH is selected, exposure compensation can be set by pressing the button once, rotating the dial, and then pressing the button again.
Button/Dial Setting page 3 of 3
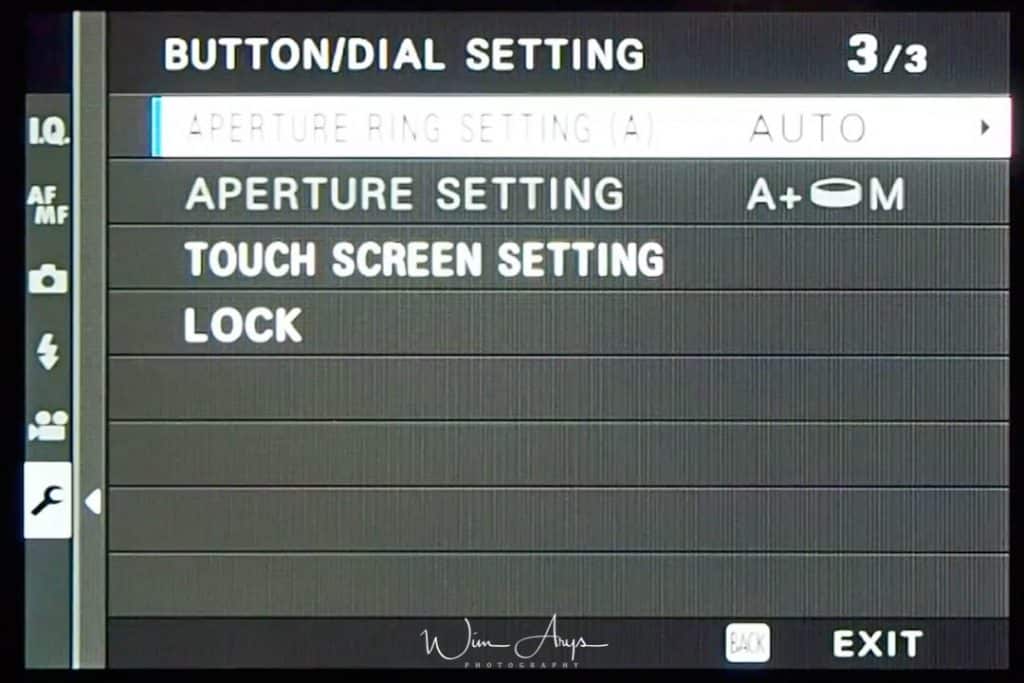
Aperture Ring Setting (A)
Select the function of the Aperture ring.
Aperture Setting
Touch Screen Setting
Enable or disable touch-screen controls.
Lock
Lock selected controls to prevent unintended operation.
| Option | Description |
|---|---|
| LOCK SETTING | Choose from the following:
UNLOCK: Reset lock options. ALL FUNCTION: Lock all controls in the FUNCTION SELECTION list. SELECTED FUNCTION: Lock only the controls selected in the FUNCTION SELECTIONlist. |
| FUNCTION SELECTION | Choose the controls locked when SELECTED FUNCTION is chosen for LOCK SETTING. |
Power Management
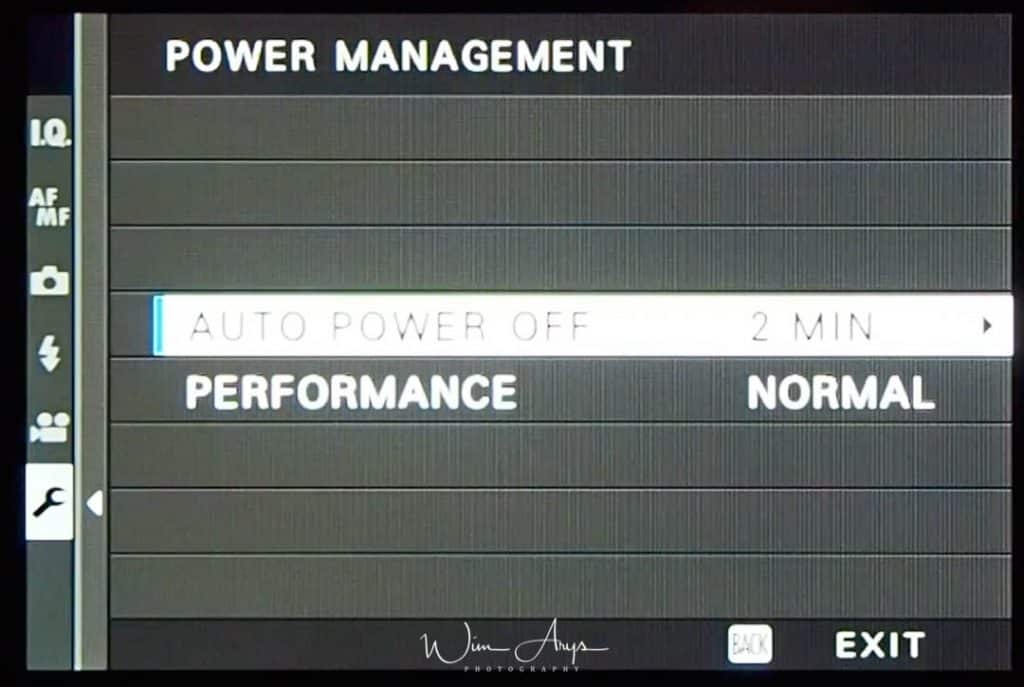
Auto Power Off
Choose the length of time before the Fujifilm X-H1 turns off automatically when no operations are performed. Shorter times increase battery life; if OFF is selected, the Fujifilm X-H1 must be turned off manually.
Performance
High Performance Mode speeds up autofocus at the cost of battery life.
Save Data Setting
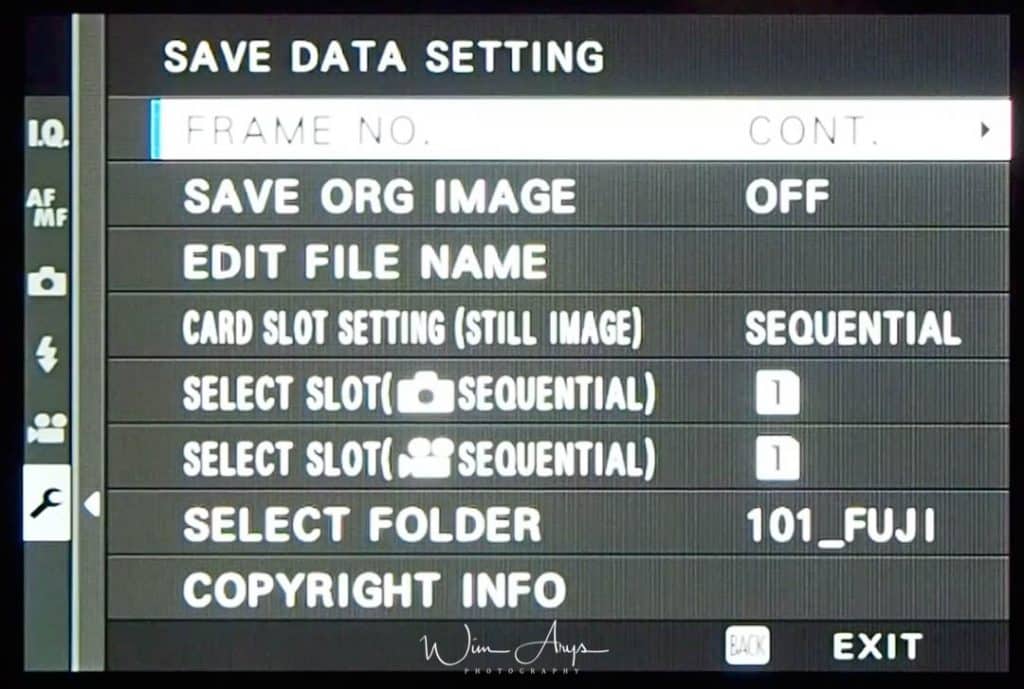
Frame No.
New pictures are stored in image files named using a four-digit file number assigned by adding one to the last file number used. The file number is displayed during playback as shown. FRAME NO.controls whether file numbering is reset to 0001 when a new memory card is inserted or the current memory card is formatted.
| ONTINUOUS | Numbering continues from the last file number used or the first available file number, whichever is higher. Choose this option to reduce the number of pictures with duplicate file names. |
|---|---|
| RENEW | Numbering is reset to 0001 after formatting or when a new memory card is inserted. |
Save Org Image
Choose ON to save unprocessed copies of pictures taken using RED EYE REMOVAL.
Edit File Name
Change the file name prefix. sRGB images use a four-letter prefix (default “DSCF”), Adobe RGB images a three-letter prefix (“DSF”) preceded by an underscore.
Card Slot Settings (still image)
Choose the role played by the card in the second slot.
| Option | Description |
|---|---|
| SEQUENTIAL | The card in the second slot is used only when the card in the first slot is full. |
| BACKUP | Each picture is recorded twice, once to each card. |
| RAW/JPEG | As for SEQUENTIAL, except that the RAW copy of pictures taken with FINE + RAW or NORMAL + RAW selected for IMAGE QUALITY SETTING > IMAGE QUALITY will be saved to the card in the first slot and the JPEG copy to the card in the second slot. |
Select Slot (still image Sequential)
Choose the card that is recorded to first when SEQUENTIAL is selected for CARD SLOT SETTING (STILL IMAGE).
Select Slot (Movie Sequential)
Choose the card that is recorded to first when SEQUENTIAL is selected for CARD SLOT SETTING (Movies).
Select Folder
Select which folder to record to.
Copyright Info
Copyright information, in the form of Exif tags, can be added to new images as they are taken. Changes to copyright information are reflected only in images taken after the changes are made.
| Option | Description |
|---|---|
| DISP COPYRIGHT INFO | View the current copyright information. |
| ENTER AUTHOR’S INFO | Enter the creator’s name. |
| ENTER COPYRIGHT INFO | Enter the name of the copyright holder. |
| DELETE COPYRIGHT INFO | Delete the current copyright information. This change applies only to images taken after this option is selected; copyright information recorded with existing images is not affected. |
Connection Settings
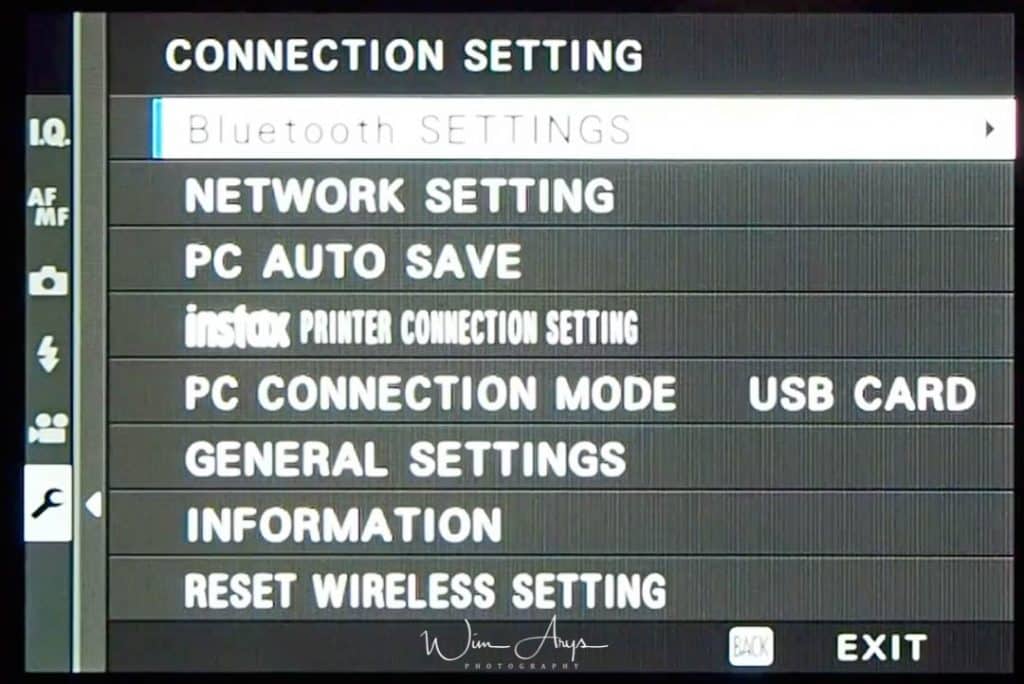
Bluetooth Settings
Change Bluetooth connection settings.
Network Settings
Adjust settings for connection to wireless networks.
| Option | Description |
|---|---|
| GENERAL SETTINGS | Choose a name (NAME) to identify the Fujifilm X-H1 on the wireless network (the Fujifilm X-H1 is assigned a unique name by default) or select RESET WIRELESS SETTINGS to restore default settings. |
| RESIZE IMAGE FOR SMARTPHONE | Choose ON (the default setting, recommended in most circumstances) to resize larger images to for upload to smartphones, OFF to upload images at their original size. Resizing applies only to the copy uploaded to the smartphone; the original is not affected. |
| ACCESS POINT SETTINGS |
SIMPLE SETUP: Connect to an access point using simple settings. MANUAL SETUP: Manually adjust settings for connection to a wireless network. Choose the network from a list (SELECT FROM NETWORK LIST) or enter the name manually (ENTER SSID). |
| IP ADDRESS |
AUTO: The IP address is assigned automatically. MANUAL: Assign an IP address manually. Manually choose the IP address (IP ADDRESS), network mask (NETMASK), and gateway address (GATEWAY ADDRESS). |
PC Auto Save
Choose the method used for connection to computers via a wireless LAN.
| Option | Description |
|---|---|
| SIMPLE SETUP | Connect using WPS. |
| MANUAL SETUP | Choose the network from a list (SELECT FROM NETWORK LIST) or enter the name manually (ENTER SSID). |
Instax Printer Connection Setting
Adjust settings for connection to optional FUJIFILM instax SHARE printers.
The Printer Name (SSID) and Password
The printer name (SSID) can be found on the bottom of the printer; the default password is “1111”. If you have already chosen a different password to print from a smartphone, enter that password instead.
PC connection Mode
Adjust settings for connection to a computer.
| Option | Description |
|---|---|
| USB CARD READER | Connecting the Fujifilm X-H1 to a computer via USB automatically enables data transfer mode, allowing data to be copied to the computer. The Fujifilm X-H1 functions normally when not connected. |
| USB TETHER SHOOTING AUTO | Connecting the Fujifilm X-H1 to a computer via USB automatically enables tethered shooting mode. You can also use FUJIFILM X Acquire to save and load Fujifilm X-H1 settings, allowing you to reconfi gure the X-H1 in an instant or share settings with other camerass of the same type. The Fujifilm X-H1 functions normally when not connected. |
| USB TETHER SHOOTING FIXED | The Fujifilm X-H1 functions in tethered shooting mode even when not connected to a computer. At default settings, pictures are not saved to the memory card, but pictures taken while the Fujifilm X-H1 is not connected will be transferred to the computer when it is connected. |
| WIRELESS TETHER SHOOTING FIXED | Choose this option for wireless remote photography. Select a network using CONNECTION SETTING > WIRELESS SETTINGS. |
| USB RAW CONV./BACKUP RESTORE | Connecting the Fujifilm X-H1 to a computer via USB automatically enables USB RAW conversion/backup restore mode. The Fujifilm X-H1 functions normally when not connected.
USB RAW CONV. (requires FUJIFILM X RAW STUDIO): Use the Fujifilm X-H1’s image processing engine to rapidly convert RAW files to high-quality JPEG images. BACKUP RESTORE (requires FUJIFILM X Acquire): Save and load Fujifilm X-H1 settings. Reconfigure the Fujifilm X-H1 in an instant or share settings with other Fujifilm X-H1s of the same type. |
General Settings
General Wi-Fi Settings.
Information
View the Fujifilm X-H1’s MAC address.
Reset Wireless Setting
Reset all wireless settings to fatory default.
Bugs and solutions
As the Fujifilm X-H1 is now officially available, some users have reported bugs. This is a full list of those bugs with a possible solution.
X-H1 Lockups
Possible solution – Use approved SD cards from Fujifilm‘s list online and only use cards that are 180MB/s or higherAlso use NP-126S batteries only.
Electronic Front Shutter mode shutter locks up
When in Electronic Front Shutter mode, shutter locks up and then exhibits error message to turn off and turn on camera.
Possible solution – Appears to be a manufacturing issue. Return to store and exchange for new one.
Inconsistent Autofocus Performance in both stills and photography modes.
Possible solution – Unknown at this time.
Auto ISO Settings memory bug
Possible solution – Unknown at this time.

Well done —- thanks
Thanks Thomas
Cheers, thanks for that, easy to search.
No problem, happy to help.
Any idea what color temp we should use to film dental video interviews shot in medical practices….looking to replicate these interior scenes .. fairly close interview scenes using a FUJIfilm xf50mm f2rwr prime lense – video can be seen here – second video
Best to try and match them in post production
Thanks for the guide! Much appreciated. Question: how to save the whole settings shebang to a file/ flashcard so it can be reloaded later? Is it at all possible to set up/ modify/ save and restore from an attached PC? Is Fuji working on that feature .. ?
I don’t think this model has that function, Sorry Andre.
Thanks for your help; new to XH1.
Hi – when I switch off my Fuji X-H1 the sub-monitor briefly shows a number, currently 4369. What does this means please ?
Great help. Easier to find answers than the official manual!
great instruction file -many thanks..What me turns crazy at the moment is a focussing issue with wide ancle lenses which gives me 35% blurry photos.Also the mechanical shutter at low speed seems to influence the ibis generating blurry photos.
Anyone who has the same problems?