
Canon EOS M50 setup guide with tips and tricks
Introduction
The Canon EOS M50 uses a 24.2-megapixel APS-C CMOS sensor. The sensor has a native ISO range of 100 to 25,600 and is the same sensor Canon M50.This small camera is definitely a great option both for beginners and more advanced photographers. It’s easy to carry everywhere, has excellent image quality and reliable metering and auto white balance. Thanks to the new DIGIC 8 image processor the M50 can shoot at up to 10fps in Single AF mode, and should you want to track your subject using Continuous AF this drops to a still very strong 7.4fps.
If you’re new to digital photography or Canon cameras, I’m sure this guide full of tips and trips will make you more familiar with the various settings, features and functionalities of the Canon M50. Now it’s time to turn your camera on and press the Menu button. You’ll be able to follow along page by page with this guide. Please note that in order to see all the pages, you’ll need to turn the camera Mode Dial to Av, Tv or M. (In Full Auto, some settings are automatically configured).
Also, if you want to see this more soothing black camera interface instead of the bright white, change the colour of the Menu in: Disp Level settings – Menu Display – Standard.
Canon EOS M50 Menu system
The Shoot Menu (Red Camera Icon)
Page Shooting menu 1 (SHOOT1)
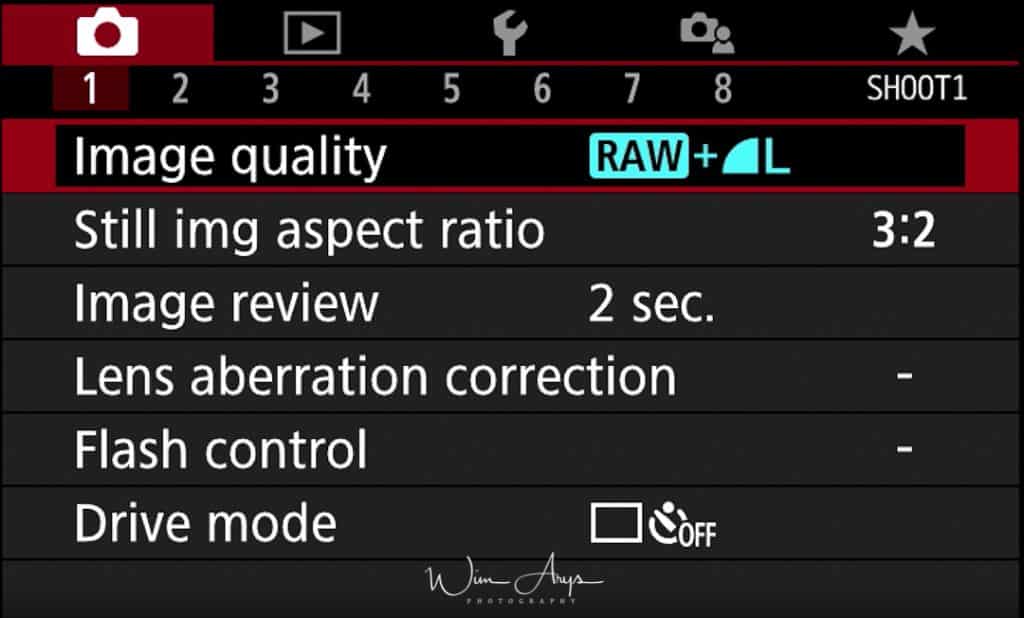
Image quality: you primarily need to decide whether to shoot RAW or JPEG. Raw records all the data from the sensor, Jpeg is basically a much smaller file that has all kinds of information already baked in. Most serious photographers shoot RAW, as this gives you the most flexible file to work with in an application like Adobe Lightroom.
You’ll be able to recover more colour in the highlights of your image for instance, and pull more detail out of the shadows with a Raw file than with a Jpeg. The only downside are the larger files and the fact that of course you’ll need to develop them later on. RAW file average size of 15.5 MB an JPEG file average size of 7.4 MB with the M50.
You’ll see that the is also a cRAW option, this is a format that uses lossy compression to reduce file sizes by roughly 40%. This is absolutely fine to use, the deterioration is negligible.
| Image quality | Image size (3:2 aspect ratio) | Shots / 32GB UHS-1 card | Max. shots per burst | |
| Large Fine | 6000 x 4000 pixels | 3651 | Approx. 33 | |
| Large Normal | 6000 x 4000 pixels | 6782 | Approx. 33 | |
| Medium Fine | 3984 x 2656 pixels | 6645 | Approx. 30 | |
| Medium Normal | 3984 x 2656 pixels | 11741 | Approx. 30 | |
| Small Fine | 2976 x 1984 pixels | 9948 | Approx. 29 | |
| Small Normal | 2976 x 1984 pixels | 16455 | Approx. 29 | |
| Small 2 | 2400 x 1600 pixels | 16874 | Approx. 30 | |
| RAW | 6000 x 4000 pixels | 1084 | Approx. 10 | |
| RAW+Large Fine | 6000 x 4000 pixels | 835 | Approx. 10 |
If you decide to shoot Jpeg, you can choose between Large, Medium or Small, each with a Fine or Normal setting. Check the table above for the relative pixel sizes for each setting. I would advise Large and Fine of course.
Still img aspect ratio: this describes how square (1:1) or wide (16:9) your image is. It’s expressed as a figure, like this: width:height (width always comes first). The aspect ratio of the APS-C sensor is 3:2, and you should use this if you want to use the full surface of the sensor. Cropping can also be done later.
- 3:2: the native sensor dimension of the M50.
- 4:3: native resolution of a micro-four-thirds camera .
- 16:9: for a wider perspective.
- 1:1: a basic square setting.
Image review: You can modify the amount of time the image displays on the LCD monitor after your M50 writes it to the memory card. You can set the preview time from 2 to 8 seconds or display the image until you turn off the camera. Or you can turn it OFF if you don’t want this. I turn it off as I can always press the play button if I decide to review a shot I’ve just taken..
- Off
- 2 sec
- 4 sec
- 8 sec
- Hold
Lens aberration correction: digital technology provides the ability to adjust images in-camera. One area this can be useful is in correcting for optical performance. By mapping the performance of each camera and lens at a variety of focal lengths, manual focus distances and apertures, it is possible to correct for these irregularities and bring the lens performance closer to ‘perfection’. These corrections are only available for photos captured in the JPEG file format. There is no reason to turn this off, except if you’re noticing a slow down when shooting in burst mode. Then this might be the reason
- Peripheral illumination correction: This is called lens light fall-off or drop in the corners or vignetting.
- Distortion correction: If you’re shooting with a wide-angle lens you may have noticed that at the wide end you will most likely find some distortion. This corrects distortion for any lens in the lens database.
- Digital Lens Optimizer: Performs high- level correction for lens aberration in-camera
- Chromatic aberr corr: Automatically remove color fringing due to Chromatic aberration.
- Diffraction correction: a camera and lens specific correction that uses a profile of the lens used to ameliorate the effects of diffraction caused by small apertures (usually f/11 and beyond where there will be decrease in sharpness).
Flash control: Using this menu item, you can adjust flash power. The Flash Control option also enables you to customize a few other aspects of the built-in flash as well as control an external flash head.
- Flash firing: Normally, this option is set to Enable. If you want to disable the flash, you can choose Disable instead. However, you don’t have to take this step in most cases.(just close the pop-up flash head on top of the camera if you don’t want to use flash).
- E-TTL II meter: This option enables you to switch from the default flash metering approach, called Evaluative. In this mode, the camera exposes the background using ambient light when possible and then sets the flash power to serve as fill light on the subject. If you instead select the Average option, the flash is used as the primary light source, meaning that the flash power will expose the entire scene without relying on ambient light. Typically, this results in a more powerful (and possibly harsh) flash lighting and dark backgrounds.
- Red-eye reduc.: When flash is used in a low-light environment, the subject’s eyes may come out red in the image. Red eye happens when the light from the flash reflects off the retina of the eyes. The camera’s red-eye reduction feature turns on the red-eye reduction lamp to shine a gentle light into the subject’s eyes to narrow the pupil diameter or iris. A smaller pupil reduces the chances of red eye from occurring.
- Slow synchro: Slow Sync Flash is a function found on many cameras that tells your camera to shoot with both a longer shutter and firing the flash. This means you get the best of both worlds above and can both get a relatively sharp shot of your primary subject and get some ambient light from the background and foreground.
- Safety FE: The camera automatically changes the shutter or aperture value when the flash fires to avoid overexposing and blowing out the highlights in the scene.
- Built-In flash settings:
If you highlight this option and press Set, you display the screen shown here.
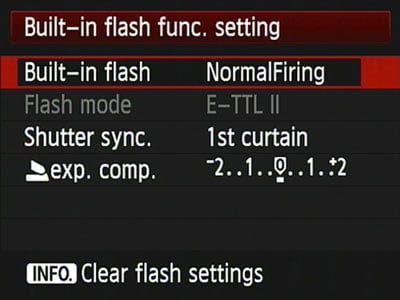
But which options are adjustable on the M50 depends on whether you set the first option, Built-in Flash, to Normal Firing, or to one of the two settings that set the built-in flash to trigger off-camera flash units.
The other options available for normal flash operation work like so:
- Shutter Sync: By default, the flash fires at the beginning of the exposure. This flash timing, known as 1st curtain sync, is the best choice for most subjects. However, if you use a very slow shutter and you’re photographing a moving object, 1st curtain sync causes the blur that results from the motion to appear in front of the object, which doesn’t make much visual sense.To solve this problem, you can change the Shutter Sync option to 2nd curtain sync, also known as rear-curtain sync. In this flash mode, the motion trails appear behind the moving object. The flash fires twice in this mode: once when you press the button and again at the end of the exposure.
- Flash Exposure Compensation: This setting adjusts the power of the built-in flash.
The M50 has four options affecting the flash here. Shutter Sync and Flash Exposure Compensation are joined by:
- Flash Mode: Ignore this; it’s not adjustable when you use the built-in flash.
- E-TTL II Metering: See above.
- External flash func. Setting and External flash C.Fn setting: these last 2 options on the Flash Control list relate to external flash heads; they don’t affect the performance of the built-in flash. However, they apply only to Canon EX-series Speedlites that enable you to control the flash through the camera. If you own such a flash, refer to the flash manual for details.
Drive Mode: Extremely high speeds continuous shooting up to 10 fps is possible using One Shot AF (first AF position is fixed), and up to 7,4 fps using servo AF (where the camera continuously focuses even with moving subjects).
- Single: the camera fires one shot each time the shutter button is fully depressed.
- continuous high: the shutter keeps firing for as long as you depress the button at maximum burst rate.
- continuous: the shutter keeps firing for as long as you depress the button at a slower burst rate. Great idea if you need to be able to shoot and write longer to the SD card without flooding the buffer.
- self timer 10: the camera takes a picture after 10 seconds.
- self timer 2: the camera takes a picture after 2 seconds.
- self timer continuous: the camera take pictures continuously after a small delay.
Page Shooting menu 2 (SHOOT2)
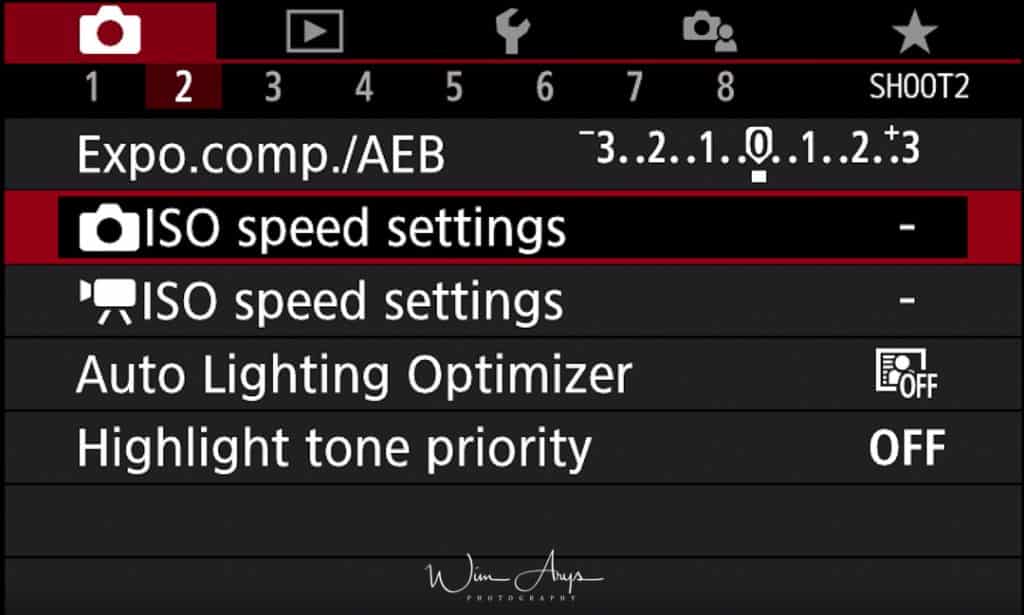
Expo.comp./AEB: Exposure Compensation and Auto Exposure Bracketing.
Exposure compensation: If you believe that your camera is over- or underexposing your images, or you want to do this for creative reasons, you can change the level of exposure by a scale of plus or minus 3 EV.
Auto Exposure Bracketing.: Using the exposure compensation setting, you can capture images at different exposure levels, and then select the optimal image later with a +/- 5 EV scale. These two functions can the be used in combination.
Only 3 shots are allowed. EV compensation is more easily available via other interfaces, but is here so it can be used with auto exposure bracketing.
ISO speed settings for photos
ISO speed: can either be set to Automatic or determine an appropriate value for yourself. Say for landscapes when using a tripod this is generally set to what is called base ISO 100. ISO 100 would give you the optimal quality for this sensor, but for many other types of photography you’ll need a higher ISO in order to have a fast enough shutter speed and hence no movement in your images. Leave this on auto for most uses.
ISO Auto: This is used to set the max for Auto, from 400 to the top value of 25600. When raising the ISO value, you are effectively raising the sensitivity of the sensor by boosting the output. This leads to more and more noise with every doubling of power. A Maximum of 6400 is as far as I would go with this camera. Perhaps 3200 would be better if your shooting style allows it and you don’t get blurry images .
ISO speed settings for movies
ISO Auto: set to 6400,12800 or 25600. Don’t go higher than 12800 for video.
Auto Lighting Optimizer
Auto-corrects image brightness and contrast. This only affects Jpeg and not your Raw files, but it can be handy for the Jpeg shooters out there. Have a go and see if you like the effect set to low or standard.
Highlight tone priority
Improves gradation in highlights to avoid over exposure in bright subjects. What the camera does in highlight tone priority is underexpose the image to avoid clipping highlights, then boost the shadows up to give the appearance of a wider dynamic range in the jpegs. It does the same thing you might do when processing raw files, except it just applies it to jpegs. Another great feature to experiment with. Either Off or enabled.
Page Shooting menu 3 (SHOOT3)
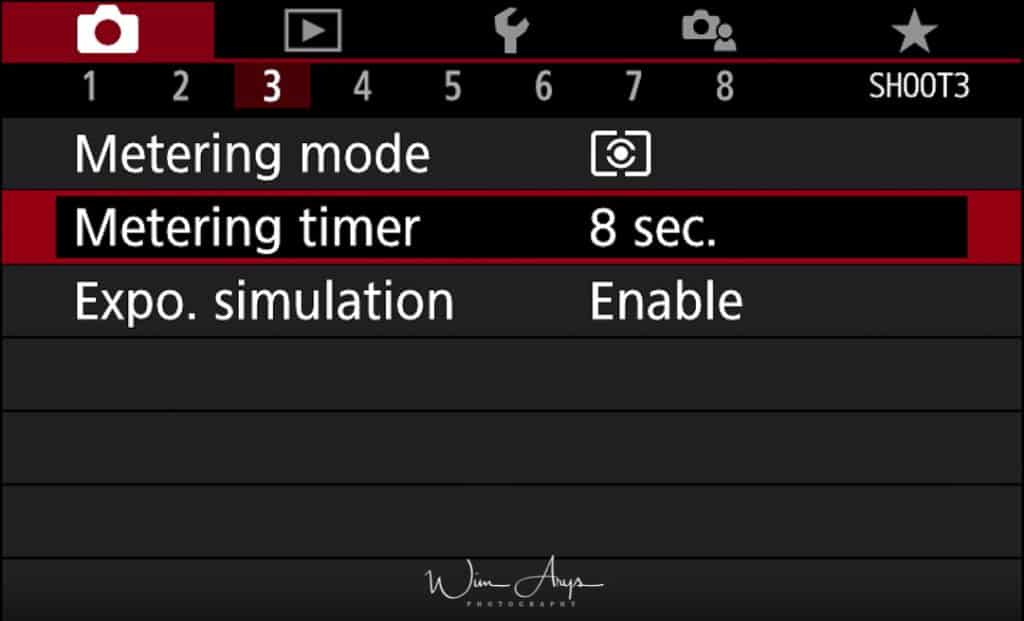
Metering mode
Taking a picture is often referred to as ‘making an exposure’. This is because when you press the camera’s shutter release you set the start for the registration of light hitting the sensor.
Another sensor inside the camera, called the metering sensor, is central to this whole operation: it measures the light that’s coming through the lens and determines how much is needed to produce a well-exposed photo.
You can select four different ways how this sensor will read light:
- Evaluative: This mode meters the whole scene, but places more emphasis on what the camera is focused on. Because the camera effectively applies its own exposure compensation in this metering mode, it can improve your chances on getting a good exposure when you need to grab a shot quickly. Most photographers stick with this metering mode.
- Partial: This alternative to spot metering enables you to take a reading from a very small area in the centre of the frame. This area is around six percent of the sensor. It’s a slightly larger area than the normal spot metering, which makes it easier to use. This is a great tool for portrait photography.
- Spot: Spot metering only covers the centre autofocus point and the area immediately surrounding it. It offers pinpoint precision when it comes to metering, although you’ll need to judge tones accurately to get the most out of this metering mode.
- Center-weighted average: This is the oldest metering mode, where a meter reading is taken across the frame. It will however place more emphasis on what is positioned in the center of the frame and it doesn’t use any exposure compensation, it applies the same averaging pattern to every shot.
Metering timer
When you half press the shutter (or use back button focus) in one of the creative zone modes and then release it, the camera’s meter takes a reading and sets the exposure values. These values time out and disappear after the amount of time set by this option. You have to half press again to take a new reading at that point. From 4, 8, 16, 30 sec too 1, 10, 30 min.
Expo. Simulation
When ‘Exp.SIM’ (which stands for Exposure Simulation) is on, indicates the image you are seeing on the rear screen and EVF is what the final image will look like. You can leave this on except when using flash in the studio as you’ll only see a dark frame in that case.
Page Shooting menu 4 (SHOOT4)
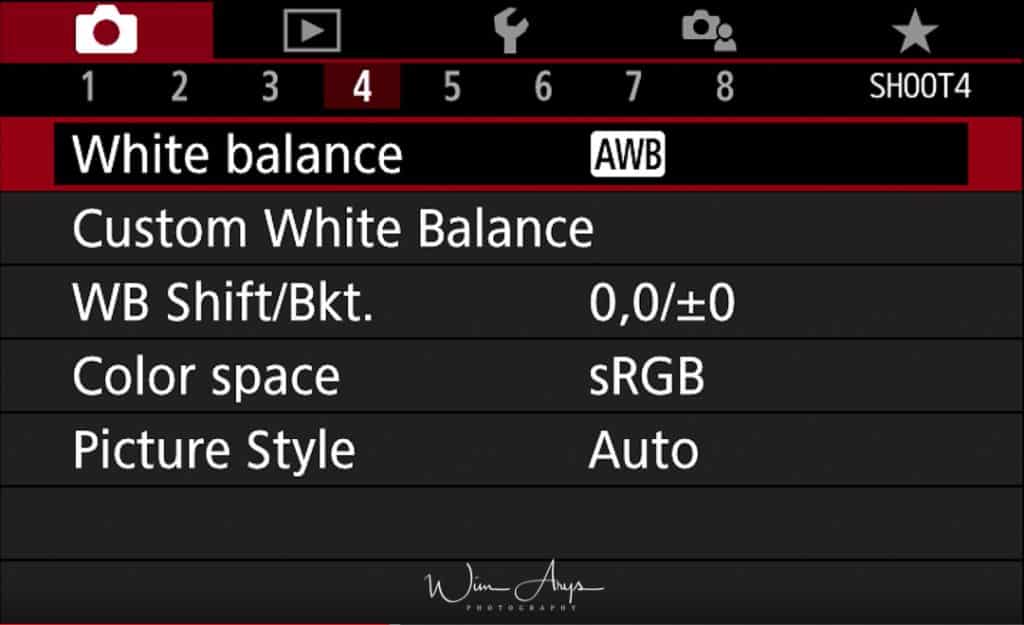
White balance
Normally AWB (auto white balance) will do just fine but you also have the option to change this to AWB W (auto white balance with white priority This setting is amazing for indoor lighting), Daylight, Shade, Cloudy, Tungsten, White fluorescent, Flash, Custom and Colour Temperature adjustable.
Custom white balance
This setting brings up compatible images to use. Set the white balance under the same light source thatwill illuminate your shot.
WB Shift/Bkt.
White balance shift is a setting on the EOS M50 camera that allows a photographer to bias the colours in images in either blue, amber, magenta or green directions. This colour shift can be used to add or remove colour shifts that may occur when shooting in mixed lighting conditions. Typically think flash and daylight, flash and indoor lights, street lights and daylight and so on. White balance can be shifted from -9 to +9 in both blue / amber and green / magenta directions, or combinations of blue/amber and green/magenta shifts. The blue/amber shift is equal to five mired for each step.
Color space
sRGB is what is used online, and Adobe RGB has a more extended colour profile that mimics the human eye. You might think that the latter is preferable, but unless you print a lot of photos with professional equipment, Adobe RGB is more hassle than its worth since you’ll need to proof every picture you want to use online and convert it to sRGB.
Picture Style
Picture style allows you to take photos in the color tones that Canon deems most suitable to each subject . These include normal presets like Standard, Portrait and Landscape but also advanced scenarios like Monochrome, Fine Detail, Neutral and Faithful.
All these picture styles can be individually adjusted to taste with adjustments like Sharpness, Fine detail, Threshold, Contrast, Saturation, Hue. These adjustments can be saved in 3 user defined slots and even transferred to other EOS cameras.
Auto, Standard, Portait, Landscape, Fine Detail, Neutral, Faithful, Monochrome, User Def. 1, 2 and 3]
Page Shooting menu 5 (SHOOT5)
Long exp.
Turn On noise reduction for exposures of 1 second or longer with the Canon M50. This function takes a second black or dark frame (with the shutter closed) with the identical shutter time of your first photo. The noise in this frame is then subtracted from the original photo. This method is the most reliable type of noise reduction, as the noise is measured specifically at that place and time with the same level of humidity and temperature. All factors that can contribute to noisy images especially in long exposures.
Some photographers however find it annoying to have to wait for this to finish as it doubles the time. You can turn it off and experiment with other types of noise reduction in Lightroom or any other photo editor if you shoot RAW.
High ISO speed NR
You can choose from 3 levels of noise reduction: Standard, High or Low. This function is especially effective when shooting at high ISO speeds.
Multishot: This technique automatically combines four images captured at once to reduce noise. Compared to setting High ISO speed NR to [High], this feature minimises loss of image quality while reducing noise. Best technique for Jpeg shooters.
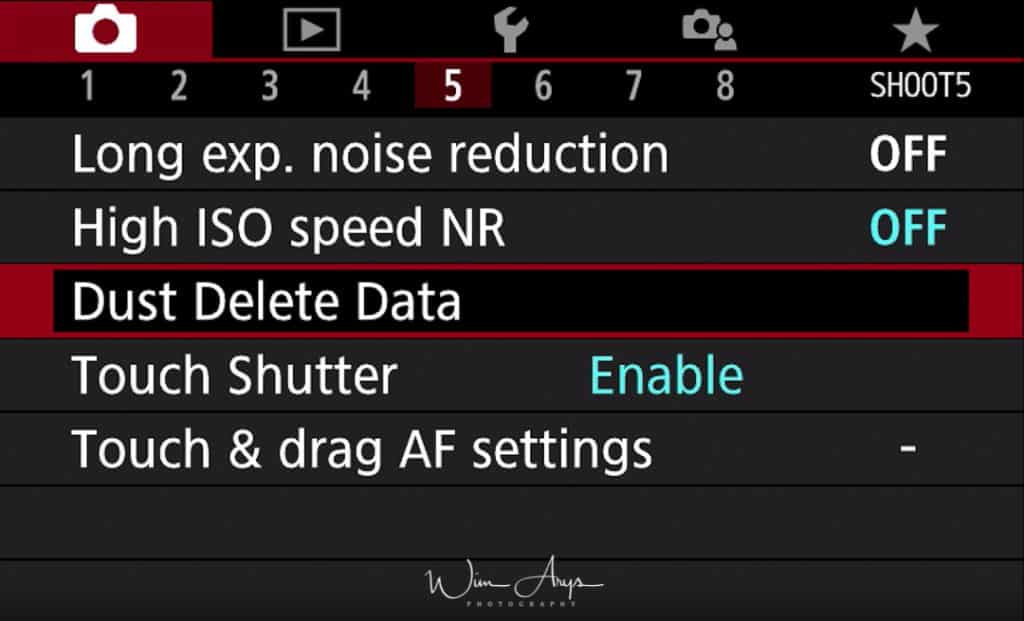
Dust Delete Data
This function allows you to download your shots to your computer using the canon software. The software will analyse the images, and it will register any dust spots that show up on multiple images. This database is then relayed back to the Canon M50 that will ignore the pixels with dust on.
I don’t think this is necessary, as periodically wet cleaning yourself or by a professional should be part of your camera cleaning routine, anyway.
Touch Shutter
If the Touch Shutter function is set to On, you can take shots easily by having the camera focus on your subject and adjust the brightness simply by touching. I don’t use this function, but if you’re coming from a smartphone, you could find it very useful.
Touch & drag AF settings
Touch & Drag AF basically means that you can drag the desired autofocus point to anywhere on the screen. This is much faster than any other method to do this.
You can select the active touch area: Whole panel, Right, Left, Top Right, Btm Right, Top Left, Btm Left. I have it set to the Bottom Left since this allows you to look through the EVF and change the focus point easily at the same time.
Page Shoot 6 (SHOOT6)
AF operation
One Shot: for Still Subjects. When you press the shutter button halfway, the camera will focus only once.
- When focus is achieved, the dot inside the AF point achieving focus lights up briefly in red, and the focus confirmation light <> in the viewfinder will also light up.
- With evaluative metering, the exposure setting will be set at the same time focus is achieved.
- While you hold down the shutter button halfway, the focus will be locked. You can then recompose the shot if desired.
Servo: This AF operation is for moving subjects when the focusing distance keeps changing. While you hold down the shutter button halfway, the subject will be focused continuously.
- The exposure is set at the moment the picture is taken.
- When the AF point selection is automatic, the camera first uses the center AF point to focus. During autofocusing, if the subject moves away from the center AF point, focus tracking continues as long as the subject is covered by another AF point.
AF method
Face + Tracking:
- the Canon M50 searches for faces in the frame. If it finds one, it displays a white focus frame over the face.
- In a group shot where more than one face is recognized by the camera, you see arrows on either side of the focus frame. To choose a different face as the focusing target, tap the face or use the Multi-controller to move the target frame over the face.
- To lock focus on the face, press and hold the shutter button halfway down or press and hold the AF-ON button. When focus is locked, the focus frame turns green, as shown on the right above, and the camera emits a beep. (Disable the sound effect via the Beep option on Shooting Menu 1.) If focus isn’t successful, the focus frame turns red.
Zone:
Select a zone where the EOS M50 will look for focus. Nice to use with the Touch and Drag AF settings of the previous page .
1 point: only one AF point is used for extremely precise autofocus.
AF frame size
Select either Normal or Small frame size for the 1 point AF operation.
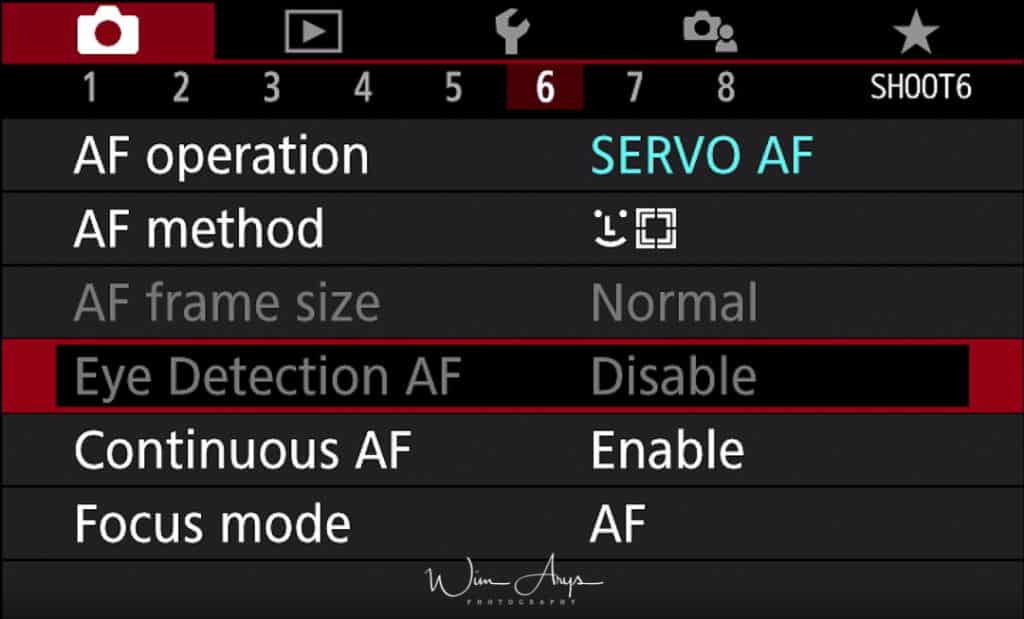
Eye Detection AF
his is an exciting new feature, introduced with the EOS M50 camera. When its AF Method is set to Face Detect + Tracking, the entire active AF area (see the colored outlines in the graphics above) is used for focusing. And, if a human face is detected, the Face Detect technology has been enhanced — the camera doesn’t simply focus on the most prominent face in the scene. Instead, it now is able to detect the nearest eye on that face, and puts a smaller focus box on that eye. If that person moves around the picture area, the Eye Detection AF continues to track that eye, as long as it remains visible.
When Eye Detection AF is active, you’ll see a large, outer box indicating that Face Detection has recognized a human face. And within it, a smaller box will surround the actual eye that is being concentrated upon for Eye Detection AF.
This means that sharp focus will more than ever be placed on the “leading” eye of your subjects, whether you’re shooting portraits or candid pictures. Where many experienced photographers might have previously made the effort to change to a single AF point, and move it manually to cover the face of a human subject, the new Eye Detection AF technology means that the process can be left to the EOS M50 in many cases.
All that has to be done to activate Eye Detection AF is to Enable Eye Detection AF in the 3rd Shooting Menu screen, and be sure that Face Detect + Tracking is the active AF Method. It will function in most shooting modes.
While Eye Detect AF will normally focus upon the eye nearest to the camera, if you want to concentrate on the subject’s other eye, that’s easy to do — just press the AF Point Select button, on the back of the camera, twice. You’ll see the smaller “box” surrounding the detected eye jump to the subject’s other eye.
For Face Detection AF, and the more advanced Eye Detection AF to function, the camera basically has to be able to identify typical human facial features two eyes, a nose, and a mouth. Accordingly, there can be some limits to the M50’s Eye Detection AF:
- It will not function with Servo AF, so it’s unable to work with moving subjects (therefore, Eye Detection AF is not possible in Sports Mode or Panning Mode).
- It’s disabled if you’re using the Miniature effect or Fish-eye effect settings, within the Creative Filters modes.
- Eye Detection AF cannot be used when recording video (overall Face Detection is possible during video recording, including when continuous Movie Servo AF is active).
- The primary face in the scene needs to be sufficiently close to take up a certain amount of space in the picture — if a detected face is too distant or small in the frame, the EOS M50 will revert to conventional Face Detection, and you won’t see the smaller “box” displayed over a subject’s eye before you take the picture.
- Eye Detect AF may have problems if the subject’s eyes are partially or fully closed.
- The primary face needs to be turned so it’s essentially facing toward the camera, and the eyes need to be somewhat in the camera’s direction as well. While direct eye contact with the camera isn’t required, if the subject’s eyes are angled significantly to one side or the other, the M50’s Eye Detection AF may not be able to detect the eye nearest the camera (again, it will usually revert to ordinary Face Detection, or conventional Automatic AF point selection).
- If one or both of the subject’s eyes are in deep shadow, Eye Detection AF (and sometimes overall Face Detection AF) may have difficulty functioning.
- Sunglasses, excessive make-up around the eyes, masks, and so on will usually prevent the Eye Detection AF from being able to detect and focus upon the nearest eye. And, like Face Detection, it’s designed to detect human eyes… it normally will not work with animals or other non-human subjects.
Continuous AF
Enable or disable continuous AF where the camera constantly tries to acquire focus, even without pressing the shutter. Turn this Off.
Focus mode
Select either autofocus where the camera focusses automatically or manual focus where you need to turn the manual focus ring on the lens to manually achieve focus.
Page Shoot 7 (SHOOT7)

Lens electronic MF
Disable after One-Shot AF/Enable after One-Shot AF: The latter allows you to fine-tune focus manually in AF mode whilst half-pressing the shutter button.
AF-assist beam firing
This is a read beam that some flashes have, which helps to gain focus in situations with low light.
MF peaking settings
Peaking is a manual focussing aide when the camera is set to manual focus. The in-focus area will have a type of coloured noise superimposed onto scene in the EVF or on the screen. This is of course not stored, it’s merely an aide that helps you determine where your manual focus lies and if your subject will be in focus. Very handy feature, I have it set to the Color red and Level High.
IS settings
Some lenses have optical image stabilisation built in. This helps with getting sharp pictures even with low shutter speeds; There are really no negative sides to using this, except that it’s not necessary to use when shooting landscapes.
There is also an electronic image stabilisation system for use with video, that might be beneficial to some, although the effect is minimal.
Movie Auto level:
If you have Digital IS on, this is greyed out. But switch it off – and you may as well if lens has OIS but doesn’t support Combination IS – and you can switch auto level on. This compensates for roll – e.g. it should keep the horizon level.
Page Shoot 8 (SHOOT8)
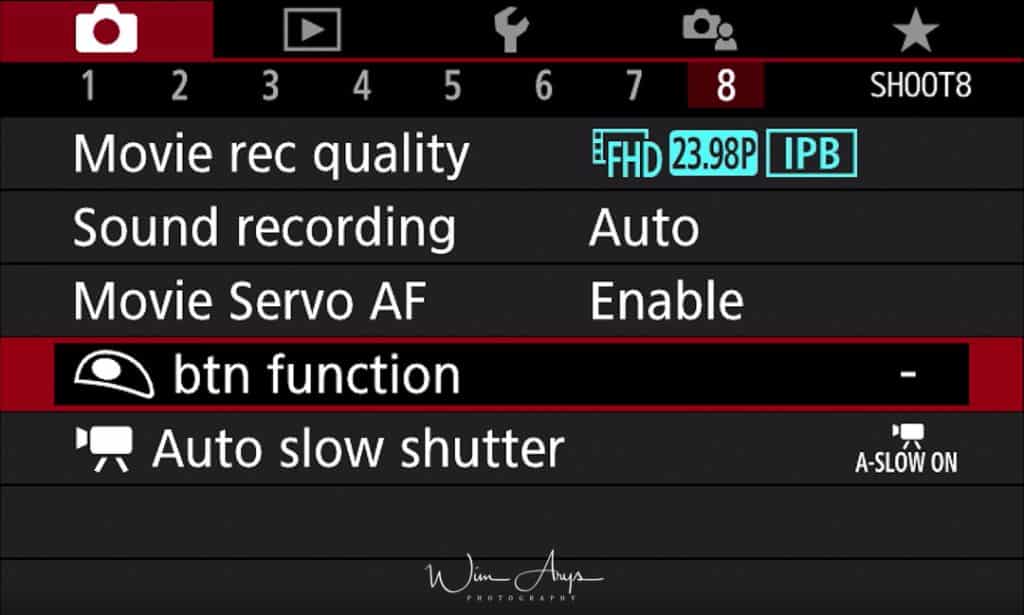
It’s possible to record 4K video with the Canon M50 but, it comes with some limitations. It’s only available when the Movie mode is selected on the mode dial. And the frame rate is only 25 fps with a maximum bit rate of 150Mbps.
A more serious restriction is the degree of frame cropping, which combines the 1.6x crop associated with the APS-C sensor with an additional 1.6x crop imposed by the 4K setting. This is a very heavy crop and for some bloggers or videographers, it might be a too big a hurdle to overcome.
Movie rec quality: You can choose between 4K, FHD or HD.
| Quality setting | Recording file size | Recording time on a 32GB card |
| 4K 25p | 15000 KB/sec. | 35 minutes 33 seconds |
| FHD (1080p) 50p | 7500 KB/sec. | 1 hour, 11 minutes 7 seconds |
| FHD 25p | 3750 KB/sec. | 2 hours, 22 minutes 13 seconds |
| HD (720p) 100p | 6500 KB/sec. | 1 hour, 22 minutes 3 seconds |
| HD 50p | 3250 KB/sec. | 2 hours, 44 minutes 6 seconds |
Continuous recording will stop after 29 minutes and 59 seconds or when a single HD 100p recording reaches seven minutes and 29 seconds. It will create new files after recording stops if the user holds down the recording button.
The additional frame cropping doesn’t affect the Full HD or HD recording modes, which can also benefit from Dual Pixel AF, allowing faster, more precise autofocusing. Time-lapse recording is also supported with three pre-set ‘Scene’ modes and users can choose between Full HD (1920 x 1080 pixels) and 4K (3840 x 2160 pixels).

The first (3 seconds between shots) is for subjects like moving people, the second for slower changes (5 seconds between shots), like clouds in motion and the third is even slower (15 seconds between shots) for ‘slowly changing scenes’. There’s also a Custom setting that lets you select the interval between shots and the total numbers of frames in the sequence.
Note that Dual Pixel AF is not available when shooting 4K video. You must rely on contrast-based AF, which can be noticeably slower.
Sound recording:
Sound rec. Auto/Manual/Disable;
Manual gives access to a Rec. Level 5-point scale, and a Wind filter/Attenuator screen with Enable/disable for the Wind Filter and Auto/Enable/Disable for the Attenuator.
All these screens have a full-width live horizontal scale showing the current sound levels on the L and R channels.
Movie Servo AF:
When shooting video, a Movie Servo AF mode offers smooth and natural focusing when changing from different subjects or different distances within the scene, as well as the ability to specify tracking sensitivity, AF speed, and Face Tracking priority.
Shutter release btn function
You can select the function of the Shutter release Half-press here:
- Meter.+Movie Servo
- AF/Meter.+One-Shot
- AF/Metering only
Auto slow shutter
The Canon M50 automatically uses slow shutter speeds to obtain brighter recordings in places with insufficient lighting. It uses speeds down to 1/30 second.
Playback Menu (blue playback icon)
Page Play 1 settings (PLAY1)
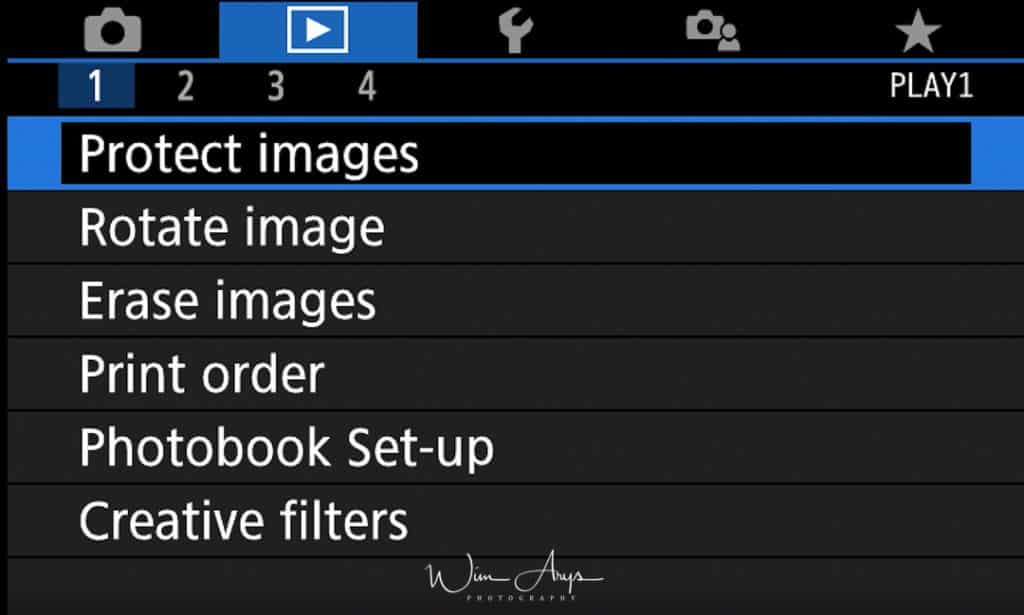
Protect images
You can select how to protect and unprotect an image from deletion on the EOS 50D. Once an image is protected, it cannot be erased by the camera’s erase function. To erase a protected image, you must first cancel the protection. If you erase all the images, only the protected images will remain. This is convenient when you want to erase unnecessary images all at once.
You can choose to Select images, Select range, All images in folder, unprotect all images in folder, All images on card or unprotect all images on card.
Rotate image
Vertical images are rotated automatically so they are displayed vertically on the camera’s LCD monitor and personal computer instead of horizontally. The setting of this feature can be changed.
- Immediately after image capture, the vertical image will not be automatically rotated for the image review.
- If the vertical image is taken while the camera is pointed up or down, the image might not rotate automatically for playback.
- If the vertical image is not automatically rotated on the personal computer screen, it means the software you are using is unable to rotate the image.
Erase images
Select and erase images by selecting a range or All images in folder orAll images on card.
Print order
You can connect the camera to a printer via Wi-Fi to print your images directly. This setting takes you to the selection screen where you can select a single image, multiple images for printing and the general set up. See the tutorial below on how to connect to a smartphone, it is the same procedure to connect to a printer
Photobook Set-up
This function is useful for ordering photobooks online and for printing photobooks on a printer.
When you select images to use in photobooks (up to 998 images) and use EOS Utility (provided software) to transfer them to a computer, the selected images will be copied into a dedicated folder. This function is useful for ordering photobooks online and for printing photobooks on a printer.
Creative Filters
Creative filters offer a way to add special effects to your images. You have a wide range of filters available: Grainy B/W, Soft Focus, Fish-eye Effect, Water painting effect, Toy camera effect, Miniature effect , HDR Art standard, vivid, bold and embossed.
Page Play 2 settings (PLAY2)
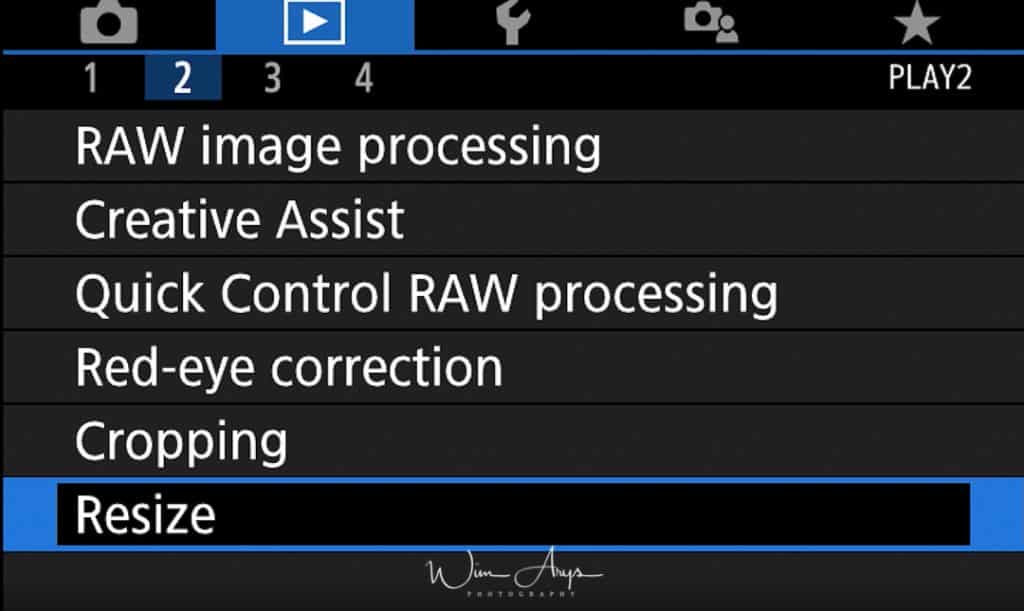
RAW image processing
Being able to perform RAW image post-processing right after shooting on a camera is a function that comes in very handy.
These settings are available on the Canon M50:
- Brightness adjustment: EV-1, EV-2/3, EV-1/3, EV±0, EV+1/3, EV+2/3, EV+1
- White balance: WB: Shot settings, Auto, Day Light, Shade, Cloudy, Tungsten light, White fluorescent light, Flash, Colour temperature
- Picture Style: Picture Style: Shot settings, Auto, Standard, Portrait, Landscape, Fine Detail, Neutral, Faithful, Monochrome, User Def. 1, User Def. 2, User Def. 3
- Auto Lighting Optimizer: Disable, Low, Standard, High
- High ISO speed Noise Reduction: Disable, Low, Standard, High
- Image quality: write small, medium and large jpeg files in fine or standard resolution.
- Peripheral illumination correction: Enable/Disable
- Chromatic aberration: Enable/Disable
- Diffraction correction: Enable/Disable
Creative Assist
Even if you know little about photography, you can select from on-screen options written in simple English to change the brightness, blur the background, and take pictures that are all your own.
You can also save your favorite settings and easily load them back in later. It can even apply settings from images shot in Creative Assist.
When you display images shot in Creative assist mode, the camera can show you which mode settings correspond to which camera settings, making it easier to step up to the Creative Auto shooting modes.
Quick Control RAW processing
This allows you to quickly process a RAW file according to a creative filter and/or creative assist mode.
Red-eye correction
You can automatically correct red eye in images taken with the flash. You can also correct red eyes in recorded images. However, red eyes may not be automatically detected in some images or the results may not turn out as you intended.
Cropping
Complementary to the other in-camera RAW processing feature, you can crop your image or multiple images here freely or according to preset dimensions.
Resize
It’s also possible to resize your RAW images and save them in-camera for posting on social media for instance.
Page Play 3 settings (PLAY3)

Rating
You can add a star rating to your images here. This rating will show up later when you transfer the images to your computer if you use Canon’s Digital Photo Professional.
You can:
- Select images
- Select range
- All images in folder
- All images on card
Slide show
You can setup and start an in-camera slideshow here.
Set image search conditions
You’ll find lots of factors to choose here, I honestly don’t know why this was implemented and never use it.
Image jump w/dial
This setting selects how much of the jump your image library will tale when you turn the dial.
You can select one by one, jump 10, jump by specified number, by date, by folder, display movies only, stills only, protected only or display by image rating.
Page Play 4 settings (PLAY4)
Playback information display
You can enable up to 9 individual screens–all except the first, which is the basic shooting info overlay, allow the histogram to be specified as brightness or RGB, and in some cases, both.
AF point disp.
This setting either shows or hides the number of AF points on screen and in your EVF.
View from last seen
Either enable or disable the view from previous images in order to compare them.
Set Up Menu (Spanner, yellow gear icon)
Set Up Menu Page 1 (SET UP1)
Select folder
You can select and/or create the folder on your SD card where files will be stored here.
File numbering
You can set the file numbering for each new shot to Continuous or Auto Reset/Manual Reset. Continuous will consecutively number your photos. Auto reset will reset the numbering every time an SD card is inserted, and Manual reset will reset the numbering once;
Auto rotate
Auto rotate automatically rotates your images that are shot in portrait mode to fit the screen size. You can turn this on or off and decide whether this will behaviour will also apply to images imported to your PC using the canon software.
Format card
You should format your SD card in-camera every time you insert an SD card when starting a new session. This to make sure that there won’t be any writing errors. Remember that formatting will erase all the images on the card, and won’t even be recoverable if you choose the low level format option.
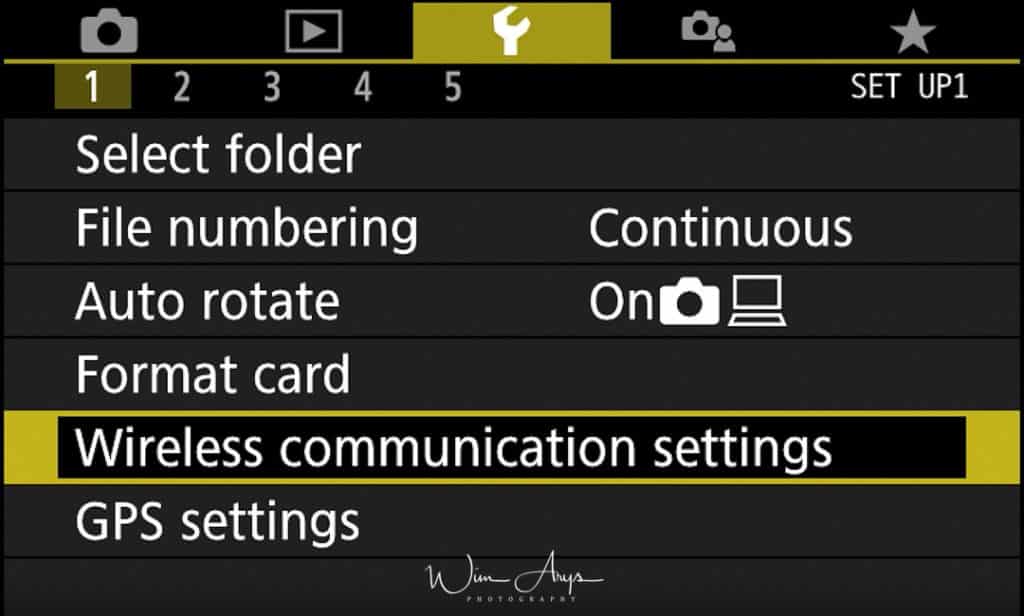
Wireless communication settings
You can wirelessly send images to your computer, smartphone or printer. This can be done either through Bluetooth or WiFi.
GPS settings
Even though the Canon M50 does not have a GPS module built-in, it is still possible to add location data to your images via the GPS data of your smartphone. You’ll need to install the Camera Connect app from Canon in order to do this.
Set Up Menu Page 2 (SET UP2)
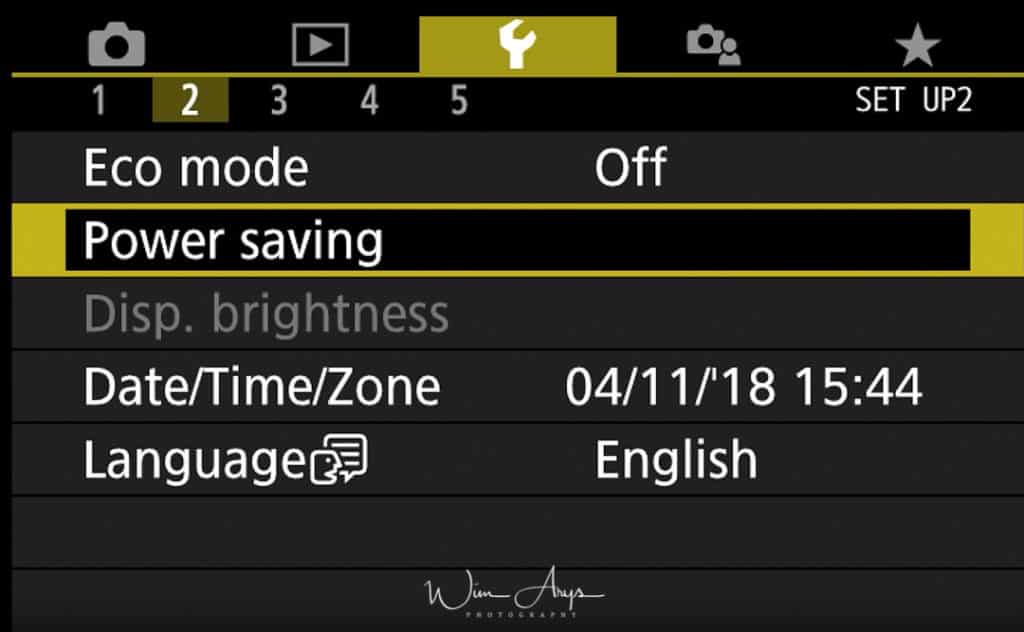
Eco mode
| This function allows you to conserve battery power.When the camera is not in use, the screen quickly darkens to reduce battery consumption. |
Power saving
The power will shut off in the following circumstances. Press the power button again to restore power.
| Shooting Mode | Powers down approximately 3 minutes after the last control is accessed on the camera. The LCD monitor automatically turns off 1 minute* after the last control is accessed even if [Auto Power Down] is set to [Off]. Press any button other than the power button to turn the LCD monitor back on. |
| Playback Mode or connected to a Printer. | Powers down approximately 5 minutes after the last control is accessed on the camera. |
Display brightness
Adjust the brightness of the display in 7 steps.
Date/Time/Zone
Select your local time zone, a date and time for your camera. This information will be written in the EXIF data of your photos.
Language
Select your preferred language for the camera Menus. I choose English, as it is easiest to find information online in English.
Set Up Menu Page 3 (SET UP3)
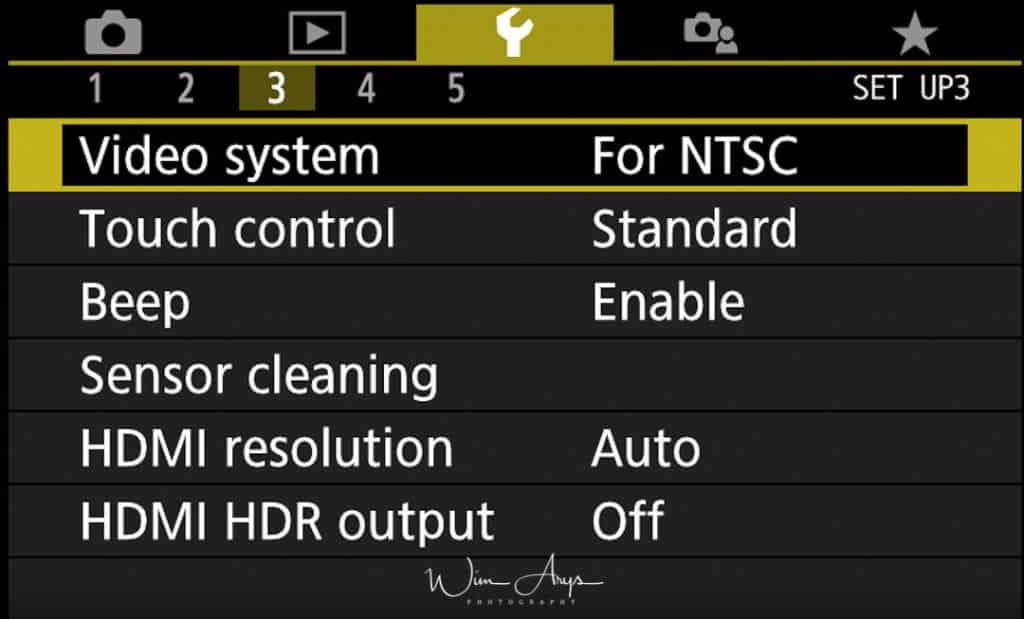
Video system
Select either NTSC or PAL depending on the region where you live.
Touch control
You can turn on or off the touch sensitive screen on the back of your Canon M50. Standard/Sensitive/Disab
Beep
You can either enable or disable the beep when you engage the shutter as well as when you touch the screen.
Sensor cleaning
You should set this to Auto cleaning. This will send a charge through your sensor every time you turn it off, dislodging any dust particles that might be on the sensor. You should also make a habit of regularly cleaning the sensor cage with a simple air blower.
If you prefer to only periodically clean the sensor, you can use the ‘clean now’ function to immediately do this procedure.
HDMI resolution
You can choose either Auto where the camera will decide automatically what type of device it’s connected too, or 1080p.
HDMI HDR output
HDR output to compatible TV supported with a Micro – Type-D connector. If you won’t be using this function, turn It off.
Set Up Menu Page 4 (SET UP4)
Shooting info. Disp.
There are a few sub menus here, let’s see what they do.
Screen info. settings: these settings give 5 different screen options. The first 3 allow you to configure the data overlaid on live view and save them as 3 separate screen types. You can turn on or off the basic shooting info (the data at top and bottom of screen), the detailed shooting info (the icons running down the left and right sides), whether the data acts as a touch button or not – if not, it loses the white frame and grey background – this applies to the Q menu button, the touch shoot button, the magnify button, the shutter frequency, aperture, EV compensation scale and ISO value and “buttonizes” or “debuttonizes” them all at once; the histogram; the level gauge.
The fourth screen style is just the AF targets and the exposure info when it is active, and the last screen type is the black, non-live view DSLR-style info screen. These options are the ones you cycle through with the Info button when shooting with the camera – effectively this section allows you to customise them to taste.
Still within this submenu we have LVF info/toggle settings (3 different EVF choices – one with basic shooting info under the screen, the other two configurable to individually add and combine as desired the vertical detailed shooting info icons, histogram, level gauge]. Like the previous item, it’s a way of customising what you get when you cycle through the styles of VF display whilst shooting when you use the Info button to do so.
Then the submenu has Grid display [Off, 3×3, 6×4, 3×3+diag], Histogram disp [Brightness/RGB, Large/Small], Reset. That’s the end of this submenu.
Reverse display
Even though the display looks the same when this function is turned on, it is symmetrically opposite along the vertical axis. Quite a neat feature for the swivel screen when it comes to taking a self portrait or on a self-timer mode.
Disp. Performance
You can set this to Power-saving to conserve battery life, even though refresh rates will be a bit slower than with the Smooth setting.
VF display format
[Display 1] shows the Live View image across the entire viewfinder screen. This allows you to fully maximize use of the EVF display, but shooting icons such as those indicating white balance settings and the Auto Lighting Optimizer will be overlaid on the sides of the viewfinder image. If you do not fancy that, you may prefer [Display 2], which features a smaller Live View image, with the shooting icons in the borders surrounding the image.
The icons displayed are customisable to some extent and rotate accordingly when you switch to portrait orientation.
Display settings
You can select whether to automatically switch from the back screen to the EVF if your eye is detected, or only use the back screen, or only use the EVF and turn the screen off.
Set Up Menu Page 5 (SET UP5)
Custom Functions (C.Fn)
This Menu has 5 sub menus:
- ISO expansion: you can boost ISO setting from 25600 to 51200, but this works for Jpeg files only.
- Safety Shift: Safety shift overrides your current settings if they are so far out that you would just get a blank photo. It will override your settings and change either your aperture, speed, or ISO so you get something instead of a blank photo.
- Release shutter w/o lens: allows you to engage the shutter even though no lens is detected. This is a function necessary to use lenses with the right fit, but without electronic contacts.
- Retract lens on power off: sets whether to retract the lens when you power off the camera or not. Always set to Yes for safety reasons.
- Custom Control: see explanation below.
It’s possible to use the camera’s Custom Controls menu to change default operations to assign a different function (like video start/stop control) to any of these keys:
- M.Fn button (top of camera, to left of shutter button)
- AF/MF button (9 o’clock position, on round rear control pad)
- Exposure Compensation button (12 o’clock position on round rear control pad)
- Flash button (3 o’clock position on round rear control pad)
- Erase button (6 o’clock position on round rear control pad)
There are up to 26 functions that can be assigned to these buttons: exposure compensation, movie record, manual focus, flash mode, one-touch image quality setting [this can be configured in detail], one-touch image quality (hold) [again, configurable in detail], still image aspect ratio, flash function settings, drive mode, ISO, Auto lighting optimiser, metering mode, Picture style, white balance, touch shutter on/off, touch & drag AF, AF operation (one shot/servo), AF method, magnify, peaking, Eco mode, temporarily maximise screen brightness, temporarily manually switch between VF and screen, display off, depth of field preview, or no function on this button.
The exception is the Shutter release button customisation – this is separate from the one in an earlier menu and offers 3 choices of what should happen on half-press of the shutter button: Metering and AF start, Metering start only, AE lock (while button pressed).
Display level (Camera + head and shoulders icon, turquoise)
DISPLAY LEVEL (just the one page)
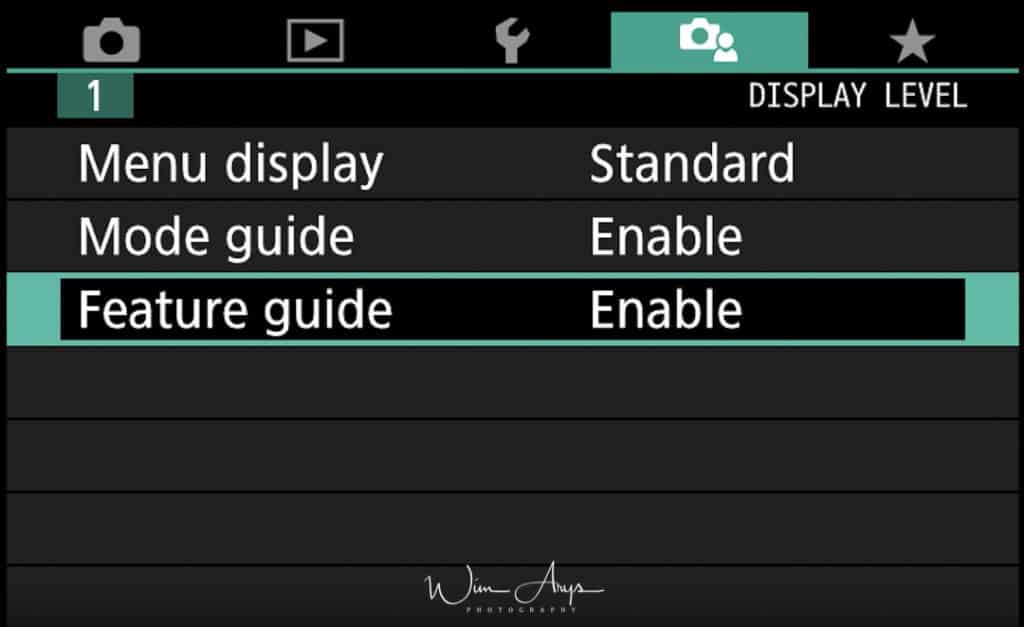
Menu display
By default the M50 shows a simplified version of the menu, which is different from the standard Canon menu. It hides lots of advanced settings and in order to get access to all settings you’ll need to switch to the classic Canon DSLR menu by setting Menu display to standard.
Mode guide
The Mode guide gives you an explanation of the mode that you choose with the Mode dial. Leave this on if you’re a beginner.
Feature guide
If this is turned on, you’ll see an explanation of every element in the Menu system through a pop-up box at the bottom of the screen.
Star icon (green)
MY MENU1
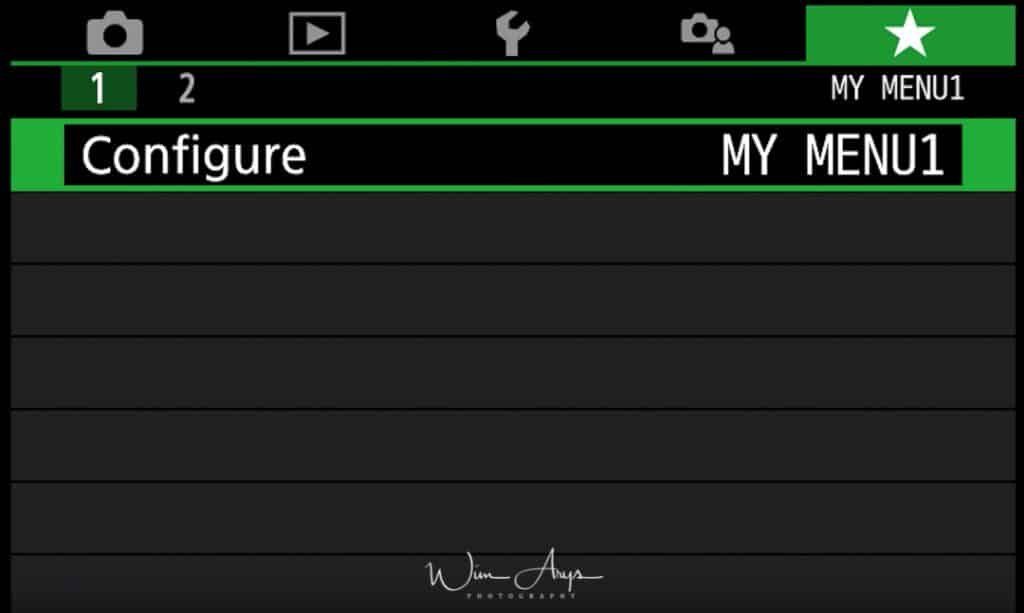
My Menu allows you to build your own menus. You can add all your most used Menu functions to this page like Format for instance. Adding favourite functions to this menu means that you’ll be able to access them quicker than having to browse through the entire Menu system.
Common Canon M50 questions
Is there a remote for the Canon EOS M50?
The M50 doesn’t have a port for a cable release and lacks an infrared receiver for the Canon RC-6 remote. The Canon BR-E1 Bluetooth remote control can however be used.
How to Use Canon EOS M50 Manual Focus?
Go to shoot page 6 and change to shooting mode to manual focus. On Shoot page 7, turn on Peaking. When uou turn the manual focus ring on the lens, the in-focus area will have a type of coloured noise superimposed onto scene in the EVF or on the screen. I have it set to the Color red and Level High.
How do I update my Canon EOS M50 firmware?
- Go to your regional website.
- Download the latest firmware in the support section.
- Copy the files to an SD card in the main folder.
- Make sure your camera battery is fully charged and insert the SD card with the latest firmware.
- Turn on your camera and go to the setup menu page 5, Firmware tab.
- Press OK and keep the camera on without touching your camera.
Conclusion
I hope you’ve enjoyed this run-through of the entire Canon M50 Menu system with some added tips and tricks.
The Canon M50 is a fantastic mirrorless camera, and as you might have noticed, there are many features hidden inside the Menu system. If you have questions, ask them in the comment section below. Happy shooting!

Great-great info, especially on the background of a lousy manual.
Thank you.
Thanks for the compliment Yehuda.
The best info I’ve found about the (my) M50.
Thanks a lot!!
Happy to help 🙂
have you used EF-M 18-150mm lens. Is it sharper than kit lens.
I feel sometimes the images are not as sharp as I would like them to be. I am learning things about photography and I have started using manual mode. Most of the things I learn I use implement it practically and make sure its not just theory.
There was a blogger who wrote that certain camera settings can affect sharpness. Is it true.
would you want to give certain tips for making images sharp. Am i expecting too much from kit lens?
Hi Sanket, sure, f/8 will always be sharper than maximum aperture. Unfortunately this depends on the light available most of the time.
Just bought my M50 and this is the best info I have found so far. Thank you for the very informative tips and tricks.
Thanks JT, it’s good to Knox that my work is helping you guys out.
This online tutorial is immensely helpful to novice like myself. I was wondering how that manual is going help me.
Thank you. I saved this article for my future reference. Much easy to understand compared to the manual.
I need advice
I go to 10 day vacation what canon lenses you recommended to add > i rented M 5o 15-45 . Usually i go with my K3 II Pentax and Pentax lenses ,but at this time after my arm surgery its to heavy to . I can rented adaptor but i not expert about Canon lenses Thank you for advice Mike
Hi Mike, I think a 15-45 mm will do just fine. If you’re into landscape photography, I would also suggest the Canon EF-M 11-22mm f4-5.6 IS STM. Enjoy your travels!
can i have these settings for M50 camera and your article in form of booklet . thanks
Have just bought an M50. Documentation is rudimentary to say the least so this is very helpful
Thanks for your time
No problem Nick!
How can I punt on grid display (3×3) on Canon M50?
Completely new to M50 Used DSLR’s for years…
Very happy i found your guide wich helped me with a problem
Thanks Poul
I understand that when using a tripod, image stabilization should be turned off. There does not seem to be any way of turning off image stabilization ( for stills as opposed to video) with the kit lens. Any ideas about this ?
You only need to turn off the in body 5 axis image stabilization Chris.
Thanks, Wim, very useful info! Greetings from Evere!
Thanks
but i can not use slow Motion video. Please tel me the faction
I believe this camera can’t do slow-motion video Suvra.
Very good detail, Wim! I have a question about the viewfinder display. I want to use the level, but I can’t seem to enable it. Any thoughts? Thanks!
Set-Up Menu Page 4: Shooting info. Disp. Bob
Wow. This is a really impressive blog post and I cannot tell you how immensely helpful it was to me, not to mention that it saved me a lot of time! Well done and many thanks!
Hii, this information is amazing. I’ve got the M50 for 4 months now but this page has given me so much more information than the basic manual.
Can I ask your opinion on which Speedlites work off camera for M50? Is Neewer NW 670 any good? Thanks very much in advance.
Thanks Shamil. Sure, Neewer will work well. They usually rebrand Godox so it’s just as good.
Awesome! Thanks heaps.
Hello Wim. I’m late to the game! – It’s June 2020 and I bicycled over to Target to pick up the M50 yesterday. But I do so appreciate this guide – I’ve admired your work before and will look forward to printing and reading it offline. Thank you!
Hello I am a beginner and wanted to learn how to get a picture with great focus and background defocused to 1.0 af or the lowest it can go. Is this achievable with canon eos m50? If so i would greatly appreciate any advice tips. Thank you
Hi Michelle, what do you mean with “defocused to 1.0′? For a shallow depth-og field you need a fast prime lens. Preferably around 75mm with a large aperture like f/1.8.
Hello,
I am an amateur photographer mom, who just purchased this camera to replace an old NIkon D60.
I am terrifies of taking anything manual as I have no idea what I am doing! Is there an auto setting that is good for outdoor portraits with and without blurred background.
I need to take some photos of my daughter for her year book.
Thanks for any help or tips you could email me,
I will try to decipher some of this post. It seems very user friendly.
Thanks again.
Hi Tracy, sure, set the camera mode dial to “Av”. This is aperture priority mode. Now change your lens to the largest aperture (the smallest number). Try to move as close as possible to your subject. This method will give you the maximum blur you will be able to achieve with your lens.
Hi, my dad owns a Canon M50..I’m am going on a trip to a beach with his friends…I am sure this will help me in taking pics in his camera..👍👍
I have a question, where do u activate these creative filter.
Go to Page Play 1 settings (PLAY1) and scroll down to the Creative Filers tab in order to select and activate a creative filter.
Very helpful, thank you.. I have been to a few classes but it is hard to remember all the settings when told all at once. This information will be vey valuable 🙂
Thanks for your comment, I really appreciate it.
This is a terrific guide for someone new to the camera, like myself. Thanks for making it!
This tutorial scratched two itches:
1. Focus peaking
2. Small histogram in EVF.
Thank you.
Hi Wim,
Fabulous info, thank you so much. I have two questions please:
1. My old Nikon had U1 and U2 where I could save my settings and just click onto either one when I needed them, I have searched high and low and presume there is no way to do this on the M50?
2. I use bracketing A LOT and the camera is constantly resetting/switching off the ‘Expo comp/AEB’ settings where I’ve set it to 2 stops up and down, why is it doing that when I’ve set it? It’s so annoying and I’m constantly having to go into the menu to set it again? And not just when I switch the camera off, I mean constantly during a shoot where I’m taking 100-150 photos, I’ll need to go in at least 5 times, maybe more to set it again? Thanks so much for your advice about this, fingers cross you have some good news for me :))
Hi Mel, the only user defined settings that can be saved is a picture profile I’m afraid.You could use the custom functions to assign specific operations to a button to more easily make changes. In regards to your bracketing issue, I would suggest clear settings on Set Up Menu Page 5, and see if resetting the camera changes anything.
February 2021 and I’ve upgraded from a Canon EOS 450D to the M50 and Im lost!! I knew my 450d inside out, bless her, but the old girl needed to retire.
Id love to have the shooting info displayed permanently on the screen in Manual mode so I can use the touch screen to change them ie Fstop, shutter speed etc… but I can find the option to add this. Can you help please? Many thanks to you. By the way, this guide is INCREDIBLE!! Thank you so so much!! Just wish Canon would print the booklets how to again to distribute with their new fangled cameras. Ha Ha Ha!!
Thank you for your kind words Jennifer.
Thank you so very much for this fantastic guide! Very helpful, I was so lost with the online manual. It’s my first DSLR and have been quite overwhelmed.
Thanks Denise.
I want to try using a prime lens with my Canon M50 Mark 2. I bought two EF-M compatible prime lenses. I tried using them today but the shutter button refused to snap the pictures. Exactly what setting(s) do I need to change on the camera that will allow me to use a prime lens?
First, set the camera to P,A,Tv, or M mode. Then, go to the end of the menus and look for “custom functions”. Shutter release without lens attached: ON
Hi there,
just got 2 question about this M50.
1. can this m50 print out the date once we press the play button to check the outcome of the picture we took
2. i am new to this M50. Where can we get the info on how to use the dial setting. Previously, from my canon power shot, i always use to Auto setting.
I don’t think printing out the dates is possible unfortunately. Dial settings, you can check your original manual for that.
Extremely useful and very much appreciated
I was having a problem trying to use my Canon M50 in my microscope for photomicrography.
Thanks to your setup guide and tips I solved the problem.
Thank you very much, sir!
Hi there, I’m getting confused with how to take pictures of moving things such as people or vehicles and having the photo come out clear(not blurred) how do I do this?, thanks 😊
hello, this is so helpful, thank you
How do I turn off the sensor thing by the viewfinder that shuts off the screen display please?
I want to be able to put the camera against a wall with the display rotated so i can see what I’m framing
thanks so much!
I believe in the Display settings Menu Victoria.
Super guide! Very useful (and I have been digging before).
Three little comments:
1. The “Video System” – while it derives from the TV world locale – is irrelevant in that original sense, since all movies are anyway packed in AVI files.
WHAT IT DOES, though, is giving you access to two different sets of movie quality settings. PAL gives you the options of 25fps and 50fps in FHD, as well as 50fps in HD. NTSC OTOH offers you FHD in 23.98fps (=24), 29.97fps (=30), and 59.94fps (=60), as well as HD in 59.94fps (=60).
Note that the last chosen quality setting is not remembered when switching around the Video System setting…
2. Configuring the Custom Controls (Custom Functions 5) is well worth the time. There are quite a few YT vids that show good ways to set them up.
3. Use the Custom Menu option. For instance I have Choose Folder, Custom WB and Format Card (among others) right on the first tab of my customized menu. I have set this such it appears always first when entering the menu. It’s a timesafer that adds up so much, it is not funny…