
Third party RAW developers for Fuji X-TRANS files in Lightroom
Introduction
The Fuji X-Trans CMOS II sensor incorporates an original colour filter array with an extremely random pattern, eliminating the need for an optical low-pass filter (OLPF). These filters are used in conventional systems to inhibit moiré at the expense of resolution. The X-Trans CMOS II sensor array lets the sensor capture unfiltered light from the lens, achieving excellent resolution. And indeed, Jpeg’s straight out of the camera look stunning, but the RAW files can often look soft in comparison, especially if you’ve based your image workflow around Adobe’s Lightroom application.
Lightroom and Fuji X-Trans II RAW files
I’ve personally been using Adobe Lightroom for years, as it is not just a RAW developer, but also one of the easiest ways of building and maintaining your image library on your desktop computer. Other significant advantages for me are that you can easily use third party plug-ins, edit in Photoshop straight from the application itself and that Lightroom has the most straightforward export options.
When I bought my first X-Trans sensor camera (the Fuji X100S), I believe these RAW files were not even supported, and when they finally were, they looked very soft with strange colour anomalies. I started looking for another RAW developer and went for Capture One, which absolute did a far better jab at decoding the Fuji RAW files. But I missed the flexibility of Lightroom, not to mention that my images from other cameras were still being handled by Lightroom. Let’s face it, they are the industry standard, support new cameras more quickly and do a decent job for most RAW formats from other brands.
When it comes to X-Trans files, much has improved in the last six months since Adobe have been working closely with Fujifilm and you can now even dial-in Fuji’s in-camera film emulations for RAW files.
Because of the architecture of the X-Trans sensor (and the way this information is stored), additional sharpening is needed in order to ‘pull’ these images into focus. You should see sharpening with these files as an essential step in your processing workflow. Since Lightroom is mostly used for processing RAW from Bayer sensors (where this is often not needed, or at least differently), the usual sharpening methods and settings don’t work for RAF files. There are a few blogs out there explaining how to setup sharpening in Lightroom for Fuji files, Google it, as I don’t want just to copy and paste other people’s work.
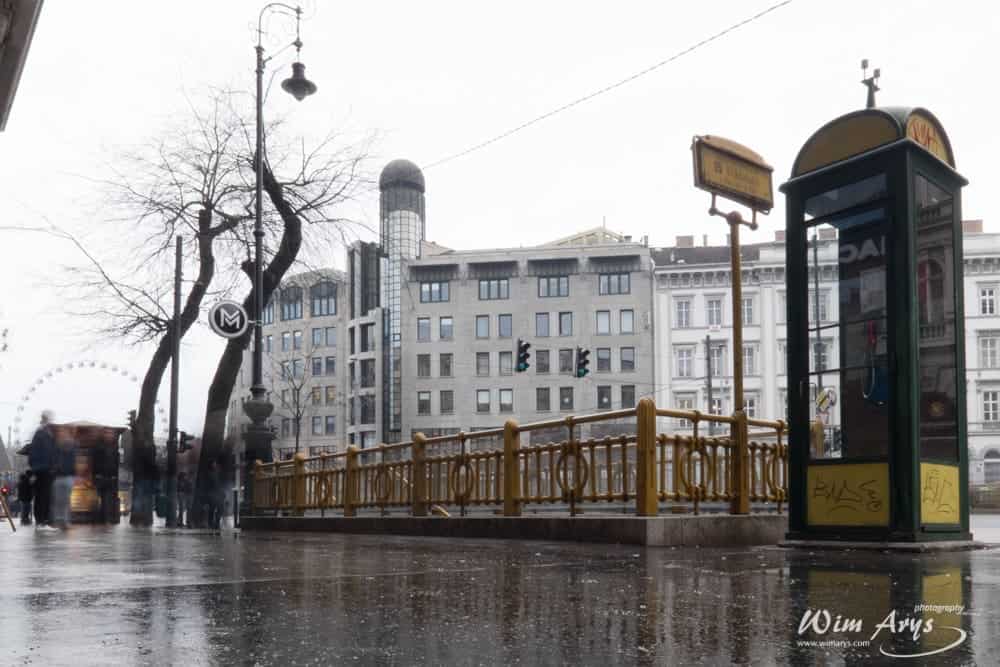
long exposure sharpened in Lightroom
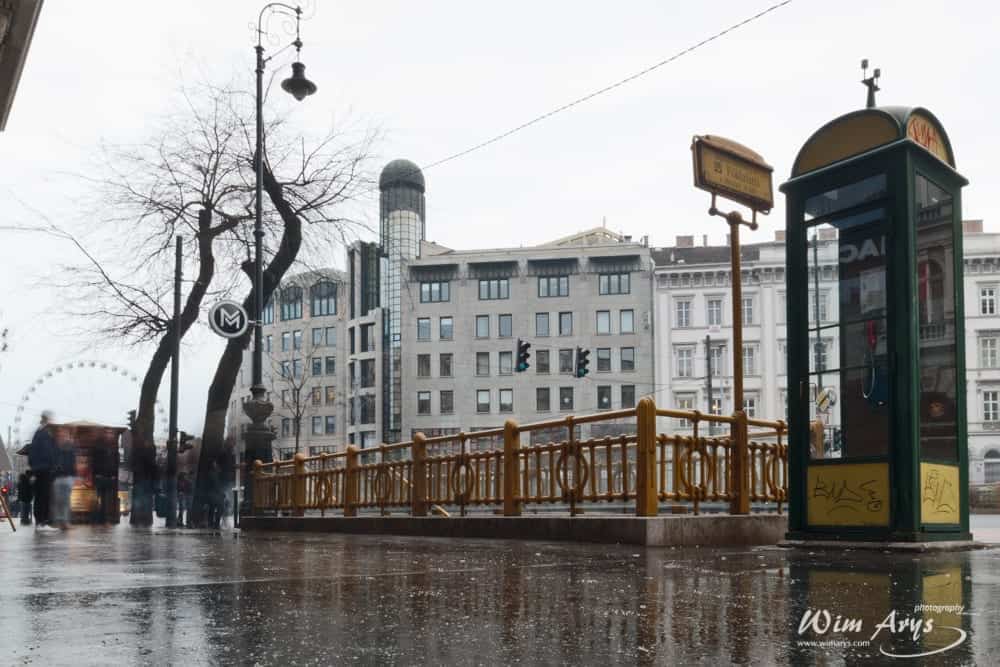
long exposure sharpened in Iridient with some highlight recovery
Third party RAW developers ideally suited for X-Trans II files
You might have heard about PhotoNinja and Iridient Developer, two independent RAW developer applications that can, at times, render superior results than Lightroom. Especially when it comes to sharpening methods and noise reduction, both offer different flavours with extensive customisability of settings.
Iridient Developer
Iridient Developer is a powerful RAW image conversion application designed and optimized specifically for Mac OS X. This RAW software gives you total control over your digital pictures, yet still provides easy drag and drop batch conversion. It uses the open source RAW decoding program Dcraw as a backbone and supports over 550 RAW image formats. There is a new version 3 beta out right now with exciting features added like a clarity slider and an ‘Iridient Reveal’ sharpening method. This sharpening technique lowers the learning curve when it comes to making the best of the methods available.
Photo Ninja
Photo Ninja uses the same Dcraw backbone architecture as Iridient. It is a professional-grade RAW converter that delivers exceptional detail, outstanding image quality, and a natural look. Photo Ninja has unique capabilities for improving and optimizing your digital images. Their noise reduction algorithms are one of the best currently available.
Incorporating Iridient Developer or Photo Ninja in your Adobe Lightroom workflow
Both Iridient Developer and Photo Ninja are stand-alone applications, but there is a way of integrating them into your Lightroom workflow. As I mentioned earlier, it’s not always necessary to use an external RAW developer with Lightroom nowadays. You might find that in some cases where the standard sharpening methods or noise reduction algorithms are not sufficient, you can trick Lightroom in using them as a plug-in. This involves making a copy of your RAW files as a TIF and exporting your image to either Iridient Developer or Photo Ninja. This technique forces those applications to load the original RAW file and overwriting the TIF with the developed file in Lightroom.
Method in Lightroom:
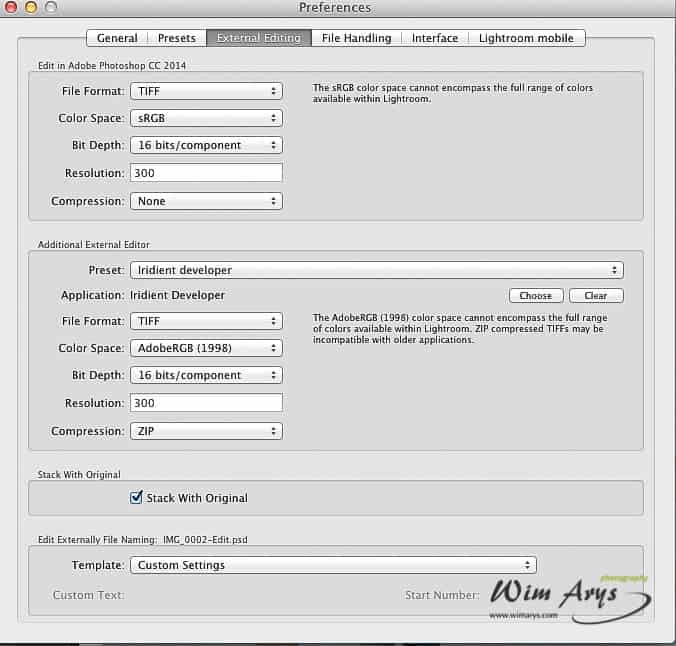
First you’ll need to go into the Preferences window in Lightroom (Lightroom – preferences) and add the external editor as a preset. Point LR to either Iridient or Photo Ninja, select TIFF as format, 16 bits/component bit depth, 300 dpi resolution (or whatever you prefer) and select ZIP compression (for smaller files).
After you’ve done this, name and save your new preset by going to the Preset drop down menu in the Additional External Editor window. (see screenshot)
Now you’ll find the Preset you just made when right clicking on an image (where you’ll find other plug-ins in Lightroom)
For Iridient Developer:
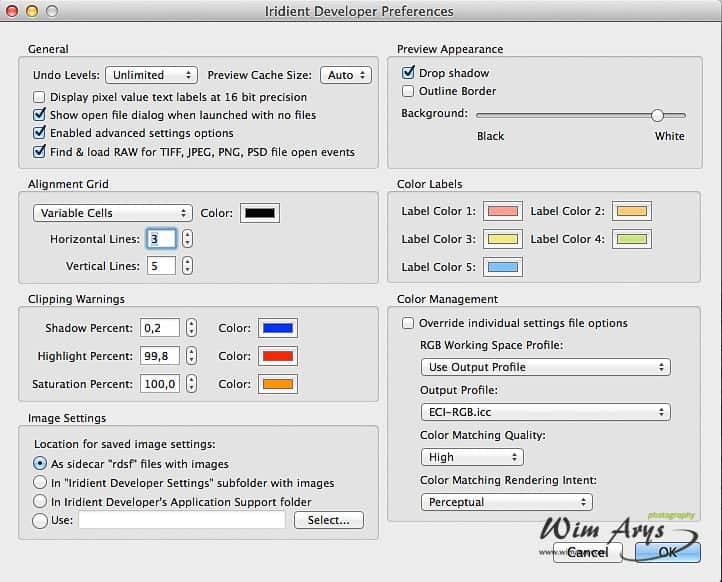
Second step, launch Iridient Developer, go to Preferences and select “Find and load RAW for TIFF, JPEG, PNG, PSD file open events. This setting is telling Iridient to search for and load the original RAW file instead of the TIFF you’ve just made in LR.
In order to overwrite the TIFF in Lightroom after developing in Iridient, you need to go to File-Process Image and Overwrite (Standard image).
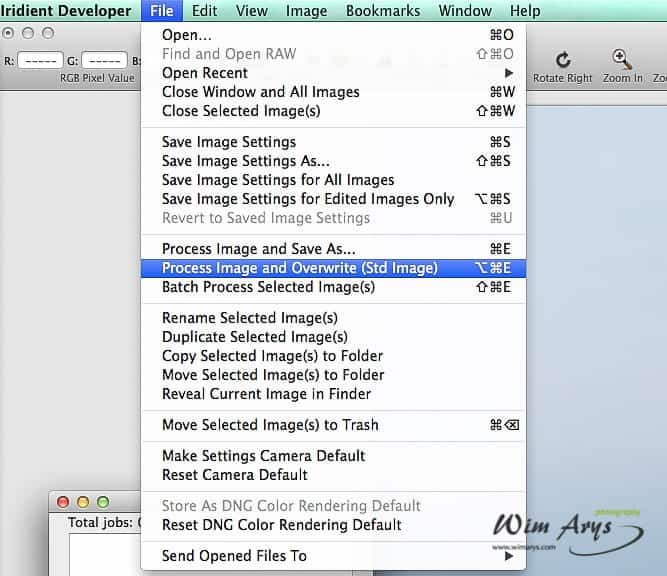
Return to Lightroom, and you’ll find your Iridient developed file as a TIFF there.
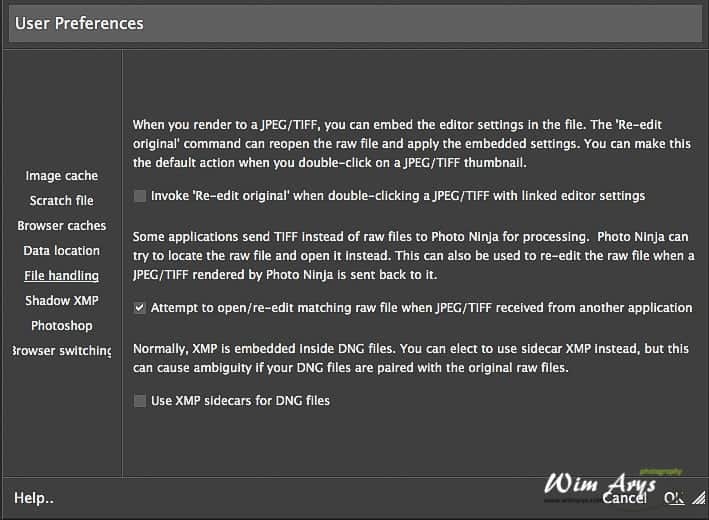
For Photo Ninja:
Second step here is to go to User Preferences and enable “Attempt to open/re-edit matching RAW file when JPEG/TIFF received from other application.
Third step, after you’ve developed the file to you liking in Photo Ninja, go to the Image menu, and click quick render to overwrite the TIFF file in Lightroom.
Conclusion
Although it is not needed to go to an external RAW developer in Lightroom 5 for every single Fuji X-Trans RAW image, it is definitely handy to have the option if you feel it is lacking sharpness or you just can’t seem to get it right in Lightroom.
Both Iridient Developer and Photo Ninja have their own unique advantages, with Iridient being better at sharpening and Photo Ninja having the advantage for noise reduction. By integrating either of these with Lightroom, you’ll get that easy workflow back with a centralised image database at your disposal.

Hello Wim
I have just purchased iridient, so found this very informative. I presume there is no way to apply a Fuji profile in LR, before it goes into irident, and then irident still recognising it as a raw file
Cheers
Julian
Hi Julian, Iridient will always load the original RAW file, so no this is not possible.
Thanks Wim, for an informative article 🙂 I’m using lighroom for raw conversion of my X-TRANS files, and have from time to time wondered whether I should try something else. If you could, it would be very helpful for me to see examples of images where you have experienced a problem with lightroom, and also the result(s) that you are happier with, after conversion using other software. Also, while I find it very sympathetic that you don’t want to take credit for other peoples work on the sharpening issue, it would be great if you could provide links to what you consider the most helpful articles in the subject. The only one I have seen essentially said that you should bump up the detail slider. BR Karsten
Hi Karsten, this is the way I have it setup currently:
normal
Amount: 25
Radius: 1
Detail: 100
Masking: 10
medium
Amount: 35
Radius: 1
Detail: 100
Masking: 10
low
Amount: 45
Radius: 1
Detail: 100
Masking: 10
high
Amount: 55
Radius: 1
Detail: 100
Masking: 10
Make 4 presets first with these settings. When Importing, tick ‘develop settings’ and load the normal preset.
I’ve added a quick example to the post, a crop of a long exposure processed in Lightroom (my basic sharpening preset) and in Iridient.
Hi Wim,
I’ve been using Iridient for a while now with Fuji (and Sigma Foveon) files but hadn’t figured out how to incorporate the process into Lightroom workflow so easily as this article shows. So a big thank you! This will save me a great deal of time.
Hi Ryan, thanks for your comment, happy I could help.
I found a way that works for me with Capture One. I import the images into LR, cull the images, Open Capture One and import that folder of images, work the images and export via a recipe back to to the original folder in LR and the images are placed in a subfolder named ‘selects’. Then sync the folder in LR for and further tweaks. It may sound complicated but once the recipe in Capture One is setup the process is very easy. I tried a trail of Irident and liked Capture One.
Hi Lynn, thanks for your input. It’s an ingenious workflow. The only thing I’m missing here is the ability to have your original RAW files untouched in Lightroom. I personally like to keep all my RAWs, as I often re-discover images I might not have liked at first, but do after a few months.
I do not touch the RAF files in Lightroom other than a quick sort and toss. Capture One imports the RAF file untouched.
Are you saying Lightroom will do some processing on import? If so wouldn’t that be the case in using Iridient Developer or Photo Ninja if the RAF flies are first cataloged in Lightroom? Am I missing something?
Hi Lynn, If you load and view images in Lightroom, yes there is some processing applied, whether or not you load any corrections or presets.
The RAF files loaded in this way to Iridient or Photo Ninja are untouched, since they look for and load the original untouched RAW files imported in the Lightroom catalogue.
So to summarise, this technique allows you to load RAW files to Iridient or Photo Ninja without any processing before it ‘hits’ these RAW developers.
I hope this answers your questions.
I always send all RAWs to a duplicate folder on a different drive at time of import, using Lightroom’s feature allowing same. I expect those files to be plain copies of the raw as shot.
Indeed the best backup solution in Lightroom Jonathan.
Thank you very much for posting about this. I was curious if adding the extra sharpening in Lightroom is still necessary if using the Iridient/Lightroom external edit conversion process first, or is additional sharpening in Lightroom only required when not using Iridient/Photo Ninja to convert the raw file?
Sharpening and how much is a personal choice, you can decide for yourself how much you want. The best approach is to do it at the RAW stage though, so use Iridient or PhotoNinja.