Sony RX10 IV settings, tips and tricks
Sony RX10 IV settings, tips and tricks
Introduction
Welcome to my Sony RX10 IV advanced manual with tips and tricks. This guide starts from your Menu settings and goes through all aspects of this interesting camera. I know it is a lot of information, but you’ll get the hang of it soon, I promise.
Compared to the older RX10 III, the new mark four is mainly faster thanks to a newly developed Bionz X processor. It can shoot at 24 fps with AF and AE and can shoot for up to 249 JPEG images (112 Raw). Its 0.03 sec AF-lock speed is extremely fast. It’s also is the first in the series to include a touchscreen.
A few things have remained the same, like the 24-600mm lens, but it’s the first RX10 camera to include on-sensor phase detection, with 315 AF points covering 65% of the frame (slightly over 80% in each direction). It’s also the first Cyber-shot to include Sony’s “High Density” AF Tracking system, from the a9, and the company says that they have improved Eye AF.
It also gains the option to make one of the customizable buttons act as AF-On, to let you start AF and fire the shutter independently.
Naturally the lens has optical image stabilization built-in, rated at 4.5 stops of shake reduction. A focus range limiter switch has been added to the side of the Mark IV’s lens, with a choice of ‘All’ or 3m-infinity.
Since the Sony RX10 IV has the same menu layout as recently released Sony Alpha cameras, you’ll quickly find your way around if you already own one of those.
I’ll be going over the entire Menu structure in this post, and giving you tips, pointers, and tricks along the way.
Are you looking for an advanced manual with tips and tricks on older models? You can find those posts here:
Diving into the Sony RX10 IV MENU system
When you switch on your Sony RX10 IV you’ll be asked to enter a date, time and time zone. This setting is necessary, as all images captured will have a timestamp, making it easy to find your favorite pictures.
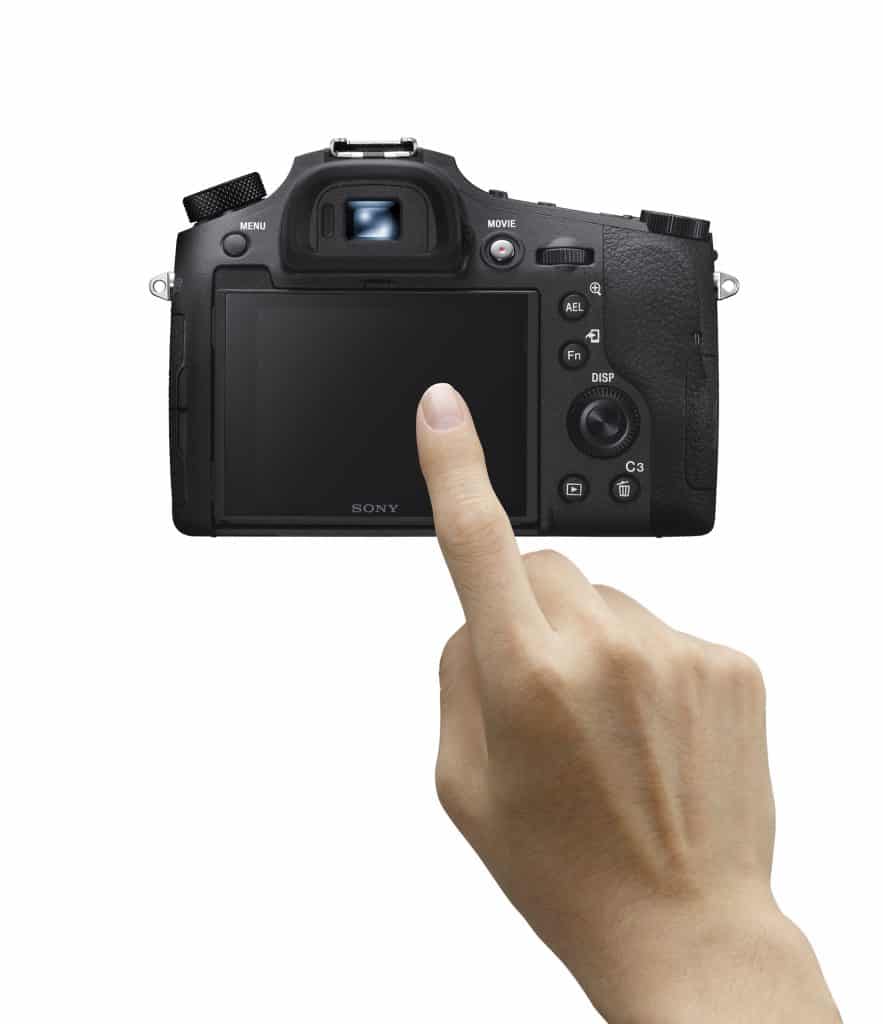
After this is set up, press the MENU button. You’ll see a range of icons and pages.
We’ll start at page 1 of the camera Icon (camera settings)
MENU – Red Camera Icon – page 1 (Quality and Image Size settings)

Quality:
Do you edit your pictures on your desktop? If so, set to RAW or RAW jpeg. A RAW file saves all information the camera pixels register during shooting and will make for better quality images if you want to edit in something like Adobe Lightroom.
A jpeg is a compressed image (available in FINE (larger) and STANDARD (smaller, less quality) which takes up less space on your SD card but is less suited for editing afterward. Jpeg images will also have in-camera noise reduction applied, something you might or might not want to take care of yourself later, depending on your style and preference.
Image size:
The larger the image size, the more detail will be reproduced when the image is printed on large-format paper. The smaller the image size, the more images can be recorded.
Image size when the aspect ratio is 3:2:
- L: 20M 5472×3648 pixels
- M: 10M 3888×2592 pixels
- S: 5.0M 2736×1824 pixels
Image size when the aspect ratio is 4:3:
- L: 18M 4864×3648 pixels
- M: 10M 3648×2736 pixels
- S: 5.0M 2592×1944 pixels VGA 640×480 pixels
Image size when Aspect Ratio is 16:9
- L: 17M 5472×3080 pixels
- M: 7.5M 3648×2056 pixels
- S: 4.2M 2720×1528 pixels
Image size when Aspect Ratio is 1:1
- L: 13M 3648×3648 pixels
- M: 6.5M 2544×2544 pixels
- S: 3.7M 1920×1920 pixels
Note that when Quality is set to RAW or RAW & JPEG, the image size for RAW images is automatically set to L for optimal quality.
If SD card space is an issue, you can set it to Small.
Aspect ratio:
You can choose 3:2 (which uses the full sensor surface), 4:3, 1:1 or 16:9 (crop but a more broad view). Leave as is at 3:2, you can always crop your pictures later.
Panorama Size:
(when in panorama shooting mode) Size is selectable between standard and wide. Wide means your picture will cover a larger area. Set it to standard, having to scan an even broader area when making panoramas will take some experience with the camera to do efficiently.
Panorama direction
A panorama picture (only available in jpeg) is a composite of several images stitched together. When in this mode, you’ll see an arrow that guides you in what direction and speed you should pan the camera to take the sequential images that will be stitched together. You can choose the path in this menu (either, up, down, left or right).
Long Exposure NR
Set if you want the processing engine to apply noise reduction for images captured with a long exposure time. Leave it ON as there is no way of duplicating this process in post-production, except to take a black frame of the same length in the same atmospheric conditions.
MENU – Red Camera Icon – page 2 (more Quality and Image Size settings)
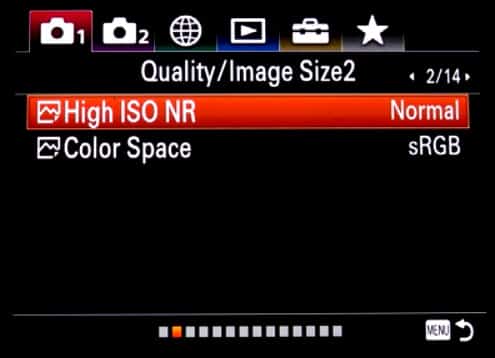
High ISO NR
Here you can select the amount of noise reduction applied to images with high ISO settings (when quality is set to jpeg). As Sony has rather aggressive noise reduction, I would change it to Low. (if not, you run the risk of getting paint-like, smeared images at higher ISO values).
Color Space
You can choose between Standard and Adobe (extended color range) RGB. This is only important if you shoot JPEG and not RAW. Adobe RGB would be preferable if you print many images because of the extended color range.
MENU – Red Camera Icon – page 3 (Shooting modes and Autofocus Drive settings)
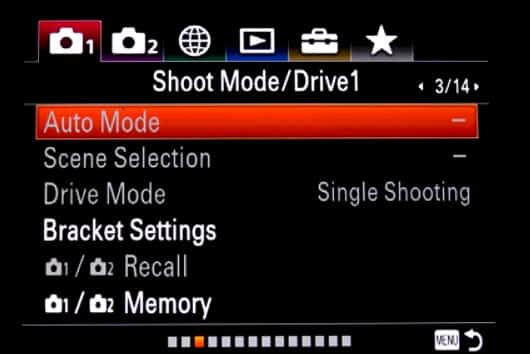
Auto Mode
Switch the auto mode between Intelligent Auto and Superior Auto.
Intelligent Auto:
This mode automatically detects the type of scene you’re shooting and adjusts the scene automatically. You’ll see the icon for the recognized scene appears on the top right hand of the screen.
These scenes are the same ones which can be selected individually in SCENE mode.
The Sony RX10 IV will also use the most appropriate FOCUS AREA, and ISO value (the ISO range cannot be changed in iAuto though).
Drive Mode (single shooting, continuous shooting Lo-Mid-Hi), Self-timer and Self-timer cont (multiple images with the self-timer) can be changed by using the Fn button.
Works for both RAW and JPEG shooting.
Disadvantage: ISO range is fixed to 50-6400 (you can’t change the range).
Superior Auto:
Superior Auto is similar to iAuto, as it also detects scenes automatically, except it uses more complex processing.
This includes composite layering (layering different shots on top of each other for HDR style pictures) and automatically choosing what it thinks is the best image.
Disadvantage: ISO range is (like in iAuto) fixed and only usable for jpeg shooting.
Scene Selection
This is more easily controlled via the right thumb wheel when you’re in SCN mode, but you can also select the presets for different scenes (like sports or portrait) from here.
Drive Mode
Do you want to take a single picture when you press the shutter button or multiple images? You can select this here, as well as self-timer functions and bracketing.
Bracketing is taking a series of pictures, each with different settings, useful for combining your images with various exposures for HDR effects in software afterward, to name just one example.
You can also press the dedicated drive mode button to get to these settings.
- Single Shooting: Normal shooting mode.
- Cont. Shooting: Shoots images continuously while you press and hold down the shutter button.
- Self-timer: Shoots an image using the self-timer after a designated number of seconds have elapsed since the shutter button was pressed.
- Self-timer(Cont): Shoots a designated number of images using the self-timer after a designated number of seconds have elapsed since the shutter button was pressed.
- Cont. Bracket: Shoots images while holding the shutter button down, each with different degrees of brightness.
- Single Bracket: Shoots a specified number of images, one by one, each with a different degree of brightness.
- WB bracket: Shoots a total of three images, each with different color tones according to the selected settings for white balance, color temperature, and color filter.
- DRO Bracket: Shoots a total of three images, each at a different degree of D-Range Optimizer.
Bracket Settings
You can set the self-timer in bracket shooting mode, and the shooting order for exposure bracketing and white balance bracketing.
- Selftimer during Brkt: Sets whether to use the self-timer during bracket shooting. Also sets the number of seconds until the shutter is released if using the self-timer. (OFF/2 Sec/5 Sec/10 Sec)
- Bracket order: Sets the order of exposure bracketing and white balance bracketing.
Recall (Camera Settings1/Camera Settings2)
This functionality allows you to shoot an image after recalling often-used modes or camera settings registered with the Mode Dial memory positions in advance. It is now also possible to save your camera settings to a memory card and recall them later (or on a different camera). This is done by using the ‘select Rec. media’ function inside this menu.
Memory (Camera Settings1/Camera Settings2)
This setting allows you to register up to 3 often-used modes or product settings to the product and up to 4 (M1 through M4) to the memory card. You can recall the settings using just the mode dial. You can register various functions for shooting. The items that you can register are displayed on the menu of the camera. Aperture and Shutter speed are always available. You’ll need to select your SD card first using the ‘select Rec. media’ function inside the prior menu.
MENU – Red Camera Icon – page 4 (more Shooting Mode and Autofocus Drive settings)
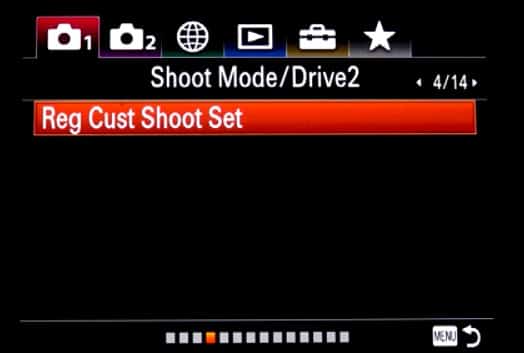
Reg Cust Shoot Set
You can save a number of settings here to a customized Shoot Set. There are 3 shoot sets available that you can recall at any time. You can import your current settings to one of these three shoot sets. You can also store these on your SD card and move them from camera to camera.

You can save the following settings:
- Shoot Mode (Like program Auto)
- Aperture
- Shutter Speed
- Drive Mode
- Exposure compensation
- ISO (like Auto or a single ISO value)
- Metering Mode
- Focus Mode
- Focus Area
- AF On
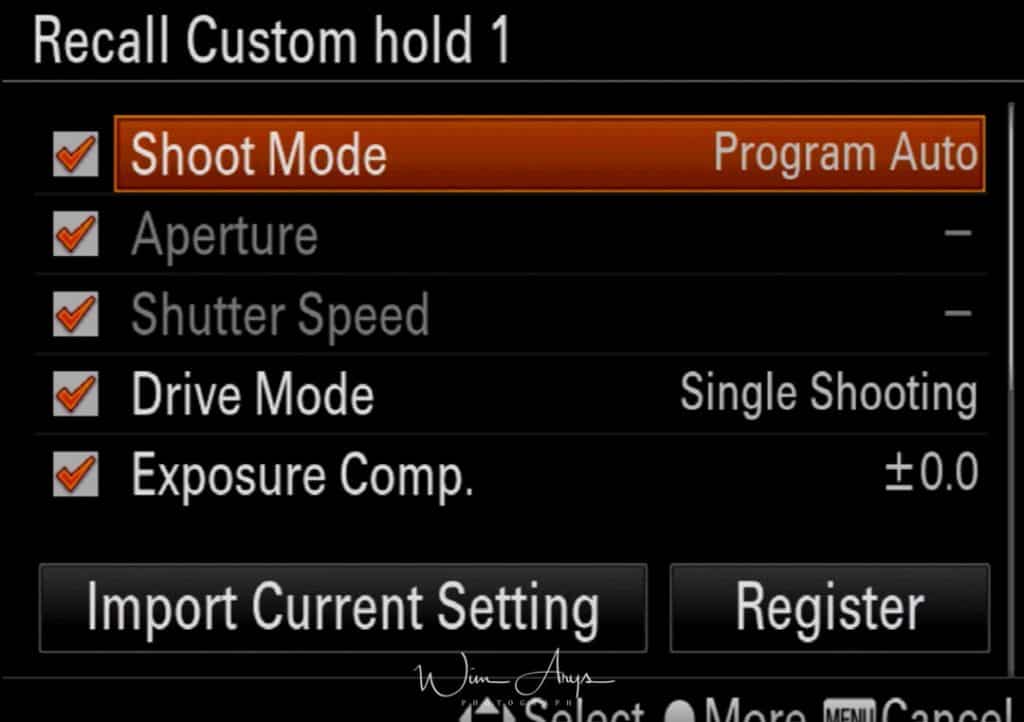
You can press Register to save these custom shoot presets to your SD card.
MENU – Red Camera Icon – page 5 (Autofocus settings)
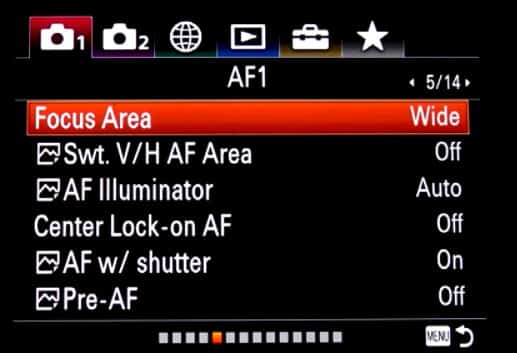
Focus area
features a Fast Hybrid AF system that combines the respective advantages of 315 phase–
- Wide: Wide focus area uses all focus points on the sensor. Ideal for action scenes where there is a lot of movement going on in your frame.
- Center: Focusses on whatever is centered in your images. A fail-proof way of getting the camera to focus on what you want. If you have any problems using the autofocus and are in a situation where you don’t want to miss any shots, revert to Center and just make sure you have your subject centered.
- Flexible spot: Allows you to move the focusing frame to a desired point on the touch screen and focus on an extremely small subject in a narrow area. If you want to use this focus area, set it to medium or large, as the camera will struggle to find focus when setting to small (except perhaps for close-up portraits where you’d want to focus on the iris of the eye)
- Expand Flexible spot: If the camera can’t focus on a single selected point, it uses focus points around the flexible spot as a secondary priority area for focusing.
- Lock-on AF: When the shutter button is pressed and held halfway down, the camera tracks the subject within the selected autofocus area. This setting is available only when the focus mode is set to Continuous AF. Point the cursor to ‘Lock-on AF’ on the Focus Area setting screen, and then adjust the desired area to start tracking by pressing the multi-selector left/right. You can also move the tracking start area to the desired point by designating the area as a flexible spot or expand flexible spot.
Tip: You can move the focus area in Flexible Spot or Expand Flexible Spot by touching the screen.
Swt. V/H AF Area
This is called Orientation linked AF points in Canon language. Switch AF point/AF Area to align with your subject in landscape mode (horizontal) if you change the camera orientation to Portrait (vertical) mode.
Off: disable this feature
AF Point Only: If you switch to portrait mode, the RX10 IV will automatically move the AF point in use up to align with your subject.
AF Point AF Area: If you switch to portrait mode, the RX will automatically move the AF point and AF area in use up.
AF illuminator
The AF illuminator is a little red light allowing the camera to focus more easily when the shutter button is pressed halfway. It automatically is switched off when you fully press the shutter. Leave it on except if you are using an underwater housing.
Center Lock-on AF
This is a very powerful autofocus feature. When turned ON, it allows you to track a subject. In the iAuto mode, you can access this feature (when turned ON and the Sony RX10 IV is set to AF) by pressing the Center button of the multi-controller. You’ll see a square on your screen, then center your desired tracking subject and the camera will continue to track it, even when it exits your frame and reappears.
AF with shutter
Selects whether to focus automatically when you press the shutter button halfway down. Leave ON.
Pre-AF
Select if the Sony RX1O IV will automatically adjust focus before you press the shutter button halfway down.
MENU – Red Camera Icon – page 6 (more Autofocus settings)
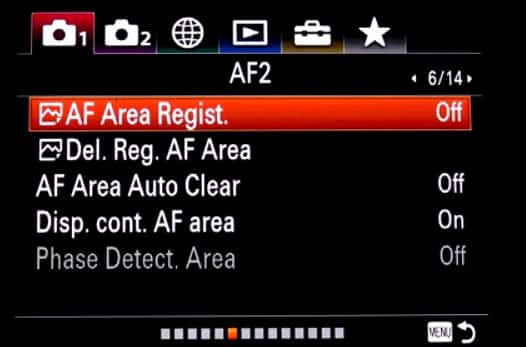
AF Area Regist.
Another feature inherited from Canon. By registering an AF area/point, you have a quick way to move between points without having the thumb-stick of scroll across the AF field. For example, a bird photographer can set their camera up so they can quickly switch from a spot AF point for precisely focusing on a static subject, to a wide AF pattern for quickly acquiring and tracking a bird in flight.
Del. Reg. AF Area
Deletes the registered AF area in AF Area Regist.
AF Area Auto Clear:
Sets whether the focus area should be displayed all the time or should disappear automatically shortly after focus is achieved.
Disp. cont. AF Area
You can set whether or not to display the focus area that is in focus when Focus Area is set to Wide and Focus Mode is set to Continuous AF.
Phase Detect Area:
Use only the phase detection points.
MENU – Red Camera Icon – page 7 (Exposure Settings)
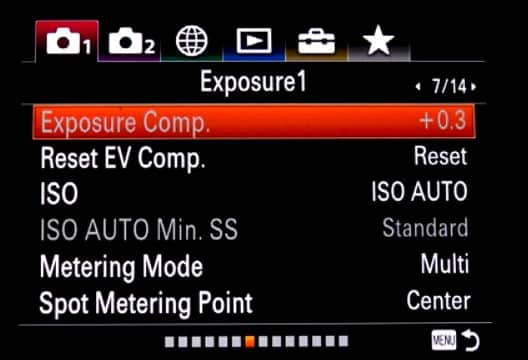
Exposure Comp
(Also available in the Quick Menu, accessed by pressing the FN button):
If you find that your image is overexposed (for instance when you are shooting at large apertures for a shallow depth-of-field in bright daylight), you can tweak the exposure compensation here in a plus or minus 5 (exact EV dependent on next step) range.
Reset EV Comp
Sets whether to maintain the exposure value set using Custom Settings when you turn off the power when the exposure compensation dial position is set to 0.
ISO
You can select at which ISO value you’d like to capture your image or change the Auto ISO range.
I have this range set between 100-1600 as this range is virtually noise-free, and I don’t like the ISO performance above 1600. In a pinch, when you’re getting blurred images due to a too long shutter speed at low ISO, you can experiment with higher ISO settings. It’s better to get a sharp but noisy image than a blurred one….
Iso Auto Min SS.
This is a useful and exciting setting. If you select ISO AUTO you are in P (Program Auto) or A (Aperture Priority) mode; you can set the shutter speed at which the ISO sensitivity starts changing. The difference in shutter speed at which ISO sensitivity starts to change between [Faster], [Fast], [Standard], [Slow], and [Slower] is 1 EV.
You have three possibilities here:
- FASTER (Faster)/FAST (Fast): The ISO sensitivity will start to change at shutter speeds faster than the Standard (normal). This will help you prevent getting blurred images when shooting action or sports. This at the cost of raising the ISO and noise in your images. Remember this is linked to your Auto ISO settings, so it won’t go any higher than your upper limit, even if the camera is capable of doing so.
- STD (Standard): The camera automatically sets the shutter speed based on the focal length of the lens.
- SLOW (Slow)/SLOWER (Slower): The ISO sensitivity will start to change at shutter speeds slower than the Standard setting. This enables you to shoot images with less noise. Never to be used if you want to shoot action, but can be useful if you are a landscape or architecture photographer who likes to walk around without a tripod yet takes some time to frame and shoot images carefully.
- 1/8000 ― 30″: The ISO sensitivity starts to change at the shutter speed you have set.
Metering Mode
Metering mode refers to the way the camera reads the light and sets the exposure.
In multi, it considers the whole frame and sets exposure according to internal algorithms programmed in camera.
In spot or center, the camera only considers what is in that spot or the center (per example, if your subject is completely black, the camera will try to compensate by overexposing the image).
- Multi: Measures light on each area after dividing the total area into multiple areas and determines the proper exposure of the entire screen (Multi-pattern metering).
- Center: Measures the average brightness of the entire screen, while emphasizing the central area of the screen (Center-weighted metering).
- Spot: Measures only the central area (Spot metering). This mode is suitable for measuring light on a specified part of the entire screen. The size of the metering circle can be selected from [Spot: Standard] and [Spot: Large]. The position of the metering circle depends on the setting for [Spot Metering Point].
- Entire Screen Avg.: Measures the average brightness of the entire screen. The exposure will be stable even if the composition or the position of the subject changes.
- Highlight: Measures the brightness while emphasizing the highlighted area on the screen. This mode is suitable for shooting the subject while avoiding overexposure.
Tip: When [Spot] is selected and [Focus Area] is set to either [Flexible Spot] or [Expand Flexible Spot] while [Spot Metering Point] is set to [Focus Point Link], the spot metering point can be coordinated with the focus area.
Spot Metering Point
Sets whether to coordinate the spot metering position with the focus area when Focus Area is set to Flexible Spot or Expand Flexible Spot.
- Center: The spot metering position does not coordinate with the focus area, but always meters brightness at the center.
- Focus Point Link: The spot metering position coordinates with the focus area.
MENU – Red Camera Icon – page 8 (more Exposure settings)

AEL w shutter
Sets whether to fix the exposure when you press the shutter button halfway down. Select Off to adjust the focus and the exposure separately.
- Auto (default setting): Fixes the exposure after adjusting the focus automatically when you press the shutter button halfway down when Focus Mode is set to Single-shot AF.
- On: Fixes the exposure when you press the shutter button halfway down.
- Off: Does not adjust the exposure when you press the shutter button halfway down. Use this mode when you want to change focus and exposure separately.
The camera keeps adjusting the exposure while shooting in Cont. Shooting or Spd Priority Cont. mode. Operation using the AEL button is prioritized over the AEL w/ shutter settings.
Exposure Std. Adjust
Adjusts this camera’s standard for the correct exposure value for each metering mode. You can set a value from -1 EV to 1 EV in 1/6 EV increments.
MENU – Red Camera Icon – page 9 (Flash settings)
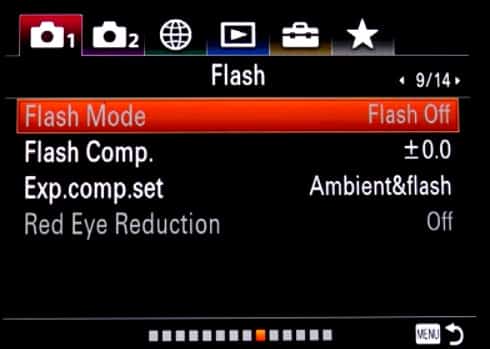
If you’re interested in flash photography, you’ll need to purchase a hot shoe flash. I would suggest a Godox, as these can both use HSS and TTL, and are quite cheap. (Also available in the Quick Menu accessed by pressing the FN button
If you’d like to get more into flash photography, you should read up on the different possibilities and what their effect would be on your images. This is a basic explanation of what the different modes do:
- fill flash: A fill flash is useful even in daylight to fill the shadows with light (like a person in the shade).
- Slow sync: Tells the camera to use a longer shutter speed along with a flash, and thus is better for night shots. In manual and shutter priority modes, there is no difference in flash power. But when using aperture priority, program, or auto, choosing slow sync tells the camera to use a longer shutter speed than it would ordinarily pick.What the slow sync flash mode does is a first fire the flash for the subject exposure, then allow for a longer shutter speed that will allow for more ambient light to be captured by the sensor.
- Rear Sync: Capturing an image involves two shutter actions: one when the capture starts and on when it stops. Rear Sync tells the flash to fire right before the shutter closes. Moving objects will show a streak where they came from and a sharp image where they were at the end of the exposure. This conveys a sense of speed with moving objects. Rear Sync is a creative technique, if you’d like to know more about this type of photography, I’d suggest doing a Google search on ‘Rear Sync Flash Photography.’
- Wireless: Select wireless is if want to use the in-camera flash to trigger an external flash like the Sony HVL-43M (with TTL!). Using an external flash is helpful when shooting weddings and dimly-lit subject matter, You can use your main flash to light the subject, and your external flash to light the background.
Flash comp or Flash compensation:
Especially when using Slow Sync or Rear Sync Flash modes, you might have to lower the power of the Flash to get a decently exposed image. (Also available in the Quick Menu accessed by pressing the FN button).
Exp comp set
Selects if the Exposure compensation function ( -5 in 0.5EV or 0.3EV steps) also reduces flash power or not. Leave it to Ambient And Flash, unless if you want to use HSS sync with flashes, then it is handy to be able to control exposure and flash output separately.
Red Eye Reduction:
This anti-Red Eye setting quickly fires the flash before your image capture starts, reducing the red-eye effect often seen when using a flash.
MENU – Red Camera Icon – page 10 (Color, White Ballance and Image Processing settings)
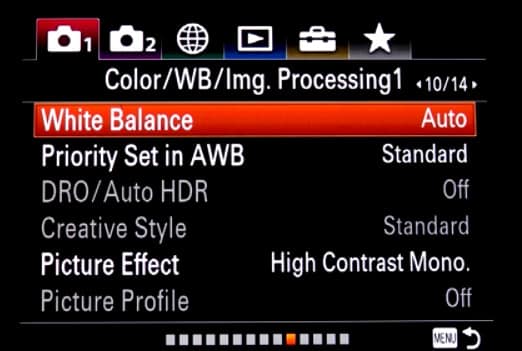
White Balance
You can either set the white balance to Auto, where the camera tries to guess what the neutral grey value is, or use one of the preset white balance settings for different lighting conditions or customize the white balance according to your preference or using a grey card.
Priority Set in AWB
Selects which tone to prioritize when shooting under lighting conditions such as incandescent light when White Balance is set to Auto.
- Standard: Shoots with standard auto white balance. The camera automatically adjusts the color tones.
- Ambience: Prioritizes the color tone of the light source. This is suitable when you want to produce a warm atmosphere.
- White: Prioritizes a reproduction of white color when the color temperature of the light source is low.
DRO/Auto HDR
DRO:
This stands for Dynamic range optimise and analyses the contrast of your scene in real-time. It produces an image with optimal brightness and recovered shadow detail. You can use this function even while the subject is moving or during the continuous shooting.
Auto HDR:
(not available for RAW captures) this feature Shoots three images with different exposures and then overlays the bright area of the underexposed image and the dark area of the overexposed image to create a picture with an extended range from highlight to shadow.
The highlight detail in auto HDR is better than that in DRO and with reduced noise. The shutter is released three times, so using this function for moving subjects is not recommended.
Creative Style
The Sony creative styles can best be explained as being film emulations (the same way as do some other camera manufacturers implements this). There is a range of styles available from vivid colour to black and white. If you’re shooting RAW, these styles are embedded, but can always be zeroed after importing them to you RAW editor of choice. Jpegs are saved with this styling applied. It is always useful to try some of these, and can be a real boost for your creativity, as you will notice that you make different images in say black-and-white as opposed to colour.
- Standard: For shooting various scenes with rich gradation and beautiful colors.
- Vivid: The saturation and contrast are heightened for shooting striking images of colorful scenes and subjects such as flowers, spring greenery, blue sky, or ocean views.
- Neutral: The saturation and sharpness are lowered for shooting images in subdued tones. This is also suitable for capturing image material to be modified with a computer.
- Clear: For shooting images in clear tones with limpid colors in highlight, suitable for capturing radiant light.
- Deep: For shooting images with deep and dense colors, suitable for capturing the solid presence of the subject.
- Light: For shooting images with bright and simple colors, suitable for capturing a refreshingly light ambience.
- Portrait: For capturing skin in a soft tone, ideally suited for shooting portraits.
- Landscape: The saturation, contrast, and sharpness are heightened for shooting vivid and crisp scenery. Distant landscapes also stand out more. Sunset: For shooting the beautiful red of the setting sun.
- Night Scene: The contrast is lowered for reproducing night scenes.
- Autumn leaves: For shooting autumn scenes, vividly highlighting the reds and yellows of changing leaves.
- Black & White: For shooting images in black and white monotone.
- Sepia: For shooting images in sepia monotone.
You can edit these different styles and save your own creative style if you want.
This functionality can be changed:
- Contrast: The higher the value selected, the more the difference of light and shadow is accentuated, and the bigger the effect on the image.
- Saturation: The higher the value selected, the more vivid the color. When a lower value is selected, the color of the image is restrained and subdued.
- Sharpness: Adjusts the sharpness. The higher the value selected, the more the contours are accentuated, and the lower the value selected, the more the contours are softened.
Picture Effect
Think of this menu as an Instagram app right in your camera, with all kinds of retro filters and effects. These are only available when quality is set to Jpeg (Not in RAW).
- Off: Disables the [Picture Effect] function.
- Toy Camera: Creates a soft image with shaded corners and reduced sharpness.
- Pop Color: Creates a vivid look by emphasizing color tones.
- Posterization: Creates a high contrast, abstract look by heavily emphasizing primary colors, or in black and white.
- Retro Photo: Creates the look of an aged photo with sepia color tones and faded contrast.
- Soft High-key: Creates an image with the indicated atmosphere: bright, transparent, ethereal, tender, soft.
- Partial Color: Creates an image which retains a specific color, but converts others to black and white.
- High Contrast Mono.: Creates a high-contrast image in black and white.
- Rich-tone Mono.: Creates an image in black and white with rich gradation and reproduction of details.
Picture Profile
Allows you to change the settings for the color, gradation, etc.
The basic contrast and coloring are defined by the combination of [Gamma] (gamma curve) and [Color Mode] (color characteristics) settings.
Gamma:
-
- Movie: Standard gamma curve for video.
- Still: Standard gamma curve for still images.
- Cine1: Softens the contrast in darker image areas and emphasizes gradation changes in lighter image areas, producing a subdued tone overall (equivalent to HG4609G33) Gamma curve that obtains a dynamic range of 460% when the exposure is adjusted to 33% video output with 18% reflectance gray. The maximum value of video output is 109%. Images shot with this gamma can be used without grading, but since the images have smooth gradation characteristics, this can be used to grade and finalize the viewed image in the post-production process.
- Cine2: Similar results to [Cine1] but optimized for editing with up to 100% video signal (equivalent to HG4600G30)
Gamma curve that obtains a dynamic range of 460% when the exposure is adjusted to 30% video output with 18% reflectance gray. The maximum value of video output is 100%. - Cine3: Stronger contrast between dark and light image areas and greater emphasis on black gradation changes (compared to [Cine1] and [Cine2])
- Cine4: Stronger contrast than [Cine3] in darker image areas.
- ITU709 ITU709 gamma curve (low-light gain of 4.5).
- ITU709: (800%) Gamma curve for checking scenes recorded using [S-Log2] or [S-Log3].
- S-Log2 [S-Log2] gamma curve. This setting is selected when some grading work will be performed after recording. The exposure is set so that 18% reflectance gray video is output as 32%. Under these conditions, a dynamic range of 1,300% is obtained with 90% reflectance white. The maximum value of video output is 106%.
- S-Log3: [S-Log3] gamma curve with characteristics closer to those of film. This setting is selected when some grading work will be performed after recording. It allows for better reproduction of gradations in shadows and the mid-tone range than S-Log2. The exposure is set so that 18% reflectance gray video is output as 41%. Under these conditions, a dynamic range of 1,300% is obtained with 90% reflectance white. As a characteristic of S-Log3, the dynamic range can be extended above 1,300%. However, Picture Profile is set to a dynamic range of 1,300% in order to maintain a balance with camera performance. Under these conditions, the maximum value of video output is 94%.
Color Mode:
-
- Movie Color tones for [Movie] gamma curve (standard color reproduction for movies when Picture Profile is not used)
- Still Color tones for [Still] gamma curve (standard color reproduction for still images when Picture Profile is not used)
- Cinema Color tones for [Cine1] and [Cine2] gamma curve
- Pro Color tones similar to standard Sony broadcast camera image quality (used in combination with [ITU709] gamma curve)
- ITU709 Matrix ITU709 color tones (used in combination with [ITU709] gamma curve)
- Black & White Sets the saturation to 0 for recording in black and white
S-Gamut Setting based on the assumption that some grading work will be performed after recording. Used when [Gamma] is set to [S-Log2]. - S-Gamut3.Cine Setting based on the assumption that some grading work will be performed after recording. Used when [Gamma] is set to [S-Log3].
- This setting is easier to use than [S-Gamut3], because it limits the color space to a more practical range than that of [S-Gamut3]. It is recommended in cases where [S-Gamut3], a wide color space, is not required.
- S-Gammut3 Setting based on the assumption that some grading work will be performed after recording. Used when [Gamma] is set to [S-Log3].
This setting has a wider color space than that of [S-Gamut3.Cine]. It is suited for converting images to a format with a wide color space like BT.2020.
Depending on the type of camera, the entire [S-Gamut3] color space may not be supported.
Black Level:
This function adjusts the black level of the image -15 to 15. As an image effect, you can emphasize the color black to create an image that gives a powerful impression, or you can weaken black to give the image a soft impression.
Shifting Black Level in the minus direction emphasizes the black color in the image, while changing the level in the plus direction weakens the black color.
If you want to simulate an old film, or capture winter morning fog, the black level value should be increased. If you decrease the value, gradations in dark areas will be smoothed out, making the areas appear in crisp black. When using multiple fixed cameras to shoot the same subject from different angles, the balance between subject and background often varies. This balance variation may cause the black color in the subject to appear different when cameras are switched. However, this is an optical illusion. If it occurs, you can correct it by adjusting Black Level to make the black color look the same.
When using multiple fixed cameras to shoot the same subject from different angles, the balance between subject and background often varies.
This balance variation may cause the black color in the subject to appear different when cameras are switched. However, this is an optical illusion. If it occurs, you can correct it by adjusting Black Level to make the black color look the same.
Black Gamma:
This function lets you alter the shape of the selected gamma curve and adjust gradations in dark image areas. Range available between Wide, Middle or Narrow. Leven between -7 and 7.
[Range] controls the luminance range that Black Gamma influences. The [Narrow] setting keeps the range close to black, while the [Wide] setting extends the range to gray. [Range] should be set narrower when you want to control the quality of dark areas. If you want to adjust the overall image tone, [Range] should be set wider. At first, it may be a good idea to start from the [Narrow] setting.
Increasing the [Level] value brightens the image, whereas decreasing the value makes the image darker. For example, if you set [Range] to [Narrow] and decrease the [Level] value, you can create an image with dark areas that are similar to the ones seen in films. Unlike Black Level, Black Gamma Level adjusts luminance subtly.
Knee:
This function sets the knee point and slope for video signal compression to prevent over-exposure by limiting signals in high-intensity areas of the subject to the dynamic range of your camera.
First, select whether to set the knee point and slope automatically or manually in [Mode], and then adjust each setting.
- Knee > Mode: Auto / Manual
- Knee > Auto Set > Max Point: 90% to 100%
- Knee > Auto Set > Sensitivity: High / Mid / Low
- Knee > Manual Set > Point: 75% to 105%
- Knee > Manual Set > Slope: –5 to 5
Mode:
- Auto:
- Automatically adjusts the knee based on what is selected in the following settings (when [Movie] or [ITU709] is selected in [Gamma]).
- [Max Point] determines the maximum knee point level (white level). The knee slope is automatically adjusted according to the Max Point setting. The standard is to keep it at 100%. A lower setting will turn white grayish, while a higher setting will discard gradations in high luminance areas.
- [Sensitivity] changes the luminance level at which the knee’s automatic adjustment starts. When set to [High], the knee’s automatic adjustment starts at lower input signal levels than normal. When set to [Low], the knee’s automatic adjustment starts at higher input signal levels than normal.
- When a parameter other than [Movie] or [ITU709] is selected in [Gamma], the gamma curve will not exceed the White clip point and over-exposure rarely occurs. When [Mode] is set to [Auto] with these settings, the Knee function is disabled. If you want to enable the Knee function, set [Mode] to [Manual].
- Manual:
- Sticks to settings based on the following selections.
- [Point] sets the position of the knee point output level.
- [Slope] determines the inclination of the knee slope.
A negative slope setting results in a gentler knee slope angle. This expands the dynamic range, but reduces the ability to produce rich gradations. A positive slope setting makes the knee slope inclination steeper. This shrinks the dynamic range, but bolsters the ability to express gradations. When [Slope] is set to 5, the Knee function is disabled. - Set [Point] and [Slope] in [Manual Set] in combination. If you select a higher setting for [Point] and a gentler setting for [Slope], you can obtain video-like sharp highlight effects. If softer film-like highlight effects are desired, select a lower setting for [Point] and a steeper setting for [Slope]. In practical terms, move [Point] and [Slope] up and down in opposite directions while checking the gradations in high luminance areas until you find the ideal settings.
Saturation
A positive value results in more vivid colors, while a negative value presents faded colors. Saturation must be adjusted in tandem with contrast. Bright and vivid settings produce video-like images, while dark and vivid settings result in film-like images. The combination of bright and light creates pastel tones, whereas dark and light settings create artistic finishes.
Color Phase
As you rotate the color wheel to the left (decreasing the set value) or to the right (increasing the set value), the colors shift along the spectrum from red to yellow, green, cyan, blue, magenta and red. Because this affects all colors, it is difficult to make specific adjustments exactly as intended. Use this function when matching coloring closely between different cameras.
Color Depth
This function adjusts the luminance for each color phase. The luminance changes more drastically when the selected color is richer (higher saturation). It does not change much at all when the color is achromatic.
A higher set value lowers luminance while deepening the color. A lower set value increases luminance, making the color look paler.
This setting does not only enhance the apparent vividness of colors, but also can express deep, dark colors.
Because each of the 6 colors — R (Red), G (Green), B (Blue), C (Cyan), M (Magenta), Y (Yellow) — can be adjusted individually, you can apply this function to just the colors you want to emphasize.
Emphasizing image edges (Detail)
This function adjusts how much detail is applied to the subject’s image edges.
Because settings other than [Level] are quite complex, we recommend you start by adjusting only the [Level] setting first.
Level
This function determines the strength of detail image processing to be applied.
- If you apply too much detail, the subject’s original atmosphere may be undermined, as its translucence may be lost or it may be given an unnatural luster. Excessive detail when shooting shiny leaves, for instance, may result in the leaves looking as if they are made of plastic. It is also advisable to apply detail only modestly when shooting paintings.
- Because Detail makes image edges wider, the original texture of a subject consisting of very fine lines may be lost if too much detail processing is applied. (Example: thin lace curtains)
- Also, be aware that Detail may fatten up the edges of noise particles that appear under a high gain setting, and may make such particles highly noticeable. In such cases, you can adjust the amount of detail processing on the noise particles by using the [Crispening] function.
- The image edges become more visible when viewed on large screens. It may be advisable to ease off on Detail if you plan to view the image on large TVs or screens.
MENU – Red Camera Icon – page 11 (more Color, White Ballance, and Image Processing settings)
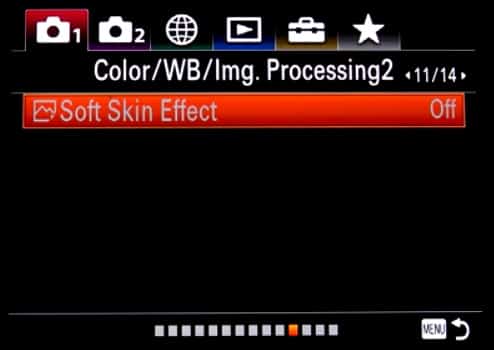
Soft Skin Effect
If you’re using this camera mainly for pics of friends and family, this is an excellent feature, as it will soften and smooth skin tones make you and your beloved ones look their best. (only available when quality is set to Jpeg)
MENU – Red Camera Icon – page 12 (Focus Assist settings)
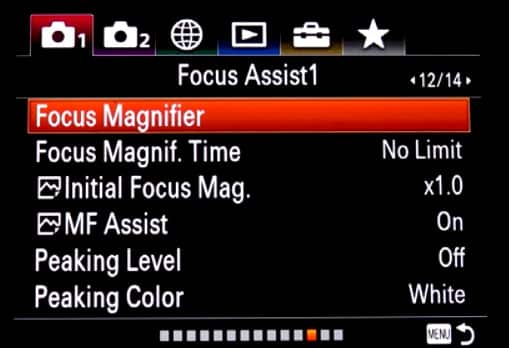
Focus Magnifier
When focussing manually or in DMF mode, you can set the camera to magnify a part of the screen so you can check focus. This sub-menu allows you to select the part of the image that will be magnified during shooting.
Focus Magnif. Time
You can set how long to hold the magnified area during MF assist. 2 sec, 5 seconds or no limit. 2 seconds is how I have it set up.
Initial Focus Mag.
Sets the initial magnification scale when using [Focus Magnifier]. Select a setting that will help you frame your shot.
MF assist
This works in conjunction with the Focus Magnifier found on this page too You might remember that you can select the area to magnify there when using manual focus (MF). MF assist will need to be turned on if you want to use this feature.
Peaking Level
-
-
-
-
-
- Peaking Level is a manual focusing aid which works when you have your camera set to MF or DMF.
-
- You’ll see a type of noise outlining the parts of your image where the focus lies, and you can adjust the sensitivity to high, mid or low.
- Which setting is best depends on what lens you use, as with a sharper lens it can be configured to low, while more soft lenses benefit from a medium or high setting to clearly visualize what you’re focusing on.
-
-
-
-
Peaking Color
You can choose the color of this Peaking between Red, white and yellow. I have it set to red, as this contrasts nicely with most scenes you capture.
MENU – Red Camera Icon – page 13 (more Focus Assist settings)
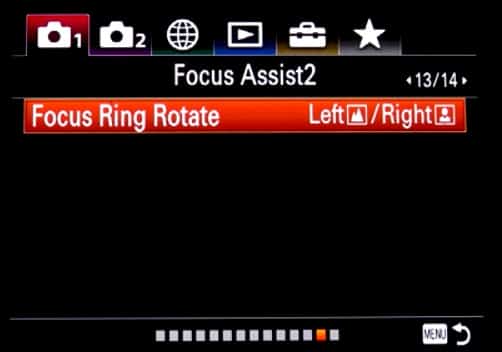
Focus Ring Rotate
This option lets you choose which direction to rotate the lens ring that is assigned to adjust manual focus, turning either left or right to focus on more distant subjects. You can set this option according to what feels most natural to you.
MENU – Red Camera Icon – page 14 (Face Detection and Shoot Assist Settings)
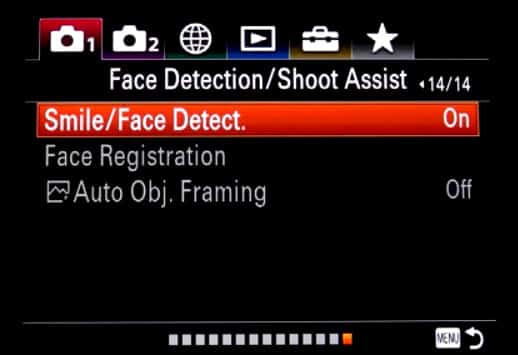
Smile/Face Detect
This is another powerful feature. It can be set to detect automatically and focus on (registered) faces and enable a function called Smile Shutter. When the latter is enabled, the camera will automatically capture an image when a smile is detected. Did I hear you say Selfie? Yes, it’s the ultimate selfie tool, along with the pivoting screen.
Face Registration
If you register faces in advance, the product can detect the registered face as a priority when [Face Detection] is set to [On (Regist. Faces)]. Shoot the face from the front in a brightly lit place. The face may not be registered correctly if it is obscured by a hat, a mask, sunglasses, etc.
- MENU – (Camera Settings1) – [Face Registration] – [New Registration].
- Align the guide frame with the face to be registered, and press the shutter button.
- When a confirmation message appears, select [Enter].
Auto Object Framing
When enabled, the Sony RX10 mark 4 will automatically crop your captured image to what it deems best. Meaning it will cut the picture for a nicer composition. Only available for Jpegs, though, a nice feature if you don’t want to bother too much with the technical side of photography.
MENU – Purple Camera Icon – page 1 (Movie settings 1)
![]()
Movie: Exposure Mode
You can set the exposure mode for movie shooting.
- Program Auto: Allows you to shoot with the exposure adjusted automatically (both the shutter speed and the aperture value).
- Aperture Priority: Allows you to shoot after adjusting the aperture value manually.
- Shutter Priority: Allows you to shoot after adjusting the shutter speed manually.
- Manual Exposure: Allows you to shoot after adjusting the exposure (both the shutter speed and the aperture value) manually.
HFR (High Frame Rate): Exposure Mode
You can select the exposure mode for HFR shooting based on the subject and effect you want.
- Program Auto: Allows you to shoot with the exposure adjusted automatically (both the shutter speed and the aperture value).
- Aperture Priority: Allows you to shoot after adjusting the aperture value manually.
- Shutter Priority: Allows you to shoot after adjusting the shutter speed manually.
- Manual Exposure: Allows you to shoot after adjusting the exposure (both the shutter speed and the aperture value) manually.
File format (for movies)
Selects the movie file format.
- XAVC S 4K: Records high-definition movies in XAVC S 4K. This format supports a higher bit rate. Audio: LPCM
- AXAVC S HD: (default setting):Records movies in crisper quality than AVCHD with larger amounts of data. Audio: LPCM
- AVCHD:The AVCHD format has a high degree of compatibility with storage devices other than computers.
Note that when recording XAVC S format movies, you should use Class 10 or faster SDXC memory cards. At Least 64 GB.
Record Setting
You can choose the quality of recorded video here. You can change the image size, frame rate, and image quality for movie recording. The higher the bitrate, the higher the image quality. If you’re not familiar with this, leave as is.
Menu items details:
When File Format is set to XAVC S 4K:
- 30p 100M/25p 100M: Records the movies in 3840 × 2160 (30p/25p). Bit-rate: Approx. 100 Mbps
- 30p 60M/25p 60M: Records the movies in 3840 × 2160 (30p/25p). Bit-rate: Approx. 60 Mbps
- 24p 100M: Records the movies in 3840 × 2160 (24p). This produces a cinema-like atmosphere. Bit-rate: Approx. 100 Mbps
- 24p 60M: Records the movies in 3840 × 2160 (24p). This produces a cinema-like atmosphere. Bit-rate: Approx. 60 Mbps
When File Format is set to XAVC S HD:
- 60p 50M/50p 50M: Records the movies in 1920 × 1080 (60p/50p). Bit-rate: Approx. 50 Mbps
- 30p 50M/25p 50M: Records the movies in 1920 × 1080 (30p/25p). Bit-rate: Approx. 50 Mbps
- 24p 50M: Records the movies in 1920 × 1080 (24p). This produces a cinema-like atmosphere. Bit-rate: Approx. 50 Mbps
- 120p 100M/100p 100M: Records 1920 × 1080 (120p/100p) size movies at a high speed. Movies can be recorded at 120 fps/100 fps. You can create smoother slow-motion images using compatible editing equipment. Bit-rate: Approx. 100 Mbps
- 120p 60M/100p 60M: Records 1920 × 1080 (120p/100p) size movies at a high speed. Movies can be recorded at 120 fps/100 fps. You can create smoother slow-motion images using compatible editing equipment. Bit-rate: Approx. 60 Mbps
When File Format is set to AVCHD:
- 60i 24M(FX)*: 50i 24M(FX): Records high image quality movies of 1920 × 1080 (60i/50i). Bit-rate: Approx. 24 Mbps (Max.)
- 60i 17M(FH): 50i 17M(FH) (default setting): Records standard image quality movies of 1920 × 1080 (60i/50i). Bit-rate: Approx. 17 Mbps (Avg.)
- 60p 28M(PS)*:
General notes:
- Movies recorded with the [60i 24M(FX)]/[50i 24M(FX)] as the [Record Setting] are converted by PlayMemories Home in order to create an AVCHD recording disc. You cannot create a disc in the original image quality. This conversion can take a long time. If you want to keep the original image quality, store your movies on a Blu-ray Disc.
- [120p]/[100p] cannot be selected for the following settings.
- [Intelligent Auto]
- [Superior Auto]
- [Scene Selection]
HFR settings
By shooting with a higher frame rate than the recording format, you can record a smooth super-slow-motion movie.
- Set the mode dial to High Frame Rate. The HFR setting screen will be displayed.
- Select MENU- Camera Settings-HFR Settings and select the desired settings for Record Setting, Frame Rate, Priority Setting, and REC Timing. You can adjust the desired exposure mode by selecting MENU- camera Settings-High Frame Rate. You can set other shooting settings such as focus area, focus mode, and frame rate, and perform zooming on the HFR setting screen.
- Press the in the center of the control wheel. The HFR shooting screen will be displayed. To change the settings, press in the center once again to switch to the HFR setting screen.
- Press the MOVIE button. The camera will automatically start recording as soon as you finish shooting
Menu item details
- HFR Record Setting: Selects the frame rate of the movie from 60p 50M/50p 50M, 30p 50M/25p 50M, and 24p 50M.
- HFR Frame Rate: Selects the shooting frame rate from 240fps/250fps, 480fps/500fps, and 960fps/1000fps.
- FFR Priority Setting: Select Quality Priority or Shoot Time Priority. If you select Shoot Time Priority, the recordable duration is longer than in Quality Priority mode.
- HFR REC Timing: Selects whether to record a set amount of time after pressing the MOVIE button (Start Trigger), or to record for a set amount of time until you press the MOVIE button (End Trigger).
Frame rate
In super-slow-motion movie shooting, the camera shoots at a faster shutter speed than the number of shooting frames per second. For example, when [Frame Rate] is set to [960fps], the shutter speed per frame will be faster than approx. 1/1000 second in order to shoot 960 frames per second. To maintain this shutter speed, sufficient ambient light is necessary during shooting. If the ambient light is insufficient, the ISO sensitivity will become higher, resulting in more noise.
Shortest shooting distance
The image becomes out of focus when the subject is too close, such as during macro shooting. Shoot from the shortest shooting distance (from the front of the lens, approximately 3 cm (0.10 ft.) at the wide-angle end, approximately 72 cm (2.36 ft.) at the telephoto end, and approximately 140 cm (4.59 ft.) at a 35 mm-equivalent focal length of around 250 mm) or further.
Timing of recording
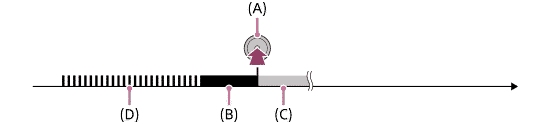
Depending on the [REC Timing] setting, the relationship between when you press the MOVIE button and the recorded section of the movie is as shown below.[Start Trigger]
Movie capturing (shooting) starts when the MOVIE button is pressed. When the MOVIE button is pressed again, or when the recordable duration of time has elapsed, movie capturing ends and the camera starts to record the captured movie to the memory card.
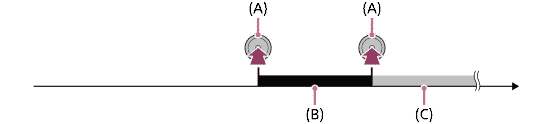
(A): The point when the MOVIE button is pressed
(B): Recorded section
(C): Recording to memory card in progress (You cannot start the next session of shooting.)[End Trigger]/[End Trigger Half]
Buffering (temporarily capturing a movie on the camera) starts once the shooting standby screen is displayed. When the captured data fills the buffering capacity, old data is overwritten sequentially. When you press the MOVIE button, the camera starts to record a movie of the set duration calculated retroactively from that point on the memory card.
- With [End Trigger], a movie of the maximum possible duration is recorded. With [End Trigger Half], a movie of half the maximum possible duration is recorded. With [End Trigger Half], the time it takes to record to the memory card is also shorter than with [End Trigger].
End Trigger
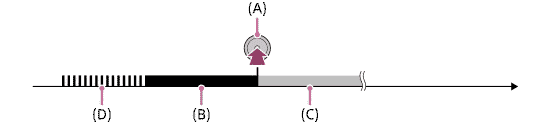
End Trigger Half
(A): The point when the MOVIE button is pressed
(B): Recorded section
(C): Recording to memory card in progress (You cannot start the next session of shooting.)
(D): Buffering in progress
To redo shooting
You can cancel recording by selecting [Cancel] on the screen. However, the movie recorded up to the point you cancelled will be saved.
Playback speed
The playback speed will vary as below depending on the assigned [ Frame Rate] and [Record Setting].
| Frame Rate |
Record Setting |
||
|---|---|---|---|
| 24p 50M* | 30p 50M/25p 50M | 60p 50M/50p 50M | |
| 240fps/250fps | 10 times slower | 8 times slower/10 times slower | 4 times slower/5 times slower |
| 480fps/500fps | 20 times slower | 16 times slower/20 times slower | 8 times slower/10 times slower |
| 960fps/1000fps | 40 times slower | 32 times slower/40 times slower | 16 times slower/20 times slower |
*Only when [NTSC/PAL Selector] is set to NTSC.
[Priority Setting] and shooting duration
| Priority Setting |
Frame Rate |
Effective pixel number read out from image sensor | Shooting duration |
|---|---|---|---|
| Quality Priority | 240fps/250fps | 1824×1026 | Approx. 4 seconds |
| 480fps/500fps | 1824×616 | Approx. 3 seconds | |
| 960fps/1000fps | 1244×420 | ||
| Shoot Time Priority | 240fps/250fps | 1824×616 | Approx. 7 seconds |
| 480fps/500fps | 1292×436 | Approx. 7 seconds/Approx. 6 seconds | |
| 960fps/1000fps | 912×308 | Approx. 6 seconds |
Playback time
For example, if you shoot for approx. 4 seconds with [Record Setting] set to [24p 50M]*, [Frame Rate]set to [960fps], and [Priority Setting] set to [Shoot Time Priority], the playback speed will be 40 times slower and the playback time will be approx. 160 seconds (approx. 2 minutes and 40 seconds).
Quality Dual Rec
Selects the quality of still images to be shot while recording movies. (Extra Fine, Fine or Standard)

MENU – Purple Camera Icon – page 2 (Movie settings 2)
![]()
Img. Size (Dual Rec)
Selects the size of still images to be shot while recording movies.
- L: 17M
- M: 7.5M
- S: 4.2M
Auto Dual Rec
Sets whether or not to automatically shoot still images when shooting movies. Shoots when impressive compositions, including people, are detected. This function may also record versions of the automatically shot images that have been trimmed into optimal compositions. When a trimmed image is recorded, both the image before trimming and the trimmed image will be recorded.
- Off: Auto Dual Rec is not performed.
- On: Shoot. Frequency Low/On: Shoot. Frequency Standard/On: Shoot. Frequency High: Auto Dual Rec is performed with the specified shooting frequency.
Proxy Setting
Sets whether to simultaneously record low-bit-rate proxy movies when recording XAVC S movies. Since proxy movies are small in file size, they are suitable for transferring to smartphones or uploading to websites. Note that you cannot playback Proxy movies on the camera screen.
- Proxy movies are recorded in the XAVC S HD format (1280×720) at 9 Mbps. The frame rate of the proxy movie is the same as that of the original movie.
AF Drive Speed (movie)
You can switch focusing speed when using autofocus in movie mode.
- Fast: Sets the AF drive speed to fast. This mode is suitable for shooting active scenes, such as sports.
- Normal: Sets the AF drive speed to normal.
- Slow: Sets the AF drive speed to slow. With this mode, the focus switches smoothly when the subject to be focused is changed.
AF Track Sens (movie)
You can set the AF sensitivity separately in movie mode.
- Responsive: Sets the AF sensitivity to high. This mode is useful when recording movies in which the subject is moving quickly.
- Standard: Sets the AF sensitivity to normal.
- Locked on: Sets the AF sensitivity to low. You can shoot with a stable focus by ignoring the influence of anything in front of the subject.
Auto Slow Shut. (movie)
Sets whether or not to adjust the shutter speed automatically when recording dark scenes.
- On: Uses Auto Slow Shutter. The shutter speed automatically slows when recording in dark locations. You can reduce noise in the movie by using a slow shutter speed when recording in dark locations.
- Off: Does not use Auto Slow Shut. The recorded movie will be darker than when On is selected, but you can record movies with smoother motion and less object blur.
MENU – Purple Camera Icon – page 3 (Movie settings 3)
![]()
Audio Recording
You can switch off audio recording in movie mode. When you record audio movies with loud volumes, set Audio Rec Level to a lower sound level. Doing so enables you to record more realistic audio. When you record audio movies with lower volumes, set Audio Rec Level to a higher sound level to make the sound easier to hear. Regardless of the Audio Rec Level settings, the limiter always operates.
Audio Rec Level
You can adjust the audio recording level while checking the level meter.
Audio Level Display
Sets whether to display the audio level on the screen.
Don’t see the audio level display?
- Check if Audio Recording]is set to Off.
- Check if DISP (Display Setting) is set to No Disp. Info.
- During slow-motion/quick-motion shooting, audio is automatically turned OFF.
Audio Out Timing
You can set echo cancellation during audio monitoring and prevent undesirable deviations between video and audio during HDMI output.
- Live: Outputs audio without delay. Select this setting when the audio deviation is a problem during audio monitoring.
- Lip Sync: Outputs audio and video in sync. Select this setting to prevent undesirable deviations between video and audio.
Wind Noise Reduction
This helps reduce noise from the wind during video recording.
Steadyshot (Movie)
Sets SteadyShot effect when shooting movies.
- Intelligent Active: Provides a more powerful SteadyShot effect than Active.
- Active: Provides a more powerful SteadyShot effect.
- Standard: Reduces camera shake under stable movie shooting conditions.
- Off: Does not use SteadyShot.
MENU – Purple Camera Icon – page 4 (Movie settings 4)
![]()
Marker Display (movie)
Select if you want guidelines (a grid) in movie mode. The markers are displayed on the monitor or viewfinder
Marker Settings (movie)
Sets the markers to be displayed while shooting movies. You can display several markers at the same time.
- Center: Sets whether or not to display the center marker in the center of the shooting screen. [Off]/[On]
- Aspect: Sets the aspect marker display. [Off]/[4:3]/[13:9]/[14:9]/[15:9]/[1.66:1]/[1.85:1]/[2.35:1]
- Safety Zone: Sets the safety zone display. This becomes the standard range that can be received by a general household TV. [Off]/[80%]/[90%]
- Guideframe: Sets whether or not to display the guide frame. You can verify whether the subject is level or perpendicular to the ground.
Video Light Mode
Sets the illumination setting for the optional HVL-LBPC LED light.
- Power Link: The video light turns on/off in sync with the ON/OFF operation of this camera.
- REC Link: The video light turns on/off in sync with movie recording start/stop.
- REC Link&STBY: The video light turns on when movie recording starts and dims when not recording (STBY).
- Auto: The video light automatically turns on when it is dark.
Movie w/ shutter
You can map the movie recording function to the shutter button.
MENU – Purple Camera Icon – page 5 (Shutter and Steadyshot settings)
![]()
Shutter Type (still image)
You can set whether to shoot with a mechanical shutter or an electronic shutter.
- Auto: The shutter type is automatically switched based on the shooting conditions and shutter speed.
- Mechanical Shut.: Shoot with the mechanical shutter only.
- Electronic Shut.: Shoot with the electronic shutter only.
Release without card
If set to Off, you won’t be able to engage the shutter when there is no SD card in the slot. This is a useful failsafe to prevent you from shooting images without the ability to save them.
SteadyShot
Sets whether or not to use the SteadyShot function.For optimal sharpness, turn it off when using a tripod.
MENU – Purple Camera Icon – page 6 (Zoom lens settings)
![]()
Rng. of Zoom Assist
Selects how much to zoom out with the Zoom Assist function. Small, Medium or Large amounts are available.
Zoom Setting
- Optical zoom only: Limits the zoom range to the optical zoom. You can use the Smart Zoom function if you set Image Size to M, S or VGA.
- On:ClearImage Zoom: Select this setting to use Clear Image Zoom. Even if the zoom range exceeds the optical zoom, the product magnifies images within the range in which image quality does not deteriorate significantly.
- On:Digital Zoom: When the zoom range of the Clear Image Zoom is exceeded, the product magnifies images to the largest scale. However, the image quality will deteriorate.
Zoom Speed
Sets the zoom speed of the camera’s zoom lever.o either normal or fast.
Zoom Ring Rotate
Assigns zoom in (T) or zoom out (W) functions to the rotational directions of the lens ring to which the zoom function has been assigned. For either righthanded or lefthanded people.
Zoom Func. on Ring
Sets the zoom functions when using the lens ring to change zoom scales.
- Standard: Zooms in/out smoothly when you operate the zoom by turning the lens ring.
- Quick: Zooms in/out to an angle of view corresponding to how far the lens ring has been rotated.
- Step: Zooms in/out at certain angle steps when you operate the zoom by turning the lens ring.
MENU – Purple Camera Icon – page 7 (Display screen and Auto Review settings)
![]()
Disp button
Selects the functionality (what is shown) on the screen when you press the DISP button (on the control wheel). You can choose Graphic Display, all info, no disp info, and histogram.
Finder/Monitor
You can set the behavior of the EVF and screen here. Do you want your screen on all the time, switch between screen and EVF once your eye has been detected near the viewfinder? Or turn the screen off and only use the EVF? It can all be selected here.
Zebra
The zebra function shows a zebra pattern on the screen while shooting in any area that is in danger of highlight clipping. You can switch this OFF or anywhere in a range between 70 and 100.The Zebra Pattern is a highlight warning indicator that is common in video cameras. It does not control exposure but just warns you that your highlights are blown out. It is not recorded into the resulting image.I have it set halfway at around 75, and it is a very useful indication of correct exposure of the entire scene.
Grid Line (stills)
Sets whether the grid line is displayed or not. The grid line will help you to adjust the composition of images.
- Rule of 3rds Grid: Place main subjects close to one of the grid lines that divide the image into thirds for a well-balanced composition.
- Square Grid: Square grids make it easier to confirm the horizontal level of your composition. This is suitable to determine the quality of the composition when shooting landscape, close-up, or duplicated images.
- Diag. Square Grid: Place a subject on the diagonal line to express an uplifting and powerful feeling.
- Off: Does not display the grid line.
Exposure set guide
The exposure set guide is an on-screen scroller that tells you the relation between your chosen aperture and the appropriate shutter speed for the scene you are shooting. I find this quite handy, but you can turn it off if you don’t.
MENU – Purple Camera Icon – page 8 (more screen and Auto Review Settings)
![]()
Auto Review
You can check your captured image on the screen directly after shooting. You can select how long the image will stay on the screen (10, 5 or 2 seconds). I find this very annoying, so I turned it off. If you want to review your image, you can simply press play to do so.
MENU – Purple Camera Icon – page 9 (Customizable bottons and dial settings)
![]()
Custom Key(Shoot.)/Custom Key(PB)
You can assign the desired function to the desired key. Some functions are available only when they are assigned to a custom key. For example, if you assign [Eye AF] to [Center Button] for [Custom Key(Shoot.)], you can easily recall [Eye AF] simply by pressing the center of the multi-selector while shooting.
The keys that can be assigned functions are different for [Custom Key(Shoot.)] and [Custom Key(PB)].
You can assign the desired functions to the following keys. You can also assign a shooting function to the focus hold button on the lens. However, some lenses do not have a focus hold button.2 1.
- Custom Button 1
- Custom Button2
- AF/MF Button/AEL Button
- Fn/ Button
- Control Wheel (Center Button/Down Button/Left Button/Right Button)
- Custom Button 3
Function Menu Set.
You can assign the functions to be called up when you press the Fn (Function) button.
Lens Ring setup
You can zoom and focus more intuitively using the two lens rings (front and rear). Assigns the focus function or the zoom function to the front lens ring and rear lens ring.
Movie Button
Sets whether or not to activate the MOVIE (Movie) button. Either always or only when you’re in Movie mode.
Dial Lock
You can set whether the dials will be locked by pressing and holding the Fn (Function) button. You can release the lock by holding the Fn (Function) button down again.
- Lock: Locks the front and rear dials when you press and hold the Fn button.
- Unlock: The front or rear dials are not locked, even if you press and hold the Fn (Function) button.
MENU – Purple Camera Icon – page 10 (other custom settings)
![]()
Audio Signals
Selects whether the product produces a sound or not, for example when the focus is achieved by pressing the shutter button halfway down.
Write Date (stills)
Sets whether to record a shooting date on the still image.
MENU – Network Settings – page 1
Send To Smartphone
-
- You can send one or several images directly to your wireless device (phone or tablet) by pressing this button.
-
- You can either decide to choose which images you want to transfer on the camera or the wireless device (via the Sony PlayMemories app, available for free in the apple or android store).
-
- You’ll have to connect the-the camera via Wifi first (it makes a Wifi access point), using the instruction on the A6300 screen.
-
- It works just like connecting to any other access point with your phone or tablet.
-
- You should do this as quickly as possible, just to get it out of the way.
- When your phone has wirelessly connected to the camera once, and you’ve entered the password, it will remember this, and make it a lot faster to connect later.
Send to Computer
You’ll need to connect the computer physically to the camera using the supplied USB cable, and you can push selected pictures to your Sony PlayMemories desktop software (installed from the CD or downloaded from their website). This can even be set up to continue pushing images after the camera has turned off.
View On TV
If you have a Wifi-enabled TV, you can see pictures and slideshows directly from your camera through your home wireless network.
Ctrl w/ smartphone
By connecting the camera to a smartphone using Wi-Fi, you can control the camera and shoot images using the smartphone, and you can transfer images shot with the camera to the smartphone.
Connection Info. displays the QR code or SSID used to connect the camera to a smartphone.
Airplane Mode
Disables all wireless functionality, just like airplane mode does on your phone.
Wi-Fi Settings
So the camera apps from the Playmemories store can’t be used on the RX10 Mark 4. You can however remotely control your camera with the Playmemories app for iPhone or Android.
WPS Push
If your access point has the Wi-Fi Protected Setup (WPS) button, you can register the access point to this product easily by pushing the Wi-Fi Protected Setup (WPS) button.
Access Point Set.
You can register your access point manually. Before starting the procedure, check the SSID name of the access point, security system, and password. The password may be preset in some devices. For details, see the access point operating instructions, or consult the access point administrator.
Disp MAC Address
Displays the MAC address of your Sony ILCE-7rm3.
SSID/PW Reset
Your camera shares the connection information for [Send to Smartphone] and [ Connection Info.] with a device that has permission to connect. If you want to change the device that is permitted to connect, reset the connection information.
MENU – Network Settings – page 1

Bluetooth Settings.
Another new feature only previously available in the A6500 and A9 is Bluetooth connectivity. It is possible to connect your camerato your smartphone in order to Geotag your images.
Bluetooth Settings controls the settings for connecting the camera to a smartphone via a Bluetooth connection. You need to pair the camera and smartphone before using the location information interlocking function. If you want to pair the camera and smartphone in order to use the location information interlocking function, refer to “Loc. Info. Link Set..”
Loc. Info. Link Set
You can use the application PlayMemories Mobile to obtain location information from a smartphone that is connected to your camera using Bluetooth communication. You can record the obtained location information when shooting images.
To use the location information linking function of the camera, you need the PlayMemories Mobile application on your smartphone and transfer an image to your smartphone to test the connection
Procedure:
- Confirm that the Bluetooth function of your smartphone is activated. (Do not perform the Bluetooth pairing operation on the smartphone setting screen!!! In steps 2 to 7, the pairing operation is performed using the camera and the application PlayMemories Mobile. If you accidentally perform the pairing operation on the smartphone setting screen in step 1, cancel the pairing and then perform the pairing operation by following Steps 2 through 7 using the camera and the application PlayMemories Mobile.)
- On the camera, select MENU – (Wireless) – [Bluetooth Settings] – [Bluetooth Function] – [On].
- On the camera, select MENU – (Wireless) – [Bluetooth Settings] – [Pairing].
- Launch PlayMemories Mobile on your smartphone and tap “Location Information Linkage.”
- Activate [Location Information Linkage] on the [Location Information Linkage] setting screen of PlayMemories Mobile.
- Select [OK] when a message is displayed on the monitor of the camera. The pairing of the camera and PlayMemories Mobile is complete.
- On the camera, select MENU – (Wireless) – [ Loc. Info. Link Set.] – [Location Info. Link] – [On].
(obtaining location information icon) will be displayed on the monitor of the camera. Location information obtained by your smartphone using GPS, etc., will be recorded when shooting images.
Options in this Menu:
- Location Info. Link: Sets whether to obtain the location information by linking with a smartphone.
- Auto Time Correct.: Sets whether to automatically correct the date setting of the camera using information from a linked smartphone.
- Auto Area Adjust.: Sets whether to automatically correct the area setting of the camera using information from a linked smartphone.
Edit Device name
If you wish, you can change the name of the Device Access point) perhaps to make it easier to identify which RX10 4 is yours in particular situations.
Reset Network set
Resets all network settings.
If something does not function properly, and you want to start from scratch, can be useful.
MENU – playback options – page 1
Delete
Delete one or multiple images stored on your SD card.
View Mode
select how the camera will arrange captured pictures in the viewing browser.
Image Index
Choose whether you want the image browser to display 12 (larger) or 30 (smaller) images per page.
Disp Cont Shoot Grp
Sets whether to display continuously shot images as a group. (you’ll see an image stack on your screen)
Display rotation
Select whether you want the camera to rotate images automatically when you rotate the camera or not.
Slide Show
Select whether you want the camera to repeat slideshows when all pictures are viewed or not, and choose the interval between slides.
MENU – playback options – page 2
Rotate
Change the orientation of images in-camera.
Enlarge Image
Select an image and expand a portion of that picture. Useful for checking details and focus.
Enlarge Init. Mag
Sets the initial magnification scale when playing back enlarged images. Either standard or with the magnification used on the previous image.
Enlarge Initial Pos
Sets the initial position when enlarging an image in playback. Choose either the point of focus or the screen center. I go for the point of focus.
Protect
Protect images (selectable or per date) from accidentally being erased.
Motion Interval ADJ
Strange place in the Menu for this option, but you can adjust the interval of the subject’s motion here.
MENU – Setup – page 1
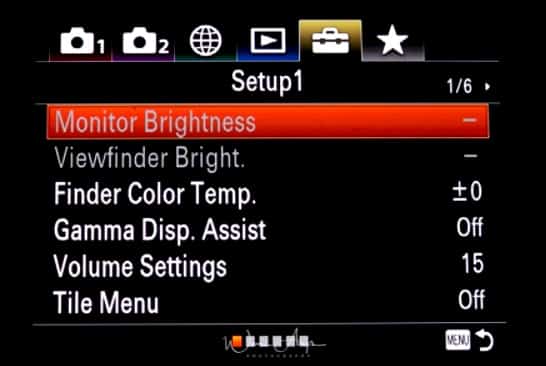
Monitor Brightness
Manually set the Monitor brightness (recommended leave to zero) or change to a brighter setting for Sunny Weather.
Viewfinder Brightness
Set to Auto, which adapts to the lighting circumstances or manually changes to your preferred setting.
Finder Color Temp
Change the color temperature of the viewfinder (colder-warmer) to you liking. I don’t make any adjustments here.
Gamma Disp. Assist
Movies with S-Log gamma are assumed to be processed after shooting in order to make use of the wide dynamic range. They are therefore displayed in low contrast during shooting and may be difficult to monitor, using [Gamma Disp. Assist], contrast equivalent to that of normal gamma can be reproduced. In addition, [Gamma Disp. Assist] can also be applied when playing back movies on the camera’s monitor/viewfinder.
Volume settings
Modify the playback volume for recorded video or demos.
Tile Menu
Selects whether to always display the first screen of the menu when you press the MENU button.
MENU – Setup – page 2
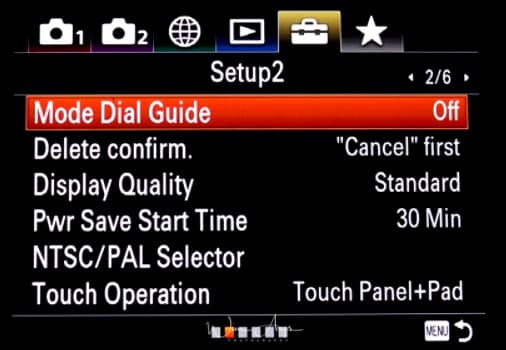
Mode Dial Guide
Turn the description for each shooting mode ON or OFF. Can be handy at first for a novice user to get familiar with what the different shooting modes do.
Delete Confirm
When deleting images on your SD card, you’ll have to confirm every deletion (to make sure you don’t accidentally delete anything). You can turn Off this confirmation here if you wish.
Display Quality
You can change the display quality from standard to high at the expense of shorter battery life.
Pwr Save Start time
Sets time intervals to automatically switch to power save mode when you are not performing operations to prevent wearing down the battery pack. To return to shooting mode, perform an operation such as pressing the shutter button halfway down. I have it set to 5 minutes, a good balance between usability and battery life.
NTSC/PAL Selector
Plays back movies recorded with the product on an NTSC/PAL system TV.
Touch Operation
Sets whether or not to activate touch operations on the monitor. Touch operations when shooting with the monitor are referred to as “touch panel operations,” and touch operations when shooting with the viewfinder are referred to as “touchpad operations.”
- Touch Panel Pad: Activates both the touch panel operations when shooting with the monitor and touchpad operations when shooting with the viewfinder.
- Touch Panel Only: Activates only the touch panel operations when shooting with the monitor.
- Touch Pad Only: Activates only the touch pad operations when shooting with the viewfinder. Off: Deactivates all touch operations.
- Off: Deactivates all touch operations.
MENU – Setup – page 3
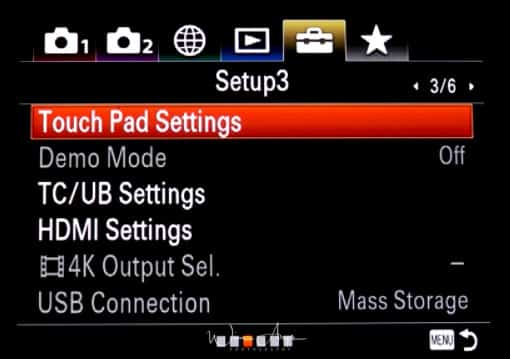
Touch Pad Settings
You can adjust settings related to touch pad operations during viewfinder shooting.
- Operation in V Orien.: Sets whether to enable touch pad operations during vertically oriented viewfinder shooting. You can prevent erroneous operations during vertically oriented shooting caused by your nose, etc. touching the monitor.
- Touch Pos. Mode: Sets whether to move the focusing frame to the position touched on the screen , or move the focusing frame to the desired position based on the direction of dragging and the amount of movement .
- Operation Area: Sets the area to be used for touch pad operations. Restricting the operational area can prevent erroneous operations caused by your nose, etc. touching the monitor.
Demo Mode
For display purposes in stores.
TC/UB settings
Timecode (TC) and the user bit (UB) information can be recorded as data attached to movies. This is used for synchronization of video in post-production. The time code can be set between the following range: 00:00:00:00 to 23:59:59:29.
- TC/UB Disp. Setting: Sets the display for the counter, time code, and user bit.
- TC Preset: Sets the time code.
- UB Preset: Sets the user bit.
- TC Format: Sets the recording method for the time code. (Only when [NTSC/PAL Selector] is set to NTSC.)
- TC Run: Sets the count up format for the time code.
- TC Make: Sets the recording format for the time code on the recording medium.
- UB Time Rec: Sets whether or not to record the time as a user bit.
HDMI Settings
When you connect the product to a High Definition (HD) TV with HDMI terminals using an HDMI cable (sold separately), you can select HDMI Resolution to output images to the TV.
- Auto: The product automatically recognizes an HD TV and sets the output resolution.
- 2160p/1080p: Outputs signals in 2160p/1080p.
- 1080p: Outputs signals in HD picture quality (1080p).
- 1080i: Outputs signals in HD picture quality (1080i).
4K Output Sel.
Outputs video in 4K resolution to an HDMI-connected TV that supports 4K.
Memory Card HDMI: Simultaneously outputs to the external recording/playback device and records on the camera’s memory card.
HDMI Only(30p): Outputs a 4K movie in 30p to the external recording/playback device without recording on the camera’s memory card.
HDMI Only(24p): Outputs a 4K movie in 24p to the external recording/playback device without recording on the camera’s memory card.
HDMI Only(25p)* : Outputs a 4K movie in 25p to the external recording/playback device without recording on the camera’s memory card.
USB connection
Selects what will happen when you connect your camera to your PC or MAC.
Auto: Establishes a Mass Storage or MTP connection automatically, depending on the computer or other USB devices to be connected. Windows 7 or Windows 8 computers are connected in MTP, and their unique functions are enabled for use.
Mass Storage: Establishes a Mass Storage connection between this product, a computer, and other USB devices.
MTP: Establishes an MTP connection between this product, a computer, and other USB devices. Windows 7 or Windows 8 computers are connected in MTP, and their unique functions are enabled for use.
PC Remote: Uses “Remote Camera Control” to control this product from the computer, including such functions as shooting and storing images on the computer.
MENU – Setup – page 4
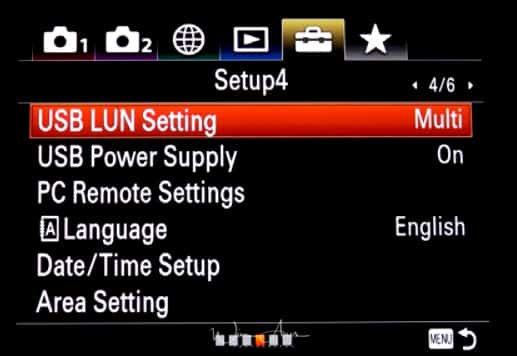
USB LUN Setting
Improves compatibility with external devices by limiting the functions of the USB connection.
Older devices that are not able to connect to the camera might work when set to single. Otherwise, use Multi.
USB Power Supply
You can extend battery life by providing a power supply over USB.
PC Remote settings
Sets whether to save still images stored in both the camera and the computer during PC Remote shooting. This setting is useful when you want to check recorded images on the camera without leaving the camera.
Language
Selects the language to be used in the menu items, warnings, and messages.
Date/Time Setup
The Clock Set screen is displayed automatically when you turn on your RX10 IV for the first time.
Area Settings
Sets where in the world where you are using your camera.
MENU – Setup – page 5
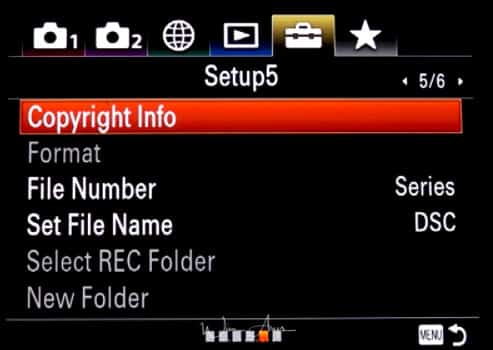
Copyright info
Writes copyright information onto the still images like your name or business.
Format
When you use a memory card with this camera for the first time, we recommend that you format the card using the camera for stable performance of the memory card. Note that formatting permanently erases all data on the memory card, and is unrecoverable.
File Number
Name your files according to some shots or reset it to start from 1.
Set File Name
Use the standard file naming system or a customisable one.
New Folder
Make a new folder for quickly organizing events and locations.
MENU – Setup – page 6
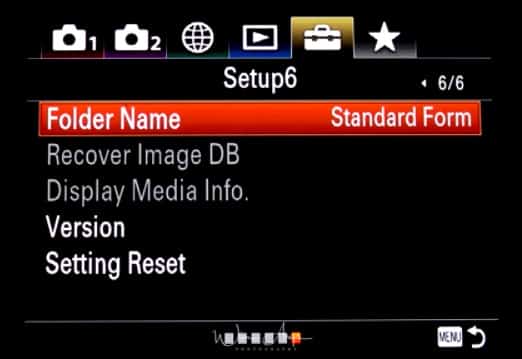
Folder name
Choose whether to have folder names in standard form (DSC) or create a new one by date. Setting folders by date will make organizing your images easier.
Recover Image DB
If you have a storage card error, you can try to rebuild the database to retrieve lost images possibly.
Display media info
You can check how much space is left on your SD card (have pictures in your desired quality and how many minutes of video)
Version
Check what version of the operating system your camera and the lens is running. Sony sporadically releases updates with new features, so it might be worth checking if any new firmware versions are available.
Setting Reset
Fully resets the camera to factory settings.
MENU – My Menu setting
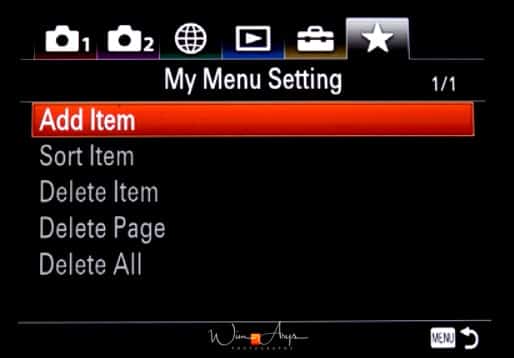
This is a new functionality. It allows you to build a custom menu. Say you often change Raw file type from compressed to uncompressed, or maybe you don’t want to spend your time scrolling through the entire menu system looking for the SteadyShot settings. Well, now you can basically build your own Menu here with your most often used settings.
Add Item
You’ll see a list of all Menu options here and you can simply select your desired options and add them to your custom built menu page.
Sort Item
This setting basically changes the order of your ‘My Menu’ selected function.
Delete Item
Deletes functions in your ‘My Menu’.
Delete Page
Deletes entire pages of your ‘My Menu’ selection.
Delete All
Deletes all previously added functions of your ‘My Menu’.
Troubleshooting
If you experience error messages with the Sony RX10 IV, try the following solutions.
-
-
If a message such as “C/E:□□:□□” appears on the screen, refer to the self-diagnosis display.
-
-
-
Remove the battery pack, wait for about one minute, re-insert the battery pack, then turn on the power.
-
-
Initialize the settings
More setup tips and settings for specific scenarios
Birds in Flight/ fast action
A high high shutter speed for eliminating/reducing motion blur and minimising effect of camera shake. High burst rate for more chances at success and better tracking.
Mode
Use Aperture priority and selected F4, this to retain the highest possible shutter speed. If needed, you can always very quickly override the F4 setting by turning the control wheel on the lens.
Mind that you can very easily accidentally turn the aperture control wheel on the lens and end up with an aperture you were not expecting.
Drive mode
High speed burst mode (24FPS) is essential to allow you to better track rapidly moving birds.
ISO
Set auto ISO to aminimum 100 and maximum 400. If push comes to shove I can quickly override this as I have programmed the right hand position on the control wheel to change ISO.
There is an option to select the “Auto ISO minimum shutter speed”: Select “Faster” as you want to keep the shutter speed up for BIF.
Focus area
Use “Wide” as I think it is practically impossible to keep a flying bird sufficiently close to the centre of the frame to ensure that the camera focuses on the bird and not something else. I have also found the camera’s ability to discern and follow the bird in this mode to be very, very good.
Metering
Use Large Spot. With Large Spot hopefully I frequently have the subject in the spot to get good exposure. If not I am no worse off than with Multi.
Note that I find that metering with BIF requires manual intervention” in the form of EC quite often. The background (sky) is frequently significantly brighter than the subject so it is prudent to dial in some positive EC. Set this into Custom Memory 1 and this is the setup I normally use when I walk around.
Static Subjects
Tracking and rapid burst mode is not essential and it is important to have as small as possible focus area to avoid the effect of branches/twigs etc that get in the way.
Mode
Aperture priority and F4. Same comments as before.
Drive mode
Medium speed burst mode (10FPS). I consider using burst mode together with AF-C to be very important for ensuring you get good results. Reasons? Birds move: burst mode and AF-C minimises the potential blurry shots. Also: sometimes the camera misses the focus on the first shot. If it is your only shot you have a blurry image. If you use burst mode with AF-S you have several blurry images.
ISO
Auto ISO with minimum 100 and maximum 400 with “Auto ISO minimum shutter speed”= Faster
Focus area
As mentioned I want the smallest possible focus area to ensure I focus on the bird and nothing else. Ergo: I use the smallest possible flexible spot in the middle of the frame. And I have never felt the need to move it.
Metering
I use Standard Spot as I am only interested in the exposure of the subject.
I have programmed this into Custom Memory 2. I have also programmed this into Custom Hold 2 and assigned Custom Hold 2 to the “Focus hold” button on the lens. The reason for this is that I use the BIF setting for walking around and sometimes want to quickly go to the perched bird setting. Seeing as this happens quite often I wanted the easiest to use button to hold: Focus hold is it!
Other buttons
I use one other custom setting that I have programmed to Custom Memory 3: this is for general/landscape use. I have set up a similar configuration as Custom Hold 3 with the AEL button to access this. This is the second most common “hold” I will use so I programmed it to the second most comfortable button to press while using the shutter release.
Because I quite often want to jump between custom configurations I have programmed Memory Recall into the first Fn button location. To switch between configurations I press the Fn button, press enter (to select memory recall), scroll left or right to memory 1, 2 or 3 and press enter.
On the rear control wheel I have:
– Left: AF area
– Down: Burst mode
– Right: ISO
Conclusion
The Sony RX10 IV brought many new software innovations to the RX line. Besides the ability to record in 4K and make High Frame rate movies, you shouldn’t overlook the many new focusing aides inside the Sony RX10 IV like Eye AF and focus peaking. I hope you found my advanced manual for the RX10 IV with tips and tricks useful. If you have any questions, I’d love to hear from you in the comment section below.

There are No camera apps for the RX10M4. You have said that there are and they can be downloaded but the RX10M4 does not have an application tap in the menu. Please confirm. Thanks
Keith, you’re absolutely right. Sony has removed the playmemories app from every camera released after 2016, including the new A7rm3.
I was able to download the app for iOS and use it with the Sony RX10 IV.
Hi Josh, I believe you are referring to the PlayMemories remote app. That works with any recent Sony camera.
i just bought the Sony RX10 IV , and you extensive manual helps me to have a good initial start , Thanks a Lot !
Regards Ed
Enjoy Ed!
Yeah. Very good. Exactly what I was looking for! 🙂 Just trying to find the settings for timelapses. Surely this setting exist somewhere on a £1800 camera, right?
Hi Adam,
as strange as is sounds, there is no timelapse functionality built-in to the RX10 IV. Earlier models could use the Sony PlayMemories apps, one of which was a timelapse app, but all Sony cameras released after mid-2016 actually had this function removed! If you’re serious about making timelapses, I would suggest you buy an intervalometer like this one from a company called DLC . JJC also makes a compatible one. You won’t be able to make the sequence in the camera, you’ll need an app on your computer to merge them all together.
Hello
We are new to the camera world having purchased this camera yesterday. We purchased with the intention of an all round use
Thankyou for your detailed guide. We want to set the camera up with modes for capturing surfing which will be of a decent range and skateboarding. Our kids surf and skate. I was wondering uf you could help with appropriate saved menus for both types of photography and video for easy access prior to shooting. Thanks so much Brooke
Hi Brooke, set your camera to AF-C, ISO auto and a fast shutter speed, over 1/1000 sec. I would use the ‘Wide’ focus area for skateboarding, and for surfers ‘Lock-on AF: expand. flexible spot. For this last one, get the focus point on your subject, half press the shutter and the camera will track your subject for you. Good luck and enjoy!
No Dual Video record on the Model 4. I do see the feature on the Model 3.
yes there is Greg. And it has been improved over previous versions You can now also record 17MP stills, without pixel binning, while simultaneously recording video. It’s now called Auto Dual Rec and automatically recording stills at a chosen frequency or when a new composition or subject is recognized.
Thank you for your extensive guide.
In the beginning of your guide you mentioned that the best setting will be described in a chapter before your conclusions. But this I can not find and will be very helpful.
Thanks and best regards,
Rudy, from Belgium too
Hi Rudi, that should be updated now. Best, Wim
Thank you for a most helpful guide which saved me a lot of guess work and frustration. One question: I have saved the in-camera help guide in the C3 key and this is what my menu shows but I cannot retrieve it. Likely I saved it wrong or retrieved it wrong. What is the correct way to do them? Many thanks, Sumiko
Hi Sumiko, in what mode are you? Try setting it to iAuto and see if it works.
Hi Wym,
Really helpful and well laid out. How do I switch off the operational “Beep” sound on the RX-10 MK4. I cannot find it in the menu. I must be missing something.
Hi Donald, you can find it here MENU → Purple Camera Icon → page 10 (Custom operations) under “audio signals”.
Erg mooi ! Ik ga hem aanschaffen in Amerika volgende week.
Is er een nederlandse talige uitgebreide handleiding of een kopie of cd daarna te verkrijgen? Ik wil er wel wat voor betalen hoor.
Hoi Roland, je zou google translate kunnen gebruiken om een vertaling in het Nederlands te hebben. Maar het is allemaal vrij technisch, dus ik ben niet zeker dat dit echt leesbaar zou zijn. De Vlaams-Nederlandse markt is helaas wat te klein om hier alles in het Nederlands te schrijven. Mvg, Wim
“Because I quite often want to jump between custom configurations I have programmed Memory Recall into the first Fn button location.”
How do you do that? I cannot find the MR in the list of functions that I can program into the Fn button locations.
Hi Other, are you sure your RX10 IV is on the latest firmware? Best, Wim
what is the latest firmware my camera says 1.00
a
Hallo Wim,
Bedankt voor deze mooie handleiding.
Ik ga deze op mijn gemak lezen met de camera bij de hand.
Op facebook zit ook rx10 pagina en daar kan je ook info vandaan krijgen. Het heet ‘Sony RX10MIII/IV Nederland & Belgie
Niet zo uitgebreid als de jouwe maar meer als aanvulling en ook om te zien wat je allemaal met de camera kan doen.
Hartelijke groet, Brenda
Hoi Brenda, graag gedaan. Veel plezier, ik zoek alvast die groep eens op! Wim
Great help! Thank you! For the BIF suggestions; is the Large Spot metering mode the Entire Screen Avg selection. Maybe I’m missing the right selection but I don’t see where it is ‘Large Spot’.
Hi Katherine, you have a setting in the metering mode menu on MENU → Red Camera Icon → page 7 (Exposure Settings) called Spot metering point. If you set this to Focus Point Link, your camera should judge exposure on whatever spot is selected. You can also select either standard or large metering circle in the Spot Metering mode on the same page. Best, Wim
Hi Wim,
Hope you are well!
I have just purchased this camera and just looking through your comprehensive information on setting.
Is there a way I can switch the life view on the monitor on and off to conserve battery power or is this not possible…feel like sticking a tape over the sensor on the eyepiece…
Please advise.
Thank you very much in anticipation
Hi Boon, yes there is. Go to MENU → Purple Camera Icon → page 7 (Display screen and Auto Review settings).You can set the behavior of the EVF and screen in the Finder/Monitor menu here.
Hi Wim, Many thanks for your help.
I have also found out that you could use Custom button 3 to activate and deactivate the monitor …Menu ..Purple camera icon..pg 9…custom key ( shoot )
custom button 3 and choose Deactivate Monitor.
Kind regards
Boon
Hi Boon, great tip, I’m sure it will be useful for others too. Thanks!
Bonsoir,
Merci beaucoup pour votre guide.
Je suis français, je ne parle pas anglais, mais je vais traduire tout votre guide avec DeepL car il va m’être très utile 😉
La doc officielle est indigeste et en France, aucun livre n’est dédié au Sony RX10 Mark4 🙁
Merci encore !
Bonjour Wieder, super que vous trouvez mon guide utile.
Hello Wim
Thank you for excellent help.
Sometimes I find it difficult to focus on a small bird with some bushes
around.
Which focus method would be optimal for my little bird?
Yours friendly
Folke
Hi Folke, have you tried Center Lock-on AF? Position the bird in the center of the frame, and your camera should track the movement better I think. Good luck, let me know how you get on.
Hi again Wim
I forgot to write that my camera is a Sony RX10 mk4
Folke
A great detailed overview of the IV. I have both the III and IV, and regardless of what I’ve read about minimal differences, it ain’t so. The IV is a different beastie!
I noted a number A7R II references in the document which don’t apply to the RX10 IV. I think I know where you started editing…
Hi Brian, all the latest Sony cameras do have very similar functionality. Can you tell me what references you are referring too, that would be helpful. I have many guides online, but try to make each one as tailored to the specific model as possible. Best, Wim
Hi Wim,
I just migrated from Panasonic FZ2000 to the Sony RX10 m4 and got dazzled by the 600 page manual.
You guide will help me find my way much faster for which many thanks,
greetings from Eindhoven!
Frans
Hi Frans, excellent, enjoy your new RX10!
Hi Wim
I’m new to Sony with the RX10iv. I appreciate your manual short cut. I’m trying to figure out how to silence the shutter sound for an upcoming safari, but can’t seem to locate that in the menu. Any clue if that’s possible and where that is located? Thanks.
Hi Jeff, have a look at Audio Signals ( in custom operations 2)
Selects whether the product produces a sound or not, for example when the focus is achieved by pressing the shutter button halfway down.
Hi Wim
Thanks for this guide, very helpful.
On the Sony RX10 IV.
1) I think your guide says this but I’d like to have it confirmed. Is it possible to have many setting changes assigned to a single menu item or a single button. So that a single menu item or button will change many settings at the same time. So that it is very quick to switch between optimum settings for different activities. If so, how many settings can be assigned and how many menu items or buttons can they be assigned to?
2) And i’m trying to decide between the Sony and the Canon EOS77D. I like the all in one approach of the Sony but I have two 12 year old non STM canon lenses I could use although price difference would probably buy replacement STM lenses 🙂 . Other than the video features would the main difference between the cameras be the increased noise at ISO above 400?
Thanks
Jeff
Jeff, you do know that the RX10 series are fixed lens cameras right? And yes, Sony cameras are highly customisable nowadays.
Hi Wim
Thanks for this guide, very helpful.
On the Sony RX10 IV.
I think your guide says this but I’d like to have it confirmed. Is it possible to have many setting changes assigned to a single menu item or a single button. So that a single menu item or button will change many settings at the same time. So that it is very quick to switch between optimum settings for different activities. If so, how many settings can be assigned and how many menu items or buttons can they be assigned to?
Thanks
Jeff
2) And i’m trying to decide between the Sony and the Canon EOS77D. I like the all in one approach of the Sony but I have two 12 year old non STM canon lenses I could use although price difference would probably buy replacement STM lenses 🙂 . Other than the video features would the main difference between the cameras be the increased noise at ISO above 400?
Thanks for this guide, very helpful.
On the Sony RX10 IV.
I think your guide says this but I’d like to have it confirmed. Is it possible to have many setting changes assigned to a single menu item or a single button. So that a single menu item or button will change many settings at the same time.
thanks
Jeff
One useful function on compacts is the “through glass” mode to help focus on distant subject beyond glass.
Does the rx10 4 have that too ?
Hi Tony, no. I think the idea is that mothers focussing system are complex enough to identify whether or not there is glass in the scene and adjust appropriately. Best, Wim
SO VERY PLEASED to have found this Jeff. A wonderful piece of work. I have saved it as a PDF file and loaded it onto my Kindle and iPad for convenient reading. THANK YOU for your hard work.
Tom (UK)
Great Tom, enjoy your camera!
Awesome! Thanks a lot!!
No problem!
Best guide for the RX10 IV I’ve run across yet. I’m new to Sony menus as well. Thank-you!
Cheers!
Hallo Wim,
Groeten uit Zuid-Afrika.
Je zeer gedetailleerde handleiding heeft mij makkelijk over de verschillende drempels van de recent gekochte Sony RX10iv heengeholpen. Had eerst een Lumix FZ200, met name voor wildlife photography in Afrika tijdens dawn & dus, dus weinig licht. Liep toch tegen de kleine sensor aan, dus daarom drie weken geleden overgestapt naar deze camera. De manual is summier, de Help Guide is beter, maar jouw uiteenzetting is de beste. Dit lange weekend gebruikt om het toestel in te stellen op mijn meest gangbare voorkeuren, met in “mijn menu” de meer gespecialiseerde settings voor birding en wildlife photography/videoshooting.
Nu nog downloaden als printable PDF.
A great job!
Aart (Pretoria)
Super Aart, veel plezier ermee!
Love all your helpful comments. Thanks. Heading to Alaska next week for snow and glacier scenes. Do you recommend a polarizer? And, What do you suggest for a starting point for a general mode/setting?
definitely Tony. you’ll need a lens that is sharp at f/11-f/16 with all that light.
Hello Wim
Your tips are very welcome.
I have a problem!
I own a Sony RX10iv
and after 4 months I have notised that the white printing
on the two bottom buttons (play and trash) are almost gone.
I have used the camera and so far taken around 1000 pictures.
I have some other Sonys NEX7, A7S and A7R cameras as well
and have never seen this happen before.
I have also owned Canon, Nikon and Panasonic cameras as well
and they have never had this problm.
Sony in Sweden say this is a normal ware off problem.
and will not be not solved by the guarantee,
Hope for your comment on this matter and advise.
Best regards
Folke
living in Sweden
Hi Folke,
you have sweaty hands :)) Don’t know what to tell you, it’s stupid that support will not fix it under warranty, but it’s not a big issue either. Best, Wim
Hi,
I’m going to NPC body builder competition. I bought this camera last week. Do you have any suggestion what setting I should use at night?
Thanks,
I believe there is a “night” SCN in the RX10 Sweetbabe.
How can I turn off the Clicky noise when a picture is taken, I shot alot of wildlife and this noise will scare them off. Can you help me with that?
MENU → (Custom Settings) → [Silent Shooting] → ON
can this guide be downloaded as pdf ? I am week in English & internet connection is not always available in my place.
No pdf available Amit, you could print it if you wanted.
Sir, I can not select the picture effect & the next menu. Pls guide
Hi Amit, strange, it’s definitely in there. Have you tried accessing it from the Fn Menu?
I can’t find the (silent shooting) option and I tried setting the shutter type to electronic to quiet the shutter but it’s no quieter than mechanical or auto. I mostly photograph birds so quiet operation is needed! Can you help?
Hi Diane, you’re right, it is confusing in these new models. But you need to go to MENU → Purple Camera Icon → page 10 (other custom settings) and turn ‘Audio signals’ Off.
Hi, I am new to Sony cameras but have just bought the RX10 IV, is it possible to enlarge/edit on the camera. I are taken a photo at full zoom but then realised I could zoom further in with the touch screen, can I save this zoomed image. I can’t find anywhere in the menus to use cropping.
Hi I am new to Sony, I have just bought the RX10 IV, is it possible to crop/ edit on the camera. I can’t find anywhere in the menus to do this. I have taken a photo with lens fully zoomed, then realised I can enlarge it further on the screen, is it possible to keep this image.
Hi Yvonne, this is not possible in this camera. You can however use a function called ‘digital zoom’ (MENU → Purple Camera Icon → page 6 (Zoom lens settings)) in the future. This allows you to take jpeg pictures with an even larger amount of magnification.
Hi, Just bought this camera for a safari and I am unable to transfer the videos I took to my laptop computer. I have already transferred all the stills to the computer successfully.
I then would like to email the videos from my computer to someone else.
PLEASE HELP!!! Thanks so much!
Hi Jonathan, the video files reside in another folderol the SD card:
MP4 it is in: MP_ROOT -> 100ANV1
AVCHD it is in: PRIVATE -> AVCHD -> BDMV -> STREAM
Best, Wim
Hi Wim,
I bought this camera in feb this year and really needed the time to play with some really good instructions. Finally sat down this morning and learnt more in an hour and a half from your brilliant guide than in the previous nine months. Finally given me the confidence to play. Thank you so much.
Thanks for the nice compliment Cathy!
Hi Wim
Can you show me how to playback/display images without all of the information? (the histogram, shutter speed,ISO etc.). I’d just like to see the picture in normal magnification in the screen.
Thanks for the info and the great explanation of the menus.
Hi Mark, if I’m not mistaking, again it’s pressing the DISP button UP to toggle the display.
That was it. Thanks again for the help!
Hi Wim, just got my Mk4.
Can you tell me how to do multiple delete, at the moment I just format the card after downloading to pc. (Does this cause any damage, doing this every time )?
Thanks mate
John.
HI John, it’s in fact advisable to format every time you’ve downloaded your images. And it is also best to do this in-camera, as this will ensure the right folder structure is maintained.
Hi Wim,
Many thanks for all the work you have put in to this guide. As an RX10iv owner for three days, I am finding it most useful, however I do have a couple of questions.
1. In the section on AF Area you mention a setting called ZONE. That doesn’t appear as an option in the list on the left hand side. Am I doing something wrong?
2. Is there a way that you can get the zoom to return to the position you had it at before you turned the camera off, or the lens retracts during image review?
Regards
Rodger
Hi Rodger, you’re right about the ZONE system, it’s not part of the AF area system anymore. I’ve amended the post to reflect this. In regards to your second question, no this is not possible and I would guess as a safety precaution. It would be very easy to damage the lens if they would allow this functionality. Best, Wim
We bought the RX 10 M4 in October 2018. So far there are 23 video clips done at three different dates. When I put the SD card into my PC, some clips are listed NOT in chronological order. Some of the clips shot in mid December ended up among the ones shot in November and a couple from November are down the list with the December clips.
It is shocking. It is supposed to be the best camera on the market!
Is it a software issue of the camera?
We have SONY A6000, two Canons, and other cameras and never anything like that happened. The same computer was used.
The SD card was new, formatted in the camera, and it is SanDisk Extreme,
32 GB, 90MB/s, class 10.
It would be hard to sort out if there are hundreds of clips.
It was my dream camera, so I am really upset about it. PLEASE HELP.
Jolanta
Hi Jolanta,
I would think that either you or someone else changed the date in the camera at one point. Either by accident or automatically after a firmware update.
Best, Wim
Hi Wim, first of all, thank you so much for such a good analysis. My question is this:
What about the extreme vignetting presented by the RX10M3 and RX10M4 in extreme zoom (400-600) and focus f4-f5.6 with uniform skies? It has a solution? .
I have read in some sites that is possible can disable lens corrections, is there such a function in the camera menu about this?
Hi Mauricio, if you shoot jpeg, optical corrections are baked in to the files. RAW does not have any corrections. But I think in the case of this vignetting specifically with the mark 3 and 4, it has more to do with the optical formula of this zoom than being true vignetting, since the problem still occurs when stopping down. So there is nothing you can do really, except the problem seems to be worse when underexposing, even slightly. Best, Wim
Thanks Wim. I hope Sony is working a firmware to solve this big detail. Regards, Mauricio
Hi Wym
Just recently bought the RX10 iv and am really pleased with the results so far, especially with your ‘bird’ settings recommendations.
What specific settings would you recommend for close up shots of small butterflies?
These shots can be challenging if the butterfly wings are ‘half open’ as there is a DOF issue.
Any suggestions would be gratefully received.
Kind regards
Jeremy
Hi Jeremy, I think you summed up the problem pretty well. Besides motion, shallow depth of field is also an issue here. My suggestion would be to use either a ring light or flash from the side in order to freeze the motion as well as allowing your to use a smaller aperture like f/11. And since it’s also winter in the UK, if you are photographing these insects outside, I would think more sun in spring and summer will help too.
Hi Wim, many thanks for this great guide with a lot of interesting informations! I´m very interested in these tips (settings) for using the RX 10 IV with her capabilities to get best and pleasant results soon! I have experiences with using semiprofessionel camcorders, so for me it´s the question how to set up the RX 10 IV – I´ve bought it last week – for using it during safaritripps through africa in the next summer.
Is it possible to get a german version?
Thanks and best wishes
Wolfgang
Not for the moment, have you tried using google translate?
Hello Wim. First let me thanks for providing this information, it’s appreciated and easy to understand. I recently purchased this camera and I’m a little perplexed. Not only do I shoot Birds but really enjoyed shooting landscapes. My problem is when I shoot landscapes the autofocus mode does not render the pictures clear, everything seems slightly out of focus. My settings are normally aperture priority mainly f8 and above focusing set too wide it doesn’t matter if I shoot single Auto or continuous there still out of focus. The only time I get a clear landscape is when I sent the camera to landscape photography which gives me no control over my picture or settings. This makes no sense to me for a camera like this. It should be easy to shoot landscapes in aperture priority no matter what F stop. Can you tell me if I have a focus problem with my camera is there something I’m not doing right. I’ve read a little that the minimum Focus distance changes for different focal lengths. When I am shooting birds or anything else I have no problem but when I want the whole picture in focus for landscapes they’re always blurry. Besides my Nikon I have been shooting with the Sony hx400v for quite a while which has a 50 * 24 to 1200 Zoom which focuses perfectly for landscapes no problems. However because of small sensor the quality is not adequate for me. If you can give me any insight into this problem I would greatly appreciate it I’m not sure if my camera is faulty. Thanks so much in advance, Mike
Hi Mike,
what exactly the problem is, is hard to answer from here.
But I would guess that the problem is that your RX10 is basically randomly choosing a focus point on what it thinks your subject is. For landscapes however, you really should focus manually because there is no camera in the world that can accurately asses where you should focus for your specific framing of a landscape.
Firstly, whoever camera or lens you use, it’s never the case that everything is sharp from near you to infinity. There is however such a thing as perceived sharpness, where, on a case per case basis, you learn where your focus should be, the place where the eyes will wonder to primarily in the picture. It takes some training and as I said it depends on the composition of your image too. In the sense that if you have a lot of foreground information, you’ll never focus at or near infinity, but you somewhere in between.
The best thing would be to set up a tripod somewhere with a decent landscape view and do a couple of experiments. Use manual focus and magnification, do some tests with different types of compositions and think about which point in the frame your eyes go to firstly. Then focus between that and a place where both the foreground and background remain perceptively sharp.
Good luck and let me know how you get on!
I know this is an old post…..But for those experiencing a similar issue, try shooting landscapes at f4 or lower or certainly no more than f5.6 as this cameras sensor is 2.7 times smaller than a full frame sensor and it’s small size has a particular effect on the fstop. F8 translates to a much higher fstop equivalent. Just as the actual focal length of these 1” sensors have different full frame equivalents, the aperture also must be agjusted. Note: shutter speed is not affected so no need to make adjustment from full frame to smaller sensors.
Dear Wim
Thank you for a very interesting and useful manual. We are going to Africa in summer and like everyone else we are hoping to see and photograph a hunting cheetah. Should I choose the sports setting of the Scene programme can I also use continuous focus.
What setting would you recommend for moving animals
Thanks a lot
Hi Martin, I’m sure you’ll have a great time. I love going on safari myself, always an adventure. I would go full manual for this. Continuous AF definitely, and at least a 1/200 second shutter speed for movement, although I would even go faster. You can leave aperture at f/2.8 or f/4 (depending on the sharpness at that focal length) and ISO at auto.There is lots of light during the daytime, but the game drives normally happen early in the morning or the early evening, because the animals are most active at that time. And often there is not as much light as you’d want, so it’s good to be prepared.
Hello Wim,
Thanks for the excellent, useful manual. I hope to receive my new Sony XR10 M4 this week. I will try to get some nice shots of birds making advantage of the great zoom.
Cool Jan, enjoy!
Wim,
Thank you for your most excellent work. It is so very well organized and informative. Best on class.
Thanks Paul!
Hey Wim,
Thank you very much for your excellent and useful guide. It helped a lot to keep oriented with such a vast amount of functions.
I have two questions and two hints:
1. Which settings do you have on Custom Hold 1 (I suppose it is BiF) and to which key did you assign Recall Custom Hold 1?
2. Which settings do you use for landscape photography?
3. The question was raised how to assign the MR / Memory Recall list to the Fn / Functions Menu (Lothar, on January 24, 2018 and others might have the same question). Solution: you have to assign in the purple Camera Icon under Custom Operation 1 (9/10 menus) under Function Men Set (3rd entry) “Shoot Mode” to one of the Menu items. Once “MR” is selected on the (Shoot) Mode Dial “MR…” will show up in the Functions Menu list and once selected you can change it using the left/right dial buttons or the Control Dial and select with the Center Button.
4. It was asked how to do timelapse shooting (Adam, on December 3, 2017 and others might have the same question). Solution: use the smartphone app or the desktop program Imaging Edge / Remote, the help guide said it has this functionality (I did not try it out yet).
And WHAT I THINK OF THE RX10M4:
the camera itself is a superb.
BUT: for such an extremely priced camera it has:
– even LESS THAN MEDIOCRE TECHNICAL SUPPORT (English and German, phone and email)
– a FOCUS CANNOT BE ADJUSTED REMOTELY neither via desktop program nor via smartphone app (AND THIS REALLY SUCKS; OTHER; MUCH CHEAPER CAMERAS EVEN HAVE REMOTE FOCUS VIA APP OR DESKTOP PROGRAM)
– a desktop program that does not adjust to higher resolution monitors (letters and icons get so small one cannot decipher them anymore)
HJStern
Hey Wim,
Thank you very much for your excellent and useful guide. It helped a lot to keep oriented amidst such a vast amount of functions.
I have two questions and two hints:
1. Which settings do you have on Custom Hold 1 (I suppose it is BiF), and, more importantly, to which key did you assign Recall Custom Hold 1?
2. Which settings do you use for landscape photography?
3. The question was raised how to assign the MR / Memory Recall list to the Fn / Functions Menu (Lothar on January 24, 2018, and others might have the same question). Solution: you have to assign in the purple Camera Icon under Custom Operation 1 (9/10 menus) under Function Men Set (3rd entry) “Shoot Mode” to one of the Menu items. Once “MR” is selected on the (Shoot) Mode Dial “MR…” will show up in the Functions Menu list when the Fn button is pressed and once “MR” is selected you can change it using the left/right dial buttons or the Control Dial and select with the Center Button.
4. It was asked how to do timelapse shooting (Adam on December 3, 2017, and others might have the same question). Solution: use the smartphone app or the desktop program, both called Imaging Edge / Remote, the help guide says it has this functionality (I did not try it out yet).
And WHAT I THINK OF THE RX10M4:
I think the camera itself is a superb camera.
BUT: for such an extremely priced camera it has:
– even less than mediocre technical support (English and German, phone and email)
– a focus that cannot be adjusted neither via desktop program nor via smartphone app (AND THIS REALLY SUCKS)
– a desktop program that does not adjust to higher resolution monitors (letters and icons get so small one cannot decipher them anymore)
HJStern
Hi one thing I am trying to find out is the standby/close down details. I currently use a Canon 7dii which you can carry all the time in standby, one touch of the focus button and the camera bursts into life, great for wildlife. All the bridge cameras I have tried close down and have to be switched on and zoomed before you can take a shoot, is this the same.
Unfortunately Yes Phil.
Hi Wim. Not intirely correct I’m afraid. I’ve had the camera for 2 weeks now. If camera is set to standby in 10 sec’s (lowest standby time setting available), it will come to live as it was when it went into standby. Only drawback is, that it can easily take 10 sec’s to find the right picture/frame of the wildlife you’re about to shoot, and then you have to wait a few sec’s for it to “come back to life” … would’ve been ever so nice if you could just turn standby ON/OFF manualy..
A great manual, Wim. Thanks! Wouldn’t wanna be without it! 🙂
Thanks, Bo
@ Phil Millns >> All my old digi-cameras, Olympus C700UZ and SP550UZ a.w.a. Nikon Coolpix P520 all wakes up from stby as they were when they went into stby. Just as it is with my current RX10M4.
BTW – no matter the stby time (it doesn’t have to set to 10 sec’s) – it/they always wakes up/returns as set when going into stby – including zoom-setting and all.
Hello Wim,
I have been a Canon user for many years, but sadly due to some health issues I can no longer hand hold the cameras with the prime lenses for any length of time and a tripod is not always a viable option.
I now have the Sony and slowly but surely I am learning the Sony language 🙂 Recently, I have been absorbed in shooting bees and butterflies in flight. Although I have some good images, I still feel I could get more “keepers” if I was more proficient with the Sony.
If you were going to shoot something similar, could you say what settings you would use please?
Thank you for taking the time to explain the settings and I hope to hear from you when you have 5 minutes to spare.
Hi Denise, first set the Iso Auto Min SS (Red Camera Icon → page 7) too FAST.
You could also try to use Center Lock-on. I’ll quote from my guide here: “When turned ON, it allows you to track a subject. In the iAuto mode, you can access this feature (when turned ON and the Sony RX10 IV is set to AF) by pressing the Center button of the multi-controller. You’ll see a square on your screen, then center your desired tracking subject and the camera will continue to track it, even when it exits your frame and reappears.”
Or Lock-on AF: “When the shutter button is pressed and held halfway down, the camera tracks the subject within the selected autofocus area. This setting is available only when the focus mode is set to Continuous AF. Point the cursor to ‘Lock-on AF’ on the Focus Area setting screen, and then adjust the desired area to start tracking by pressing the multi-selector left/right. You can also move the tracking start area to the desired point by designating the area as a flexible spot or expand flexible spot.”
good luck!
Hello Wim,
Thank you very much for your advice.
Very best regards,
Denise
Hallo Wim,
heel interesante blok,
Ik ben Nazario uit limburg Belgie en woonend in Paraguay, graag had ik uw instellingen voor Macro… kan geen fatsoelijke macro foto eruit halen…:(
bedankt
Nazario
Wat is precies het probleem Nazario?
Hello Wim,
I purchased the Sony RX 10 iv mainly to photograph regattas (rowing, not sailing). It’s tricky because once the boats pass by, there is no second chance (not like a long tennis match, etc.). Would you have any suggestions? Also, I tried to take pictures when my children were rowing in the dark (5 am practice means no sunlight). I found this to be the most difficult setting I have ever tried: moving objects in the dark/sunrise.
PS: I just discovered your wonderful website.
Hi Ana, use Lock-on AF, that should keep up with them. Moving subjects in the dark… Well, I don’t think there is a camera made yet that does a good job, unfortunately.
This has been so helpful to me. I acquired the RX10IV a week ago and I have been slowly catching up with the best settings and I believe this one worked out for me.
cool!
The RX10IV is the best all in one bridge camera.
Thanks for the setting guide.
Enjoy your camera!
Hi Wim, thanks for this superb guide!
I just bought the Sony RX10 iv as my first venture into the world of “proper” photography, 99% to record bird species. Got to say, I am disappointed in the zoom, which I read before buying was excellent!? I must be doing something wrong and missing out somewhere. I noticed that in RAW/RAW Jpeg that Optical Zoom only is the only mode available, is that right?
I need to get more from this zoom on the camera…….somehow, or am I expecting too much?
Hi Paul, I don’t understand. Are you disappointed with the quality of the optical zoom? I mean do you think it’s not sharp enough across the range? Say between 100 and 500 mm? You can do propper photography with this camera but of course it’s not a full-frame camera;
There is always the Nikon P1000, with it’s 24/3,000 mm zoom. Join their respective Facebook groups, click on the PHOTOS gallery, to see 100’s of great sample images. Cameras and lenses are ALL ABOUT Compromises. Note that the most popular Birding telephoto is the Canon 600mm f4.0. $13,000 … fewer compromises. Also weighs a ton … 🙂
Thanks Wim for your fantastic guide! You are really helping tons of people.
I have had my RX10 IV for a month now and have a question regarding the flash. I cannot choose Flash off in either mode A or S ( the ones I mainly use). It seems you can only turn the flash off completely in automatic mode, which I don’t want to use. Can this really be the case or do I have some other settings chosen that hinders me from turning the flash off? Have you come across this issue?
Grateful for any comments/tips on the issue.
Hi Jannika, that is very strange indeed. I have not encountered this problem. Perhaps another user here knows more…
So you can choose flash off in aperture and shutter priority modes? If that is the case I will need to be in touch with the seller, because my camera doesn`t allow it.
Seriously annoying… Thanks anyway Wim, hope to maybe hear from someone else w/the similar problem, if there is someone around.
Yes, I don’t see why not unless your shutter speed is too high. Best, Wim
Great work Wirm.
I have a question:
At Iso Auto Min SS menu option I only get two option. STD and 1/32000 to 30′.
The Faster and Slow options dont exist. Is this a new release of firmware or am I doing something wrong?
Thanks
José
Hi Hosé, there are a few cases when you won’t be able to select all 4:
– When the maximum shutter speed has changed based on the aperture or the Shutter Type setting.
– When using the flash to shoot bright scenes with the Shutter Type set to Electronic Shut.. (The maximum shutter speed is limited to the flash-syncing speed of 1/100 second.)
– When using the flash to shoot dark scenes with the Flash Mode set to Fill-flash or Wireless. (The minimum shutter speed is limited to the speed automatically determined by the camera.)
Hi Wim
Brilliant write up…. Thank you.
Can you tell me if there’s a “zoom memory” on the camera so that when you switch on it zooms out to where you left it when you switched off. I do a lot of bird / wildlife photography and with my current manual zoom lenses I can be at the long end of then lens as soon as I bring it to my eye. I also worry that framing will be a far slower process… what’s your experience please.
Thanks
Bill
Hi Bill, good question. Unfortunately the answer is no.
Greetings from Maryland, USA!
Wim,
By the way, THANK YOU for the article. I find it very informative.
You mentioned the flash brand Godox and I am wondering if you can specifically provide the model number?
Thanks in advance!
Ren
Depends on what power you need Ren. what exactly are you looking for?
Hi Wim,
Good explanation of the menus on RX10 I’ve.
I was messing around with Custom Key Shoot and found m1m2 could be delegated to Focus Lock button. Found out after changing it did not work as I hoped. my problem is how to return the button to its original function without resetting the whole camera. Can it be done?
Don’t think so Stephen. Maybe someone else here has managed to do it?
After uploading my photos onto my computer(Mac desktop) I don’t seem to be able to retrieve the camera setting for an individual photo. Normally I can right click on a picture in “Photos”, click “info” and get the camera setting for the picture(zoom, aperture, iso). Is there a way to have the camera record this info within the photo? Thanks
Hi Stan, this is always embedded in the EXIF data of the photo. My guess would be that Mac Photos does not support this camera.
Hello
Is there any way to set Clear Image Zoom when photographing stills? Been looking thru menu and can only see it for video
Thank you
You have to activate clear image zoom from within the menu Howard. On Purple Camera Icon – page 6 (Zoom), there are three options: Optical only; Optical + Clear Image; and Optical, Clear Image + Digital. Select the last option.
Hi my image looks like a painting. Not sure if it’s a setting picture style is off and vivid is set
Thanks
Set to standard ond not vivid would be my suggestion here.
Can you assign Zebra to a button so its not always on and can the histogram also be assigned a button and enlarged.
Hi hope you can help me
My mk4 lens started pulsating in and out about an inch while set to on. When turned to off, it does it about 4 times and then stops. The screen lights up but still blank and tried several charged batteries. Is there a reset button I can press to reset? Thanks in advance.
Sounds like a mechanical problem that will need the attention of a certified repair centre.
Hi Wim,
I have a Sony RX10IV and a birder. I like the camera for documenting bird identifications. For 99% of my shots I use the full zoom of the camera. Is there a way that the camera can be programmed to go to full zoom as soon as I soon as I flip the “on” switch? Often when I zoom manually the bird has taken off by the time it takes to get to full zoom. Thanks, JimK
Hi Jim, no it’s not possible. It’s a safety protocol in order not to damage the lens.
Hi
Is it possible to establish when my RX10M4 was manufactured? The paperwork that came with the camera is as follows:
Instruction Manual 2017
WiFi Connection/One-touch (NFC) Guide – 2017
Sony Reference Guide – 2017
Notes on use – 2016
Sony Accessories flyer 2019
It has the latest v2 firmware update
I purchased it through Amazon UK and it looks like it is pre Brexit stock coming through the distributor in Belgium, which I assume means it’s a grey import and no Sony warranty. Although Amazon are providing a 2 year warranty!
Outstanding guide, many thanks.
Stuart
Hi Stuart, If you bought it in Europe pre Brexit, Sony UK should honour your warranty.
Thank you for your detailed description of Sony RX 10 Vi. What is your recommendation for settings to shoot birds like warblers who jump around on branches? I have problem to focus on those tiny energetic birds.
I would use Center Lock-on AF for that. MENU → (Camera Settings1) → [Center Lock-on AF] → [On].
Align the target frame (A) over the subject and press the center of the control wheel.
Press the shutter button fully down to shoot the image.
I have the Sony RX10/4
My question is, can I get the camera out of intelligent mode or superior mode as many functions are not available when in either of those modes.
Thank you
Adam
Great help with a great camera.
Hi there !
My Sony RX10 M4 : -Images always not sharp,
-Can not take out video after record on camera ? Thanks.
Hi, what are the advantages/disadvantages of using the Optical Zoom function when in JPEG mode please ? Loss of quality ?
Definitely loss of quality…
Sony RX10 IV settings, tips and tricks
HI Wim , Brilliant , thank you so much.
How can i save it as a PDF
Hi Wim, a few months ago I bought a Sony DSC-RX10ıv. Using the programs Auto, P, A or S, flash photos are not always really sharp.The whole picture can be unsharp beause I did not hold the camera steady enough, some persons can be unsharp because they moved when the picture was taken, or the foreground or background can be unsharp because the depth of field was too low. EXIF data show that the camera often uses slow shutter speeds (for example 1/30 s or 1/40 s) and large apertures (for example F/2.8 or F/3.2). This may explain the sharpness problems. I did some tests with program M to see if it is possible to work with faster shutter speeds or smaller apertures. To overcome differences in exposure, I used ISO mode Auto (with the limit set at 800 to avoid noise problems). To allow shutter speeds faster than 1/100 s, I used shutter type Auto. Using these settings, it appeared that the exposure quality remained fairly constant over a range from 1/30 s to 1/1000 s and over a range of F/2.4 to F/11. This is the case for those parts of the picture that lie within the flash reach, parts outside this reach become darker with faster shutter speeds or smaller apertures. In summary, using program M it is possible to utilize faster shutter speeds (for example 1/125 s or 1/250 s) and smaller apertures (for example F/5.6 or F/8) to prevent sharpness problems without loss of exposure quality.
Hi Wim, in addition to my tests of July 26 2023, I did some more detailed flash tests with programs A, S and M using ISO mode Auto without limits. The results are interesting: in programs A and M ISO values choosen by the camera increase with decreasing aperture. However, this relation is not linear: if you plot ISO values against F values, the curve is rather flat at the beginning, becomes steeper in the middle, and becomes more flat again at the end. On the other hand, in programs S and M, ISO values do not change with shutter speed at all and remain constant throughout. As a consequence, pictures become darker with faster shutter speeds, but this effect is not linear. Pictures taken at intermediate shutter speeds are still usable and, if necessary at all, they can easily be corrected with a photo editing program.
Hi Wim, this may be a naff question, I use an EOS5D III usually but have purchased the RX10M4 for holiday use, no heavy lens to lug around. For the life of me I cannot see a way of adjusting the speed when I require movement blur in a photo. The camera is used mainly with the lens f stop set to 4, my preferred iso is 100 the speed is selected automatically, but in some instances I need the slow the speed down to obtain blur…any help would be appreciated.
Have you tried setting it to S on the top dial?
Hi Wim, many thanks for your reply. I should have said in my question that I shoot in RAW.
Perhaps that is the reason why I have the issue I raised with you!
Regards
Hi Wim, Reply part 2: I changed the dial to S and can see the shutter speed changing, this was not visible when set to M. However I re-set the dial to M and now the shutter speed is viewable and changing when I turn the control dial, not sure what has happened here but the camera seems now to be working as per the manual.
I take aircraft photo’s and I need the blur in some cases to blur aircraft propellers.
Let’s hope that everything is now as it should be. I’ll try the camera in daylight, it’s 2145 hours here in the UK.
Regards
Peter
Hi Wim, I have set the focus area on my Sony DSC-RX10 IV to Wide. Pressing the shutter button halfway shows the wide focus area in green. When I – after taking the photo – want to take another photo, the focus area sometimes (but certainly not always) is changed to a single point that is not located at the image center, but at a random location (very often in a corner). The only way to get rid of this unwanted focus point and to return to Wide is to turn the camera off and on again. The problem seems to occur spontaneously, I cannot evoke it deliberately. My questions are: 1) Can I have accidentally touched something that causes this problem? 2) Is there a way to return quickly to Wide without having to turn off the camera? 3) Can I change something in the focus settings to prevent this problem?
In retrospect, I may have been a bit premature with my question, as I just saw a similar question on another user forum. The cause of the problem is that the Touch Operation was set to Touch Panel Only and then the focusing mode can inadvertently be changed by touching the monitor. The following will then appear: a cancel focusing message, a symbol with an index finger and an X, and a gray rectangle at the point where you touched the monitor. By touching the index finger symbol or by pressing the central control wheel button one can abort the Touch Focus procedure and return to the original focusing mode (in my case Wide). Otherwise the gray rectangle will change into the focusing point (green rectangle) when pressing the shutter button halfway. The problem can be prevented by setting Touch Operation to Touch Pad Only or to Off. Maybe my findings will be useful to other users after all.
great article, but you have made it difficult to consume. The sidebar prevents saving it as PDF or any other format which i can then read on the road or on the plane on my ipad with no internet access.